4 Extending the Functionality of the Connector

This chapter discusses the following optional procedures:

Note:

From Oracle Identity Manager Release 11.1.2 onward, lookup queries are not supported. See Managing Lookups in Oracle Fusion Middleware Administering Oracle Identity Manager for information about managing lookups by using the Form Designer in the Oracle Identity Manager System Administration console.

4.1 Adding New User Attributes for Reconciliation

You can modify the default field mappings between Oracle Identity Manager and the PeopleSoft Campus target system. For full reconciliation, see Lookup.PSFT.Campus.SccConstituentFullSync.AttributeMapping lookup definition which holds the default attribute mappings. For incremental reconciliation, see Lookup.PSFT.Campus.SccConstituentSync.AttributeMapping lookup definition which holds the default attribute mappings. If required, you can add user attributes to these predefined attribute mappings.

This section contains the following topics:

4.1.1 Adding a New User Attribute for Reconciliation

To add a new user attribute for reconciliation:

  1. In the Oracle Identity Manager Design Console, make the required changes as follows:

    1. Create a new user-defined field. For the procedure to create a user-defined field, see "Creating a User-Defined Field".

    2. Add a reconciliation field corresponding to the new attribute in the PeopleSoft Campus resource object. For example, you can add the National ID reconciliation field.

    3. Modify the PeopleSoft Campus Person process definition to include the mapping between the newly added field and the corresponding reconciliation field. For the example described earlier, the mapping is as follows:

      National ID = National ID
      
    4. On the Object Reconciliation tab, click Create Reconciliation Profile. This copies changes made to the resource object into the MDS.

  2. Add the new attribute in the message-specific attribute mapping lookup definition. For example, the Lookup.PSFT.Campus.SccConstituentSync.AttributeMapping lookup definition for the SCC_CONSTITUENT_FULLSYNC message.

    The following is the format of the values stored in this table:

    Code Key Decode

    AttributeName

    NODE~PARENT NODE~NODE TYPE=Value~EFFECTIVE DATED NODE~PRIMARY

    For example:

    Code Key: National ID

    Decode: NATIONAL_ID~SCC_PER_NID_I

    In this example, National ID is the reconciliation field and its equivalent target system field is NATIONAL_ID.

  3. Add the new attribute in the Resource Object attribute reconciliation lookup definition. For example, the Lookup.PSFT.Campus.SccConstituentSync.Recon lookup for the SCC_CONSTITUENT_FULLSYNC message.

    The following is the format of the values stored in this table:

    Code Key Decode

    RO Attribute

    ATTRIBUTE FIELD~LOOKUP NAME

    For example:

    Code Key: National ID

    Decode: National ID

    In this example, RO Attribute refers to the resource object attribute name added in the preceding steps. The decode value is the code key value in the message-specific attribute mapping lookup definition.

  4. Add the new attribute in the Custom Query lookup definition. See Setting Up the Lookup.PSFT.Campus.CustomQuery Lookup Definition for more information.

4.1.2 Creating a User-Defined Field

(Optional) If you want to create a custom attribute on Oracle Identity Manager, then perform the following steps:

  1. Log in to the Oracle Identity Management Administration Console.
  2. Click Advanced.
  3. On the Configuration tab, click User Configuration.
  4. From the Actions menu, select User Attributes.
  5. Click Create Attribute.
  6. Enter details of the attribute (UDF) that you want to create. From the Category list, select Custom Attributes.
  7. Set values for the attribute properties.
  8. Review the data that you have entered, and then save the attribute.

    If you are using Oracle Identity Manager release 11.1.2.x or later, see Configuring Custom Attributes in Oracle Fusion Middleware Administering Oracle Identity Manager.

4.2 Adding New Affiliation Attributes for Reconciliation

This section contains the following topics:

4.2.1 About Affiliation Attributes

Standard reconciliation involves the reconciliation of predefined user and affiliation attributes. If required, you can add new affiliation attributes to the list of attributes that are reconciled.

The attribute that you want to reconcile should be part of the SCC_CONSTITUENT_SYNC or SCC_CONSTITUENT_FULLSYNC message. For example, consider the XML message shown in the following screenshot. For the Affiliation Rank attribute, the node name is SCC_AFL_RANK and the parent node name is SCC_AFL_PERSON. These two values will be added to the attribute mapping lookup definitions.
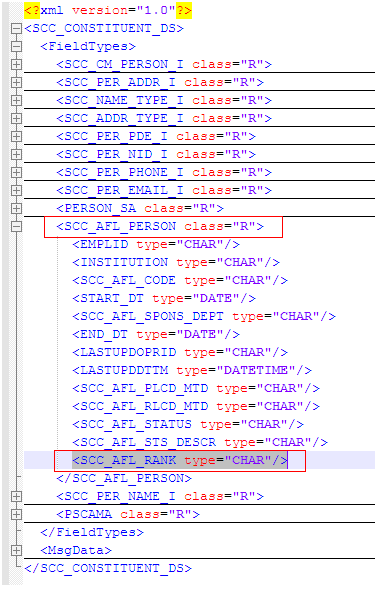
XML message

4.2.2 Adding the New Field to the List of Reconciliation Fields

To add the new field to the list of reconciliation fields in the resource object:

  1. Log in to the Oracle Identity Manager Design Console.
  2. Expand Resource Management.
  3. Double-click Resource Objects.
  4. Search for and open the PeopleSoft Campus resource object.
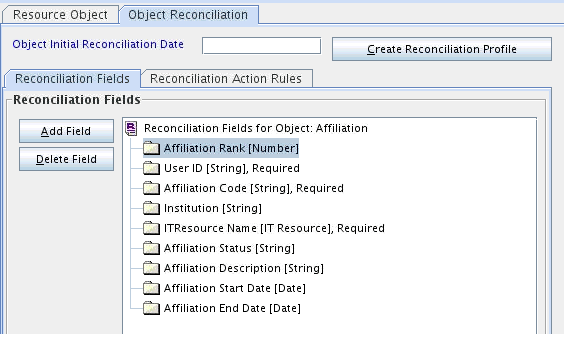
  5. On the Object Reconciliation tab, click Add Field.
  6. In the Add Reconciliation Field dialog box, enter the details of this field.

    For example, enter Affiliation Rank in the Field Name field and select Number from the Field Type list.

  7. Click the save icon.

    Figure 4-1 is a sample screenshot of the newly added affiliation field.

    Figure 4-1 Adding a New Affiliation Field for Reconciliation

    Description of Figure 4-1 follows
    Description of "Figure 4-1 Adding a New Affiliation Field for Reconciliation"

4.2.3 Creating a New Version of the Process Form

To create a new version of the process form:

  1. Expand Development Tools.
  2. Double-click Form Designer.
  3. Search for and open the UD_AFFLN process form.
  4. Click Create New Version.

    On the Create a new version dialog box, enter a new version in the Label field, and then click the save icon.

4.2.4 Adding a New Field on the Process Form

To add the new field on the process form:

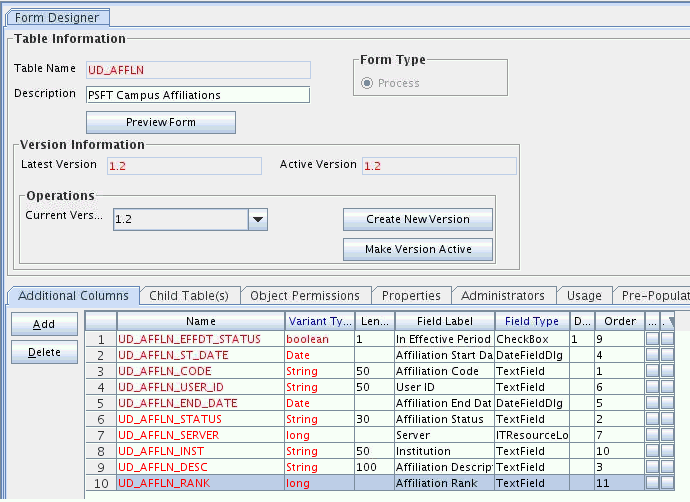
  1. Click Add.

    A field is added to the list. Enter the details of the field.

    For example, if you are adding the Affiliation Rank field, enter UD_AFFLN_RANK in the Name field and then enter the rest of the details of this field.

  2. Click Save.
  3. To activate the newly created form, click Make Version Active.

    Figure 4-2 is a sample screenshot of the new version of process form.

    Figure 4-2 Adding a New Version of Process Form

    Description of Figure 4-2 follows
    Description of "Figure 4-2 Adding a New Version of Process Form"

4.2.5 Creating a Reconciliation Field Mapping for the New Field

To create a reconciliation field mapping for the new field on the process form:

  1. Expand Process Management.
  2. Double-click Process Definition.
  3. From the Process Definition table, select and open the Affiliation resource object.
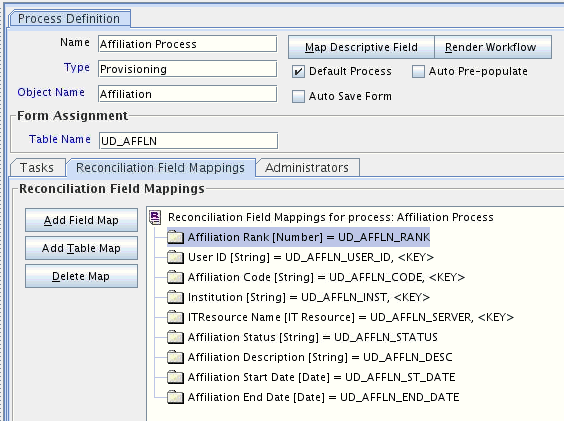
  4. Click Reconciliation Field Mappings and then click Add Field Map.
  5. In the Field Name field, select the value for the field that you want to add.

    For example, select Affiliation Rank.

  6. In the Field Type field, select the type of the field that is prepopulated.
  7. Double-click the Process Data Field field.

    A list of process data columns is displayed. From the list, select the process data column corresponding to the process data field.

    For example, select Affiliation Rank [Number] = UD_AFFLN_RANK.

  8. Click the save icon.

    Figure 4-3 is a sample screenshot of the affiliation field mappings.

    Figure 4-3 Adding a Affiliation Field Mapping

    Description of Figure 4-3 follows
    Description of "Figure 4-3 Adding a Affiliation Field Mapping"

4.2.6 Creating an Entry for the Field in the Lookup Definition for Attribute Mapping

Create an entry for the field in the lookup definition for attribute mapping as follows:

  1. Expand Administration.
  2. Double-click Lookup Definition.
  3. Search for and open the Lookup.PSFT.Campus.SccConstituentSync.AttributeMapping lookup definition.

    For full reconciliation, you must also add this entry in the Lookup.PSFT.Campus.SccConstituentFullSync.AttributeMapping lookup definition.

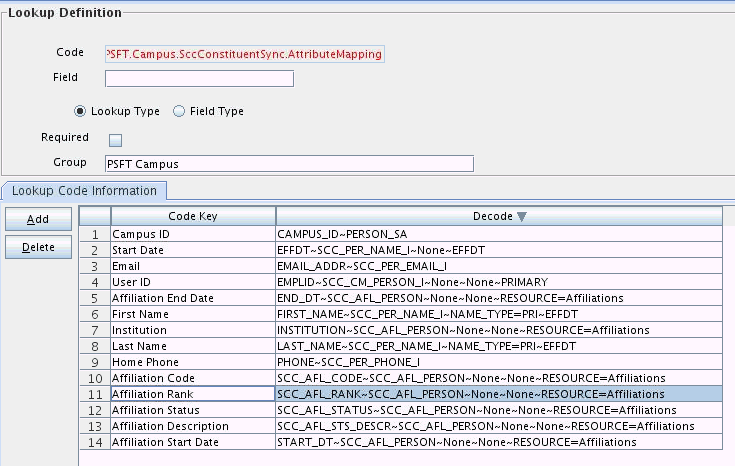
  4. Click Add and enter the Code Key and Decode values for the field.

    The Code Key value must be the form field name. The Decode value must be the attribute node name and the parent name of the field in the XML message shown at the beginning of this section. For the format of the Decode value, see Lookup.PSFT.Campus.SccConstituentFullSync.AttributeMapping.

    For example, enter Affiliation Rank in the Code Key field and then enter SCC_AFL_RANK~SCC_AFL_PERSON~NONE~NONE~RESOURCE=Affiliations in the Decode field.

  5. Click the save icon.

    Figure 4-4 is a sample screenshot of the new entry added to the attribute mapping lookup definition.

    Figure 4-4 Adding an Entry to Attribute Mapping Lookup

    Description of Figure 4-4 follows
    Description of "Figure 4-4 Adding an Entry to Attribute Mapping Lookup"

4.2.7 Creating an Entry for the Field in the Lookup Definition for Reconciliation

Create an entry for the field in the lookup definition for reconciliation as follows:

  1. Expand Administration.
  2. Double-click Lookup Definition.
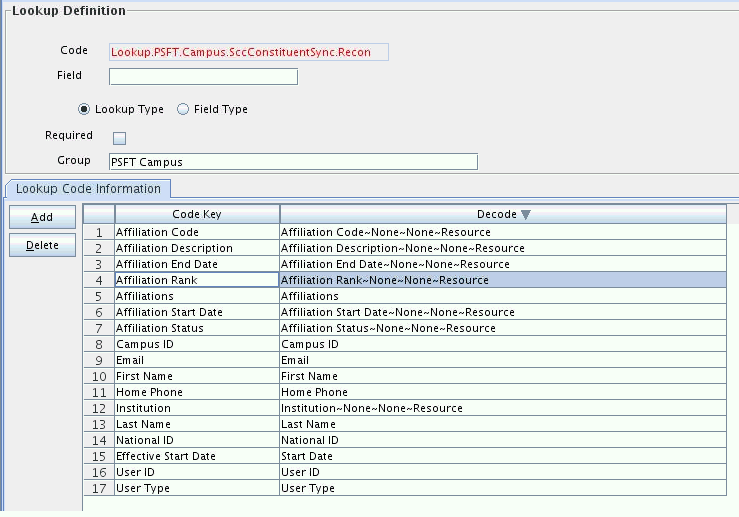
  3. Search for and open the Lookup.PSFT.Campus.SccConstituentSync.Recon lookup definition.
  4. Click Add and enter the Code Key and Decode values for the field.

    The Code Key value must be the form field name. For the format of the Decode value, see Lookup.PSFT.Campus.SccConstituentSync.Recon.

    For example, enter Affiliation Rank in the Code Key field and then enter Affiliation Rank~NONE~NONE~Resource in the Decode field.

  5. Click the save icon.

    Figure 4-5 is a sample screenshot of the new entry added to the reconciliation lookup definition.

    Figure 4-5 Adding an Entry to Reconciliation Lookup

    Description of Figure 4-5 follows
    Description of "Figure 4-5 Adding an Entry to Reconciliation Lookup"

4.2.8 Creating an Entry for the Field in the Configuration Lookup Definition

Create an entry for the field in the configuration lookup definition as follows:

  1. Expand Administration.
  2. Double-click Lookup Definition.
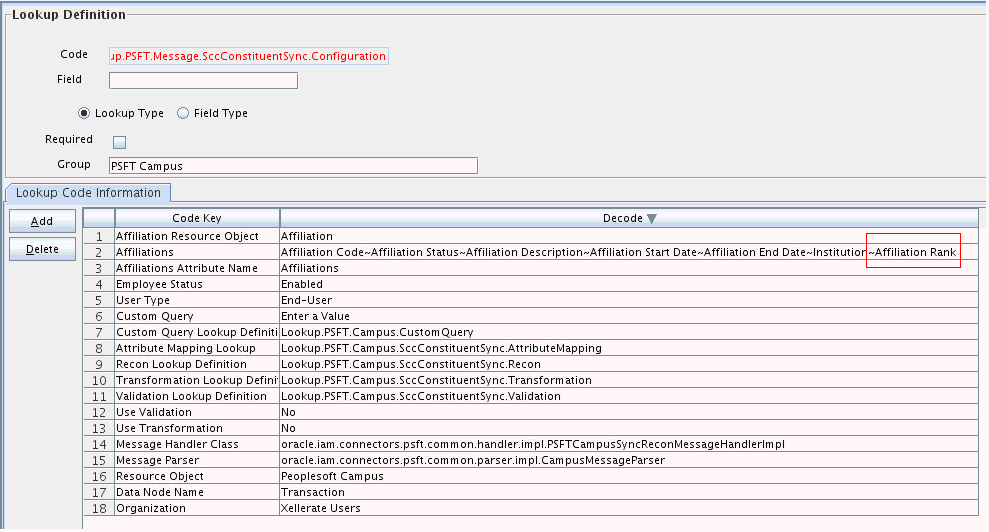
  3. Search for and open the Lookup.PSFT.Message.SccConstituentSync.Configuration lookup definition.

    For full reconciliation, you must also add this entry in the Lookup.PSFT.Message.SccConstituentFullSync.Configuration lookup definition.

  4. For the Code Key with value Affiliations, append the new affiliation field name, Affiliation Rank, in the Decode field.

    For example, enter Affiliation Code~Affiliation Status~Affiliation Description~Affiliation Start Date~Affiliation End Date~Institution~Affiliation Rank in the Decode field.

  5. Click the save icon.

    Figure 4-6 is a sample screenshot of the new entry added to the configuration lookup definition.

    Figure 4-6 Adding an Entry to Configuration Lookup

    Description of Figure 4-6 follows
    Description of "Figure 4-6 Adding an Entry to Configuration Lookup"

4.2.9 Verifying the Affiliation Rank Attribute

  1. On the Resource Objects form, for the Affiliation resource object, click Create Reconciliation Profile.
  2. Perform reconciliation to verify the Affiliation Rank attribute.

    You should be able to see Affiliation Rank in the connector logs. Ensure that they appear in the reconciliation events.

4.3 Adding Support for Primary Affiliations

Affiliations in PeopleSoft Campus are defined as the relationship between an individual and an institution. However, there is no concept of Primary Affiliations in PeopleSoft Campus. There is no cross-institution or cross-campus attribute that would inherently define a "primary" affiliation for an individual who is affiliated with multiple institutions in a multi-institution PeopleSoft Campus Solutions deployment.

In some cases, Affiliations are deployed in a manner that would benefit from an ability to identify a primary affiliation. Ranks for affiliations can be used to reflect hierarchy amongst the different affiliations.

For example, consider an institution called BIG University with BIGUNV as the Institution Code. The following table shows a sample list of Affiliation Codes and their ranks:

Affiliation Code Affiliation Description Ranking

EMPFULL

Employee Full Time

9999

STDNTFULL

Student Full Time

8888

STDNTPART

Student Part Time

7777

Roles are created in Oracle Identity Manager that correspond to each unique PeopleSoft Campus Affiliations. The Ranks of the affiliations are stored in the role descriptions in Oracle Identity Manager.

Oracle Identity Manager users would have an active role for each active affiliation. For implementing primary affiliations, the connector can be extended to add a task that reads the role names (the affiliation and the institution codes) and the role descriptions (the affiliation ranks). Then, the affiliation with the highest rank can be picked as the primary affiliation.

For the previous example, the following table indicates sample role names and descriptions in Oracle Identity Manager:

Role Name Role Description

PSFTCampus~BIGUNV~EMPFULL

Affiliation rank :9999

PSFTCampus~BIGUNV~STDNTFULL

Affiliation rank :8888

PSFTCampus~BIGUNV~STDNTPART

Affiliation rank :7777

The following screenshot shows another example of roles and ranks for supporting primary affiliations:
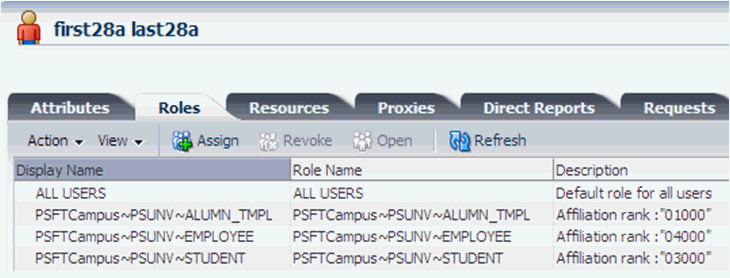
This screenshot shows another example of roles and ranks for supporting primary affiliations

4.4 Modifying Field Lengths on the OIM User Form

You might want to modify the lengths of the fields (attributes) on the OIM User form. For example, if you use the Japanese locale, then you might want to increase the lengths of OIM User form fields to accommodate multibyte data from the target system.

If you want to modify the length of a field on the OIM User form, then:

  1. Log in to the Design Console.
  2. Expand Administration, and double-click User Defined Field Definition.
  3. Search for and open the Users form.
  4. Modify the length of the required field.
  5. Click the Save icon.

4.5 Configuring Validation of Data During Reconciliation

You can configure validation of reconciled single-valued data according to your requirements. For example, you can validate data fetched from the First Name attribute to ensure that it does not contain the number sign (#). In addition, you can validate data entered in the First Name field on the user form so that the number sign (#) is not sent to Oracle Identity Manager during reconciliation operations.

For data that fails the validation check, the following message is displayed or recorded in the log file:

Value returned for field FIELD_NAME is false.

To configure validation of data, perform the following steps:

4.5.1 Implementing the Validation Logic in a Java Class

To implement the validation logic in a Java class:

  1. Write the code that implements the required validation logic in a Java class.

    See Also:

    The Javadocs shipped with the connector for more information about this interface

    You must create a class with the following signature:

    public boolean validate(HashMap arg0, HashMap arg1, String arg2)

    In this signature code:

    • arg0 contains User form field values

    • arg1 contains Affiliation resource field values

    • arg2 is the field on which validation needs to be done

    The following sample validation class checks if the value in the First Name attribute contains the number sign (#):

    package com.validate;
    import java.util.ArrayList;
    import java.util.HashMap;
    import java.util.logging.Logger;
    public class MyValidation {
    
        Logger log;
        public boolean validate(HashMap hmUserDetails,
                HashMap hmAffiliationDetails, String field) {
            /*
             * You must write code to validate attributes. Parent
             * data values can be fetched by using hmUserDetails.get(field)
             * For child data values, loop through the
             * ArrayList fetched by hmAffiliationDetails.get("Affiliations")
             * Depending on the outcome of the validation operation, 
             * the code must return true or false.
             *
             * In this sample code, the value "false" is returned if the field
             * contains the number sign (#). Otherwise, the value "true" is
             * returned.
             */
            log = Logger.getLogger("PSFT.VALIDATION");
            boolean valid = true;
            String sFirstName = (String) hmUserDetails.get(field);
            if(sFirstName != null){
                for(int i=0;i<sFirstName.length();i++){
                    if (sFirstName.charAt(i) == '#'){
                        log.warning("Validation failed for " + field);
                        return false;
                    } 
                }
            }
            //If validation of affiliation data is not required, comment the next line.
            valid = validateAffiliationData(hmAffiliationDetails, field);
     
            return valid;
        }
    
        private boolean validateAffiliationData(HashMap hmAffiliationDetails,
                String field) {
            log.fine("Checking for affiliation data");
            boolean valid = true;
            ArrayList<HashMap> affList = 
                (ArrayList<HashMap>) hmAffiliationDetails.get("Affiliations");
    
            if(affList !=null && affList.size() > 0){
                HashMap affMap = affList.get(0);
                String fieldVal = (String)affMap.get(field);
                log.fine("Field value is " + fieldVal);
                //TODO Validation can now be applied on fieldVal.
                //Set 'valid' to true or false depending on validation outcome.
    
            }
            return valid;
        }
    }
    
  2. Create a JAR file to hold the Java class.

4.5.2 Uploading the JAR File to Oracle Identity Manager

Run the Oracle Identity Manager Upload JARs utility to post the JAR file created in Implementing the Validation Logic in a Java Class to the Oracle Identity Manager database. This utility is copied into the following location when you install Oracle Identity Manager:

Note:

Before you use this utility, verify that the WL_HOME environment variable is set to the directory in which Oracle WebLogic Server is installed.

For Microsoft Windows:

OIM_HOME/server/bin/UploadJars.bat

For UNIX:

OIM_HOME/server/bin/UploadJars.sh

When you run the utility, you are prompted to enter the login credentials of the Oracle Identity Manager administrator, URL of the Oracle Identity Manager host computer, context factory value, type of JAR file being uploaded, and the location from which the JAR file is to be uploaded. Specify 1 as the value of the JAR type.

4.5.3 Updating the Message-Specific Configuration Lookup Definition

If you created the Java class for validating a process form field for reconciliation, then:

  1. Log in to the Design Console.
  2. Search for and open the message-specific configuration lookup definition.

    For example, locate the Lookup.PSFT.Message.SccConstituentSync.Configuration lookup definition for the SCC_CONSTITUENT_SYNC message. See Lookup.PSFT.Message.SccConstituentSync.Configuration for information about this lookup definition. Check for the parameter Validation Lookup Definition in this lookup definition. The Decode value specifies the name of the validation lookup. In this example, the Decode value is Lookup.PSFT.Campus.SccConstituentSync.Validation.

  3. Search for and open the Lookup.PSFT.Campus.SccConstituentSync.Validation lookup definition.
  4. In the Code Key column, enter First Name. In the Decode column, enter com.validate.MyValidation.

    Here, the Code Key value specifies the column name of the field you want to validate. The Decode value is the complete package name of the Java class that has the validation logic.

  5. Save the changes to the lookup definition.
  6. Search for and open the message-specific configuration lookup definition, in this example, the Lookup.PSFT.Message.SccConstituentSync.Configuration lookup definition.
  7. Set the value of the Use Validation entry to yes.
  8. Save the changes to the lookup definition.

4.5.4 Redeploying the PeopleSoftOIMListener.ear File on the Application Server

To redeploy the PeopleSoftOIMListener.ear file on the application server:

  1. Remove the PeopleSoftOIMListener.ear file from the application server.
  2. Copy the validation JAR file created in Step 2 to the following directory:

    CONN_HOME/listener/deployable-archive/PeoplSoftOIMListener.ear/PeoplSoftOIMListener.war/WEB-INF/lib

  3. Redeploy the PeopleSoftOIMListener.ear file on the application server. To do so, run the following command:
    ant redeploy
    

    See Deploying the PeopleSoft Listener for information about the deployment tool.

4.6 Configuring Transformation of Data During Reconciliation

You can configure the transformation of reconciled single-valued data according to your requirements. For example, you can use the First Name value to prefix 'Mr.' to the First Name field in Oracle Identity Manager.

To configure the transformation of data, perform the following steps:

4.6.1 Implementing the Transformation Logic in a Java Class

To implement the transformation logic in a Java class:

  1. Write code that implements the required transformation logic in a Java class.

    See Also:

    The Javadocs shipped with the connector for more information about this interface

    The following sample transformation class modifies a value for the First Name attribute by prefixing a 'Mr.' in the First Name value received from the target system. It also shows how the affiliation data can be transformed by prefixing 'Description:' to the Affiliation Description field received from the target system.

    package com.transform;
     
    import java.util.ArrayList;
     
    public class MyTransform {
        Logger log;
    
        /**Abstract method for transforming the attributes
         * @param hmUserDetails HashMap<String,Object> containing parent data details
         * @param hmAffiliationDetails ArrayList of HashMap<String,Object> containing affiliation details
         * @param sField Field name to transform
         * @return
         */
        public Object transform(HashMap hmUserDetails, HashMap                  
                hmAffiliationDetails,String sField) {
            /*
            You must write code to transform the attributes.
            User attribute values can be fetched by
            using hmUserDetails.get("Field Name").
            Return the transformed attribute.
     
            To fetch affiliation resource data values, loop through the
            ArrayList fetched by hmAffiliationDetails("<aff. Resource name>")
            User data would be passed as null when passing affiliation resource data.
            Return the transformed hashmap.
            */
            log = Logger.getLogger("PSFT.TRANSFORMATION");
            if(hmUserDetails == null){
                //User data is null when affiliation data is passed.
     
                /*If transformation of affiliations is not required,
                * these can be commented/removed.
                */
     
                log.fine("Transforming affiliation data");
                return transformAffiliations(hmAffiliationDetails,sField);
            }
     
            //Only User data is passed
            log.fine("Transforming User data");
            log.fine("Field to transform = " + sField);
            String sName= (String)hmUserDetails.get(sField);
     
     
            if(sName == null){
                return null;
            }
            //Sample transformation for first name: Prefix 'Mr.'
            sName = "Mr. "+sName;
            return sName;
        }
     
        private Object transformAffiliations(HashMap hmEntitlementDetails, String sField) {
    
            ArrayList<HashMap> affList = (ArrayList<HashMap>) hmEntitlementDetails.get("Affiliations");
            ArrayList<HashMap> transformedList = new ArrayList<HashMap>();
            if(affList == null || affList.size() < 1){
                log.warning("Affiliation list is empty. Returning original map");
                return hmEntitlementDetails;
            }
     
            for (HashMap hashMap : affList) {
                String sName= (String)hashMap.get(sField);
     
                if(sName == null){
                    transformedList.add(hashMap);
                    continue;
                }
                //Sample transformation. 
                //Affiliation description field is passed
                //It is prefixed with 'Description:' 
                sName = "Description: " + sName;
                hashMap.put(sField, sName);
                transformedList.add(hashMap);
            }
            return new HashMap().put("Affiliations",transformedList);
        }
    }
    
  2. Create a JAR file to hold the Java class.

4.6.2 Uploading the JAR File to Oracle Identity Manager

Run the Oracle Identity Manager Upload JARs utility to post the JAR file created in Implementing the Transformation Logic in a Java Class to the Oracle Identity Manager database. This utility is copied into the following location when you install Oracle Identity Manager:

Note:

Before you use this utility, verify that the WL_HOME environment variable is set to the directory in which Oracle WebLogic Server is installed.

For Microsoft Windows:

OIM_HOME/server/bin/UploadJars.bat

For UNIX:

OIM_HOME/server/bin/UploadJars.sh

When you run the utility, you are prompted to enter the login credentials of the Oracle Identity Manager administrator, URL of the Oracle Identity Manager host computer, context factory value, type of JAR file being uploaded, and the location from which the JAR file is to be uploaded. Specify 1 as the value of the JAR type.

4.6.3 Updating the Message-Specific Configuration Lookup Definition

If you created the Java class for validating a process form field for reconciliation, then:

  1. Log in to the Design Console.
  2. Search for and open the message-specific configuration lookup definition, in this example, the Lookup.PSFT.Message.SccConstituentSync.Configuration lookup definition for the SCC_CONSTITUENT_SYNC message.

    See Lookup.PSFT.Message.SccConstituentSync.Configuration for information about this lookup definition. Check for the parameter Transformation Lookup Definition in this lookup definition. The Decode value specifies the name of the transformation lookup. In this example, the Decode value is Lookup.PSFT.Campus.SccConstituentSync.Transformation.

  3. Search for and open the Lookup.PSFT.Campus.SccConstituentSync.Transformation lookup definition.
  4. In the Code Key column, enter First Name. In the Decode column, enter com.transform.MyTransform.

    Here, the Code Key value specifies the column name of the field you want to transform. The Decode value is the complete package name of the Java class that has the transformation logic.

  5. Save the changes to the lookup definition.
  6. Search for and open the message-specific configuration lookup definition, in this example, the Lookup.PSFT.Message.SccConstituentSync.Configuration lookup definition.
  7. Set the value of the Use Transformation entry to yes.
  8. Save the changes to the lookup definition.

4.6.4 Redeploying the PeopleSoftOIMListener.ear File on the Application Server

To redeploy the PeopleSoftOIMListener.ear file on the application server:

  1. Remove the PeopleSoftOIMListener.ear file from the application server.
  2. Copy the transformation JAR file created in Step 2 to the following directory:

    CONN_HOME/listener/deployable-archive/PeoplSoftOIMListener.ear/PeoplSoftOIMListener.war/WEB-INF/lib

  3. Redeploy the PeopleSoftOIMListener.ear file on the application server. To do so, run the following command:
    ant redeploy
    

    See Deploying the PeopleSoft Listener for information about the deployment tool.

4.7 Setting Up the Lookup.PSFT.Campus.CustomQuery Lookup Definition

You configure limited reconciliation by specifying a query condition as the value of the Custom Query attribute in the message-specific configuration lookup. See Lookup.PSFT.Campus.CustomQuery for more information about this lookup definition.

You must ensure that the OIM User attribute to use in the query exists in the Lookup.PSFT.Campus.CustomQuery lookup definition. You must add a row in this lookup definition whenever you add a UDF in the user form.

To add a new UDF to this lookup definition:

  1. On the Design Console, expand Administration and then double-click Lookup Definition.
  2. Search for and open the Lookup.PSFT.Campus.CustomQuery lookup definition.
  3. Click Add.

    Note:

    The Code Key value represents the resource object field name and the Decode value specifies the column name of the USR table.

  4. In the Code Key and Decode columns, enter the values for the UDF.

    The following is the format of the values stored in this table:

    Code Key Decode

    RO Attribute Name

    Column name of the USR table

    If you have added a UDF Empl ID with column name as USR_UDF_EMPLOYEE_ID, then define the following entry in this lookup definition:

    Code Key: Empl ID

    Decode: USR_UDF_EMPLOYEE_ID

  5. Click the Save icon.

4.8 Configuring the Connector for Multiple Installations of the Target System

This section contains the following topics:

4.8.1 About Configuring the Connector for Multiple Installations of the Target System

You might want to configure the connector for multiple installations of the target system. The following example illustrates this requirement:

The London and New York offices of Example Multinational Inc. have their own installations of the target system. The company has recently installed Oracle Identity Manager, and they want to configure Oracle Identity Manager to link all the installations of the target system.

To meet the requirement posed by such a scenario, you can create copies of connector objects, such as the IT resource and resource object.

The decision to create a copy of a connector object is based on a requirement. For example, an IT resource can hold connection information for one target system installation. Therefore, it is mandatory to create a copy of the IT resource for each target system installation.

With some other connector objects, you do not need to create copies at all. For example, a single attribute-mapping lookup definition can be used for all installations of the target system.

Note:

A single listener is sufficient for multiple installations of the target system. You can configure the nodes to point to the same listener with different IT resource names.

All connector objects are linked. For example, a scheduled task holds the name of the IT resource. Similarly, the IT resource holds the name of the common configuration lookup definition, which is Lookup.PSFT.Campus.Configuration. If you create a copy of an object, then you must specify the name of the copy in other connector object. Table 4-1 lists association between connector objects whose copies can be created and the other objects that reference these objects. When you create a copy of an object, use this information to change the associations of that object with other objects.

Table 4-1 Connector Objects and Their Associations

Connector Object Name Referenced By Description

IT Resource

PSFT Campus

  • Scheduled Task: PeopleSoft Campus Trusted Reconciliation

  • Resource Object: PeopleSoft Campus

You need to create a copy of IT Resource with a different name.

Resource Object

PeopleSoft Campus

Message-specific configuration lookup definitions:

  • Lookup.PSFT.Message.SccConstituentSync.Configuration

  • Lookup. PSFT.Message.SccConstituentFullSync.Configuration

It is optional to create a copy of a resource object. If you are reconciling the same set of attributes from the other target system, then you need not create a new resource object.

Note: Create copies of this resource object only if there are differences in attributes between the two installations of the target system.

Common Configuration Lookup Definition

Lookup.PSFT.Campus.Configuration

Message-specific configuration lookup definitions:

  • Lookup.PSFT.Message.SccConstituentSync.Configuration

  • Lookup. PSFT.Message.SccConstituentFullSync.Configuration

It is optional to create a copy of the common configuration lookup definition.

Note: Create copies of this lookup definition only if there are differences in attributes between the two installations of the target system.

Message-specific Configuration Lookup Definition

Lookup definitions:

  • Lookup.PSFT.Message.SccConstituentSync.Configuration

  • Lookup. PSFT.Message.SccConstituentFullSync.Configuration

Attribute mapping lookup definitions:

  • Lookup.PSFT.Campus.SccConstituentSync.AttributeMapping

  • Lookup.PSFT.Campus.SccConstituentFullSync.AttributeMapping

It is optional to create a copy of the message-specific lookup definitions.

Note: Create copies of this lookup definition only if there are differences in attributes between the two installations of the target system.

Attribute Mapping Lookup Definition

Lookup definitions:

  • Lookup.PSFT.Campus.SccConstituentSync.AttributeMapping

  • Lookup.PSFT.Campus.SccConstituentFullSync.AttributeMapping

NA

This lookup definition holds the information of the attributes reconciled from the XML message file from the target system.

Note: Create copies of this lookup definition only if there are differences in attributes between the two installations of the target system.

Recon Map Lookup Definition

Lookup.PSFT.Campus.SccConstituentSync.Recon

NA

This lookup definition maps the resource object field with the data reconciled from the message.

Note: Create copies of this lookup definition only if there are differences in attributes between the two installations of the target system.

4.8.2 Creating Copies of the Connector Objects

To create copies of the connector objects:

Note:

See Cloning Connectors in Oracle Fusion Middleware Administering Oracle Identity Manager for detailed information about the steps in this procedure.

  1. Create a copy of the IT resource. See Configuring the IT Resource for information about this IT resource.
  2. Create a copy of the PeopleSoft Campus resource object.
  3. Create copy of the SCC_CONSTITUENT_FULLSYNC and SCC_CONSTITUENT_SYNC message-specific configuration lookup.
  4. Create a copy of the Lookup.PSFT.Campus.Configuration lookup definition. Add the new lookup to the Configuration Lookup parameter of the new IT resource created in Step 1. See Lookup.PSFT.Campus.Configuration for information about this lookup definition.
  5. Create a copy of the message-specific attribute mapping and reconciliation lookup definition, for example, the Lookup.PSFT.Campus.SccConstituentSync.AttributeMapping and the Lookup.PSFT.Campus.SccConstituentSync.Recon for SCC_CONSTITUENT_SYNC message. Similarly, the Lookup.PSFT.Campus.SccConstituentFullSync.AttributeMapping for SCC_CONSTITUENT_FULLSYNC message.
  6. Create a copy of the PeopleSoft Campus Trusted Reconciliation scheduled task. See Configuring the Scheduled Task for Person Data Reconciliation for information about this scheduled task.

To reconcile data from a particular target system installation, specify the name of the IT resource for that target system installation as the value of the ITResource scheduled task attribute.