12 Understanding Power Browse Forms
This chapter contains the following topics:
-
Section 12.3, "Power Browse Form Design-Time Considerations"
-
Section 12.6, "Transaction Boundaries for Power Browse Forms and Subforms"
12.1 Power Browse Forms
Power browse forms are web-only application forms that, through the use of the subform control, enable users to view multiple, interrelated views of data, grids, and tab pages on one form and to pass logic between them. The tab pages can have their own business views (BVs), and these BVs can communicate with each other and can update based on data selection and changes that occur in other BVs on the form. In this way, you can simplify navigation tasks for users.
Power forms have these general properties:
-
All regular controls except a parent child control can be placed on a power form.
-
Multiple tab controls are permitted.
-
The maximize grid feature is supported for all grids.
-
All power form (and subform) errors and warnings are shown from the error button on the power form.
-
Power forms contain vertical and horizontal scroll bars.
JD Edwards EnterpriseOne offers two types of power forms: browse and edit. Use a power browse form to browse data on a form. You cannot use a power browse form to change data on the form. This form is similar to a find/browse form. A power browse form with a BV should always have a grid with at least one column. You can hide the grid.
See Also:
12.2 Power Browse Form Hierarchical Structures
Hierarchical relationships govern the processing between containers in the application. The power form enables you to create hierarchies based on BVs using power forms and subform controls. A power form always resides at the top of the hierarchy. It is a parent form, and can have multiple subform children. Subforms also can function as parent forms, and they can have multiple children. All subforms must have at least one parent power form or subform. At most, you can have three levels, including the initial power form, in a power form hierarchy.
Note:
Data flow follows the parenting structure in the logical hierarchy.A subform can communicate only with its parent or its children. Logic from the event rules (ER) on the subform, or its subcontrols, does not flow to or from the other subforms. Related information does not appear in the available objects.
This flowchart illustrates the general hierarchy scheme of power forms:
Figure 12-1 Power form hierarchical scheme example
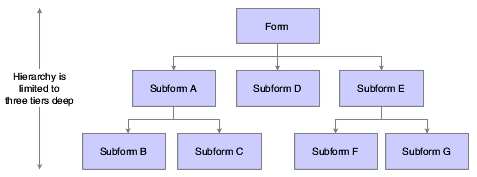
Description of "Figure 12-1 Power form hierarchical scheme example"
| Object | Passes Logic To and From |
|---|---|
| Power Form | Subforms A, D, and E |
| Subform A | Power Form, Subforms B and C |
| Subforms B and C | Subform A, Power Form |
| Subform D | Power Form |
| Subform E | Power Form, Subforms F and G |
| Subforms F and G | Subform E, Power Form |
12.2.1 Examples of the Logic Flow of Power Forms
This flowchart illustrates the flow of logic between a power form and a business function, and the power form and a form interconnect:
Figure 12-2 Power form logic flow example 1
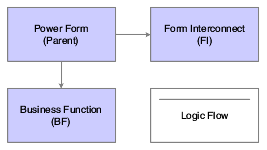
Description of "Figure 12-2 Power form logic flow example 1"
This flowchart illustrates the flow of logic between a power form as a parent, two subforms as children (subforms A and B), and a subform as a parent and a child (Subform A):
Figure 12-3 Power form logic flow example 2
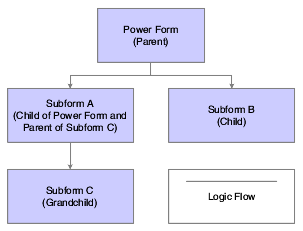
Description of "Figure 12-3 Power form logic flow example 2"
This flowchart illustrates the flow of logic between subform A and subform B. The flow of logic occurs only between subform A (parent) and subform B (child). The subforms do not communicate with the power form:
Figure 12-4 Power form logic flow example 3

Description of "Figure 12-4 Power form logic flow example 3"
12.3 Power Browse Form Design-Time Considerations
These property values are particularly significant in the design of power forms:
Use the Mapping Links property to identify the data to pass between parent and child. For each data item, specify whether the data is to flow from parent to child, child, to parent, or both directions. You must set up a mapping for every child of the parent. Without the mapping, the power browse form probably will not work correctly.
12.4 Power Browse Events
These events can occur on power browse forms during runtime:
-
Dialog is Initialized
-
Post Dialog is Initialized
-
Grid Record is Fetched
-
Write Grid Line-Before
-
Write Grid Line-After
-
Last Grid Record Has Been Fetched
-
Notified by Child
-
End Dialog
12.5 Power Browse Runtime Processing
This section discusses how runtime processes power browse forms.
12.5.1 Dialog Initialization
When a power browse form is called, runtime initializes these items in this order:
-
Thread handling
-
Error handling process
-
BV columns
-
Form controls (FC)
-
Grid fields
-
Static text
-
Helps
-
ER structures
This flowchart illustrates the tasks that runtime performs after initializing these objects to complete dialog initialization:
Figure 12-5 Power browse dialog initialization
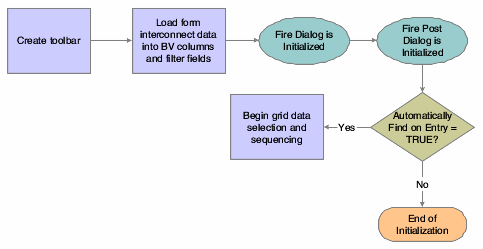
Description of "Figure 12-5 Power browse dialog initialization"
Grid data selection and sequencing occurs at the control level and ultimately leads to the population of the grid, provided runtime encounters no errors.
See How Runtime Processes the Grid Control.
The system creates an internal structure that represents the data selection and data sequencing requirements specified by the user. The system then passes this to the database engine to perform the actual database select and sequencing. The data used for selection is based on values from filter fields and query-by-example (QBE) columns. The system holds the data until the data is retrieved.
12.5.2 Find Button
The Find button is a standard button on power browse forms that appears by default. When the user clicks it, runtime fires the Button Clicked event. If no errors exist in the filter fields, runtime performs data selection and sequencing for the grid control. After reloading the grid with the fetched data, runtime fires the Post Button Clicked event.
12.5.3 Select Button
The Select button is a standard button on power browse forms that appears by default. When the user clicks it, runtime fires the Button Clicked event. If no errors occur, runtime writes the values from the selected row to the BC and fires the Post Button Clicked event. Then it fires the End Dialog event and initiates the dialog close process.
12.5.4 Close Button
The Close button is a standard button on power browse forms that appears by default. When the user clicks it, runtime fires the Button Clicked and Post Button Clicked events in immediate succession. If no errors occur, runtime attempts to close all of the modeless child forms, if any exist. If any of these child forms cannot be closed, the Close button process is terminated. Otherwise, runtime fires the End Dialog event and initiates the dialog close process.
12.5.5 Dialog Close
Power browse can be closed either by the user (typically by clicking the Select or Close buttons) or by the system. After performing any control-level close processing that might need to occur, runtime closes the form. If the event has not already occurred, runtime fires the End Dialog event. Then it performs these tasks in this order:
-
Load form interconnect data from BV columns for database commit.
-
Terminate error handling.
-
Terminate helps.
-
Free all form structures.
-
Destroy the window.
12.6 Transaction Boundaries for Power Browse Forms and Subforms
Power forms include the Transaction property, which functions the same as the other form types. By default, it is scoped to OK button processing; however, the scope can be extended to business functions, table I/O, and form interconnects.
Subforms are scoped to Save button processing; however, the scope can be extended to business functions, table I/O, and form interconnects. You can use these transaction processing settings for subforms:
| Setting | Result |
|---|---|
| Transaction Disabled (default) | No transaction processing occurs for this form. |
| Include in Parent Transaction | If the form is called within the parent's transaction boundary (OK or Save processing), the transaction will be included in the parent's transaction boundary. |
| Subform Only Transaction | Save processing for the Subform has its own transaction boundary, which is independent of all boundaries. |
This flowchart illustrates how to include all of the subforms in the form save transaction. If you rollback data on any one form, the system rolls back the changes on all of them:
Figure 12-6 Including parent, child, and grandchild in the transaction boundary
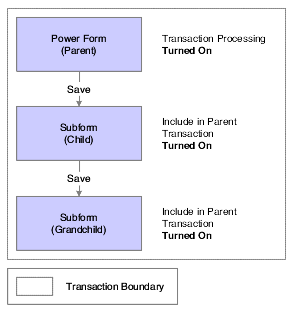
Description of "Figure 12-6 Including parent, child, and grandchild in the transaction boundary"
Here, the child is not included in the transaction for the form, which means that a rollback on the parent level will not affect any of the subforms. However, all of the subforms are included in the same transaction, so any rollback on the subforms will affect all of the subforms:
Figure 12-7 Placing parent in a separate transaction boundary from its child and grandchild
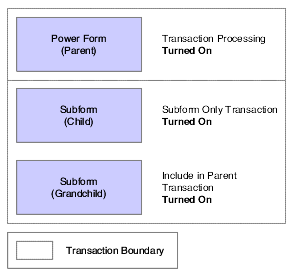
Description of "Figure 12-7 Placing parent in a separate transaction boundary from its child and grandchild"
In all these scenarios, transactions are local and will not affect appear on any other form:
Figure 12-8 Placing parent, child, and grandchild in separate transaction boundaries
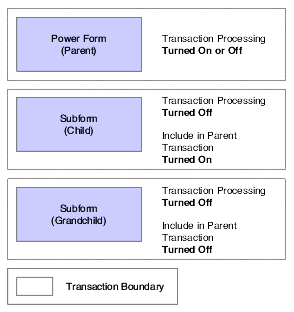
Description of "Figure 12-8 Placing parent, child, and grandchild in separate transaction boundaries"