B DREAM Writer Overview
This appendix contains these topics:
For many reports, the system uses a JD Edwards World facility called the Data Record Extraction and Management (DREAM) Writer. This appendix briefly describes some basic DREAM Writer functions. For more information, see the JD Edwards World Technical Foundation Guide.
When you choose a report from a menu, one of the following happens:
-
The DREAM Writer version list appears. You can perform the following tasks on an existing version:
-
Submit a version for processing.
-
Create a new version of the report.
-
Change and maintain the different versions.
-
-
The system automatically submits a version for processing. If you want to run a different version, you can still access the DREAM Writer version list. To do this, type the number of the menu selection in the Selection field and press F18.
-
The Processing Options Revisions screen appears. After you review the processing options and make any necessary changes, press Enter to submit the report.
Note:
The setup information varies with each report and version. This appendix uses the Tenant Rent Roll report as an example.B.1 Version List
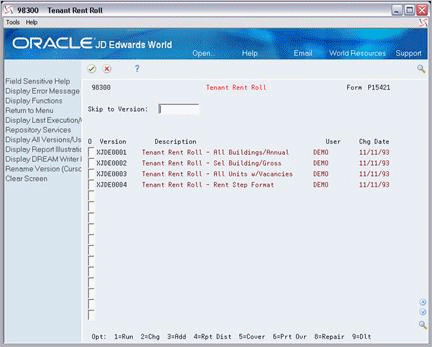
The version list contains all the versions that exist for a report. From the list, you can perform the following tasks on a version:
| Task | Task |
|---|---|
| View the DREAM Writer information | Change |
| Run | Delete |
| Copy (Add) | View and change the printer information |
B.1.1 View the DREAM Writer Information
To view the DREAM Writer information for a version, type 5 (Cover) in the O (Option) field to the left of the version and press Enter. The DREAM Writer Version Inquiry screen appears.
Figure B-2 DREAM Writer Version Inquiry screen
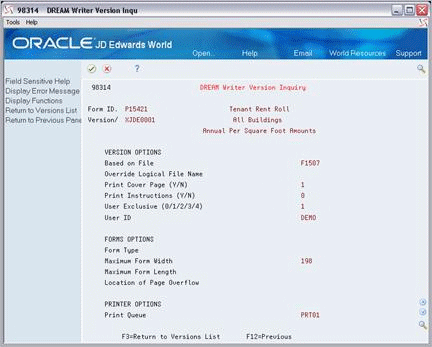
Description of "Figure B-2 DREAM Writer Version Inquiry screen"
The information on this screen makes up the cover page for the version and shows how the report is set up. You can use the roll keys to scroll to additional pages of information.
B.1.2 Run
To submit a version for processing:
-
Type 1 in the O (Option) field to the left of the version you want to run.
-
Press Enter.
The Processing Options Revisions screen appears.
Note:
In some cases such as the DBA Master Listing, the system automatically submits the version for processing at this point. -
Review the processing options and make any necessary changes.
-
Press Enter.
The message Submitted appears to the right of the version.
B.1.3 Copy (Add)
To create a new version of a report from an existing one, type 3 in the O (Option) field to the left of the version you want to copy and press Enter.
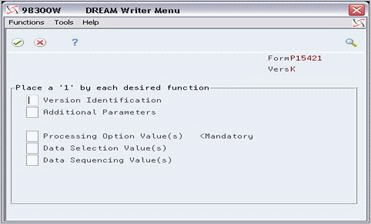
The system lets you access five setup screens so you can review and change the selections for the new version. These screens relate to the following functions, which are described later in this appendix:
-
Version identification
-
Additional parameters
-
Processing options
-
Data selection
-
Data sequence
You use the following keys to move from screen to screen:
| Key | Description |
|---|---|
| F3 or click the X in the tool bar
Note: The list includes the new version even though you may not have finished the setup process. |
Returns you to the version list. |
| F12 or choose the "Return to" exit | Returns you to the previous setup screen. |
| Enter or click the check mark in the tool bar | Accepts the information you specify and proceeds to the next setup screen.
When you press Enter on the final setup screen, you return to the version list. The list includes the new version. |
| Roll (Page up/down) keys | Scroll to additional pages of processing options. |
B.1.4 Change
To change the DREAM Writer information for a version:
-
Type 2 in the O (Option) field to the left of that version.
-
The DREAM Writer Menu window appears, displaying a list of the same setup screens you use when you copy (add) a version.
-
Type 1 (Select) in the field to the left of each screen you want to access.
-
Press Enter.
The system displays the setup screens you specified so that you can review and change the information.
You use the following keys to move from screen to screen:
| Key | Description |
|---|---|
| F3 or click the X in the tool bar
Note: The version includes the changes you made before you pressed F3. |
Returns you to the version list. |
| F12 or choose the "Return to" exit | Returns you to the previous setup screen. |
| Enter or click the check mark in the tool bar | Accepts the information that you specify and proceeds to the next setup screen.
When you press Enter on the last setup screen you specified, you return to the version list. The version includes all the changes you made. |
| Roll (Page up/down) keys | Scroll to additional pages of processing options. |
Note:
You cannot change a version that has DEMO in the User field.B.1.5 Delete
To delete a version, type 9 in the O (Option) field to the left of that version and press Enter.
Note:
You cannot delete a version that has DEMO in the User field.B.1.6 Printer Information
To view and change the printer information for a version, type 6 in the O (Option) field to the left of the version and press Enter. The Printer File Overrides screen appears.
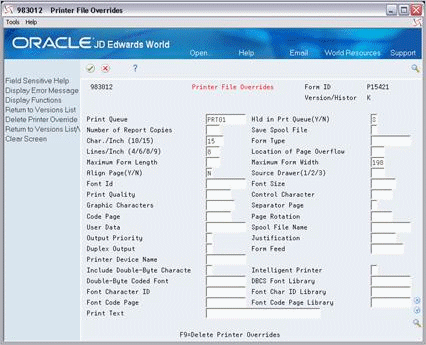
You can also access this screen if you press F5 or exit to Printer Overrides from the Processing Options Revisions screen.
B.2 Version Identification
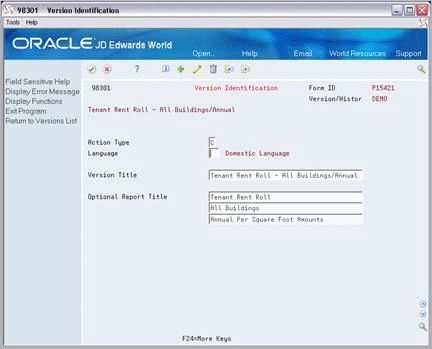
The title of the version appears as the description in the version list. If the Optional Report Title fields are blank, the system uses the version title for the report.
B.4 Processing Options
Figure B-7 Processing Options Revisions screen
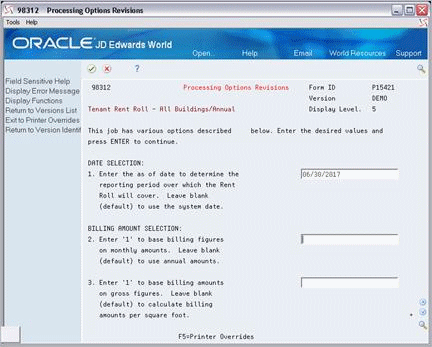
Description of "Figure B-7 Processing Options Revisions screen"
Processing options let you specify information that controls the reporting date, format, selection values, and so on. If there is more than one page of options, use the roll keys to access the others. Processing options do not exist for some reports.
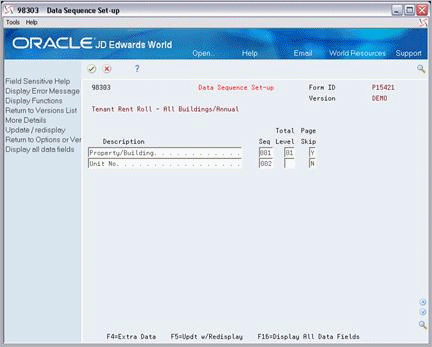
B.5 Data Selection
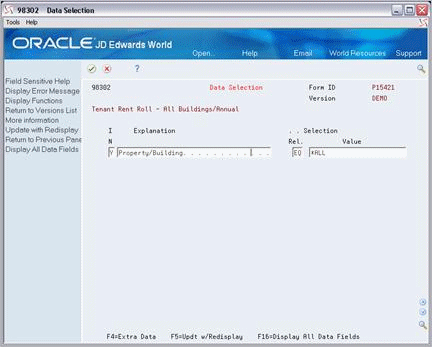
Along with the processing options, this screen lets you specify what information the system selects for a report. Every field in the file on which the report is based is available for selection.