Performing an Installation
Rapid Install offers two options for a new installation:
-
Standard installation, which creates a new system using configuration parameter values specified by the user to meet the site's specific requirements.
-
Express installation, which also creates a new system but uses default values for many parameters, requiring only a few to be supplied by the user.
After you have run the Rapid Install wizard for either the standard installation or express installation, you can also optionally rerun Rapid Install in silent mode, which uses the previously entered parameters stored in a configuration file as well as default values, without requiring further responses from the user.
This chapter covers the following topics:
Standard Installation
This section describes the setup steps for a standard installation, where the user supplies various system-specific parameters. An Express installation is described in Setting Up an Express Installation.
Required Action: Before you perform the steps described in this section, you must have created a stage area using the buildStage script, as described in Setting Up the Stage Area.
Follow the instructions in the section Before You Install. Then complete the following tasks, which are grouped into logical sections.
Important: You do not carry out the installation steps on every node that will be part of your Oracle E-Business Suite system. You carry them out on the database node and primary application tier node, apply the latest release update packs, then use standard cloning commands to scale up to the required number of application tier nodes. The applicable cloning procedures are also mentioned in the relevant sections of this book.
Describe System Configuration
-
Start the Rapid Install wizard
Start the wizard from the command line by entering
rapidwizat the prompt. The Welcome screen lists the database and the technology stack components that are installed with Oracle E-Business Suite.This screen lists the components that are included in, or otherwise supported by, this release of Oracle E-Business Suite. For example, a new installation includes a fresh Oracle 12c Release 1 (12.1.0.2) database.
You can expand the component lists, using the scroll bar to bring all the components into view.
Welcome screen
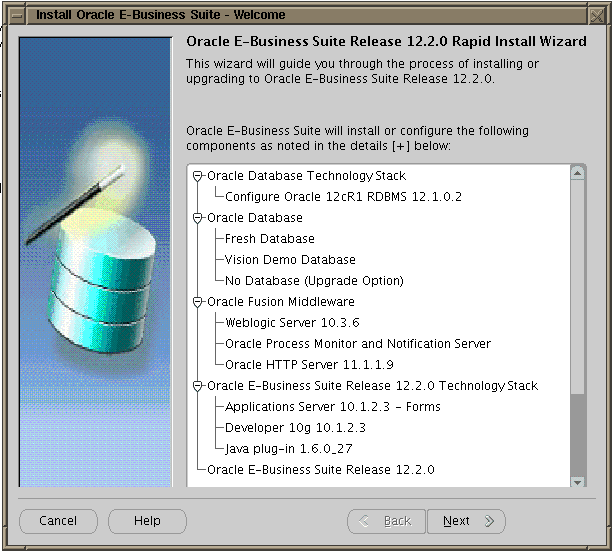
This screen is for information only. No decisions need to be made. When you have reviewed the information, click Next to continue.
-
Use the Select Wizard Operation screen to indicate the action you want Rapid Install to perform. You begin both new installations and upgrades from this screen. Based on the action you choose, the Rapid Install wizard continues with the appropriate screen flow.
Wizard Operation screen with "Install Oracle E-Business Suite Release 12.2.0" option selected
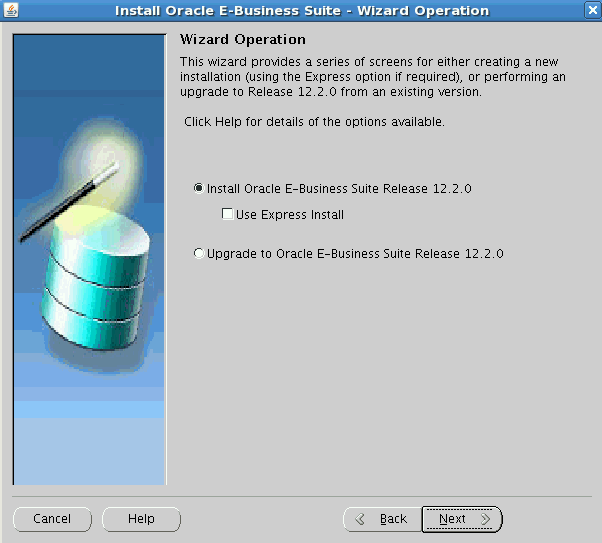
The available actions are as follows:
-
Install Oracle E-Business Suite Release 12.2.0
This action sets up a new, fully configured system, with either a fresh database or a Vision Demo database. The configuration is derived from the system-specific configuration parameters you will enter in the Rapid Install wizard and save in the Oracle E-Business Suite database (conf_<SID>.txt file initially, until the database has been created).
-
Express Configuration
This install option sets up a fully configured, single-user system with either a fresh database or Vision Demo database. You supply a few basic parameters, such as database type and name, top-level install directory, and choice of port pools. The remaining directories and mount points are supplied by Rapid Install using default values.
Note: The steps in Setting Up an Express Installation in this chapter describe this option.
-
Upgrade to Oracle E-Business Suite Release 12.2.0
Choose this option to indicate that you are upgrading your Oracle E-Business Suite products to the current version of Oracle E-Business Suite. The wizard screen flow presents two paths: one that lays down the file system and installs the new technology stack, and one that configures servers and starts services.
Additional Information: See Oracle E-Business Suite Upgrade Guide: Release 11i to Release 12.2 or Oracle E-Business Suite Upgrade Guide: Release 12.0 and 12.1 to 12.2.
Using the following steps, you will set up a new installation. Choose Install Oracle E-Business Suite Release 12.2.0 and then click Next to continue.
-
-
Enter your email address. Optionally select the checkbox to indicate that you wish to receive security updates through My Oracle Support, and enter your My Oracle Support password.
Data collected is sent via HTTPS (secure HTTP) to Oracle Support, facilitating pro-active problem avoidance and helping to reduce the time needed for resolution of support issues.
Screen to enter email details for security updates
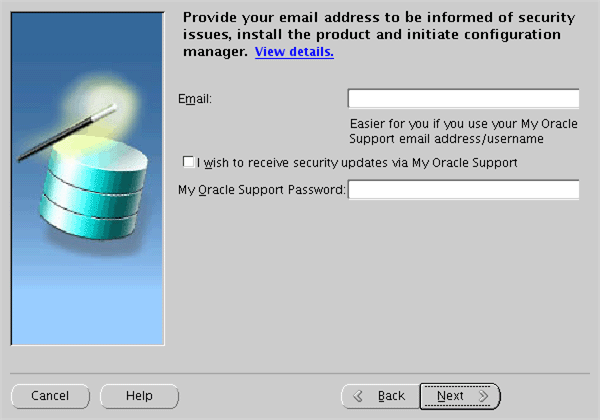
If submission of your details fails because no connection can be made, a pop-up screen appears prompting for proxy server information:
Specify Proxy Server Information screen
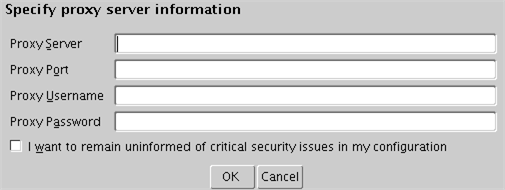
If this screen appears, enter the proxy server, proxy port, proxy username, and proxy password. You can optionally select the "I want to remain uninformed of critical security issues in my configuration" checkbox. Then click OK.
-
Identify configuration file
On the Configuration Choice screen, you indicate whether you will be using previously saved configuration details.
Configuration Choice screen
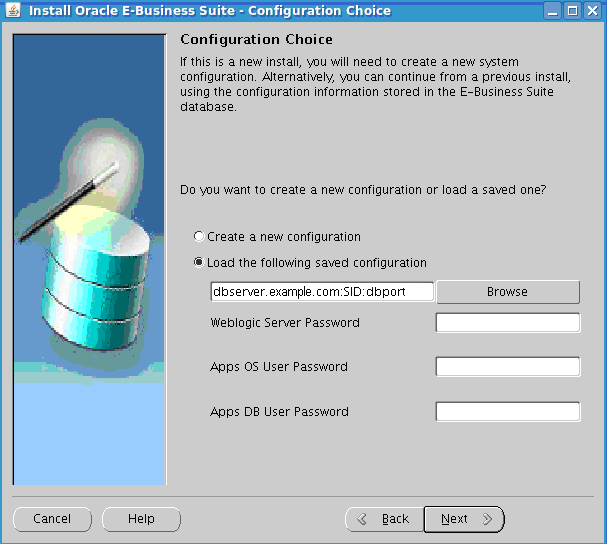
If you choose Create a new configuration , Rapid Install saves the configuration parameters you enter on the wizard screens in the Oracle E-Business Suite database, and in a configuration file (conf_<SID>.txt), which is stored in your system temporary directory until the installation is completed.
If you choose Load the following saved configuration, the database connect string field becomes active. For a configuration stored in the database, this field is made up of
<host name>:<SID>:<database port>, for exampleserver1.example.com:VIS:1521.Important: The host name must include the domain.
Enter the appropriate database connect string (or conf_<SID>.txt file location, if applicable) to point Rapid Install to a stored configuration whose parameters you wish to use. Typically, you would choose this option when performing a multinode install.
Conditional Action: If Rapid Install is being run on the database tier using the Load the following saved configuration option, you must enter the default password for the apps database user.
After completing this step, click Next to continue.
-
Specify Global System Settings
On the Global System Settings screen, you indicate whether you want to accept the default port values. You can specify a Port Pool setting to enable multiple Oracle E-Business Suite environments to co-exist on the same machine.
For example, if you select an increment of 3 from the Port Pool list, the values in the Derived Port Settings will reflect this choice. Use the scroll bar to review the port settings, or click Edit Ports to navigate to the Port Values screen.
Global System Settings screen
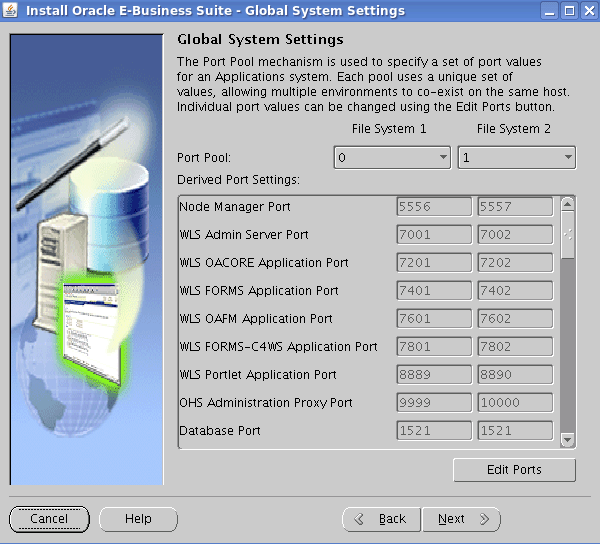
The default value of the Port Pool set is zero, but you can customize it by selecting another value from the drop-down list in the Port Pool field. There are 100 port pool selections: if you select an increment of 3, the default values are increased by that value. The Database Port (1521) becomes 1524, the RPC Port (1626) becomes 1629, and so on.
At this point, you can simply accept the values for your chosen Port Pool (and therefore individual ports) by clicking Next. This will suffice for many installations.
Optional Action: If desired, you can specify individual port values to meet particular site-specific requirements. Clicking on the Edit Ports button will open a screen that allows you to set the values of any ports you wish.
Port Values screen
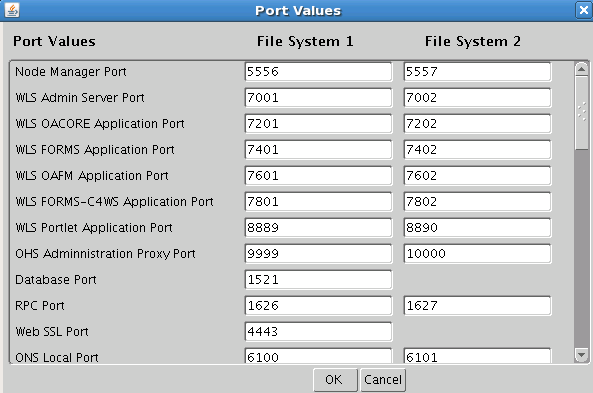
When finished on this screen, click OK to return to the Global System Settings screen, and click Next on that screen.
-
Define Database Node Configuration
On the Database Node Configuration screen, indicate the kind of database you want to install in the new system, the name you will use to identify it, the machine on which it will run, and that machine's domain name. You then need to confirm the operating system shown on the drop-down list is correct, specify the Oracle user's operating system account name and group, and finally specify the base directory under which the installation is to take place.
Database Node Configuration screen
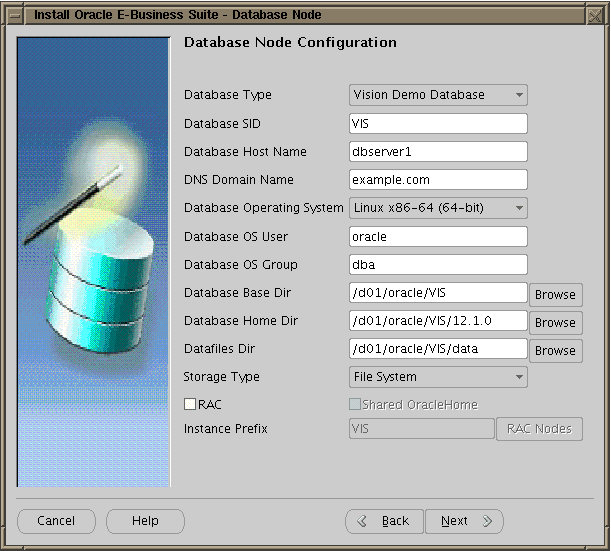
Important: The host name for the database tier node must be no longer than 30 characters. While entering the host name, ensure that you specify the host name in lower case. Using upper case or mixed case for the host name is not supported.
The Rapid Install wizard displays a warning message if the fully qualified domain name (FQDN) exceeds 30 characters. If the host name for the database tier node is no longer than 30 characters, then you can ignore the warning and proceed with the installation. Otherwise you must update the host name before you proceed.
Additionally, the host name must begin with an alphabetic character. The host name cannot include an underscore (
_) character.You can install either a fresh database or a Vision Demo database.
-
A fresh database is fully configured and ready to be used for a new implementation. This type of database is suitable for any type of system that requires a fresh database, such as a production system or test system. The default name for a production database is PROD. If you are installing a database for another use, for example as a test system or a backup system, choose the Fresh Database option and enter a database name that reflects its purpose, for example TEST.
-
A Vision Demo database is used for demonstration or training purposes. It contains a fully configured Oracle E-Business Suite system that has been implemented and populated with a set of transactions for a fictitious company. The Vision Demo database is set up for multiple-organization use. It is installed with the AL32UTF8 character set to maximize the support for character sets in this release. The default database name is VIS.
In the Database SID field, enter the database name, or service name, for the local instance. You can either accept the default database name or enter another name, which must be alphanumeric, must not exceed eight characters in length, must not start with a number, and must not include any spaces.
Important: The database name specified in this field is used to determine the database SID. The database SID may vary depending on your environment.
-
In an environment that does not use Oracle RAC, the database SID is the same as the database name.
-
In an Oracle RAC environment, the instance number is appended to the database name to form the database SID for each Oracle RAC node.
The Database Install Information screen prompts you for information Rapid Install needs to set up and install the database.
The Database OS User is the account that will own the database technology stack and file system. Enter the name of the Database OS Group. The Database OS User may belong to other groups, but it must belong to this group.
If you wish to browse the file system for suitable base directories, click the applicable Browse button to open a navigation window.
The Database Base Dir field defaults to a sample directory name, using the operating system syntax for the machine where you started the Rapid Install wizard. This directory is the top-level directory that Rapid Install uses to derive the mount points associated with the database.
Directory Browse navigation window
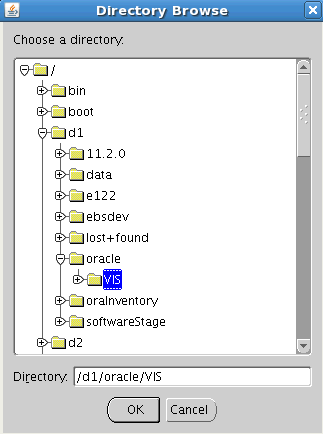
On this screen, click on a suitable folder, or type a path in the Directory field. Click OK to confirm your choice and return to the Database Node Configuration screen, or click Cancel to return without making a selection.
As well as letting you specify the type of storage where the database files will reside, the Database Node Configuration screen enables you to specify whether this database node will be part of an Oracle Real Application Clusters (Oracle RAC) system.
Conditional Action: Before you perform an Oracle E-Business Suite installation on Oracle RAC, you must ensure that the necessary Oracle Grid infrastructure is in place. For instructions on how to do this, refer to the document corresponding to your Oracle Grid version:
-
My Oracle Support Knowledge Document 2962772.1, Installing and Upgrading Oracle Grid Infrastructure 26ai for Oracle E-Business Suite Release 12.2 Databases
-
My Oracle Support Knowledge Document 2676282.1, Installing and Upgrading Oracle Grid Infrastructure 19c for Oracle E-Business Suite Release 12.x Databases
-
My Oracle Support Knowledge Document 1626606.1, Using Oracle 12c Release 1 (12.1) Real Application Clusters with Oracle E-Business Suite Release R12.2
Failure to follow these instructions will result in problems during Oracle E-Business Suite installation in your Oracle RAC environment.
Important: When installing the Grid Infrastructure, you must specify the host name in lower case. Otherwise, Rapid Install will fail with an error like this:
oracle.sysman.assistants.rconfig.engine.InvalidConfigurationException:
Node that has single instance database running should be specified in the NodeList.
Please specify node TESTSYS as part of NodeList at
oracle.sysman.assistants.rconfig.engine.ClusterStep.checkNodeList(ClusterStep.java:203)
In this example, the issue was caused by the host name TESTSYS being in upper case.
Important: On all platforms, the
compatibledatabase initialization parameter must be set to 12.1.0 for the Oracle E-Business Suite database and for the ASM instance and ASM disk groups.After completing this screen, click Next to continue.
-
-
Select product license type (Fresh Database installation only)
When installing a fresh database (not a Vision demo database), the wizard prompts you to indicate the type of licensing agreement you have purchased from Oracle. It then presents the appropriate licensing screen.
Completing a licensing screen does not constitute a license agreement. It simply registers your products as active. The only way to set up a license agreement is to purchase Oracle E-Business Suite products through the Oracle Store or an Oracle sales representative. You should have complete information about your product license before you complete the licensing screens.
Select Licensing Type screen
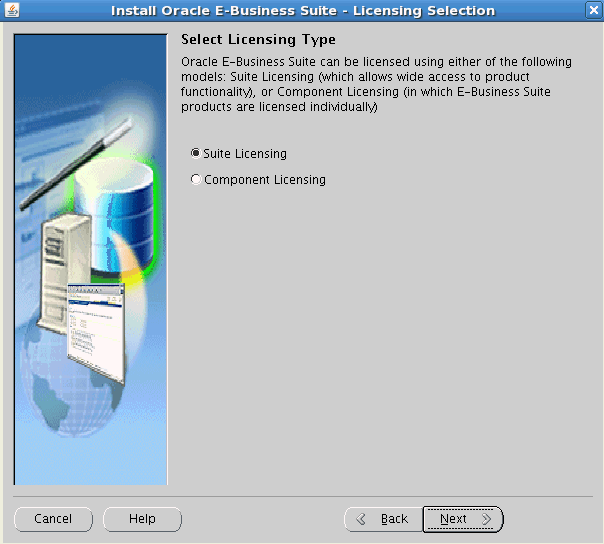
Rapid Install installs all products regardless of their licensed status. However, you must register products you have licensed so that they are flagged in the system as active. An active flag marks products for inclusion in patching and other tasks that you will perform to update and maintain your system after the initial installation.
Note: Rapid Install automatically installs and registers shared and dependent products for you.
You can register products using either the Suite license model or the Component license model. Complete only one of these licensing screens, to match your licensing agreement.
If you clicked the Suite licensing option on the Suite Selection screen, the Licensing Page for that option appears.
License Additional Products screen
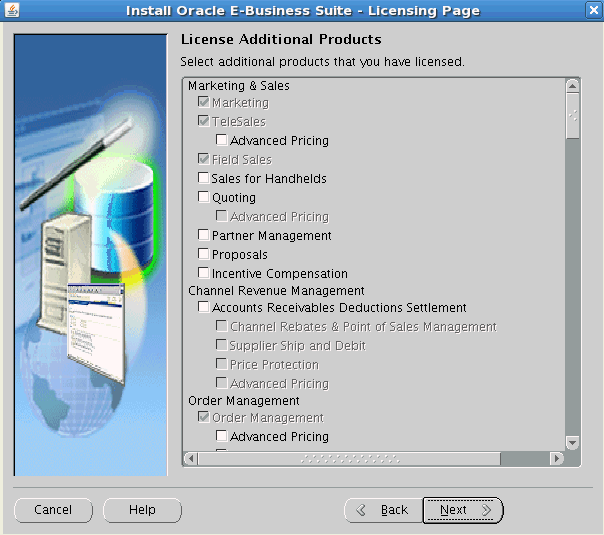
This licensing model allows wide access to Oracle E-Business Suite functionality. By choosing it, you tell Rapid Install to automatically register all products included in the Oracle E-Business Suite price bundle. The products that are checked and grayed are licensed automatically as a part of the suite. The ones that are not must be registered separately as additional products; they are not part of the Oracle E-Business Suite price bundle. Place a check mark next to any additional products you have licensed and want to register.
If you clicked the Component licensing option on the Suite Selection screen, the Licensing Page for that option appears.
License Products screen
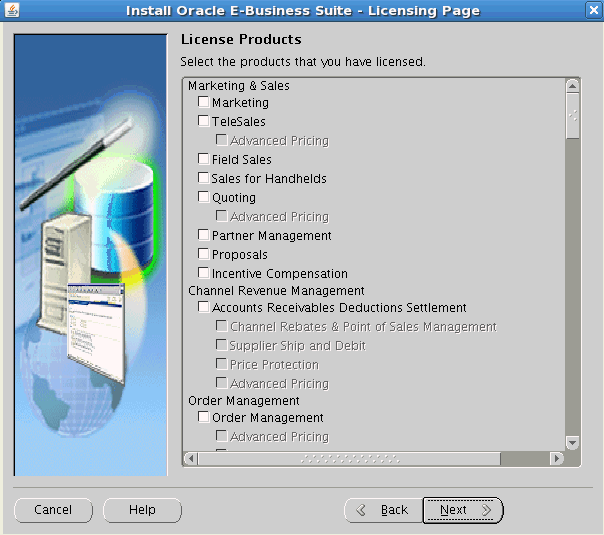
Choose this option if your licensing agreement is for individual Oracle E-Business Suite component products. These products are licensed based on the number of authorized users or on the number of business transactions processed. All individual products are listed on this screen. Products that are grayed out cannot be selected unless the "parent" component is selected.
Optional Action: You can register additional products after the initial installation is complete. See License Manager, Oracle E-Business Suite Maintenance Guide. Note that once a product is licensed, it cannot be "unlicensed".
Complete the appropriate licensing screen and click Next to continue.
-
Select Country-Specific Functionality (Fresh Database installation only)
Some systems require the country-specific functionality of a localized Oracle E-Business Suite product. For example, if your company is based in the United States but also operates in another country, products such as Human Resources require additional features to accommodate the labor laws and codes that differ from those in the United States. You register the name of the region associated with the localized product on the Select Country-specific Functionalities screen.
If your company operates only in the United States, you can bypass this screen. If you begin doing business in another country at a later date, you can use License Manager to register the associated region at any time after the original installation or upgrade.
Country-Specific Functionalities - Initial Screen
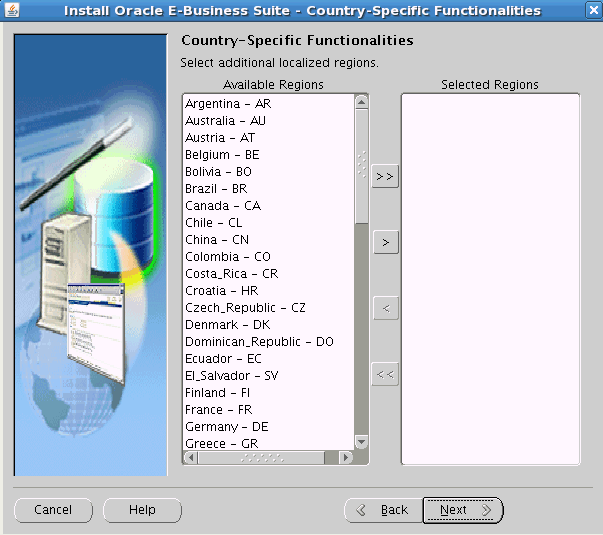
All the country-specific functionalities that Oracle supports are listed on this screen, arranged alphabetically. Double-click a region in the Available Regions box to move it into the Selected Regions box or highlight it and click the right arrow (>). To deselect a region, highlight it and double-click or click the left arrow (<) to remove it from the Selected Regions box.
For example, if you select Canada, the screen would look like this.
Country-Specific Functionalities - Subsequent Screen
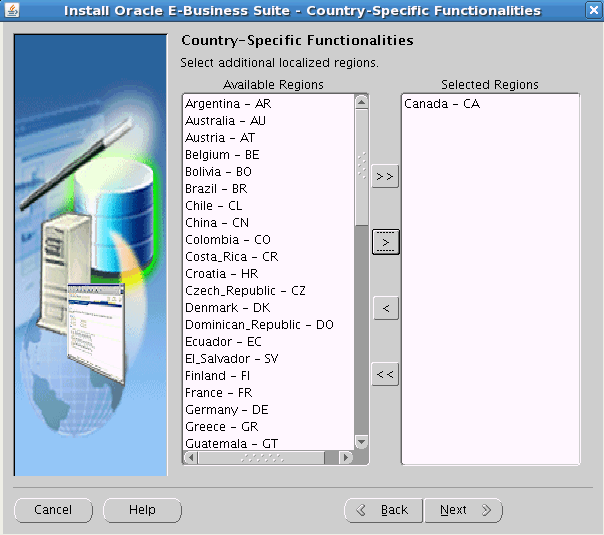
To select or deselect all the regions and move them between boxes in a single action, use the relevant double arrows, >> or <<.
After making your selection, click Next to continue.
-
Select Internationalization Settings (Fresh Database installation only)
American English is the only language installed in your system by default. However, Oracle E-Business Suite supports numerous other languages. These can be activated using License Manager (part of Oracle Applications Manager), and installed after the initial Release 12.2.0 installation is complete.
Additional Information: See License Manager, Oracle E-Business Suite Maintenance Guide.
Internationalization Settings screen
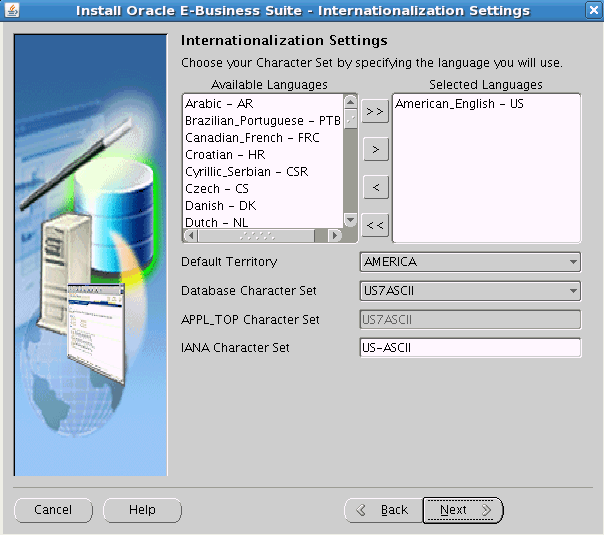
The languages you select help determine the available options for the other NLS-related configuration parameters (such as territory and character set) that your system requires and can support.
Additional Information: See Globalization Support, Oracle E-Business Suite Concepts.
Double-click a language in the Available Languages box to move it into the Selected Languages box or highlight it and click the right arrow (>). Highlight a language in the Selected Languages box and click the left arrow (<) to remove it. To select or deselect all languages in a single action, use the double arrows, >> or <<.
Note: You cannot remove American English from the Selected Languages box.
Languages are no longer licensed using Rapid Install; instead, use License Manager (part of Oracle Applications Manager) to license languages. To install new languages after Rapid Install has been run, see License Manager, Oracle E-Business Suite Maintenance Guide.
Click Next to continue.
The NLS language and territory settings are stored as profile options in the database. They are configured at the site level when you run Rapid Install. The base language is used for the default language setting and the default territory is used for the territory profile option. Users inherit these values the first time they log in via the Oracle E-Business Suite Home Page.
The base language defaults to American English. If you choose additional languages on the Select Additional Languages screen, they appear in the Selected Languages box.
Rapid Install does not set database date and numeric formats during installation. It uses default formats based on the territory profile setting (as derived from NLS_LANG). The Default Territory is AMERICA at the site level. Enter a new value, as needed, based on your user requirements.
The "Database character set" and the "APPL_TOP character set" drop-down menus initially show US7ASCII as the default character set. Other compatible character sets are listed as well.
Conditional Action: AL32UTF8 is the default character set for the Vision Demo database and the APPL_TOP. You cannot convert either of these character sets. Additional setup steps may be required for systems with fresh install databases that will use AL32UTF8. See Set Up Unicode Character Sets in Finishing Tasks for details.
If you selected an additional language, the character set choices will change to include only those that are compatible with both American English and the additional languages selected.
If you want to change the character set in either the database or the APPL_TOP, select a new value from the drop-down list.
Caution: Any languages you plan to install after the Rapid Install run is complete must be compatible with the character set of your Oracle E-Business Suite system.
The IANA (Internet Assigned Numbers Authority) character set is the Internet-assigned standard character set name used by the Web server. See http://www.iana.org/assignments/character-sets for more information.
You can change this value, as needed. Complete the appropriate fields on this screen, and click Next to continue.
-
Enter Primary Application Tier Node Information
You have already specified the top-level directory for the database. Now you must specify top-level directory and subdirectories associated with the application tier nodes.
Additional Considerations for Multinode Installs
If you have an environment that uses multiple application tier nodes, you must use the same platform for them all.
Multiple application tier node installation is no longer performed from Rapid Install. Instead, Rapid Install performs a single application tier node installation. You then apply the requisite AD and TXK patches to bring the application tier node to the latest codeline.
Additional Information: For more information, see My Oracle Support Knowledge Document 1617461.1, Applying the Latest AD and TXK Release Update Packs to Oracle E-Business Suite Release 12.2.
After completing this task, you can add a suitable number of further nodes to the environment using standard cloning procedures. This strategy of creating more nodes after the installation is complete avoids the need to patch multiple application tier nodes to the latest codeline.
Additional Information: For cloning instructions, see Section 5.3 of My Oracle Support Knowledge Document 1383621.1, Cloning Oracle E-Business Suite Release 12.2 with Rapid Clone.
You can also use the cloning procedures in creating hybrid or DMZ architectures. To learn more about this, refer to My Oracle Support Knowledge Document 1375670.1, Oracle E-Business Suite Release 12.2 Configuration in a DMZ.
When you have completed all these tasks, you must run the
$INST_TOP/admin/scripts/adstrtall.shscript on the new application tier nodes to start the services.Important: The following additional step is required on Windows only.
After you have created the required number of additional application tier nodes by cloning, you must go back to the primary application tier node and run the following command:
$ perl %AD_TOP%\bin\adRegisterWLSListeners.pl -contextfile=<context file>
This only needs to be done on File System 1 (fs1). There is no need to restart any services after running this command.
Primary Applications Node Configuration screen - UNIX
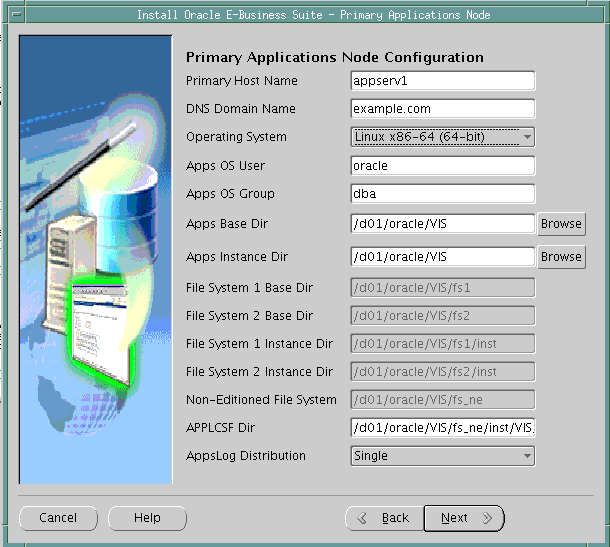
Important: The node name returned by the operating system 'hostname' command for the application tier node must be no longer than 30 characters. If you configure your system to return only the host name for the node, without the domain name, then the host name must be no longer than 30 characters. If you configure your system to return the fully qualified domain name (FQDN), then the FQDN must be no longer than 30 characters, including the host name, domain name, and periods (.) used as separators.
The Rapid Install wizard displays a warning message if the FQDN exceeds 30 characters. If your system returns only the host name as the node name, and the host name is no longer than 30 characters, then you can ignore the warning and proceed with the installation. Otherwise you must update your configuration before you proceed.
Additionally, the host name must begin with an alphabetic character. The host name cannot include an underscore (
_) character. While entering the host name, ensure that you specify the host name in lower case. Using upper case or mixed case for the host name is not supported.The default sample directories use the syntax of the operating system where you started Rapid Install. In addition, some of the fields are specific to the operating system in use.
The above example shows this screen for a Linux system, where you need to complete the information for the apps OS user (the account that owns the application tier file system and technology stack) and apps OS group (the group to which the apps OS user belongs). Accept the defaults, or enter new values.
On all these Primary Applications Node Configuration screens, the Base Directory is the top-level directory that Rapid Install will use to derive the mount points for the application tier nodes. You can accept the defaults or enter new values.
Required Action: You must accept the system-supplied defaults for the derived mount points.
The AppsLog Distribution field lets you chose where concurrent processing log and out files are stored.
-
Single - The concurrent processing log files for all products will be stored in a single common log file directory under the APPLCSF directory. Likewise, the concurrent processing out files for all products will be stored in a single common out file directory under the APPLCSF directory. This is the default value.
-
Product - A directory will be created for each product under the APPLCSF directory, and the concurrent processing log files and out files for each product will be stored in corresponding directories under that product's directory. Additionally, a directory named
systemwill be created under the APPLCSF directory, and the log files and out files for the Internal Concurrent Manager will be stored in corresponding directories under thesystemdirectory.
A particular application tier node's role is not defined by the files installed: all the APPL_TOPs on a multinode system contain the same files. Instead, the role is determined by the services that you set as enabled. These services specify the set of processes that will be started on each application tier node, and consequently the functions the node will perform. In other words, there is no concept of a "Forms node", "Web node", and so on, as there is no direct association between installed files and the services that can be run on that machine. This model enforces the three-tier architecture and simplifies tasks such as patching and upgrading.
However, the Web Administration service group is an important exception, which can only be enabled on a single application tier node (and must be enabled on one node). This Web Administration node is where the WLS Admin Server will reside.
The services provide the following functionality:
Application Tier Node Services Summary This Service Group: Supports: Root Service -
Node Manager
Web Administration -
WebLogic Admin Server
Web Entry Point Services -
Oracle HTTP Server
-
Oracle Process Manager
Web Application Services -
OACORE
-
OAEA
-
OAFM
-
Forms
-
Forms-C4WS
Batch Processing Services -
Oracle TNS Listener
-
Concurrent Manager
-
Fulfillment Server
-
Oracle ICSM
Other Services -
Oracle Forms Services
-
Oracle MWA Service
Currently, the following additional instructions apply to installing and activating application tier services:
-
Perform the installation on the node that has been chosen to have the Web Administration (WLS Server Administration) and Web Entry (Oracle HTTP Server) service groups enabled, and then run AutoConfig on this node.
-
Be aware that when subsequently creating secondary (managed) nodes, Rapid Install will not run
adstrtall.sh, so services will not be running and the installer will display a message to this effect at the end of the install. This failure of the post-install checks is expected.
Application tier nodes have all services enabled by default, but you can customize the services enabled on a particular node. For example:
-
To support Web and Forms services: Root Service, Web Entry Point Services, Web Application Services
-
To support Concurrent Processing services: Batch Processing Services
Important: Rapid Install will prompt you to enter the WLS Admin and apps OS user passwords. If you run Rapid Install in silent mode, the WLS Admin password will be set to the default.
Required Action: After scaling up your system as needed by cloning to create additional application tier nodes, you will need to start the services by running the command
$INST_TOP/admin/scripts/adstrtall.shscript on the new application tier nodes.Specify Web Entry Points
In some specialized configurations, described below, you may need to set certain context variables according to your node deployment.
Conditional Action: You will only need to perform these steps if your configuration falls into one of the categories mentioned.
With the unified file system supported in Oracle E-Business Suite Release 12.2, some scripts should only be run on nodes that update URL parameters. For example, in a two-node install, with the database and concurrent processing server running on Node A and Web and Forms services running on Node B, AutoConfig should not update the URL-related parameters when run on Node A, because Node B is the web entry point.
For example, installations that have multiple concurrent processing nodes or simply multiple web entry points may need to have the web entry point variables set to different values. Similarly, when adding a new node to a group of existing nodes, the new node may need to use the existing web entry point or a new web entry point (for example, in a DMZ configuration, when using load balancing; or when using a reverse proxy). In such cases, the web entry point variables must be set in each application context file to point to the correct web entry point, which will typically be the URL used to access the application.
In such circumstances, the following context variables need to be set on the applicable nodes, and AutoConfig run to update the relevant configuration files:
Web-Related Context Variables This variable: Specifies the: s_webentryurlprotocol Web Entry URL Protocol s_webentryhost Web Entry Host s_webentrydomain Web Entry Domain s_active_webport Active Web Port Another situation where you currently need to update the value of s_webentryhost is if you are using a load balancer to distribute processing across all the application tier nodes. In such a case, each of those nodes should have the value of the s_webentryhost variable to be that of the load balancer's host name.
Additional Resources: To learn more about how you can specify the values of context variables, refer to Chapter 3, Technical Configuration, in Oracle E-Business Suite Setup Guide.
-
-
Specify Application User Information
Application User Information screen
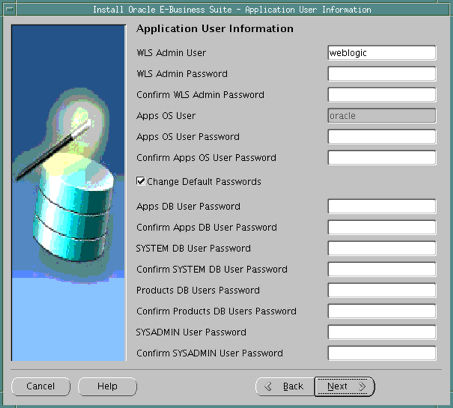
On this screen, you can specify the names and passwords for various user accounts:
-
WLS Admin User is the account you use for setting up and managing Oracle WebLogic Server.
-
Apps OS User the operating system account you use for setting up Secure Shell (ssh) on the application tier nodes (the same account must be used on all the nodes).
-
Apps DB User is the principal Oracle E-Business Suite database account. The password specified here will also be used for the related applsys and apps_ne accounts.
-
SYSTEM DB User is the principal Oracle E-Business Suite database administrative account. The password specified here will also be used for the sys account.
-
Products DB Users is the password for Oracle E-Business Suite product-specific accounts.
-
SYSADMIN User is a Oracle E-Business Suite administrative account used in initial setup.
The checkbox to change the default passwords for these accounts is automatically checked when this screen appears.
Action: For improved security of your new system, Oracle recommends accepting this setting and changing the default passwords (the new passwords must contain alphanumeric characters only).
If you wish to retain the default passwords and not change them as recommended, you will need to uncheck the box.
The default passwords are shown after the account names:
-
weblogic/welcome1
-
apps/apps
-
applsys/apps
-
apps_ne/apps
-
system/manager
-
sys/change_on_install
-
sysadmin/sysadmin
-
abm/abm, ahl/ahl ... zsa/zsa, zx/zx (and all products in between)
Additional Resources: To learn more about managing passwords, refer to section Oracle E-Business Suite Password Management in Chapter 6, Basic DBA Tasks, of Oracle E-Business Suite Maintenance Guide.
Conditional Action: If you wish to run Rapid Install in silent mode, for example to avoid having to provide user responses during an upgrade, you must retain the default passwords (including the WLS Admin password). This is because passwords cannot be passed on the command line in silent mode.
-
-
Review database node and primary application tier node information.
Node Information screen
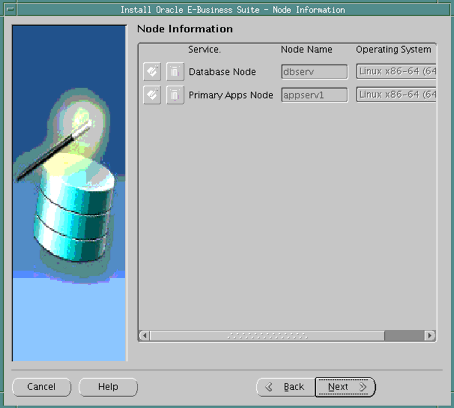
At this stage, you have specified details for the database node and the primary application tier node. Rapid Install is no longer used to create multiple application tier nodes. Waiting until after installation to add application tier nodes is a time-saving measure for the installation and patching process. After you complete the Rapid Install run you will:
-
Apply the latest AD and TXK patches.
-
Add application tier nodes by cloning or creating a shared application tier file system.
Additional Resources: When following this strategy of adding application tier nodes by cloning the primary application tier node, refer to My Oracle Support Knowledge Documents 1383621.1, Cloning Oracle E-Business Suite Release 12.2 with Rapid Clone; 1375769.1, Sharing The Application Tier File System in Oracle E-Business Suite Release 12.2; and 1375670.1, Oracle E-Business Suite Release 12.2 Configuration in a DMZ.
You may also refer to Chapter 5, Finishing Tasks, for additional recommendations.
-
-
Review Pre-Install Checks
Rapid Install performs a series of system tests to validate the configuration specified. The System Check Status screen checks port availability.
The Validate System Configuration screen appears, to indicate whether various pre-install requirements for the installation have been met. The pre-install check screen then appears:
Pre-Install Checks screen
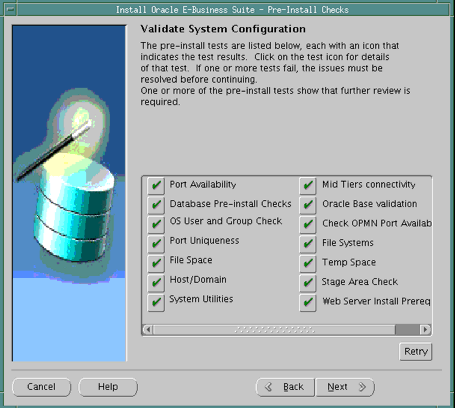
The parameters that Rapid Install validates and reports on this screen include:
The results of each test are labeled with icons. There are three result types:
-
Tick (check mark)
The test succeeded. Click the tick to see details of the test performed.
-
Exclamation mark (!)
The configuration requires review. Click the ! to get information about the system test review. Click Yes to continue, or No if you are going to resolve the issues. Rapid Install displays an alert if you continue without resolving the issues.
-
An x mark
All issues marked x must be resolved before you continue with the installation. Click the x to see the errors. If you can resolve an issue by altering the values provided on one of the wizard screens, click Back until you reach the appropriate screen, and re-enter the values. Some tests must be resolved in the operating system. In that case, you may have to restart the Rapid Install wizard after the problem has been fixed.
If problems are identified, Rapid Install displays a warning in the Oracle E-Business Suite Rapid Install Wizard Alert dialog box when you click Next.
Oracle E-Business Suite Rapid Install Wizard Alert dialog box
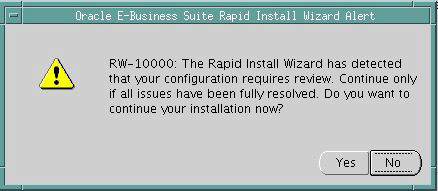
Click No to review the iissues. When you have resolved any issues, click Next on the Validate System Configuration screen to continue with the installation.
Important: For an upgrade with an existing Oracle home, when the database is down the following pre-checks will show a warning as they cannot be tested automatically. You should manually ensure that the check results are correct.
-
-
Begin the Installation
On the Component Installation Review screen, Rapid Install lists the components it will install, based on the system parameters you entered in the wizard.
Component Installation Review screen
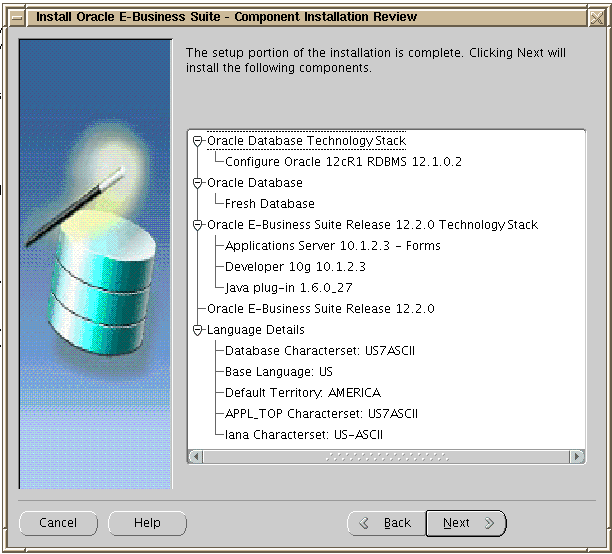
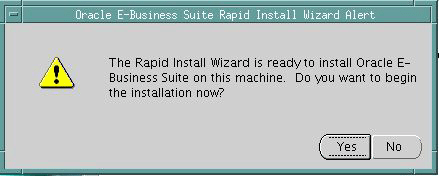
Click Next. Rapid Install now displays another alert dialog box asking you to verify that you are ready to begin the installation. Click Yes.
Oracle E-Business Suite Rapid Install Wizard Alert dialog box
Monitor Installation Progress
-
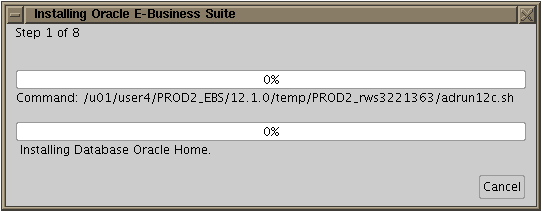
Check progress bars
During an installation, Rapid Install displays a main progress bar and an individual progress bar. The main progress bar reports on the completion percentage of the installation as a whole. The individual progress bar reports on the progress of each individual step.
Note: The installation is not complete until all the progress bars disappear from your screen.
Installing Oracle E-Business Suite progress screen
Post-Install Review
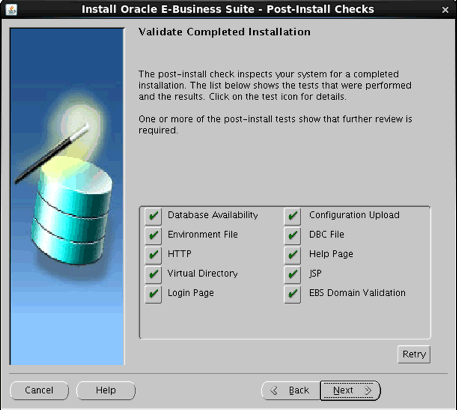
After the installation is complete, Rapid Install automatically validates the installed Oracle E-Business Suite environment. Tests include database availability, correctly-configured environment files, and functioning listeners.
-
Review the information from the tests Rapid Install has completed
If there is an ! or x icon, click it to see the details. If any of the checks fail, refer to the Rapid Install log files to determine the reason, and resolve each problem before continuing. When the errors are fixed, click Retry to perform the post-install validation again.
Post-Install Checks screen
-
Click Next if there are no errors.
Rapid Install informs you of the components that it installed on the Finish screen.
Finish screen
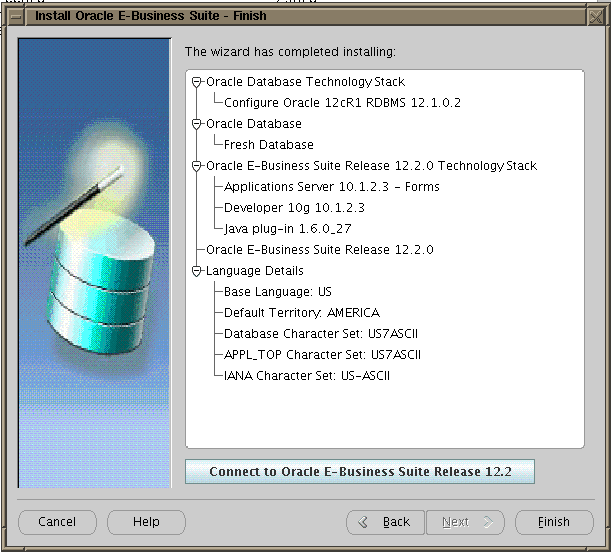
To review the Post-install Checks screen, click Back. We do not recommend choosing to log in to Oracle E-Business Suite now (by clicking on Connect to E-Business Suite Release 12.2). Instead, wait to log in until after you have applied the Release 12.2.6 RUP.
Express Installation
An Express installation sets up a fully configured single-user/single-machine system with either a fresh database or Vision Demo database. You specify basic configuration parameters, such as database type and name, top-level installation directory, and port increments. The remaining directories and mount points are supplied by Rapid Install using default values.
This type of installation contains (by default) a set of core Oracle E-Business Suite products. You can easily register additional products (according to your Oracle licensing agreement) after the installation is complete, by using License Manager.
Additional Information: For more details on how to license additional products or components, refer to Chapter 16, License Manager, in Oracle E-Business Suite Maintenance Guide.
The installation also contains the US7ASCII character set (for a fresh install) and the AL32UTF8 character set (for a Vision Demo install), in both the database and the APPL_TOP. Converting the character set may be time-consuming, and is best avoided if possible. Consider your character set requirements when using Express Installation.
-
Start Rapid Install
On the Select Wizard Operation screen, select Install Oracle E-Business Suite Release 12.2.0 and then check Use Express Install.
Wizard Operation screen with "Install Oracle E-Business Suite Release 12.2.0" and "Use Express Install" options selected
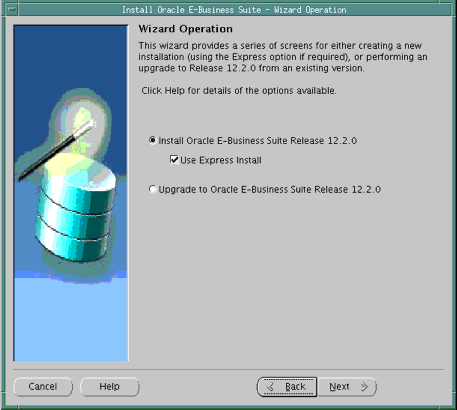
Click Next to continue.
-
Enter your email address. Optionally select the checkbox to indicate that you wish to receive security updates through My Oracle Support, and enter your My Oracle Support password.
Data collected is sent via HTTPS (secure HTTP) to Oracle Support, facilitating pro-active problem avoidance and helping to reduce the time needed for resolution of support issues.
Screen to enter email details for security updates

If submission of your details fails because no connection can be made, a pop-up screen appears prompting for proxy server information:
Specify Proxy Server Information screen

If this screen appears, enter the proxy server, proxy port, proxy username, and proxy password. You can optionally select the "I want to remain uninformed of critical security issues in my configuration" checkbox. Then click OK.
-
Enter Configuration Values
The Express Configuration Information screen prompts for minimal configuration values. Default values are provided for all fields except Domain.
This example screen is for UNIX:
Express Configuration Information screen
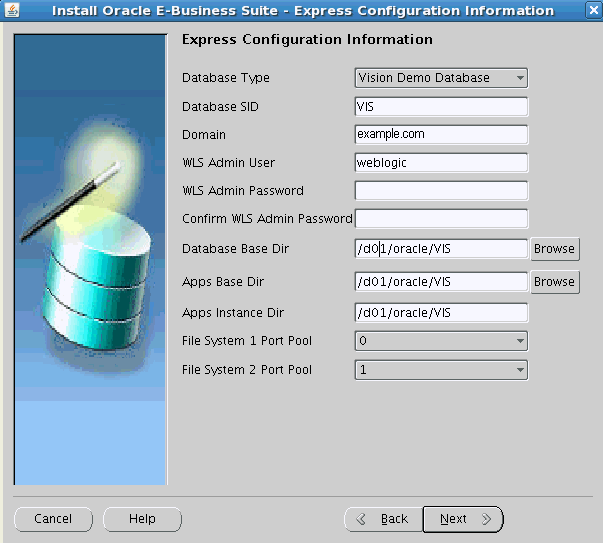
In the Database Type field, use the drop-down list to choose either a Vision Demo database or a fresh database.
In the Database SID field, enter the database name, or service name, for the local instance. You can either accept the default database name or enter another name, which must be alphanumeric, must not exceed eight characters in length, must not start with a number, and must not include any spaces.
Important: The database name specified in this field is used to determine the database SID. The database SID may vary depending on your environment.
-
In an environment that does not use Oracle RAC, the database SID is the same as the database name.
-
In an Oracle RAC environment, the instance number is appended to the database name to form the database SID for each Oracle RAC node.
On Windows (as shown in the example above), enter the path to the UNIX Toolkit directory and Visual Studio directory, or click Browse and navigate to the desired path for each of these. On UNIX systems, the DISPLAY environment variable must be set to an active and authorized display.
In the Domain field, enter a value that produces a fully qualified domain name (FQDN) when combined with a host (machine) name.
Important: The host name for the database tier node must be no longer than 30 characters. While entering the host name, ensure that you specify the host name in lower case. Using upper case or mixed case for the host name is not supported.
The Rapid Install wizard displays a warning message if the fully qualified domain name (FQDN) exceeds 30 characters. If the host name for the database tier node is no longer than 30 characters, then you can ignore the warning and proceed with the installation. Otherwise you must update your configuration before you proceed.
Additionally, the host name must begin with an alphabetic character. The host name cannot include an underscore (
_) character.In the Base Directory field, enter the top-level directory path you want Rapid Install to use to create the derived mount points for the database node and all application tier nodes. Alternatively, click Browse and navigate to the desired path.
The default value of the Port Pool set is zero, but you can customize it by selecting another value from the drop-down list in the Port Pool field. There are 100 port pool selections: if you select an increment of 3, the default values are increased by that value. The Database Port (1521) becomes 1524, the RPC Port (1626) becomes 1629, and so on.
Additional Information: The fields on this screen are fully described in Node-specific Configuration Information in Configuration Details.
Click Next to continue.
-
-
Start Installation Process
Rapid Install displays the pre-install tests as it performs them. When it is complete, the Pre-Install Checks screen appears.
Pre-Install Checks screen
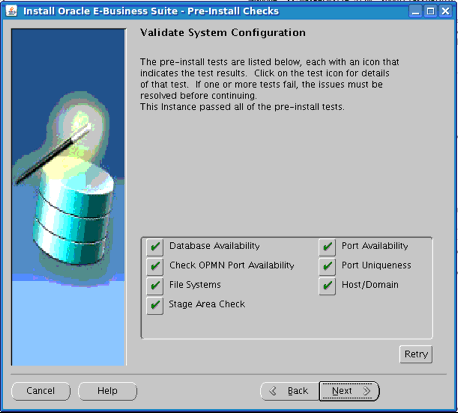
If there is an exclamation mark (!) or x icon shown, click on it to see the details stored during the check process. For example, if you see an exclamation mark beside File Space Check, clicking on it may display a screen showing an error due to insufficient file system free space.
Error Example - System Check Details screen showing File Space Check error
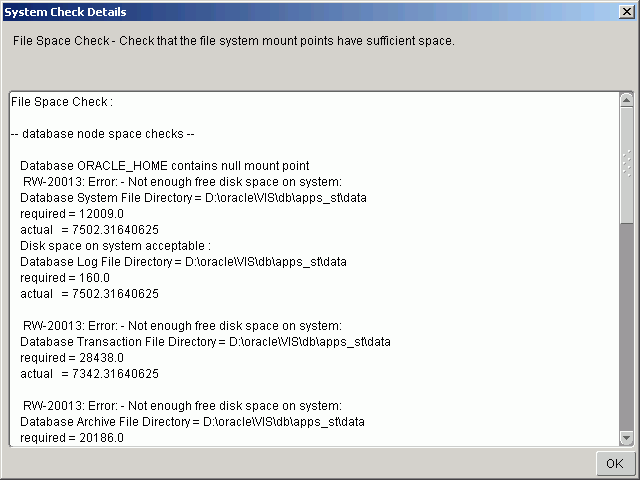
Resolve any issues you need to fix, and then click OK to return to the Pre-install Checks screen.
If you decide to continue the installation without fixing the flagged issues, Rapid Install displays a warning in the Oracle E-Business Suite Rapid Install Wizard Alert dialog box when you click Next.
Oracle E-Business Suite Rapid Install Wizard Alert dialog box
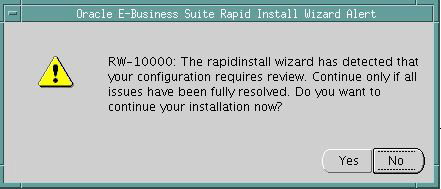
Click Yes to continue or No to stop the installation. If you click No, you must go back to the appropriate screen and re-enter the incorrect or incompatible parameter. Click Back to return to a previous screen.
-
Continue Installation
The remaining screens in the Rapid Install flow for an Express installation are the same as for a standard installation.
Installation in Silent Mode
When you perform an installation using the Rapid Install wizard user interface, Rapid Install generates a configuration file that contains the details of the system-specific configuration parameters you entered in the wizard. If you need to rerun Rapid Install, you can optionally use this configuration file to run Rapid Install in silent mode. In this mode you do not need to enter responses while Rapid Install is running. Instead, Rapid Install uses the previously entered parameters stored in the configuration file to complete the installation. Additionally, in silent mode Rapid Install sets all passwords, including the database account passwords and Oracle WebLogic Server admin password, to the default values.
Additional Information: For the list of default passwords, see Specify Application User Information.
The configuration file is generated in the following location: <DATABASE_ORACLE_HOME>/appsutil/conf_<SID>.txt
To run Rapid Install in silent mode, use the following command:
rapidwiz -silent -config <configuration_file>
Note: You cannot use silent mode the first time you run Rapid Install. You must enter the configuration parameters in the Rapid Install wizard to generate the configuration file that you can then use to run Rapid Install again in silent mode.
What To Do Next
After the Rapid Install run is complete, some additional finishing tasks are required for all users, and others are required for specific types of installation. Go to Finishing Tasks, and perform all the tasks that are applicable to your requirements.