Setting Up Standard Coverage and Subscription Templates
This chapter describes the process of setting up standard coverage and subscription templates.
This chapter covers the following topics:
- Overview of Standard Coverage and Subscription Templates
- Specifying Standard Coverage
- Defining Standard Coverage
- Setting Up a Subscription Template
- Copying Standard Coverage into a New Coverage
- Modifying Standard Coverage for Existing Contracts
- Modifying Standard Coverage for New Contracts
Overview of Standard Coverage and Subscription Templates
This group of topics explains how can set up coverage and subscription templates.
Oracle Service Contracts enables you to define a standard set of templates, to create offerings for a common set of agreements used by your organization, and modify them to meet your customers' requirements.
In order to create a:
-
Service item in Oracle Inventory, you must first define a Standard Coverage.
-
Subscription item in Oracle Inventory, you must first define a Subscription Template.
Standard Coverage
A Standard Coverage contains attributes that are associated to a Service Item in Oracle Inventory. It provides key information on how service should be carried out on products covered under the contract. For each business process covered, it defines the times of coverage, days of coverage, reaction and resolution times for a service request, preferred resources, and the discounted rates that would be applied when work is performed on covered products, see Specifying Standard Coverage.
You can use Standard Coverage to define warranty inheritance rules and transfer rules.
You can also link a Preventive Maintenance (PM) program to standard coverage, which includes the schedule to perform a particular set of activities, such as changing toner in a copy machine.
Note: The preventive maintenance schedule is created in a manner similar to the billing schedule. Multiple maintenance streams can be defined for a preventive maintenance program. Preventive Maintenance programs are defined in Oracle Complex Maintenance, Repair, and Overhaul. For more information, see the Oracle Complex Maintenance, Repair, and Overhaul User's Guide.
The following topics and procedures define and describe how to set up standard coverage:
Subscription Template
A subscription template contains attributes, that are associated to a subscription item in Oracle Inventory. The attributes include Subscription type, Media and Property type, Fulfillment Channel, and Frequency.
A subscription item can be a tangible item like a magazine, or an intangible item like a membership.
Currently Oracle Order Management is supported as the fulfillment channel. If no fulfillment channel is specified, it is considered an intangible item, and no delivery schedule is created for that item. Subscription Frequency such as Yearly, Monthly, Weekly, and Daily identifies how often an item should be delivered.
The following procedure describes setting up a subscription template, Setting Up a Subscription Template.
Specifying Standard Coverage
Service coverage describes the situations under which the customer is covered for service. Services are broken down into business processes, which are related the service, such as Depot Repair. Coverage Terms are then defined for these business processes.
Creating a Standard Coverage
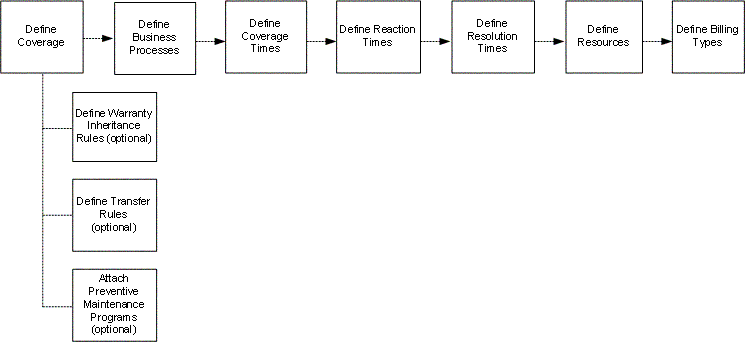
The preceding diagram shows the steps necessary to complete standard coverage. A description of the steps and an example follow:
-
Define Coverage: Specify coverage name, type, importance level, effective dates, warranty inheritance, transfer rules, or attach a preventative maintenance program.
-
Define Business Process: Specify the business processes that the Standard Coverage will use.
For example, select the Field Service business process. You will need to define coverage times, reaction times, resources, and billing types for each business process that you add.
-
Define Coverage Times: Specify the days of the week and hours used to calculate reaction and resolution times. A customer can request service anytime. If they call up support, the service agent will not turn down the call if the call is beyond the coverage times. The coverage times simply determine the starting point from where you start counting reaction and resolution times. For example, if coverage ends at 5 p.m. on a Monday and starts again at 9 a.m. on a Tuesday, with a two-hour response time, then a call received at 4 p.m. on Monday, will have a respond time of 10 a.m. Tuesday (assuming that work through is not selected). If the coverage is 24 hours per day, seven days a week, then the respond by time would be 6 p.m. Coverage times are defined for each business process as part of coverage terms, and they are applicable to one time zone. You can specify the severity for the coverage time.
-
Define Reaction Times: Specify the allowed amount of time by which action must be initiated for a requested process.
For example, set up reaction times of two hours on Monday through Sunday, Therefore, you must respond within two hours of being notified by the customer.
Reaction times are tied to severity. You can specify the respond by time and days.
-
Define Resolution Times: Specify a fixed time per contract by which a normal operation should be restored. The Resolution Times will be made available to other functions, such as Service Request.
For example, you could set up resolution times of eight hours Monday through Friday, which means if the customer calls Monday through Friday you must resolve the issue within eight hours.
Resolution times are tied to severity.
Respond By and Resolve By dates calculated using the coverage details are validated against the contract effectivity if the OKS: Validate Reaction or Resolution Times profile option is set to Yes. In addition, specify the resolve by time and days.
Note: When checking entitlements in Oracle TeleService, the application uses the best customer time zone to calculate reaction and resolution times. For example, in the preceding scenario, if the best customer time zone is EST.
Service request determines the best customer time zone for service entitlement in the following order:
-
Incident time zone: The time zone of the incident. It can be derived from the incident address on a service request.
-
Primary contact time zone: The time zone of the primary contact
-
Customer time zone: The time zone derived from the Service Request Customer's identifying address or phone number.
-
Server time zone: The time zone of the server. By convention, all date and time information in the E-Business Suite is stored according to this time zone. In many cases, this time zone is also referred to as the corporate time zone.
Other rules that help determine the best customer time zone, include:
-
If the best customer time zone matches a coverage time zone, the application converts the service request reported time to the best customer time zone and uses the coverage times setup for the best customer time zone. The application returns respond by and resolve by times by adding the applicable response time and resolution time to the passed service request reported time in server time zone.
-
If the best customer time zone does not match any coverage time zone but the default coverage is defined applicable to all time zones, the application converts the service request reported time to the best customer time zone and uses the coverage times setup for the default coverage time zone. The application returns respond by and resolve by times by adding the applicable response time and resolution time to the passed service request reported time in server time zone.
-
If the best customer time zone does not match any coverage time zone and default coverage is not applicable to all time zones, the application converts the service request reported time to the default coverage time zone and compares it with the coverage time defined for the default coverage time zone. The application returns respond by and resolve by times by adding the applicable response time and resolution time to the passed service request reported time in server time zone.
Example
Scenario Result Best customer time zone: EST
Reported Time: 9AM, EST
Coverage (not default) defined for time zone EST:-
Coverage Time: 9AM to 6PM, Monday through Friday
-
Response Time: 1 Hour
-
Resolution Time: 5 Hour
Respond By: 10AM, EST
Resolve By: 2PM, ESTBest customer time zone: EST
Reported Time: 9AM, EST
Coverage defined for time zone EST:-
Coverage Time: 9AM to 6PM, Monday through Friday
-
Response Time: 1 Hour
-
Resolution Time: 5 Hour
Respond By: 10AM, EST
Resolve By: 2PM, ESTBest customer time zone: EST
Reported Time: 9AM, EST
No Coverage defined for time zone EST
Default Coverage and applicable to all time zones:-
Coverage Time: 9AM to 6PM, Monday through Friday
-
Response Time: 1 Hour
-
Resolution Time: 5 Hour
Respond By: 10AM, EST
Resolve By: 2PM, ESTBest customer time zone: EST
Reported Time: 9AM, EST
No Coverage defined for time zone EST
Default Coverage but not applicable to all time zones:-
Coverage Time: 9AM to 6PM, Monday through Friday
-
Response Time: 1 Hour
-
Resolution Time: 5 Hour
Respond By: 1PM, EST
Resolve By: 5PM, EST -
-
Define Resources: Specify the list of resources that are eligible to work on a specific task when a service request is created. Resources can be classified as Primary, Preferred, or Excluded.
For example, identify a primary service engineer that responds to service calls.
This information is used by Assignment Manager to assign a service engineer.
-
Define Billing Types: Specify for each Business Process, what type of work is covered, to what limit, and at what rate. The billing types and rates are used when calculating the amount to charge a customer when work has been performed.
For example, define a replacement transaction type where the customer is charged for material and labor.
Defining Standard Coverage
The following must be defined as part of your implementation:
-
Coverage Type Lookup Code (Oracle Service Contracts)
-
Business Processes (Oracle TeleService)
-
Price List (Oracle Order Management)
-
Time Zone
-
Service Request Severity (Oracle TeleService)
-
Resource Types (Oracle TeleService)
-
Resources (Oracle TeleService)
-
Billing Types (Oracle TeleService)
-
Billing Rates (Oracle TeleService)
-
Preventive Maintenance Program (Oracle Complex Maintenance, Repair and Overhaul)
To define standard coverage:
-
From the Navigator, navigate to Service Offerings, and then select Standard Coverage.
The Standard Coverage window appears.
-
In the Coverage region, enter the following:
Name: Enter the name of the coverage.
Type: Select the type of coverage such as Gold, Silver, or Bronze from the LOV.
After you select a coverage type, the Importance Level field and start dates for the Effective Dates fields are populated with values.
The effective Start Date is required and the End date is optional.
Note: When reviewing a service request, a service agent can click the Line Details button to open the Line Details form, which enables the service agent to view the covered level details and compare the products covered under the contract with those that are related to the service call.
The Line Details button is active only when the contract coverage is viewed from the Service Request form. It is disabled when you create or update standard coverage.
Access to the Line Details option is controlled by application function security so that only authorized users are able to see the contract line details. You must ensure that your administrator has added the Service Contracts function named Covered Level Details to the appropriate user menus.
Description: Enter a brief description for the coverage.
Exception: Optionally, enter an exception coverage for the standard coverage definition.
Note: Although there is no support for exception coverage during entitlement calls, the ability to define exception coverage does facilitate extensions to the entitlement process.
For example, you may wish to extend exception coverage to all customers with the Gold coverage plan in order to ensure a minimum level of support for these customers even if their contracts expire; or an exception coverage may be referenced for entitlement calls to a contract under a grace period.
Suitable as Exception check box: Select this check box if you want to use this standard coverage as an exception coverage for other standard coverages.
Note: You can add a note the standard coverage by clicking the Notes button. This opens the Notes window.
For information on notes, see Communicating Using Notes.
-
Define warranty inheritance rules as follows:
Warranty check box: Select this check box to define warranty inheritance, which allows the warranty to continue if the product is replaced. This check box controls whether or not this coverage can be selected against a warranty item in the item master.
Inheritance: Select value if the warranty should continue when the product is replaced.
Remaining Duration: Replacement product's warranty is the remaining duration of the original warranty.
Full New Duration: Replacement product's warranty is a new warranty duration.
Note: The Warranty check box can be updated. However, if an Inheritance has been entered in conjunction with the Warranty check box, the Inheritance must be set to NULL before the Warranty check box can be unchecked.
Billing Types may be set up for warranties as for any other type of coverage.
Synchronize date installed check box: Select this check box, if you want to set the warranty start date to be the same as the installation date.
When a product installation date is changed, Service Contracts checks for contracts that cover that product. For every service that covers the product, the coverage definition is checked for warranty coverage that has the attribute set to allow the installation date synchronization.
If this option is selected, Service Contracts checks whether any service request has been logged on dates that would be outside the warranty period if it were changed to start on the new installation date. If no service request exists, the warranty start date is changed to the installation date. To preserve the original duration of the warranty, the end date is also changed. The effect of the change is automatically cascaded to the coverage definition.
In order for this feature to work you must confirm that within the Status and Operation setup, the Active status is checked for Update Online within the Warranties/Extended Warranties category.
Define other standard coverage rules as follows:
Free upgrade check box: Select this check box if you want to track this coverage as having a free upgrade.
This flag does not provide any automated functionality at this time.
Transfer: Determine the status of the contract in case a customer product is transferred from one owner to another. This is a required field.
No Change: There would not be any changes in the existing owners contract. No new contract is created for the new owner.
Terminate: The current contract subline is terminated. The termination date would be the transfer date. No new contract is created for the new owner.
Terminate if Not Related: If the new owner is related to the current owner, no changes are made to the contract. If the parties are not related, the current contract is terminated. The termination date would be the Transfer date.
Transfer: The current contract subline is terminated with the Termination date set to Transfer date. If the Contract Transferred is a Warranty Contract, then a Contract for the new Owner is created in Active Status. If the Contract transferred is an Extended Warranty or Service Contract, a contract is created for the new owner in the status defined by the profile option OKS: Transfer Status. The contract will have a one-time billing schedule and advance billing.
Transfer if Not Related: If the new owner is related to the current owner, this option keeps the current owners contract in force. If the owners are not related, the current contract is terminated and a contract for the new owner is created. If the contract transferred is a Warranty contract, then the new contract is created in the Active status. If the contract transferred is an Extended Warranty or Service type contract, the contract will have an advance one-time billing schedule and the status of the contract would be defined by the profile option OKS: Transfer Status.
Define Preventive Maintenance programs as follows:
Program Name: Select a Preventive Maintenance Program.
The program description displays after you select a program name.
Preventive Maintenance programs are set up in Oracle Complex Maintenance, Repair, and Overhaul.
Note: You can open the Preventive Maintenance Schedule form and view or modify the information related to the selected Preventive Maintenance program, by clicking the Schedule button.
For more information on setting up Preventive Maintenance programs, see the Oracle Complex Maintenance, Repair, and Overhaul User's Guide.
-
-
In the Business Process region, enter the following:
Business Process: Select a Business Process from the LOV, such as Depot Repair.
Offset Duration: Enter the offset duration or amount of time you would like the service to be offset from the authored contract's start date.
For example, set onsite support to start one month after the contract comes into effect and set hotline support to be available immediately.
Offset Period: Specify the unit of measure for the offset duration, such as hour or day.
If the Offset Duration is modified, the Start and End dates are automatically adjusted as long as they're within the range of the service coverage dates, and conversely, if the Start and End dates are modified, the Offset Duration is automatically adjusted.
Price List: Select the default price list that should be used when billing service charges.
Discount: Select the percentage of discount allowed for the transaction group, for example 10%, from the LOV.
-
From the Coverage Times tab, enter the following:
Timezone: Select a Time zone from the LOV.
You can define more than one time zone for each business line. However, you must define at least one time zone for every business process line.
Default check box: Select a time zone as the default for the selected business process.
Apply Default to Other Time Zones check box: To have the Default coverage times applied to any other time zone for which you have not entered any coverage times, select the Apply Default to Other Time Zones check box
In the Covered Times region: Enter a Start Time, End Time, and select the check boxes for the applicable days for each time zone.
For a given business process, the coverage time for at least one day must be entered.
You can enter multiple coverage times for a specific time zone.
You can also define multiple coverage times for the same day, as long as the coverage time records do not overlap.
Note: You can click the Always Covered button, to set to set the Start Time and End Time for all days to 00:00 and 23:59 respectively.
Severity: Select a Severity from the LOV.
-
From the Reaction Times tab, enter the following:
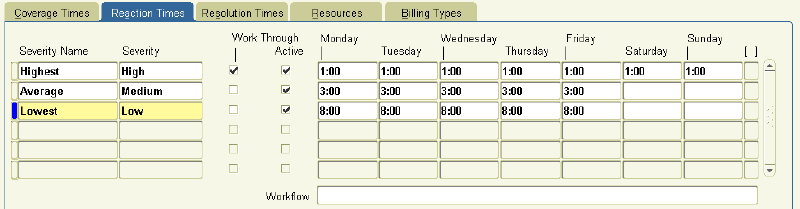
Severity Name: Enter a name for the severity definition, for example, Level 1 or Important.
Severity: Select the level of severity, for example High, from a LOV.
Respond By Time and Days: Enter the respond by time and number of days.
Workthrough check box: If selected, this check box overrides the normal coverage times for that transaction.
For example, suppose you have support between 9 a.m. and 5 p.m. from Monday through Friday with a two-hour reaction time. If a customer calls at 4:45 p.m. in the middle of the week and Work Through is selected, then the customer is entitled to receive support by 6:45 p.m. that evening. If the Work Through option is not selected, then the support representative has until 10:45 a.m. the next morning to respond to the call.
Active check box: If selected, this check box indicates this severity level is active and makes the reaction times available through an entitlements call.
Reaction Times for days of the week: Enter specific reaction times, in hours, for each applicable day.
For example, if 2:00 is entered in the Monday field, then a service call must be made within two hours if the call occurs on Monday.
Workflow: Select the applicable workflow for each reaction time name specified.
-
From the Resolution Times tab, enter the following:
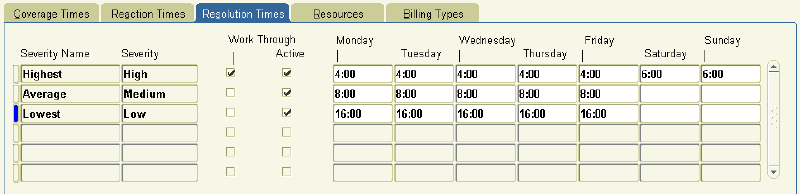
Severity Name: Comes from the Severity Name on the Reaction Times tab.
Severity: Comes from the Severity on the Reaction Times tab.
Resolve By Time and Days: Enter the resolve by time and number of days.
Workthrough check box: If selected, this check box overrides the normal coverage times for that transaction.
Active check box: If selected, this check box indicates this severity level is active and makes the resolution times available through an entitlements call.
Resolution Times for days of the week: Enter specific resolution times, in hours, for each applicable day.
For example, if 4:00 is entered in the Monday field, then the issue must be resolved within four hours if a call occurs on Monday.
Calculation of Response Time and Resolution Time
If the Coverage Time is 0800 hours to 1700 hours Monday through Friday, the following tabular scenarios explain the calculation of Response Time and Resolution Time:
Scenario Task Start Time Expected Outcome Respond By Days Respond By Time Calculated Respond By P3 Task created at 1100 hours on Friday 1100 hours on Friday End of Coverage of Next Day with Coverage 1 Not Specified 1700 hours on Monday P2 Task created at 1100 hours on Tuesday 1100 hours on Tuesday Specific Time during Next Day with Coverage 1 10:00 1000 hours on Wednesday P3 Task created at 2300 hours on Tuesday 0800 hours on Wednesday End of Coverage of Same Day with Coverage 0 Not Specified 1700 hours on Wednesday P3 Task created at 1530 hours on Tuesday 1530 hours on Tuesday End of Coverage of Same Day with Coverage 0 Not Specified 1700 hours on Wednesday -
From the Resources tab, enter the following:
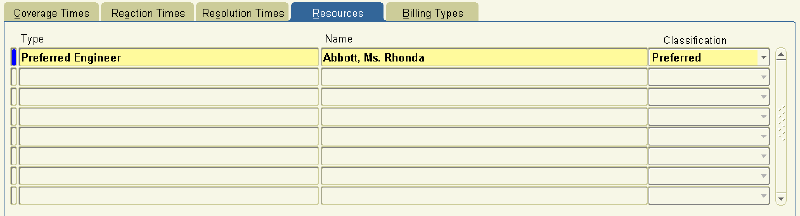
Type: Select a resource type from the LOV. For example, Engineer.
Name: Select the resource by name.
Classification: Select the proper classification for the resource from the LOV.
You can classify a resource as Preferred, Primary or Excluded.
If you classify a resource as Excluded, the Assignment Manager removes the resource from the list of available resources.
-
From the Billing Types tab, enter the following:
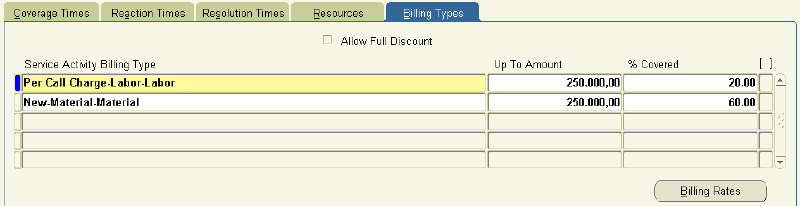
Service Activity Billing Type: Select the billing type from the LOV.
Duplicates are not allowed.
If the billing type is Labor, then the Billing Rates button is enabled.
Up To Amount: Enter the maximum allowed amount.
If you leave this field blank, the upper limit is restricted by the percentage covered or discount you enter in the % Covered field.
% Covered: Enter the percentage covered or discount.
For example, if new parts have been installed to fix a problem at a customer site, the bill for the work needs to be calculated, taking the coverage on the service contract into account. If parts are covered 50% up to a maximum of $300, and the charge for parts was $800, after applying the rates agreed on the contract, the charge would be calculated as $500, after the maximum discount of $300 has been applied. For the same contract rates, if the charge for parts came to $500, the customer would receive the full 50% discount ($250) because the discount is below the $300 maximum.
Allow Full Discount check box: If selected, this check box provides 100% coverage for warranties without requiring setup of billing types. If unchecked on the template, the box will be grayed out on the contract. Any bill types data populated on the template will override the use of this check box.
Billing Rates: Check this button to open the Billing Rates form.
-
Save.
Setting Up a Subscription Template
To set up a subscription template:
-
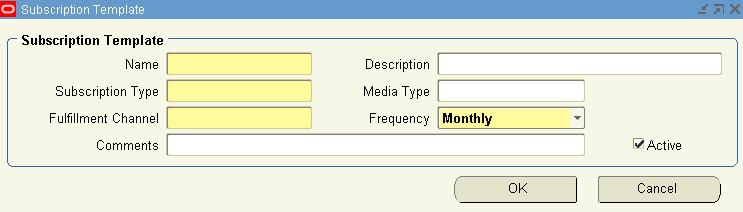
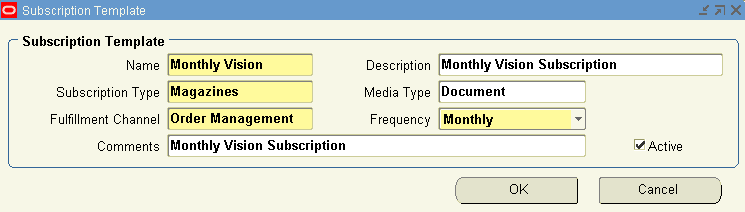
From the Navigator, navigate to Service Offerings, and then select Subscription Template.
The Subscription Template window appears.
-
In the Name field, enter a name for the template.
Examples of names include Monthly or Yearly.
-
In the Description field, enter a description for the template.
Examples of descriptions include Monthly Subscription and Yearly Subscription.
-
In the Subscription Type field, select the type of subscription from the LOV.
Examples of subscription types include journals, magazines, and newsletters.
-
In the Media Type field, select the type of medium from the LOV.
Examples of medium include document, image, and audio.
-
In the Fulfillment Channel field, select of one the following options:
-
Order Management: for tangible items that need to shipped
-
None: for intangible items
-
-
In the Frequency field, select a subscription frequency:
-
Daily
-
Weekly
-
Monthly
-
Yearly
-
-
Enter any additional information in the Comments field.
-
Verify that the Active check box is selected to ensure that the subscription template is active.
-
Select OK.
Copying Standard Coverage into a New Coverage
You can provide a new service offering by making copy of the existing standard coverage and incorporating required changes to it. For example, you can copy a coverage and add additional business processes and change response times.
To copy standard coverage into a new coverage
-
From the Navigator, navigate to Service Offerings, and then select Standard Coverage.
The Standard Coverage window appears.
-
Click the flashlight icon in the toolbar. The Coverage Template window appears with a list of the standard coverages. Select a standard coverage.
-
From the Tools menu, select Copy Coverage. The Copy Coverage window appears.
-
Enter a name for the new coverage.
-
Click OK.
Modifying Standard Coverage for Existing Contracts
To modify standard coverage for existing contracts
-
From the Navigator, navigate to Service Offerings, and then select Standard Coverage.
The Standard Coverage window appears.
-
Search for the coverage name that to modify.
-
Make updates as desired.
-
Save.
Modifying Standard Coverage for New Contracts
Prerequisite: Create a copy of the coverage name you wish to modify. See Copying Standard Coverage into a New Coverage.
To modify standard coverage for new contracts
-
Make updates as desired.
-
Save.
-
Assign the new coverage to the service item in the Item Master. See Creating Service Items.
Moving forward, the application applies the new coverage when the service is ordered in a contract or order.