Creating New Views
You can create new temporary or permanent views in the following ways:
-
You can modify existing tables by adding or deleting columns, rearranging columns, and resorting columns.
-
You can create new tables to focus on objects and relationships for which there are no default views.
The views you create are available only for the current session. But you can save a view for future use. Once saved, your custom views are shown in the My Views category of the Navigator.
Modifying Tables
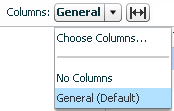
Controls for modifying tabular displays (by adding or deleting columns) and for resizing columns are shown just above table views. The figure below shows the column chooser and its drop-down list. It also shows the sizing control, which allows you to resize columns so that all columns are visible in the table.

Choose No Columns to display no columns. If you select Choose Columns.... Business Transaction Management displays a tool you can use to add or delete columns.

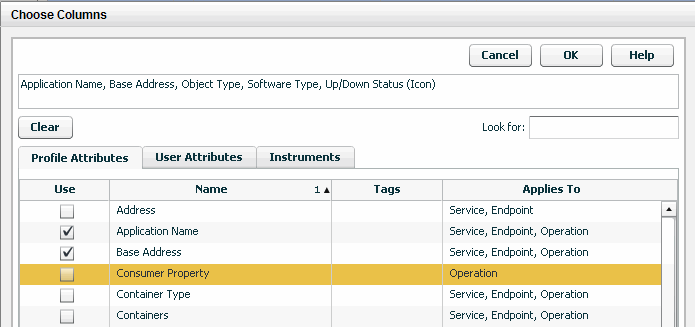
The Choose Columns tool shows the attributes that are currently chosen from any of the three tabs: Profile Attributes, User Attributes, and Instruments.
The top box lists all columns that are currently chosen from any of the three tabs: Profile Attributes, User Attributes, and Instruments.
You can select columns to add or subtract in three tabbed categories. To start, click a tab, and use the Look for filter to narrow the options shown if needed.
-
To add a column click the box in the Use column for the desired attribute or instrument.
-
To remove a column click the checked box in the Use column for the desired attribute or instrument.
User attributes are used only in graphic displays. They dictate whether clients are shown for endpoints or services.
The time control displayed for the Instruments tab applies to all instruments chosen, you can select more than one interval for instruments.
When you are satisfied with your changes, click OK. Look over the resulting view to make sure you have the information you need. You might still want to move or resize columns before saving this as a permanent view.
-
To view sorting options for a given column, pass the cursor over the column heading. A pop-up will inform you of your options.
-
To change column widths, place the cursor on the line separating column headings until the resizing icon appears, then drag the icon to change the width of the column.
-
To move columns in different positions, click the column heading and drag to the desired position.
Any changes you make to a table will be lost when you close or refresh your browser. But you always have the option to save a view you have created.
Using the Custom Data Explorer to Create a View
By default, the console displays objects and relationships thought to be most useful to most users. If the default views do not include the objects or relationships that interest you, use the custom data explorer to display any object known to the system and its relationships to other associated objects. Using this information, you can create your own custom views.
To use the Custom Data Explorer, choose Explorer > Custom Data Explorer from the Navigator.
The custom data explorer uses the main area with which you are already familiar. At the top of the main area, it includes some new controls: Two drop down lists allow you to select an object and one or more associated objects to include in a tree view.
-
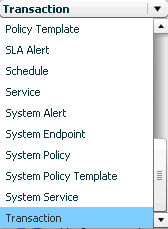
The list of possible primary objects is quite long; use the scroll bar to find the object of interest. For a sample view, Transaction is chosen as a primary object.

-
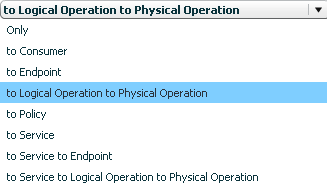
The list of possible associated objects, to the right of object list, contains all the objects that the selected object can relate to. For example, the Transaction object can relate to the following:

Choosing Only displays no related objects. Choosing a related object displays that object below the primary object in a tree view.
Once you have chosen an item from both lists, the main view will display a tree view with the primary object at the top and one or more subordinate objects underneath. For the sample view, Transactions is chosen as the primary object, and to Logical Operation to Physical Operation is chosen for the associated objects.
You could now use the Column Chooser tool to display attributes and instruments for these primary and associated objects.
When you are done, you can save the view to make it permanent. This process is described in the next section.
Saving a View
To save a view that you have created by modifying an existing view, do the following:
-
With the view in focus, select View > Save current view as from the main menu.
-
If you want this to be a new view, specify its name. This is the name used to reference the view in the My Views category in the Navigator.
-
If this will replace a view by the same name, click the check box Replace the view if it already exists?
-
Click OK.
The view you saved will be displayed in the Navigator in the category My Views. To set the view as a default view, select Set current view as default from the View menu.