Oracle® Enterprise Manager Ops Center
Quick Start Guide
12c Release 1 (12.1.4.0.0)
E25147-06
June 2013
This guide describes how to perform a simple software deployment.
1 Introduction to Quick Start
Oracle Enterprise Manager Ops Center is an enterprise-level datacenter automation software tool. This guide walks you through how to quickly install and configure the software for a basic monitoring setup. After you configure the software, you can add assets, view the operating system analytics, monitor assets, and view alerts and incidents.
This configuration is not practical for larger datacenters, but it does get you started with the software. You can update or change the configuration at any time to add remote Proxy Controllers for a larger scale deployment and to enable other features, such as OS provisioning and updates.
The following topics are covered in this guide:
For an overview of the software and features, see the Oracle Enterprise Manager Ops Center Concepts Guide.
2 Getting Ready
Many configurations are possible, but we have simplified it for a quick start. This guide describes how to install and configure an Enterprise Controller with a colocated Proxy Controller that uses a local database.
This procedure configures the Enterprise Controller to run in disconnected mode. You can change the connection mode to connect the Enterprise Controller to the Internet after you configure the software. The Internet connection, either directly or through an HTTP proxy, provides the most efficient and direct method of obtaining operating system and software updates. You can also view service requests and configure automated service requests when you are in connected mode.
A lightweight utility, called the OCDoctor, verifies that your system meets the requirements to successfully install and run the software.
2.1 What You Need
You need the following for a simple installation and configuration:
-
A system to run the software:
-
SPARC or x86 platform that is running a supported Oracle Solaris or Linux OS, such as Oracle Solaris 11, Oracle Solaris 10 9/10, or Oracle Linux 5.5.
Note:
To provision and update Oracle Solaris 11 operating systems, Oracle Enterprise Manager Ops Center must be installed on Oracle Solaris 11. -
87 GB of disk space.
-
6 GB Swap Space.
-
6 GB Memory.
-
Root access.
-
-
One or more systems to monitor:
-
Root access to a SPARC or x86 platform that is running a recent operating system version, such as Oracle Solaris 10 or 11, or Oracle Linux 5.5.
-
A newer Oracle Sun server (at least 2006).
-
Enable the SSH services on the OS and know the port number (the default is 22).
-
-
OCDoctor utility to test for requirements.
See Running the OCDoctor to Identify Prerequisites for where to download the file.
-
The Oracle Enterprise Manager Ops Center 12c software.
See Acquiring the Software for where to download the software bundle.
-
An e-mail address for a My Oracle Support (MOS) user account. This is needed for the service request, automated service request, provisioning, and update features.
-
(Optional) An Internet connection.
2.2 Running the OCDoctor to Identify Prerequisites
The OCDoctor quickly identifies potential issues before you download and install the software. In some cases, it provides a fix. New versions of the OCDoctor are released regularly. Be sure to get the latest version.
To check the computer compatibility before downloading the software:
-
Go to
http://java.net/projects/oc-doctor/downloadsand download the OCDoctor-LATEST.zip file to the/var/tmp/OCdirectory on the system. -
Unzip the file and run the utility with the --ec-prereq option.
The utility checks for conditions and returns an OK or Warning.
For example:
# ./OCDoctor.sh --ec-prereq
Ops Center Doctor version 4.11 (Aug 31 2012 [Build 648])
========== Checking Enterprise Controller Requirements ... ====================
OK: Size of Main Memory: 8192 MB
OK: Size of swap space: 8197 MB
OK: Found enough disk space on /var/opt/sun/xvm (114G)
OK: Installed Solaris Package Cluster: SUNWCall
OK: Solaris 10 found
OK: Solaris 10 u9 found
<Output omitted>
-
If you receive any warnings, fix them before installing the software.
For example, a warning appears when you use NIS and you have a
groupip 60in your NIS group. To temporarily bypass, comment out the NIS entries during the installation.passwd: files # nisgroup: files # nis
2.3 Acquiring the Software
Platform-specific software bundles are located on the Oracle Technology Network.
-
Make a
/var/tmp/OCdirectory on your system. -
Go to the Oracle Technology Network
http://www.oracle.com/technetwork/indexes/downloads/index.html. Scroll down to find the link to the Oracle Enterprise Manager Ops Center Downloads site. Read and accept the license at the top of the page. -
Download the Enterprise Controller for your OS platform and save the bundle on the directory you created in step 1.
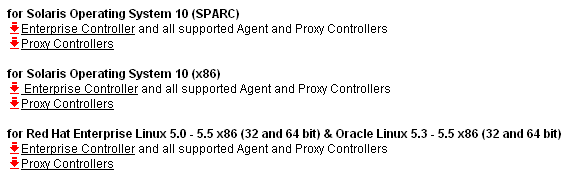
Description of the illustration download.png
-
Unzip the bundle.
Downloading the Database Installation Bundles
Before you install Oracle Enterprise Manager Ops Center with an embedded database, you must download the required Oracle Database 11g Enterprise Edition version 11.2.0.3 installation bundles.
Note:
This procedure requires a valid My Oracle Support (MOS) account, which must be associated with a Customer Service Identifier (CSI) with a software contract.-
Create a
/var/tmp/downloadsdirectory on the Enterprise Controller system. -
Navigate to
http://support.oracle.com, click Sign In, and sign in with your My Oracle Support (MOS) credentials. -
Click the Patches & Updates tab.
-
Enter 10404530 in the field next to Patch Name or Number.
-
Click the Add Filter icon, then select your Enterprise Controller system's operating system and architecture in the drop-down menu next to Platform.
-
Click Search.
The Oracle Database 11g Enterprise Edition version 11.2.0.3 patch set is displayed.
-
Click Download.
The file download popup is displayed.
-
Download the first two files. These files end with
_1of6.zipand_2of6.zipfor Oracle Solaris systems, and end with_1of7.zipand_2of7.zipfor Linux systems. -
Copy or move the downloaded installation bundles to the
/var/tmp/downloadsdirectory on the Enterprise Controller system.
3 Installing and Configuring the Software
The software is easy to install, just launch the script. Once installed, open the application in a browser and answer the configuration questions about how you want to run the software, then you are ready to start adding assets to monitor.
You are prompted to provide a My Oracle Support (MOS) account during setup. The MOS account is required to fully enable all capabilities. The account is not required for installation or basic monitoring. You can provide a MOS account in the UI after the installation is complete to enable other features.
3.1 Installing the Software
-
Go to the
/var/tmp/OC/xvmoc_full_bundledirectory and run the install script.#
./install -
The Oracle Configuration Manager installation starts. Enter a MOS e-mail address to associate with Oracle Enterprise Manager Ops Center.
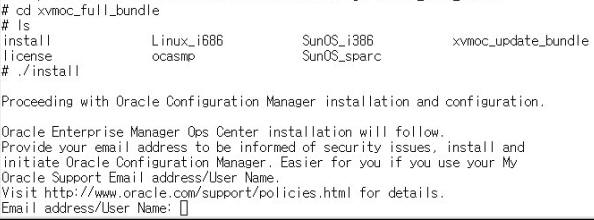
Description of the illustration start_install.jpg
-
The installer takes about 15 minutes to run and updates as the steps are completed, as shown below. When all items are completed, you are prompted to configure the software.
Ops Center Enterprise Controller Installer
(version 12.1.2.2140 on SunOS)

1. Check for installation prerequisites. [Completed]
2. Configure file systems. [Completed]
3. Install prerequisite packages. [Not Completed]
4. Install Agent components. [Not Completed]
5. Create Deployable Proxy Bundles. [Not Completed]
6. Install application packages. [Not Completed]
7. Run postinstall tasks. [Not Completed]
8. Install Expect. [Not Completed]
9. Install IPMI tool. [Not Completed]
10. Set database credentials. [Not Completed]
11. Install and configure Oracle Database. [Not Completed]
12. Install Service container components. [Not Completed]
13. Install Core Channel components. [Not Completed]
14. Install Proxy Core components. [Not Completed]
..........................
19. Initialize and start services. [Not Completed]
(2 of 19 Completed)

Executing current step: Install prerequisite packages...
3.2 Configuring the Software
A simple deployment configures the Proxy Controller on the Enterprise Controller system. This configuration does not set up the image and update libraries or DHCP services that are required for provisioning and updating your operating systems.
In this procedure, the Enterprise Controller is configured to run in disconnected mode, which means that it is not connected to the Internet.
-
To log into the software, go to https://<system name>:9443.
-
Enter the system's root user name and password. Select Ops Center local as the default database source. Click Log In.
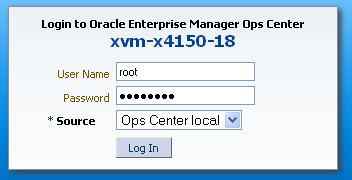
Description of the illustration login.png
-
If the Prerequisite Checklist appears, your system might not meet the minimum requirements.
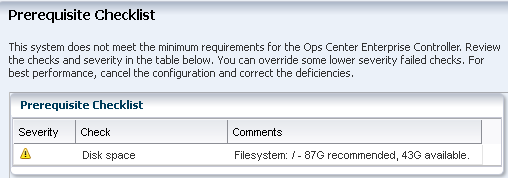
Description of the illustration prereq_checklist.png
-
If the checklist indicates system changes are required, cancel the configuration and make the suggested changes.
-
To continue, click Next.
-
-
Click Next to accept the following default values on the Enterprise Controller Setup page:
-
EC Name – The default is the system that the Enterprise Controller is installed on. This name appears in the UI masthead. You can change the name for better identification.
-
Administrative User – Set the currently logged in User as the Administrative User. This is the only user that the software recognizes until you add other users. The Administrative User has the Enterprise Controller Admin and All Assets Admin roles.
-
Colocated Proxy – Installs the Proxy Controller on the same system as the Enterprise Controller.

Description of the illustration ec_setup.png
The Proxy Controller configuration job is launched. Close the window when the configuration is complete.
-
-
Verify that the Proxy Controller you installed and configured is online, then click Next.
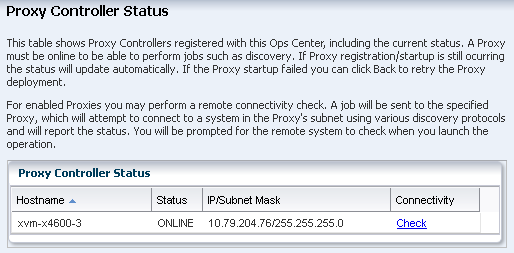
Description of the illustration pc_status.png
-
On the Connection Mode page, select the Disconnected Mode option, then click Next.
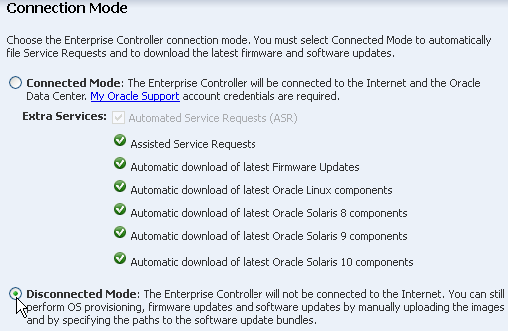
Description of the illustration disconnect_mode_setup.png
-
On the Create Software Libraries page, accept the default locations for the libraries, then click Next to configure the Update libraries.
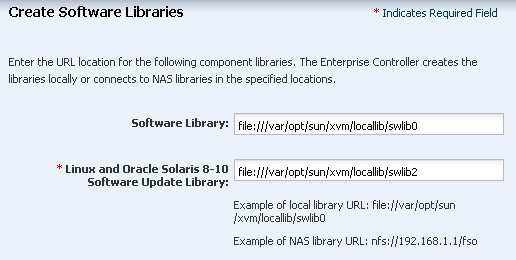
Description of the illustration config_sw_lib_setup-a.png
The Software Libraries store firmware images, ISO images, and flash archives. The Linux and Oracle Solaris 8-10 Software Update Library and the Oracle Solaris 11 Software Update Library store the OS images. The Oracle Solaris 11 Software Update Library is only created when you install the Enterprise Controller on an Oracle Solaris 11 operating system.
-
The Linux/Oracle Solaris 8-10 Software Bundle page appears, click Next to skip this step.
-
To perform OS provisioning, you must configure DHCP on the Proxy Controller. Click Next to skip this step.
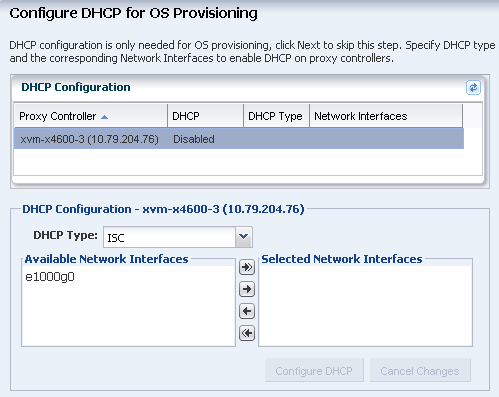
Description of the illustration dhcp_config.png
-
Click Finish.
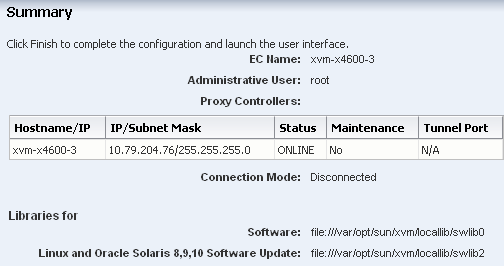
Description of the illustration summary_install_config.png
-
If you are going to manage Oracle Solaris 11 operating systems, upgrade the Oracle Solaris 11 Agent Controller. See the Oracle Enterprise Manager Ops Center Administration Guide for how to upgrade the Agent Controller from the UI.
Congratulations! You completed the installation and configuration. You can now add your systems to the UI and begin monitoring them.
4 Adding Assets
Discovery profiles define the assets that you want to begin managing. The profiles are based on the type of asset, such as Oracle Solaris operating systems and server hardware with ILOM service processors.
You need at least two Discovery profiles, one for server hardware and another for operating systems. You can add the IP ranges and discovery credentials when you create the profile or when you use the profile to add assets. In this procedure, the profile does not contain IP addresses or credentials. The details to add specific assets are supplied when you apply the plan to the targets.
Create at least two Discovery profiles, the first to define the hardware and the other to define the operating system. Generally, the discovery order does not matter, but a good practice is to discover the chassis first, then blades, and finally the operating system.
-
In Plan Management, scroll down to Profiles and Policies, then click Discovery.
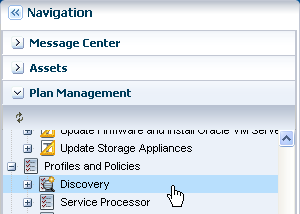
Description of the illustration nav_discover.png
-
Click Create Profile in the Actions pane.
-
Enter a name for the discovery profile. Select the asset type, either the Server Hardware or the Operating Systems. Expand the asset type to further define the type. This example is for a system with an ILOM service processor. Click Next.
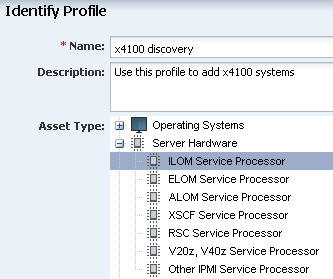
Description of the illustration disc_ilom_1.png
-
On the Tags page, click Next to skip adding tags in this procedure.
-
On the IP Ranges page, click Next to skip this step. This information is added later.
-
On the Discovery Credentials page, click Next to skip this step. This information is added later.
-
Click Finish to create the profile. The new profile appears in the center pane.
Repeat this procedure until you have at least one service processor-specific hardware discovery profile and one OS-specific operating system discovery profile.
Use the hardware discovery profile that you created earlier to add the hardware to the UI.
-
Open Assets in the Navigation pane, then click Add Assets in the Actions pane.

Description of the illustration all_assets.png
-
In Add Assets, select the first option to add and manage various types of assets. Click Next.
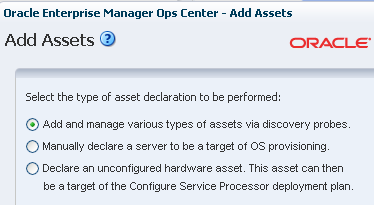
Description of the illustration add_assets.png
-
Select the Discovery Profile that you created earlier. When you select the profile, the page expands to include fields for the host name or IP address and discovery credentials.
-
Enter the name or IP address of the service processor. You can use a comma delimited list to add more names or IP addresses.
-
Select Automatic from the Network list.
-
The credentials that you created earlier appear at the bottom of the page. To change them, click New and complete the Create Credentials page.
-
Click Add Now.
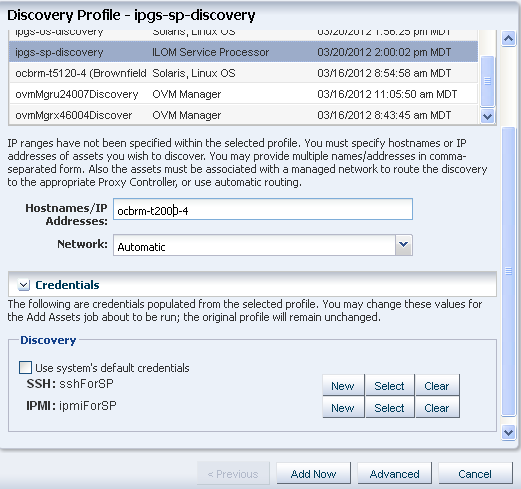
Description of the illustration add_assets_now.png
A job is launched to discover and manage the asset. You can use the same profile to discover other systems with ILOM service processors.
-
Use the OS discovery profile that you created earlier to add the operating system to the UI.
-
Open Assets in the Navigation pane, then click Add Assets in the Actions pane.
Description of the illustration all_assets.png
-
Select the first option to add and manage various types of assets. Click Next.
Description of the illustration add_assets.png
-
Select the OS discovery profile that you created. Click Next.
-
Click Next to skip adding tags in this procedure.
-
Do not specify IP addresses now. Click Next.
-
Define the discovery credentials and management option.
-
To use previously defined credentials, click Select and choose from the list.
-
To create a new set of credentials, click New to launch a pop-up wizard.
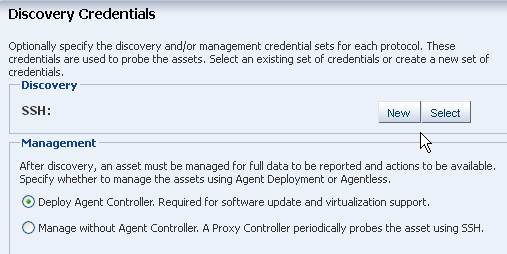
Description of the illustration discovercreds.png
-
For new credentials, enter a name and description that identifies the credential. Enter the root user name and password for the system, then click OK to return to the Discovery Credentials page.
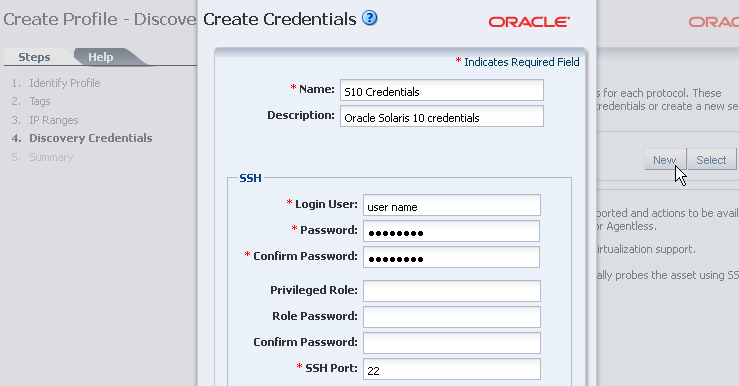
Description of the illustration create_credentials.png
-
In the Management section of the Discovery Credentials page, select Deploy Agent Controller to install the Agent Controller on the asset.
Description of the illustration discovercreds.png
A job is launched to discover and manage the asset. When the job completes successfully, expand Servers in Assets to see the hardware and associated OS.
-
5 Viewing Analytics
The Analytics feature provides details on operating system and zone performance. The charts, reports, and utilization data provide details of an individual operating system. You can use the information to improve performance and diagnose issues.
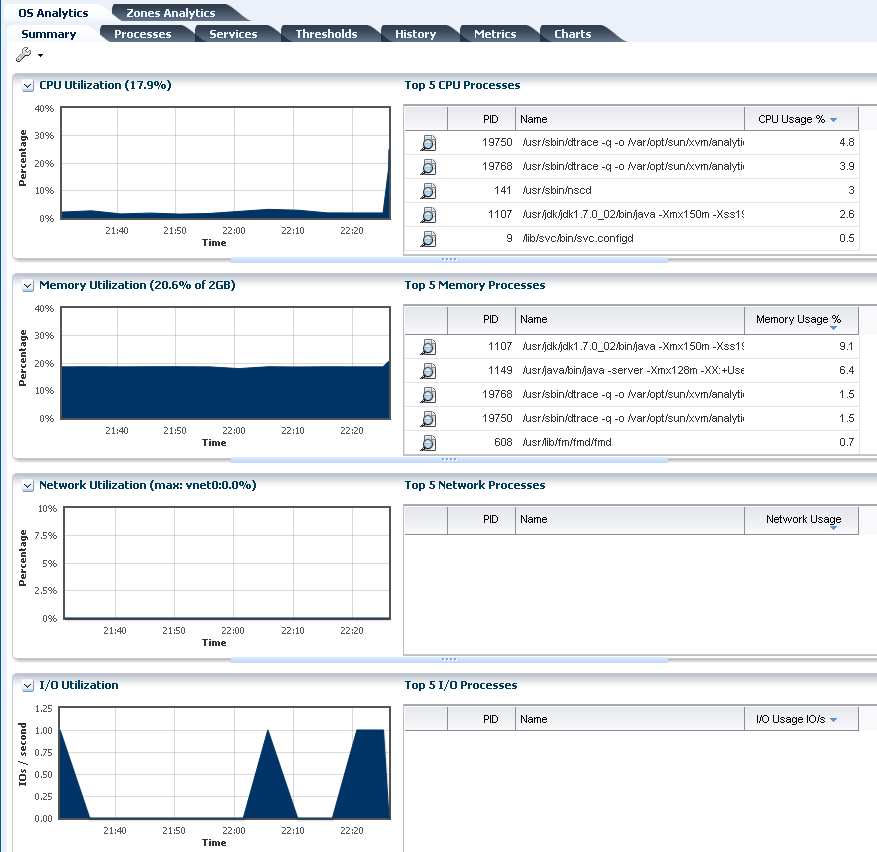
The most robust data is available when the operating system is agent managed. The Summary provides an overview of CPU, memory, network, and I/O utilization, as shown in Figure 1. Next to the graph is a table of the top five processes, or consumers, for each type of utilization. You can drill down to view greater details about one of the top five processes, or you can click the Processes tab to view details or to kill a process.
Figure 1, "OS Analytics Summary Page" shows the OS Analytics Summary page.
5.1 Viewing Services
The Services tab provides a view of Oracle Solaris 10 and 11 Service Management Facility (SMF) services. The Oracle Solaris SMF feature defines the relationships between applications, or services. SMF is a method of managing services by providing a framework for startup scripts, init run levels, and configuration files. Each service is identified by a Fault Managed Resource Identifier (FMRI).
The Services tab contains SMF service instances, state, dependencies, and severity information. You can drill down to see specific service details, including the configuration, dependencies, and the processes that are in the service contract.
You can perform the following actions in the Services tab:
-
View a list of services currently installed and their states
-
View a list of dependencies and dependents for FMRI
-
View the relationship between services and processes
-
View details about why a service is not available
-
Obtain logs for debugging
-
Clear faults for FMRI
-
Invoke the disable, enable, and restart actions on FMRI
-
Read configuration files
Services information is available for agent managed and agentlessly managed Oracle Solaris 10 and 11 operating systems, including global and non-global zones.
5.2 Viewing Thresholds
The Thresholds tab contains information about all of the monitored attributes for the selected operating system. Monitored attributes include per-instance attributes, such as File System Usage for each file-system on the asset. Figure 2 shows a partial list of the monitored attributes available for display.
Figure 2, "CPU Usage" shows the CPU usage view.

Charts for the historical data of those attributes show the alert monitor threshold levels, when configured, for that attribute. Figure 3 shows the chart for the System Load Average - 15 minutes. The time frame selected is Live. Beneath the chart are the severity levels for this monitored attribute (SystemLoad.average15MinutePerCpuCore), the operator, and the threshold values. Instead of editing the thresholds in the Monitoring tab, you can change the values on this page. You can either add values in the New Value column or click Suggest Thresholds to auto populate the fields with suggested values. Click Apply Thresholds to change the existing thresholds.
Figure 3, "Thresholds" shows the Thresholds view.
Note:
When the threshold monitor is modified, the asset is removed from the default monitoring profile and a custom profile created.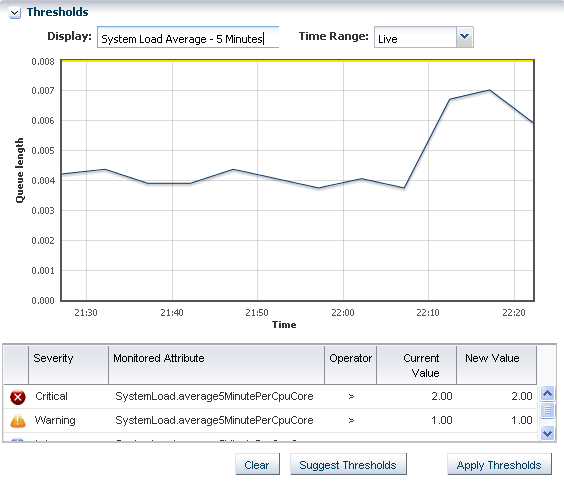
5.3 Viewing Metrics
The Metrics tab provides you with specific details about various operating system elements, such as the percentage of memory used, and view graphs. When monitoring thresholds are enabled for an element, you can reset the thresholds.
Click the Metrics tab to see OS-specific components. The following list are the types of component details available for an agent-managed Oracle Solaris OS:
-
Load
-
File Systems
-
Networks
-
Users
-
Buffer Activity
-
Disk Usage
-
Paging Activity
-
Message Activity
-
Tables Status
-
TTY Activity
-
Kernel Memory
-
DNLC
-
IPC Message Queue
-
IPC Shared Memory
-
IPC Semaphore Usage
-
CPU Detail
-
File Access
-
Disk Errors
-
Memory Utilization
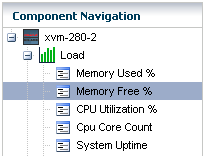
Expand a component to view the available elements. Click an element to view the details. In Figure 4, the Load component is expanded and the elements, such as percentage of memory used, CPU utilization percentage, CPU core count, and system uptime options are available in the Load list. Memory Used % is selected and the details and a graph are visible.
Figure 4, "Component Navigation" shows the Component Navigation view.
The type of resource determines the available details. Figure 5 is an example of the details and graph for the Memory Used % element. This example shows a system in trouble. The Details shows the last known value memory usage at 95.59111 percent and the established monitoring parameters. A warning incident is generated at 80 percent and a critical incident is generated when the used memory reaches 95 percent.
View the bar graph to see how the memory usage has trended over the selected time period. The yellow and red horizontal lines indicate the warning and critical thresholds.
Figure 5, "Memory Used % Details and Graph" shows the Memory Used Percentage Details and Graph.
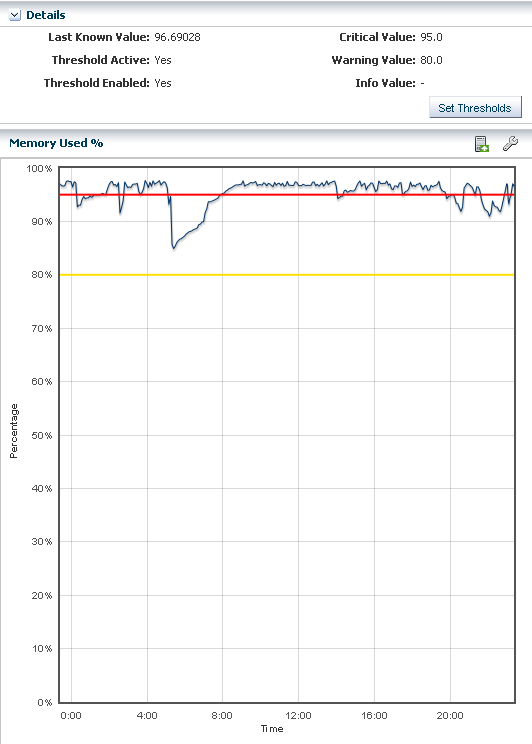
The wrench icon appears above the graph. For this graph, click the icon to change the graph style to line, bar, or area. You can change the definition of the X axis from 1 day to 1 hour, 5 days, 3 weeks, 6 weeks, or 6 months. The export icon enables you to export the graph to file in CSV or XML format.
You have the opportunity to reset the threshold values for the monitoring rule from this page, or to view recommended threshold values based on past performance. When you click the Set Thresholds button, you can modify the monitoring rule for this operating system. Doing this creates a custom set of monitoring rules for the asset. See Monitoring Rules and Policies for more information about editing individual monitoring rule parameters and creating a custom monitoring policy.
6 Monitoring Assets
The software has a set of default monitoring rules for many types of assets. When you discover and manage an asset, such as an operating system, the software begins monitoring the status based on the default rules.
6.1 How Monitoring Works
Many assets have a default monitoring profile. Different types of monitoring profiles are available, depending on the asset type. Some profiles contain individual monitoring rules, thresholds and alert levels. These alert levels are editable for Critical, Warning, and Informational incident notification. Some profiles, such as system-defined rules, are not editable but you can disable them. You can customize the alerts and monitoring profiles for each asset or group of assets.
To view or edit the default monitoring rules for an asset, click a managed asset in the navigation tree, then click the Monitoring tab in the center pane.
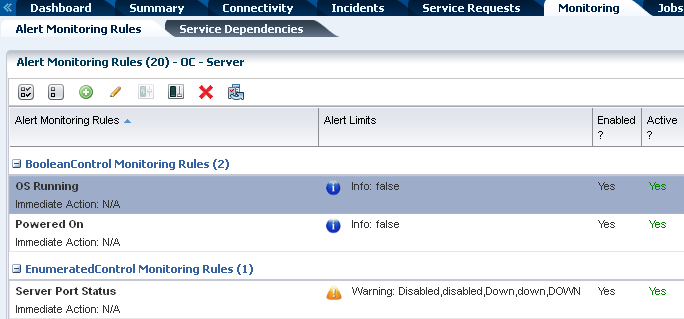
Description of the illustration monitoring.png
The icons at the top of the center pane enable you to add, edit, enable, disable, or delete rules.
When an asset first meets or exceeds a monitoring threshold or state, an alert and an incident are generated. Subsequent alerts are aggregated under the existing incident.
6.2 How to Create an Alert and Incident
An easy way to generate an alert and incident is to shutdown a monitored system. The shutdown generates a critical status alert. The System Down incident appears in the Message Center.
6.3 How to View and Assign Incidents
You can see the incidents that are unassigned, assigned to you, and assigned to others the Message Center.
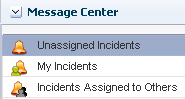
Description of the illustration message_center_1.png
Details appear in the center pane. The details include a bar chart, a list of incidents by category and severity, and a detailed list of the individual incidents.
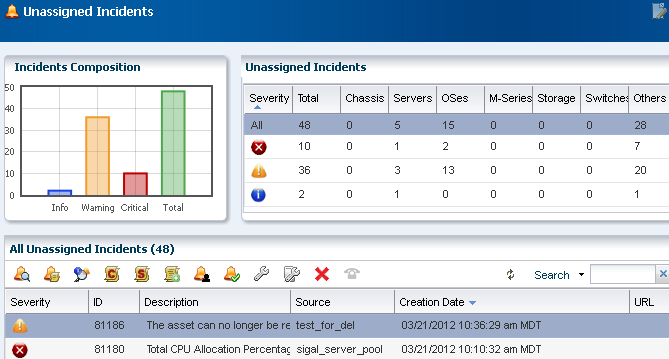
Description of the illustration message_center.png
You can also see incidents and the associated alerts for each asset in the Incidents tab.
7 Where to Go From Here
The initial setup uses a disconnected mode without registering your MOS account and without creating the software libraries. You can edit the configuration at any time to change the connection mode, create the DHCP and software libraries, and register a My Oracle Support (MOS) account. You must register your MOS account and create the software libraries before you can use the Service Request, Automated Service Request, provisioning, and update features.
What You'll Need When the Enterprise Controller is on Oracle Solaris 11
When you have the Enterprise Controller installed on an Oracle Solaris 11, you might need the following:
-
If you use an HTTP proxy to connect to the Internet, you must set the
http_proxyandhttps_proxy environmentvariables to specify the proxy server to use. -
The location of the key and certificate files for Oracle Solaris 11. If you do not have key and certificate files, go to
https://pkg-register.oracle.com/and log in using your MOS credentials to download them.
8 Related Articles and Resources
The documentation is available at http://www.oracle.com/pls/topic/lookup?ctx=oc121.
See the platform-specific Installation Guide for a more complex installation.
See end-to-end examples at http://docs.oracle.com/cd/E27363_01/nav/howto.htm.
See the Oracle Enterprise Manager Ops Center Concepts Guide for an introduction to the product and an overview of the features. See the Oracle Enterprise Manager Ops Center Feature Reference Guide for more information about the features.
See the Oracle Enterprise Manager Ops Center Administration Guide for details about connection modes and editing authentications to add a MOS user account.
9 Documentation Accessibility
For information about Oracle's commitment to accessibility, visit the Oracle Accessibility Program website at http://www.oracle.com/pls/topic/lookup?ctx=acc&id=docacc.
Oracle customers have access to electronic support through My Oracle Support. For information, visit http://www.oracle.com/pls/topic/lookup?ctx=acc&id=info or visit http://www.oracle.com/pls/topic/lookup?ctx=acc&id=trs if you are hearing impaired.
Oracle Enterprise Manager Ops Center Quick Start Guide, 12c Release 1 (12.1.4.0.0)
E25147-06
Copyright © 2007, 2013, Oracle and/or its affiliates. All rights reserved.
This software and related documentation are provided under a license agreement containing restrictions on use and disclosure and are protected by intellectual property laws. Except as expressly permitted in your license agreement or allowed by law, you may not use, copy, reproduce, translate, broadcast, modify, license, transmit, distribute, exhibit, perform, publish, or display any part, in any form, or by any means. Reverse engineering, disassembly, or decompilation of this software, unless required by law for interoperability, is prohibited.
The information contained herein is subject to change without notice and is not warranted to be error-free. If you find any errors, please report them to us in writing.
If this is software or related documentation that is delivered to the U.S. Government or anyone licensing it on behalf of the U.S. Government, the following notice is applicable:
U.S. GOVERNMENT END USERS: Oracle programs, including any operating system, integrated software, any programs installed on the hardware, and/or documentation, delivered to U.S. Government end users are "commercial computer software" pursuant to the applicable Federal Acquisition Regulation and agency-specific supplemental regulations. As such, use, duplication, disclosure, modification, and adaptation of the programs, including any operating system, integrated software, any programs installed on the hardware, and/or documentation, shall be subject to license terms and license restrictions applicable to the programs. No other rights are granted to the U.S. Government.
This software or hardware is developed for general use in a variety of information management applications. It is not developed or intended for use in any inherently dangerous applications, including applications that may create a risk of personal injury. If you use this software or hardware in dangerous applications, then you shall be responsible to take all appropriate fail-safe, backup, redundancy, and other measures to ensure its safe use. Oracle Corporation and its affiliates disclaim any liability for any damages caused by use of this software or hardware in dangerous applications.
Oracle and Java are registered trademarks of Oracle and/or its affiliates. Other names may be trademarks of their respective owners.
Intel and Intel Xeon are trademarks or registered trademarks of Intel Corporation. All SPARC trademarks are used under license and are trademarks or registered trademarks of SPARC International, Inc. AMD, Opteron, the AMD logo, and the AMD Opteron logo are trademarks or registered trademarks of Advanced Micro Devices. UNIX is a registered trademark of The Open Group.
This software or hardware and documentation may provide access to or information on content, products, and services from third parties. Oracle Corporation and its affiliates are not responsible for and expressly disclaim all warranties of any kind with respect to third-party content, products, and services. Oracle Corporation and its affiliates will not be responsible for any loss, costs, or damages incurred due to your access to or use of third-party content, products, or services.