10 Creating and Managing Workflow Processes
Workflow is a feature provided by WebCenter Sites that you use to manage the work on an asset when more than one person participates in its creation. For example, if assets of a certain type must be reviewed by an editor or a legal representative before it can be approved for publishing, the workflow feature can route those assets to the appropriate people at the appropriate time.
This chapter contains the following sections:
10.1 Overview
The end goal for any content provider is to have content assets published. Before an asset can be published, it must be approved for publishing. The workflow feature routes assets through whatever series of tasks you deem necessary in a workflow process that ushers assets from creation to approval.
You can configure a workflow process with as many or as few tasks as necessary to reflect the way the work at your organization is accomplished. You can configure email messages that WebCenter Sites sends to notify people when assets are assigned to them and to remind them that a deadline is approaching or has been missed.
Because there are so many configuration possibilities, it is typical to create a separate workflow process for each asset type that you plan to use workflow with rather than attempt to create one process for more than one asset type.
This section contains the following topics:
-
Section 10.1.3, "Workflow Steps: Moving Assets from State to State"
-
Section 10.1.9, "Restricting Access to Assets While They Are in Workflow"
-
Section 10.1.13, "Roles Required to Configure Workflow Processes"
10.1.1 Workflow Participants
When you begin creating a workflow process, the first general question is this: what are the job titles of the people who work on assets of this type? For example, are they authors, editors, marketers, graphic artists, product managers, lawyers?
The job titles of the people who participate in a workflow process are considered roles in the WebCenter Sites interfaces. Roles describe the function of an individual on a site. When you enable a user for a site, you assign that user the roles that he fulfills for that site.
When you create a workflow process, you determine which roles are appropriate for each task. Then, when an individual asset is going through that workflow process, only the users who have the appropriate role are allowed to complete the task. The individual user who is selected from the pool of users who have the correct role at any point is called a workflow participant.
10.1.2 Workflow States
Next, what are the tasks that are performed for assets of this type? For example, writing, pricing, editing, fact checking, legal review, and so on.
These tasks are called workflow states. A state is a point in the workflow process that represents the status of the asset at that point. For example, writing article, reviewing image, legal review, and so on. Participants complete the work that the state represents while the asset is in that state.
An asset that a participant is working on (or is supposed to be working on) is called an assignment. A user's assignment list is displayed In the My Assignments form in the administrator's interface. An asset appears on a user's assignment list as soon as it enters a state for which the user has a role to fulfill as a workflow participant.
Should an asset in a specific state remain in that state for only a specific amount of time? If so, assign a deadline to the state. You can then configure the workflow process to send email messages that remind a participant when the deadline is approaching or has been missed. These email messages are examples of timed actions.
You can create one or more timed action for each state.
10.1.3 Workflow Steps: Moving Assets from State to State
Next, how does the asset move from state to state? Does a marketing writer send a prospectus asset to a legal reviewer? Does a graphic artist send an image asset to an editor? And then what?
The movement of an asset between states is called a step. Because creating the steps in a process links together states in a specific order, creating the steps in your workflow process is what organizes your process.
When you create a step in a process, you specify which state a step moves the asset from (the From State), which state that step moves the asset to (the To State), and which roles can take the step.
This section contains the following topics:
10.1.3.1 How Steps Work
A step places an asset in a state and notifies participants from the appropriate roles. This operation creates the assignment. You then need a step for the participants from those roles to take that moves the asset to the next state. In other words, the roles notified by the previous step should be the roles authorized to take the next step. For example:
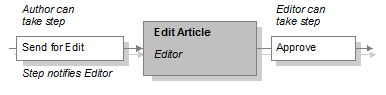
How does a user take a step in a workflow process? By specifying that he or she has finished the assignment (except for the start step, which is described below). When a user selects the Finish My Assignment option for an asset that is assigned to him or her, that option invokes the step, moves the asset to the next state, and assigns the asset to the next participants.
When more than one participant is assigned an asset in the same state, using the Finish My Assignment option is also referred to as voting. Each participant votes to move the asset to the next state.
The first step in a workflow process is a start step. A start step is one which has no From State. That is, the start step begins the workflow process, moving the asset to the first state in the series of states. This is the step that is invoked when the workflow process is assigned to the asset. Only users who have the roles authorized for the start step can start the workflow process for an asset.
10.1.3.2 Step Actions and Conditions
Step actions are events that occur when the step is completed. For example, when a step occurs, the asset is assigned to a participant. Should the participant be notified that an asset has been assigned to him or her? If so, you can configure a step action to send an email message to the new participant. You can specify one or more step actions for each step.
Another example of a step action is the ApproveForPublish action. It is a default action delivered with WebCenter Sites that approves the asset. Typically you use this action in the final step of a workflow process.
Finally, are there any requirements that must be met for an asset in a state before the step can move the asset to the next state? If so, configure and assign a step condition to the step. For example, you could configure a condition that verifies that the asset has all of its association fields filled—that an article has the associated images that it needs—before it progresses to the next state.
10.1.4 Multiple Paths for the Asset
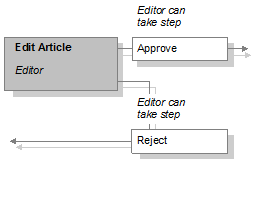
When a workflow process includes a state in which people are reviewing an asset, typically there is more than one path possible for an asset in that workflow because the reviewer can either accept it the way it is or reject it.
In such a case, you create two steps for moving the asset from the review state. When the asset is in that state, the Finish My Assignment form lists both options and the participants select the appropriate step when they finish their assignments. For example:
What happens if more than one participant are reviewing the same asset in the same state and they choose different steps (that is, vote differently)? That depends on how you configured each step. There are several possibilities:
-
Configure the steps so that the first participant to finish the assignment (vote) determines the direction the asset takes.
-
Configure the steps so that all participants have to select the same step (vote the same way) in order for the asset to progress in either direction. A step that all the participants must select before that step can be completed is called an all-voting step. Note that this option can result in deadlocks, described in the next section.
-
Use a combination of the preceding possibilities: configure one all-voting step (all participants must agree), and configure the other step(s) so that if any participant selects it, the step completes and the asset takes that path.
10.1.5 Managing Deadlocks
A deadlock occurs when the following conditions are true:
-
There is more than one step from a state.
-
Two or more of the steps require the participants to perform that step. That is, they are all-voting steps.
-
An asset in that state is assigned to more than one participant.
-
The participants select different all-voting steps when they finish the assignment.
This diagram illustrates a deadlock:
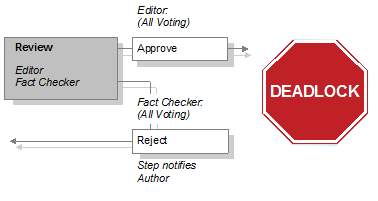
Note that if even one of the steps is not all-voting and a participant selects that step, the asset will not become deadlocked.
This section contains the following topics:
10.1.5.1 Resolving Deadlocks
An asset that is in a deadlocked state cannot progress through the workflow process until the deadlock is resolved. To resolve the deadlock, the participants must confer with each other and agree on that path that the asset should take. Then, the participants who must change their selection can do one of the following to resolve the deadlock:
-
Finish the assignment and select the step that they all agreed to take.
-
Select the Abstain from Voting option from the Workflow Commands drop-down list on the asset's Status form.
10.1.5.2 Preventing Deadlocks
Before configuring a workflow process that can result in a deadlock, be sure that it is absolutely necessary to have complete agreement on all the possible steps from the state. As you can see from this description, deadlocks cause additional work for all the participants so be sure that you use this feature only when you need to.
For example, consider a review state with two possible steps: "return for revisions" and "approve for publish." If you configure the steps so that "return for revisions" does not require a unanimous vote but "approve for publish" does, you have created a desirable control—all the reviewers must agree before the asset can be published and any rejection stops the asset from being published—without risking a deadlock.
10.1.5.3 Notifying Participants When Deadlocks Occur
If you do need to create a workflow process that can result in a deadlock, be sure to configure and assign a deadlock action that notifies the participants of the deadlock for each of the steps that can cause the deadlock. The default deadlock action is an email message that WebCenter Sites sends to the appropriate participants when a step causes a deadlock.
10.1.6 Workflow Groups
Is there ever a situation in which several assets are so closely connected that they need to be thought of as one unit of work or they need to be approved at the same time? In such a case, you can use the workflow group feature.
This section contains the following topics:
10.1.6.1 Using Workflow Groups
Workflow groups enable content providers to send a defined set of assets though the workflow together. While it is the content providers who create workflow groups and select the assets that are assigned to the group, you, the administrator, still need to know what kind of assets will be included in workflow groups. Why? So that you can configure the workflow processes appropriately.
For example, you can configure workflow steps that allow each asset in the group to progress to the next state when it is finished or you can configure a step that requires all the assets in the group to reach that point before any of them can progress. (This second example, called a synchronize step, is described next.)
10.1.6.2 Adding a Synchronize Step
When creating a workflow process that will be used with workflow groups, it is usually best to configure the process so that it has only one synchronize step. Multiple synchronize steps can slow down the work on those assets unnecessarily. Assess the business process that is reflected by the workflow process and determine which steps must truly be synchronized: perhaps all the assets should go to legal review in one batch, or perhaps all the assets should be approved for publishing at the same time, for example.
10.1.6.3 Managing Group Deadlocks
If you create a workflow process to be used with workflow groups and any of the steps can result in a deadlock, be sure to configure and assign a group deadlock action that notifies participants when there is a group deadlock and assign it to the process.
10.1.7 Delegating and Clearing Assignments
People go on vacation, get reassigned to new work groups, and move on to different jobs. What happens to the assets that they are working on? They can delegate their assignments to other participants who have the appropriate roles.
Additionally, each workflow process can have a workflow administrator. The administrator of a workflow process can delegate assignments on behalf of the other participants.
When an asset is delegated to a new participant, should that person receive an email notice? If so, configure a delegate action to send an email message to new assignees when assets are delegated to them. You can specify one or more delegate actions for each workflow process.
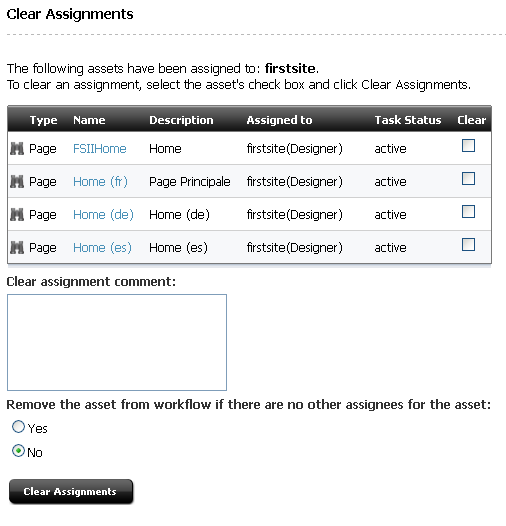
If an asset no longer needs to be assigned or if it is easiest to clear the assignment and then start over, you can use the Clear Assignments feature in the Admin tab.
10.1.8 Placing an Asset in Workflow
An asset begins its participation in a workflow process in one of the following ways:
-
A user selects a workflow process from the Workflow Commands field on the Status form for the asset.
Selecting the workflow process invokes the start step for the process, which places the asset into the first state.
-
A user creates an asset and the start menu New item for assets of that type is configured such that there is a default workflow process.
In this case, saving the asset invokes the start step for the process, which automatically places the asset into the first state.
Because steps are enabled for specific roles, only the users who have a role that is assigned to the start step of a process can select that process. This means that if you are using start menu items to place assets in workflow, you must be sure that the roles assigned to the start menu item are the same roles that are assigned to the start step of the default workflow.
10.1.9 Restricting Access to Assets While They Are in Workflow
Although workflow routes an asset through a business process, sending it to the appropriate users at the appropriate times, the fact that the asset is assigned to a specific user does not stop other users from modifying or even deleting that asset.
If you want to restrict who has access to an asset while it is in workflow, use the workflow feature called function privileges. These are restrictions set on functions such as edit, copy, approve, delete, show versions, and so on in the context of workflow states and workflow roles.
There are three parts to a function privilege:
-
The function being restricted.
-
The roles allowed or not allowed to perform the function.
-
The state during which users with those roles are allowed or not allowed to perform the function.
When a function privilege is in effect, it means that a user can perform that function only when the following conditions are true:
-
The user has an appropriate role.
-
The asset is in the correct state.
-
The asset is assigned to the user.
This means that even if the user has the correct role and the asset is in the correct state, the user cannot perform that function on that asset unless the asset is assigned to that user.
This section contains the following topics:
10.1.9.1 Function Privileges and Step Actions
Function privileges restrict access to a function from the user interface only. This means that you can program step actions that invoke a function when a step is taken regardless of what the function privilege is set to at that moment.
The ApproveForPublish step action is an example. Even if you specify function privileges that restrict users from using the Approve option in the user interface, those same users can approve an asset with a workflow step if the workflow step invokes the Approve For Publish action and the user has the correct role to take the step.
In other words, you can use function privileges to prevent users from selecting and changing assets by mistake and use actions to invoke those functions in a highly controlled way.
10.1.9.2 Function Privileges: All or None
If you create even one function privilege that allows or restricts access to a function for a given role, you must create function privileges that cover all the other roles for that function.
For example, suppose that the only function that you want to restrict is the Delete function—you want to allow only the editors to delete article assets and only then if the article is in the Review state. If you create a function privilege that allows editors to delete article assets that are in the Review state but you do not create any other function privileges, nobody else can delete article assets that are in the Review state until you explicitly grant other roles access to the Delete function in the Review state.
Additionally, if you create a function privilege that denies editors access to the Delete function for assets in the Review state, no user can delete article assets that are in the Review state until you explicitly grant other roles access to the Delete function in the Review state.
10.1.10 Deadlines
There are two kinds of workflow deadlines:
-
Assignment deadlines – which specify how long an asset should remain in an individual state. When you set a value for the Estimated Time field of a state, that creates a deadline for the assets that are assigned to workflow participants when the assets are in that state.
-
Process deadlines – which specify how long it should take for an asset to go through the entire process.
Note that these different types of deadlines do not interact with each other—they are calculated separately and are mutually exclusive. Most likely you will use either one kind or the other, but not both for the same workflow process.
This section contains the following topics:
10.1.10.1 Setting and Overriding State Deadlines
When you create a workflow state, you can set an Estimated Time for it and determine whether reminder emails should be sent when assignments miss the deadline that is calculated from the Estimated Time.
When you create a workflow process that uses the state, you specify whether the Estimated Time for the state can be changed (overridden) when a user takes the step that moves the asset into that state.
If the deadline can be changed, any participant who takes the step can override the deadline unless you configure function privileges that restrict their ability to do so. Note that any participant who has a role that was designated as an administrator role for the workflow process can always override an assignment deadline if the deadline can be changed.
10.1.10.2 Setting Process Deadlines
When you create a workflow process, you determine whether a process deadline can be set. A process deadline is set when an asset is first placed in workflow, in the Select Workflow form. Unlike an assignment deadline, however, you cannot configure the process to send reminder emails when a process deadline is approaching.
If a process deadline can be set, any participant who places the asset in the workflow can set a process deadline for that asset—unless you configure function privileges that restrict their ability to do so. Additionally, any participant who has a role that was designated as an administrator role for the workflow process can always set a process deadline, if a deadline can be set.
10.1.11 Scheduling a Deadline Calculation
There are two kinds of actions:
-
Actions that are invoked by a step. These actions are events that WebCenter Sites completes when a step is taken.
-
Actions that are triggered by a deadline. These actions are queued and are triggered only after WebCenter Sites calculates the deadlines for the assets and determines which timed actions (if any) should be invoked.
You specify how often the deadlines are calculated by configuring the Timed Action Event. This is an event that invokes a background calculation process of all deadlines. It is similar to the publishing event that invokes the background approval calculation process.
Just as the publishing process calculates approvals to determine which assets should be published, the deadline calculation process that is invoked by the Timed Action Event calculates the deadlines for all assets that are participating in workflow processes—to determine whether any reminder messages should be sent for assignment deadlines and to determine the times that should be displayed for assets in the Due and Process Deadline columns of assignment lists.
You can configure the Timed Action Event on your management system to run as often as you find it necessary.
10.1.12 How Does a Workflow Process End?
A workflow process ends when there are no more states for the asset to progress through. This occurs when the final participant takes the end step for the workflow process.
An end step is the opposite of a start step—it has a From State but no To State. When a user takes the end step, it is moved to a stateless state, which means the asset is no longer in workflow and any function privileges set for that workflow process no longer apply.
10.1.13 Roles Required to Configure Workflow Processes
The workflow building blocks are located on two tree tabs in the administrator's interface:
-
Admin – holds email objects, actions, conditions, and the Timed Action Event.
-
Workflow –holds workflow states and processes.
For access to the Admin tab, you must be assigned the GeneralAdmin role and have the xceladmin ACL assigned to your user account. For access to the Workflow tab, you must be assigned the WorkflowAdmin role for the site you want to create workflow processes for.
For more information about access rights in the WebCenter Sites interfaces, see Chapter 4, "Working with ACLs and Roles" and Chapter 5, "Configuring Users, Profiles, and Attributes."
10.2 Planning Your Workflow Processes
When you create a workflow process, you create steps that link together the states for that process. This means that you or someone else must create the workflow components—roles, email messages, the various kinds of actions, step conditions, and states—before you can create a workflow process.
This section provides more details about the configuration of each of the workflow components so that you can plan and implement your workflow processes. When planning a workflow, you will do the following:
-
Section 10.2.3, "Determine the Email Objects, Actions, and Conditions"
-
Section 10.2.7, "Determine Additional Workflow Process Details"
10.2.1 Start with a Sketch
Where do you begin? With sketches of the business processes that you need to implement as workflow processes:
-
Use boxes to represent the states.
-
Use arrows to represent the steps that connect the states.
As you read through the descriptions in this section, write on your sketches the details about which roles, actions, conditions, deadlines, and so on are appropriate for each state or step in the process.
Then, refer to your sketches as you use the administrator's interface to create your workflow processes, described in Section 10.3, "Configuring Your Workflow Processes."
10.2.2 Determine Roles and Participants
When you start planning your workflow processes, begin with the roles. What kind of functional groups participate in workflow? Then, determine how the individual users from those roles will become the participants in a workflow process for a specific asset.
This section contains the following topics:
10.2.2.1 Planning Roles
To determine the roles that you should create for your processes, ask yourself the following questions:
-
What are the job titles or roles of the content providers who are using your Sites management system?
-
What do the people in each role do? (You can map the tasks that they complete to your states.)
-
How are the roles organized? For example, is there one group of reviewers who review everything but several groups of content providers who are organized by subject (for example, sports writers, financial writers, marketing writers, and so on)
-
Do certain groups of people work with specific asset types but not with others? If so, which roles should have access to each asset type that you plan to create a workflow process for?
-
Would you ever need to notify someone who is not participating in a workflow about the status of an asset that is in workflow? If so, that person will need a role so a step or timed action can send an email message to that person.
On your sketches of your workflow processes, write the names of the roles that will have the asset assigned to them in each state.
For information about creating roles, see Chapter 4, "Working with ACLs and Roles."
10.2.2.2 Selecting Individual Participants
When you configure a workflow process, there are several ways to determine which specific users participate in the workflow for each individual asset that goes through the workflow:
-
When the workflow is assigned.
You can configure the process so that the person who first assigns the workflow to the asset must select all the users who will participate. For each state, they select users from a list. The list includes all the users who have the correct role for that state.
-
When a participant finishes the assignment.
You can configure the process so that each participant determines who the next participant is when he or she finishes the assignment. That participant selects a user name from a list that includes all the users who have the correct role for the next state.
You specify how participants will be selected when you configure the steps.
10.2.2.3 Cross-Site Assignments and Participants
Assets can be shared between sites. If a shared asset is entered into a workflow process, should users from all the sites that have access to the asset be considered as candidates for participating in the workflow? If the answer is yes, enable the cross-site assignments feature.
When you use the cross-site assignments feature, users see all of their assignments from all the sites that they have access to in their assignment list no matter which site they are currently logged into. Having one, consolidated assignment list is very convenient for your users.
Keep in mind, however, that if your users have different roles in different sites and you are using function privileges in your workflow processes, they might not be able to work on an asset that they can see in their assignment lists. For example, say that some of your users have the author role in one site and the editor role in another. If you are using function privileges to restrict editing to editors in a certain state, they can see an asset that they aren't allowed to edit in their assignment list when they are logged in to the site where they function as authors.
To enable this feature, you set the value of the xcelerate.crosssiteassign property to true. This property is in the futuretense_xcel.ini property file. For information about the property, see the Oracle Fusion Middleware WebCenter Sites Property Files Reference.
10.2.3 Determine the Email Objects, Actions, and Conditions
An action is an event that is triggered in one of three ways:
-
A step invokes it (step action).
-
A deadline triggers it (timed action).
-
A workflow situation triggers it (deadlock, group deadlock, and delegate actions)
A condition is an event that is assessed when a step is attempted. If the condition is not met, the step cannot be completed.
When you create an action or a condition, you identify an element. Elements are named pieces of code that are stored in the ElementCatalog table. It is the element that invokes the function represented by the action. If the element is coded to expect variables or arguments, you identify values for them when you create the action and those variables are then passed to the element when the action is triggered.
As an administrator, you are not responsible for coding elements. If your workflow needs cannot be met by the default workflow elements that are provided, your developers can code the functionality that you need. See the Oracle Fusion Middleware WebCenter Sites Developer's Guide for information about customizing workflow.
WebCenter Sites provides the following default workflow elements:
Table 10-1 Workflow Element Names and Expected Variables
| Element Name | Variables It Expects |
|---|---|
|
OpenMarket/Xcelerate/Actions/Workflow/StepActions/ApproveForPublish |
The name of the publishing destination that the asset is to be approved for. |
|
OpenMarket/Xcelerate/Actions/Workflow/StepActions/SendEmailToAssignees |
The name of the email object to send. |
|
OpenMarket/Xcelerate/Actions/Workflow/StepConditions/ExampleStepCondition |
|
|
OpenMarket/Xcelerate/Actions/Workflow/AssignmentActions/SendEmail |
The name of the email object to send. |
|
OpenMarket/Xcelerate/Actions/Workflow/DeadlockActions/SendEmailToAssignees |
The name of the email object to send. |
|
OpenMarket/Xcelerate/Actions/Workflow/GroupActions/SendEmailToAssignees |
The name of the email object to send. |
These elements are described in detail in the Oracle Fusion Middleware WebCenter Sites Developer's Guide.
With the exception of ApproveForPublish and ExampleStepCondition, these elements take a variable called emailname and send the email message that is identified by that variable.
How do you determine the value of the emailname variable? By creating workflow email objects. The names of the email objects that you create in the Admin tab in the WebCenter Sites administrator's interface are the names that you specify as the arguments with the emailname variable when you create actions that send email messages.
This section contains the following topics:
10.2.3.1 About Email Objects
Email objects are building blocks separate from the actions so that you can use them with more than one action. For example, the default deadlock action and the default group deadlock action use the same email message (named Deadlock Message).
You create email objects by giving them a name, a description, a subject line, and text for the body. When the message is sent, the text provided for the subject is placed in the subject line and the text provided for the body is placed in the body of the message.
There are several variables that you can use in the subject line and body text which makes it easier for you to write email messages that are personalized for each recipient.
The following table lists the default workflow variables that you can use with any email message:
Table 10-2 Default Workflow Variables
| Variable Name | Description |
|---|---|
|
Variables.assetname |
The name of the asset. Use this variable in every email message so the recipient knows which asset is being referred to. |
|
Variables.assigner |
The user name of the participant who assigned the asset to the person receiving the email. Use this variable in email messages for step actions that notify participants that a new asset has been assigned to them. |
|
Variables.time |
The time specified in the Estimated Time field for a state. Use this variable for timed actions. |
|
Variables.instruction |
The text that the previous participant entered in the Action to Take field of the Finish My Assignment form when he or she finished the assignment. Use this variable in email messages for step actions that notify participants that a new asset has been assigned to them. |
For examples of custom email variables, see the email object named Deadlock Message and the corresponding deadlock action element named OpenMarket/Xcelerate/Actions/Workflow/DeadlockActions/ SendEmailToAssignees.
Default Workflow Email Objects
The default workflow email objects are these:
-
Assignment Due Reminder – specifies the asset and the time that it is due.
-
Assignment Message – specifies the asset, the person who assigned it, and in the message from the Action To Take box on the Finish My Assignment form.
-
Deadlock Message – describes how the deadlock occurred by listing the users and the steps that they took.
-
Rejection Message –is similar to the Assignment Message, but states that the asset was rejected by the previous participant (the assigner).
To determine the email objects that you need to create, you must also determine the actions that will send the email messages held in the objects. By using the email variables in the subject and body, it is likely that you can use the same email object with more than one timed action or step action.
Typically, you need to compose email messages that specify the following kinds of things:
-
An asset has been assigned to a participant. (For step actions.)
-
An asset has been delegated to a new participant. (For delegate actions.)
-
A deadline is approaching for an asset. (For timed actions.)
-
A deadline for an asset has been missed. (Also for timed actions.)
-
An asset is in a deadlock. (For a deadlock action.)
-
A group of assets are in a deadlock. (For a group deadlock action.)
In the Admin tab, double-click Email. Examine the default email objects to determine whether you can use them. You can modify the default messages or create your own email messages.
In one corner of your sketches of the workflow processes, list the email messages that you will need for that workflow.
10.2.3.2 About Timed Actions
Timed actions are actions that are based on the deadline of a state. If you specify a deadline for a state, you can specify a timed action to remind the participants about the deadline.
You create a timed action by giving it a name and a description, specifying an element, and then providing argument values for the element, if necessary.
To create a timed action that sends email notices about a deadline, specify the OpenMarket/Xcelerate/Actions/Workflow/AssignmentActions/SendEmail element and use the Argument field to specify which email message to send.
When you create a state, you specify which timed actions to use and when to trigger them, relative to the deadline specified for the state. You can specify more than one timed action for each state.
When the Timed Action Event runs and calculates the deadlines for all the assets currently participating in workflow, the appropriate timed actions are triggered.
There is one default timed action: Send Email. It uses the OpenMarket/Xcelerate/Actions/Workflow/AssignmentActions/SendEmail element to send the Assignment Due Reminder email message.
When planning your timed actions, you must also consider the following workflow components:
-
The states that you will create, because these actions are triggered in terms of the deadlines that you set for your states.
-
The email objects that you need to create, because it is likely that your timed actions will send email messages
Because the time that a timed action is triggered is determined outside of the action itself (you do this in the form for the state), you can probably create a small number of generic timed actions—whose only difference is the email message they send—and use them repeatedly with your states.
In the Workflow tab, expand Actions, then Timed Actions. Examine the Send Email action to determine whether you can use it. You can modify the default timed action or create your own.
On each of your sketches of your workflow processes, list the timed actions that you need for that process near the list of the email messages.
10.2.3.3 About Delegate Actions
When you assign a delegate action to a workflow process, the action is triggered whenever a participant (or the workflow administrator) delegates an assignment to another participant.
You create a delegate action by giving it a name and a description, specifying an element, and then providing argument values for the element, if necessary.
You can specify one delegate action per workflow process.
There are no default delegate actions provided.
It is likely that your delegate action will send an email message to the participant to whom an assignment is delegated. If this is the case, you can create a delegate action that uses any of the default workflow elements that send email and create a new email object for that element to send.
On each of your sketches of your workflow processes, write the name of the delegate action that you will use for that process. (You can assign one for each process.)
10.2.3.4 About Step Actions
When you assign a step action to a step, the action is triggered when a participant takes the step.
You create a step action by giving it a name and a description, specifying an element, and then providing argument values for the element, if necessary.
There are two general categories of step actions: those that complete functions and those that send email messages to the participants who are being assigned the asset by the step.
Step actions are completed regardless of function privileges. That is, if you create a step action that performs a WebCenter Sites function, the action does not check the function privileges of the participant taking the step. This means that you can restrict access to a function from the user interface and require participants to use a step in a workflow in order to complete a specific function (approve for publish, for example).
You can specify one or more step actions for each step.
The default step actions are these:
-
Approve for Publish, which uses the
OpenMarket/Xcelerate/Actions/Workflow/StepActions/ApproveForPublishelement to approve the asset. Then, the next time a publishing process runs, the asset is published (as long as all of its dependencies are also approved).To use this action for your workflow processes, you must specify the publishing destination(s) that the asset is to be approved for by using the
targetsargument. -
Send Assignment Email, which uses the
OpenMarket/Xcelerate/Actions/Workflow/StepActions/SendEmailToAssigneeselement to send the Assignment Message email object to all the participants assigned the asset (that is, who are specified in the Assignment Method for the step). -
Send Rejection Email, which uses the
OpenMarket/Xcelerate/Actions/Workflow/StepActions/SendEmailToAssigneeselement to send the Rejection Message email message to the new assignee (the participants specified in the Assignment Method for the step).
To determine what kind of step actions you need to create, you must consider the following workflow components:
-
The steps that you will create for the process. Do people need to be notified that a step has assigned an asset to them? If so, you need a step action that sends an email message.
-
The states that the steps move the assets into. Does the state represent the asset after a function has been completed? If so, you need a step action that implements that function.
In the Workflow tab, select Actions, then Step Actions. Examine these actions to determine whether you can use them. You can both modify the default step actions and create your own.
On each of your sketches of your workflow processes, write the name of the step actions next to the appropriate steps. You can assign one or more step actions for each step.
10.2.3.5 About Step Conditions
When you assign a step condition to a step, the condition is assessed when the step is taken. The condition determines whether the step can be completed or not.
You create a step condition by giving it a name and a description, specifying an element, and then providing argument values for the element, if necessary. If you want to use conditions in your workflow processes, talk to your developers about the conditions you need them to implement through elements.
You can specify one or more conditions for each step.
There is one default step condition: Example Step Condition. It is a "hello world"-style example that illustrates how to code an element to check for a condition. You and your developers should examine it to learn how it works and then your developers should create their own condition elements.
When thinking about step conditions, you must consider the steps and the state. If you determine that conditions are necessary for your workflow processes, ask your developers to create them.
On each of your sketches of your workflow processes, write the name of any step conditions that you need next to the appropriate steps.
10.2.3.6 About Deadlock Actions
When you assign a deadlock action to a step that can result in a deadlock, the action is triggered whenever an asset becomes deadlocked during the step.
You create a deadlock action by giving it a name and a description, specifying an element, and then providing argument values for the element, if necessary.
You can assign one or more deadlock actions per step.
There is one default deadlock action: Send Deadlock Email. It uses the OpenMarket/Xcelerate/Actions/Workflow/DeadlockActions/SendEmailToAssignees element to send the Deadlock Message email message.
When thinking about possible deadlock actions, you need to consider the steps that you will create for your workflow processes. If you plan to design your steps so that deadlocks cannot occur, there is no need to create any deadlock actions.
In the Workflow tab, expand Actions, then Deadlock Actions. Examine this action to determine whether you can use it. You can modify the default deadlock action or create your own.
In your sketches of your workflow processes, write the name of the appropriate deadlock action next to any step that can result in a deadlock.
10.2.3.7 About Group Deadlock Actions
A group deadlock action is triggered when workflow group becomes deadlocked. Whoever creates the workflow group selects the group deadlock action. That person can select one or more for each group.
The group deadlock actions are invoked in addition to any other actions that are associated with the states or the steps in the workflow process.
There is one default group deadlock action: Send Deadlock Email. It is identical to the default deadlock action.
Planning Group Deadlock Actions
The same considerations apply for group deadlock actions as for deadlock actions. However, because it is a content provider who selects the group deadlock action for a workflow group, be sure that you give a group deadlock action a meaningful, unambiguous name.
10.2.4 Determine the States
When you create a state, you specify the following kinds of information:
-
Name and description. The name of a state should be meaningful and should represent the kind of work that is being done while the asset is in that state.
-
Amount of time an asset should remain in this state (the Estimated Time). The deadline is calculated in terms of the number of hours or days since the asset entered the state.
Note that you set the estimated time (the deadline) in terms of hours or days rather than as a specific date because a state deadline is calculated for each asset as it passes through the state.
-
The timed actions that should occur and when they should occur, in terms of days or hours before or after the deadline.
There are no default states, although there are example states provided with all of the sample sites. On a system where the sample sites are installed, select Workflow, then select States, and then select a state to examine to learn about how the sample site states are configured.
To determine the states that you need to create, ask yourself the following kinds of questions:
-
Which roles participate in each state? On your sketches, write the names of the roles next to the states.
-
Do any of these states apply to more than one asset type? If so, it's possible that you can reuse the same state in more than one workflow process.
-
How long should it take to complete each state?
-
Does this amount of time differ by asset type or by site? If yes, you cannot reuse the same state in more than one workflow process or share the workflow process with another site.
-
If there is a deadline, should WebCenter Sites notify the participant when the deadline is approaching? If yes, when? The day before? Several hours before? And which timed action (which determines which email message) should be used?
-
Should there be a notice when a deadline is missed? If yes, when? And which timed action should be used?
On the sketches of your workflow processes, list all of this information next to each state.
Depending on your goals, you might consider creating a workflow process that does not really end. For example, the Hello Asset World sample site workflow process ends after a HelloArticle asset has been approved. However, in a case like this, someone could open and save the asset by mistake, which would mean that it is no longer approved and will not get published.
To keep assets from being edited after they have been approved and before they have been published, you could create a final state that holds assets after they have been approved with a function privilege on the state that restricts anyone from editing the asset.
Be sure that if you do create a state like this that you create a step that can move the asset back into an editing state in the workflow so someone can edit it on purpose.
10.2.5 Determine the Steps
You create steps within a process. You use the steps to link together the states. This is how the process is actually created.
You specify the following kinds of information for each step in your process:
-
The name of the step. The name should be meaningful and should describe the path being taken. For example, Send for Review, Send for Approval, and so on.
-
The From State, which is the state that the step is moving the asset from. If the step has no From State, it is the start step that begins the workflow process. A From State is required for each step other than the start step.
-
The To State, which is the state that the step is moving the asset to. If the step has no To State, it is the end step the ends the workflow process.
-
Which roles are authorized for the step.
If this is the very first step, the roles you specify determine which users can select this workflow for an asset. If you are using a Start Menu item to assign the workflow process to an asset, be sure that the roles assigned to this first (start) step match the roles assigned to the Start Menu item.
For subsequent steps after the first (start) step, the roles that you select must either match or be a subset of the roles that were selected to be notified by the previous step. Otherwise, the asset cannot leave the state because no one who is assigned the asset is allowed to move it to the next state.
-
Who gets the asset next? (That is, when this step is completed). You specify the assignee for the To State by selecting one of the following assignment methods:
-
Retain From State assignees.
This option assigns the asset to its current assignees—that is, to the user who completes the step.
This option is useful when you are creating a step that returns to the same state (which creates an iterative state) or when it is the start step and you want the asset to be assigned to the person who selects the workflow process (whether through a start menu item or by selecting it on the Status form).
-
No assignments; control actions with function
privs.This option keeps the asset in the workflow process, which means that function privileges are enforced, but the asset is not actually assigned to anyone.
Note:
When an asset is assigned to the current assignees (Retain From State assignees option) or assigned to no one (No assignments option), the workflow system records workflow history for that step. -
Assign from a list of participants.
With this option, you select roles. When a user assigns the workflow process to an asset, a list of users with the roles that you selected is displayed. The user selects one or more users from the list, and those users are assigned the asset when it is in the state that this step moves the asset to.
-
Choose assignees when the step is taken.
You also select roles with this option. This option means that the person who takes this step (by completing the assignment) during the workflow process selects the user who is assigned the asset next from a list of users with the roles selected for the step.
-
-
Whether the estimated time for the state that this step moves the asset to can be changed or not. (Called an Assignment Deadline.)
-
Any step actions that should occur.
-
Any step conditions that should be assessed.
-
If the step can be taken by more than one user (assignee), whether all the assignees must take this step before the asset can move to the next state. (The All assignees must vote field.)
-
If the step can result in a deadlock, what the deadlock action should be.
-
If the process will be used for a workflow group, whether all the assets in the group must complete this step before any of the assets can move to the next state. (The Step is group synchronized field.)
There are example steps in all of the sample site workflow processes. On a system where the sample sites are installed, select Workflow, then select Processes and examine a process to learn about how the sample workflow steps are configured.
When determining what your steps should be, consider the following questions:
-
Every process needs a start step. Before you create a start step, you must first determine how the asset is created and then placed into workflow.
Does the first participant create the asset, place it into workflow, and then keep working on the asset? If so, configure the step so that it is assigned to the person taking the start step (choose the Retain "From State" assignees option) and remember to create a start menu item that assigns the workflow to the asset by default.
Or does a supervisor create the asset and then assign to it a participant? If so, configure the start step so that the person taking the start step has to select the assignees.
-
What is the order of the states?
-
How many paths do you need between each state? This answer determines how many steps you need.
-
Do you need to create an iterative state? If so, configure the step that takes the asset back to that state so that it is assigned to the person taking the step (choose the Retain "From State" assignees option).
-
For steps that move an asset from a state in which more than one person is working on that asset, must all the participants complete their assignment before the step can be taken? If so, configure the step to be an all-voting step.
-
Does the asset have more than one possible path from a state? (That is, there needs to be more than one step with the same From State.) If yes, do any of the steps from the state require that all participants vote the same way before the asset can progress? If yes, try to design the process so only one of the steps that lead from that state require that all the participants vote the same way. If you have two all-voting steps from the same state, deadlocks can occur.
-
For each step, should WebCenter Sites notify the affected participants when the step is completed and the asset progresses to the next state? If yes, which step action (which determines the email message) should the step use?
-
Do groups of related assets ever need to be worked on at the same time? If so, can you configure your steps to work appropriately for both a single asset and a group of assets? If not, create separate workflow processes for the workflow groups.
-
For a workflow group, are there any states that all the assets in the group must enter at the same time? (For example, all the assets should be approved at the same time.) If so, configure that step to be a synchronize step. Note that it's best to have only one synchronize step per workflow process.
-
What should happen to the asset if you decide not to publish it, after all? Should you have a cancel step? How many cancel steps do you need?
On your sketches of your workflow processes, right next to the box that represents a step, list the step actions, the roles who can take the step, the roles who should be notified when the step is taken, whether the step is an all-voting step, and whether the step is a synchronize step.
10.2.6 Determine the Function Privileges
Administrators grant or deny roles the privilege to use functions (such as create and edit) on a given site. When the privilege is granted, the functions are displayed to site users with those roles. Users can invoke the functions when an asset is in the state specified by the privilege. (By default, function privileges are granted to all roles on a given site.)
You can set function privileges for each function in a workflow process, as necessary. Instructions for setting function privileges can be found in "Step E: (Optional) Configure Function Privileges".
The following table lists the functions that you can allow or disallow users to perform during a workflow process.
Table 10-3 Functions and User Action Allowances
| Function | If the Function Privilege is Granted... |
|---|---|
|
Abstain from Voting |
Users have the option to not vote in a workflow step. Displayed as an option in the Workflow Commands drop-down menu on the asset's Status form. |
|
Approve for Publish |
Users can mark an asset as approved for publishing. Displayed as an option in the more... drop-down menu on the asset's Inspect and Status form. |
|
Authorize |
Users can configure permissions to an asset. |
|
Build |
Users can build a collection asset. Displayed as an option in the more... drop-down menu on an asset's Inspect and Status forms. |
|
Checkout |
Users can check out an asset, as long as revision tracking is enabled for the asset type. Displayed as the Check Out button at the top of an asset's Edit and Status forms. |
|
Copy |
Users can copy an asset. Displayed as an option in the more... drop-down menu on an asset's Inspect and Status forms. |
|
Delegate Assignment |
Users can delegate an asset (assigned to themselves) to another user (one who has the appropriate role for the asset while it is in that state). Displayed as an option in the Workflow Commands drop-down list on the asset's Status form. |
|
Delete |
Users can delete an asset. Displayed as an icon in the action bar on an asset's Inspect and Status forms. Also displayed as an icon next to the asset in lists. |
|
Edit |
Users can open an asset in its Edit form. Displayed as an icon in the action bar on an asset's Inspect and Status forms. Also displayed as an icon next to the asset in lists. |
|
Inspect |
Users can open an asset in its Inspect form. Note: Users without permission to inspect an asset cannot view any data specific to the asset type. Instead, they see a limited version of the Inspect form, which displays only standard, unrestricted fields (such as name, description, and ID). |
|
Make Root of Translation |
Users can set an asset as the master asset of translations. (Used by multilingual assets.) Displayed as the Make Master link in the Translations field of a multi-lingual asset's Inspect form. |
|
Place Page |
Users can place a page on the Site Plan tab. Displayed as an option in the right-mouse menu on the Site Plan tab when the user right-clicks Placed Pages. |
|
Preview |
Users can view an asset in the context of its page. Displayed as the Preview icon in the asset's toolbar. |
|
Remove from Group |
Users can remove the asset from a workflow group. Displayed as an option in the Workflow Commands drop-down list on the asset's Status form. |
|
Remove from Workflow |
Users can remove the asset from a workflow process. Displayed as an option in the Workflow Commands drop-down list on the asset's Status form. |
|
Rollback |
Users can return an asset to one of its previous versions (all of which are stored in the revision tracking system). Note: This function is displayed as the Rollback button at the top of an asset's Edit and Status forms when revision tracking is enabled and at least two versions of the asset exist. |
|
Set Export Destination Path/Filename |
Users can fill in the Path and Filename fields on an asset's New or Edit forms. |
|
Set Participants |
Users can set participants for a workflow process. Displayed as an option in the Workflow Commands drop-down list on the asset's Status form. Additionally, this function prompts the user to select participants when the workflow process is configured. In this manner, the user finishing an assignment must select the next participant (person being assigned the asset). |
|
Set Process Deadline |
Users can set a deadline indicating the date and time by which the workflow process must be completed. Note: This function is displayed only if the workflow is configured to allow its users to set a process deadline. This function then appears as an option in the Select Workflow form for assets, and when a workflow group is created or edited. |
|
Set Assignment Deadline |
Users can set a deadline indicating the date and time by which the next state must be completed. A deadline set with this option overrides any deadlines set for the state in the workflow process. Note: This function is displayed only if the workflow is configured to allow its users to set an assignment deadline. This function then appears as an option in the asset's Select Workflow form and in the Finish My Assignment form. |
|
Share Assets |
Users can share the asset with another CM site. Displayed as the Share Asset option in the more... drop-down menu on an asset's Edit, Inspect, and Status forms when the asset type is enabled for more than one CM site. |
|
Show Participants |
Users can view a list of the participants in the workflow process that is currently assigned to the asset. Displayed as an option in the Workflow Commands drop-down list on the asset's Status form. |
|
Show Status |
Users can view the Status form for an asset. Displayed as an option in the more... drop-down menu on an asset's Inspect and Status forms. |
|
Show Version |
Users can view information about each version of the asset that the revision tracking system is storing. Displayed as the Show Versions button at the top of an asset's Edit and Status forms when revision tracking is enabled for this asset type. |
|
Set Nested Workflow |
Users can create a workflow within an existing workflow. Note: The administrator's interface does not support nested workflow, but functionality can be obtained with the use of tags. |
|
Translate |
Users can create a translation of the master asset. (Used by multilingual assets.) Displayed as an option in a multi-lingual asset's more... drop-down menu, on the Edit, Inspect, and Status forms. |
This section contains the following topics:
10.2.6.1 Planning Function Privileges
For each workflow process, determine which functions you want to restrict access to, during which states you want to restrict those functions, and which roles should or should not have access to those functions when assets that are assigned to them are in those states.
List any restrictions that you want to enforce next to the appropriate states on your sketches of your workflow processes.
Remember that in order for your function privileges to enforce the restrictions that you intend, the roles of the users specified for the state in the function privilege must match the roles of the users associated with those states in the workflow process itself. If the roles don't match, the result can be a condition in which no one can move the asset out of a state because the users who are allowed to work with the asset by the privilege are not allowed to by the state.
Also, remember that if you create even one function privilege that allows or restricts access to a function for a given role, you must create function privileges that cover all the other roles for that function.
10.2.6.2 Implementing Simplified Access Control
Because function privileges are associated with workflow processes, you can restrict individual users' access to specific functions only when an asset is participating in a workflow process.
What can you do if you do not want to design and implement workflow processes but you still want to control access to specific functions? Create a simplified workflow process with one state and use the No assignments; control actions with function privs assignment method.
When a step moves an asset into a state using the No assignments assignment method, the asset does not appear on anyone's assignment list, it just stays in the state which means that any function privileges assigned to that state are enforced.
To implement access control in this way, follow these general steps:
-
Create a state. It needs a name and a description. It does not need a deadline or any timed actions.
-
Create a new workflow process. Select all the roles you want to enforce restrictions for and all the asset types you want to use this workflow process for.
-
Create one step— the start step that puts assets of those types into the state. For the step, select the No assignments option. Enable the step for the roles that you want to be able to create assets of this type and assign this workflow to.
-
Configure the function privileges that you want to enforce for assets in the state that you created.
-
Create start menu items for the asset types that automatically assign this workflow process. Be sure that the roles who can use the start menu item match the roles who are assigned to the start step in the workflow process.
Now when users select New, then select asset type, the new asset is automatically placed into your single-state workflow. Because the workflow has only the start step which places all assets of that type into the single state, those assets do not leave the state and the function privileges are always enforced.
10.2.7 Determine Additional Workflow Process Details
If you have been sketching your workflow processes, filling in all the details about actions, conditions, email messages, states, steps, and function privileges, by now you have planned nearly the entire design of your workflow processes.
Although the main task when creating a process is to create the steps that link the states (which is how your business process is represented), you must also specify the following kinds of information for each workflow process:
-
Its name and description. The name should be descriptive so that users select the correct workflow process for the correct asset types.
-
Which sites can use the process.
-
Which asset types can use the process.
-
Which roles can participate. This is a superset of all the roles that are designated in the steps.
-
Which role will serve as the administrator of the workflow. A workflow administrator can delegate assignments on behalf of other participants.
-
Whether a process deadline can be set for assets that participate in this workflow process.
-
What the delegate action is.
-
What the steps are. For each step, you specify the information described in the section named Section 10.2.5, "Determine the Steps."
-
Whether any of the WebCenter Sites content application functions should be restricted to users in certain roles while they are working on assets in specific states. For function privileges, you specify the information described in Section 10.2.6, "Determine the Function Privileges."
There are example workflow processes delivered with all of the sample sites. They are described in detail in the next section.
10.3 Configuring Your Workflow Processes
This section presents the procedures for creating all the components for a workflow process and then stitching those components together into your workflow processes.
Remember that to create email objects, actions, and conditions or to schedule the timed action event, you need access to the Admin tab, which means that you need the GeneralAdmin role and the xceladmin ACL. To create workflow states and workflow processes, you need access to the Workflow tab, which means that you need the WorkflowAdmin role.
10.3.1 Overview
Before you create a workflow process, you must create the individual workflow components that you need for that process. Here are the general steps that you must take presented in the order you perform them:
-
Plan your workflow process by drawing it. See section Section 10.2, "Planning Your Workflow Processes" for help with this step. Then refer to your sketch and notes throughout this section.
-
Create the roles that you need for your workflow processes. See Chapter 4, "Working with ACLs and Roles" for help with this step. Be sure that any users who will participate in workflow have user profiles created for them. Otherwise, they will not receive email messages from the workflow process.
Note:
If you want the pool of users who are candidates to be participants in a workflow to include folks from all the sites that an asset is shared to, be sure to enable the cross-site assignments feature. See Section 10.2.2.3, "Cross-Site Assignments and Participants" for details. -
Create the email objects that you need for your actions and enable the
xcelerate.emailnotificationproperty in thefuturetense_xcel.inifile. See Section 10.3.2, "Setting Up Email Objects." -
Create the step actions, timed actions, deadlock actions, group deadlock actions, and delegate actions that you need. See Section 10.3.3, "Setting Up the Actions and Conditions."
-
Create your states. See Section 10.3.5, "Setting Up the States."
-
Create your process. While creating your workflow process, you create the steps for that process. The steps link together the states so they occur in the proper order. Additionally, while creating your process, you configure any function privileges that you need. Section 10.3.6, "Setting Up the Workflow Processes."
-
If your states have deadlines, be sure to configure the Timed Action Event so that the deadlines of assets are calculated regularly and the appropriate timed actions (if any) are invoked in a timely way. Section 10.3.4, "Setting Up the Timed Action Event."
-
Test your workflow processes. See Section 10.3.7, "Testing Your Workflow Process."
-
Set up your start menu shortcuts so that workflow processes are assigned automatically to assets when they are created. For help with start menu items, see Section 9.2.2, "Creating Start Menu Items."
10.3.2 Setting Up Email Objects
You create email objects so that your step and timed actions can send them to the appropriate participants at the appropriate times. Examine the sketches of your workflow processes, determine the email messages you need, and then use the procedures in this section to create and edit them.
Your user account must give you access to the Admin tab in order for you to create email objects.
This section contains the following topics:
10.3.2.1 Enabling the Email Feature
To ensure that your workflow process can successfully send email messages, the following conditions must be true:
-
In the
futuretense.inifile, the properties on the Email tab must be configured to provide information about your email server. -
In the
futuretense_xcel.inifile, thexcelerate.emailnotificationproperty must be set totrue.For information about the properties cited above and using the Property Editor, see the Oracle Fusion Middleware WebCenter Sites Property Files Reference.
-
The workflow participants must have email addresses specified in their user profiles. For information about creating user profiles, see Section 5.5, "Working with User Profiles and User Attributes."
10.3.2.2 Creating Email Objects
-
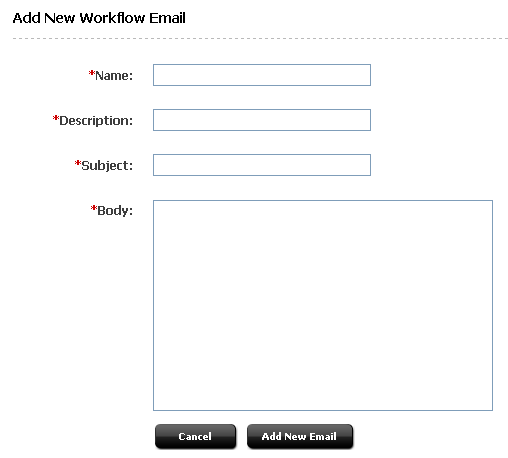
In the Admin tab, expand Email and double-click Add New.
WebCenter Sites displays the Add New Workflow Email form:
-
In the Name field, enter a unique name of up to 36 characters. This is the name that you provide to the
emailnamevariable when you use this email object with an action. -
In the Description field, enter a short, informative description of up to 36 characters.
-
In the Subject field, enter a short, informative subject for the email message. See Section 10.2.3.1, "About Email Objects" for a list of available variables.
-
In the Body field, enter the text for the message. See Section 10.2.3.1, "About Email Objects" for a list of available variables.
-
Click Save.
10.3.2.3 Editing Email Objects
-
In the Admin tab, expand Email, then double-click the desired email object.
-
In the action bar, click Edit.
-
In the Edit Workflow Email form, make the necessary changes. See Section 10.2.3.1, "About Email Objects" for a list of available variables.
-
Click Save.
10.3.3 Setting Up the Actions and Conditions
When you create any kind of action or a step condition, you identify an element and you supply values for the variables that the element expects. If you are creating an action that sends an email message, you identify which email object to send with the emailname variable.
Before you begin creating actions or step conditions, be sure that you have the elements and email objects that you need. WebCenter Sites provides several default action elements and email objects. Use the administrator's interface to examine the email objects and use WebCenter Sites Explorer to examine the ElementCatalog table. Determine which elements you plan to use and then write down the entire name of those elements. If you need additional email messages, consult the previous section, Section 10.3.2, "Setting Up Email Objects" and create the email messages that you need.
The following procedures describe how to create, edit, and delete the workflow actions—step, timed, delegate, deadlock, and group deadlock action—and step conditions. Your user account must give you access to the Workflow tab in order for you to create actions or conditions.
This section contains the following topics:
10.3.3.1 Creating Actions and Conditions
To create actions and conditions
-
In the Workflow tab, expand Actions.
-
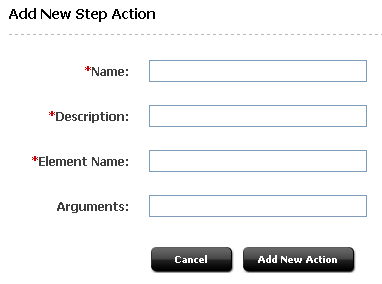
Under Actions, expand the category describing the action you are creating, then double-click Add New.
The available categories are: Step Actions, Step Conditions, Timed Actions, Delegate Actions, Deadlock Actions, or Group Deadlock Actions.
WebCenter Sites displays the Add New form corresponding to the type of action you selected. The example below shows the Add New Step Action form:
-
In the Name field, enter a unique name of up to 40 characters.
-
In the Description field, enter a short, informative description of up to 40 characters.
-
In the Element Name field, enter the name of the element in its entirety.
For example, to use the default workflow element
SendEmailToAssignees, enter:OpenMarket/Xcelerate/Actions/Workflow/StepActions/SendEmailToAssignees -
In the Arguments field, use the following convention to supply values for the arguments or variables that the element needs to function correctly:
name=value
For the
SendEmailToAssigneeselement, for example, you must provide a value for theemailnamevariable (that is, the name of an email object). For example:emailname=AssignmentDueReminder
If an element takes more than one variable, separate the name/value pairs with the ampersand (&) character. For example:
name1=value1&name2=value2
-
Click Add New Action.
10.3.3.2 Configuring Approve for Publish Step Actions
The approval process approves an asset to a specific publishing destination. To use the default Approve for Publish step action with your workflow processes, you specify the publishing destination for the assets that are approved by the action.
If all the assets for all of your workflow processes are published to the same destination, you can simply configure the existing Approve For Publish action. However, if some types of assets are published to a different destination than the others, you must create an additional Approve for Publish action for each publishing destination, or combination of publishing destinations.
The Approve for Publish step action uses the OpenMarket/Xcelerate/Actions/Workflow/StepActions/ApproveForPublish element which takes the targets variable. You can use this same element with as many additional approval step actions as you need.
For the default Approve for Publish step action, provide a value for the targets variable. Possible values for the targets variable are the names of any of the publishing destinations that have been created on this WebCenter Sites system.
For example:
targets=serverX.
To specify more than one publishing destination, separate each with a comma. For example:
targets=serverX,serverY
Note:
If the name of a publishing destination that is referenced by thetargets variable is changed, you must also change the value of the targets variable in your Approve for Publish steps.10.3.3.3 Editing Actions and Conditions
To edit actions and conditions
-
In the Workflow tab, expand Actions.
-
Under Actions, expand the category describing the action you want to edit.
The available categories are: Step Actions, Step Conditions, Timed Actions, Delegate Actions, Deadlock Actions, or Group Deadlock Actions.
-
Under the selected category, double-click the action you want to edit.
-
In the action bar, click Edit.
-
Make your changes, then click Save.
10.3.3.4 Deleting Actions and Conditions
To delete actions and conditions
-
In the Workflow tab, expand Actions.
-
Under Actions, expand the category describing the action you want to delete.
The available categories are: Step Actions, Step Conditions, Timed Actions, Delegate Actions, Deadlock Actions, or Group Deadlock Actions.
-
Under the selected category, double-click the action you want to delete.
-
In the action bar, click Delete.
WebCenter Sites displays a warning message.
-
Click Delete Action.
10.3.4 Setting Up the Timed Action Event
Before any of your timed actions can be triggered, you must configure the timed action event so that it calculates deadlines at regularly occurring intervals. Note that there can be only one timed action event per WebCenter Sites system.
-
In the Workflow tab, double-click Timed Action Event.
-
In the action bar, click Edit.
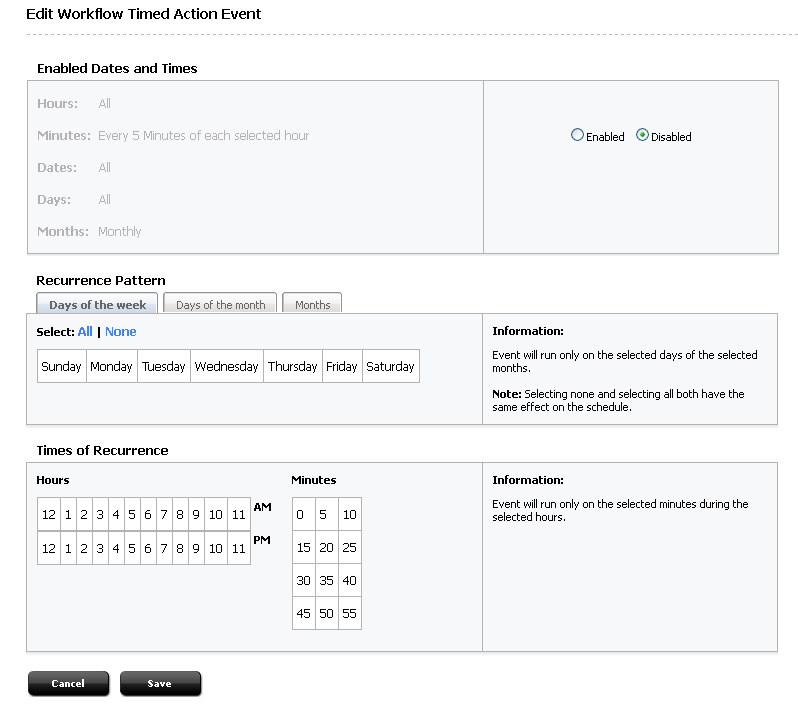
WebCenter Sites displays the Edit Workflow Timed Action Event form:
Figure 10-6 Edit Workflow Timed Action Event
Description of ''Figure 10-6 Edit Workflow Timed Action Event''
-
Set the schedule for how often the state deadlines should be calculated in terms of months, days, hours and minutes, depending on the selected interval.
Selected values will be highlighted in blue. All values are toggled separately, so it is not necessary to use Ctrl to select multiple values.
The method of setting a timed action event is similar to the method for setting a publication event. See "Example Schedule" for more information.
-
In the Enabled Times and Dates field, select Enabled.
-
Click Save.
A summary of the schedule is displayed.
WebCenter Sites uses the same abbreviations and codes to summarize the schedule for the timed action event that it does for your publishing events. For information about how to read the schedule, see Section 18.8, "Reading the Schedule Abbreviations."
10.3.5 Setting Up the States
When you create a workflow state, you specify a deadline, select a timed action, and configure when the timed action should run. Therefore, before you begin creating your workflow states, be sure that you have created the timed actions that you need.
To work with workflow states, your user name must be assigned the WorkflowAdmin role for the site that you are working with.
This section contains the following topics:
10.3.5.1 Creating Workflow States
-
In the Workflow tab, expand States and double-click Add New.
WebCenter Sites displays the Add New Workflow State form:
-
In the Name field, enter a unique, meaningful name of up to 40 characters.
-
In the Description field, enter a short, informative description of up to 40 characters.
-
(Optional) In the Estimated Time fields, configure the deadline for assets in this state. You can specify a deadline in terms of days, hours, or a combination of the two.
-
(Optional) Click Add Timed Actions and complete the following steps:
Figure 10-8 Add TImed Action to Workflow State Form
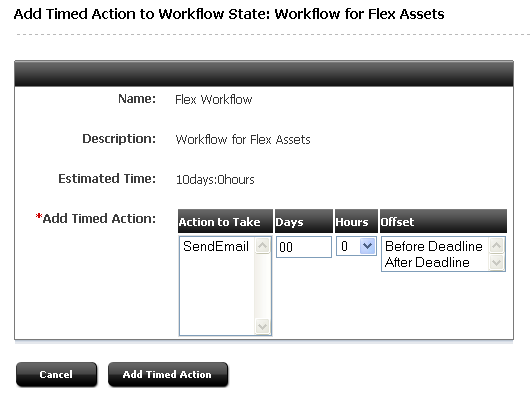
Description of ''Figure 10-8 Add TImed Action to Workflow State Form''
-
In the Action to Take list, select a timed action.
-
In the Offset field, specify whether the action should be triggered before the deadline or after the deadline.
-
In the Days field and/or the Hours field, specify how many hours or days before or after the deadline (that you specified in step 5) that the action is to be triggered.
-
Click Add Timed Action.
-
Repeat this entire step for each timed action that you want to set up for this state.
-
-
Click Add New State.
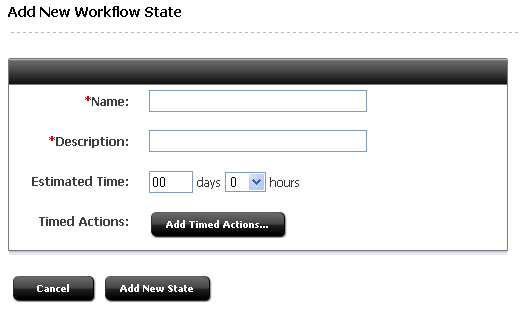
10.3.5.2 Editing Workflow States
-
In the Workflow tab, expand States and double-click the state to edit.
-
In the action bar, click Edit.
-
In the Edit form, make the desired changes.
-
(Optional) To change the timed action or the time that it is scheduled to run, click Add Timed Actions, make the appropriate changes, and click Add Timed Actions again.
-
Click Save.
10.3.6 Setting Up the Workflow Processes
When you create a workflow process, you specify global process information and then you create steps, assigning step actions to them as needed. The steps in the process create the flow of the process by linking the states in a specific order.
Before you can begin creating a workflow process, you must have already created your step actions, step conditions (if necessary), and states.
To work with workflow processes, your user name must be assigned the Workflow Admin role for the site that you are working with.
Note:
If your content providers will use workflow groups, be sure to enable the Workflow Groups tab for them. For information, see Section 9.5.2.2, "Creating the 'Workflow Groups' Tab".This section contains the following topics:
10.3.6.1 Creating Workflow Processes
When you create a workflow process, you configure three categories of information: global process settings, steps, and function privileges.
Step A: Name and Set Global Settings for the Process
-
In the Workflow tab, expand Processes and double-click Add New.
WebCenter Sites displays the Workflow Process: (new) form:
-
In the Name field and enter a unique name of up to 25 characters.
-
In the Description field, enter a short, informative description of up to 64 characters.
-
In the Sites list, select the sites that can use this workflow process.
-
In the Asset Type list, select the asset type(s) that this workflow process is for.
-
In the Roles list, select the roles that will participate.
-
In the Administration Roles list, select the roles that can act as the administrator for this workflow process when an asset is using it.
-
In the Process Deadline section, specify whether the workflow administrator (or other user if you configure function privileges that allow it) can set a process deadline for the assets that participate in this workflow process.
-
If you have configured one or more delegate actions, select the appropriate actions in the Delegate Actions list.
-
In the Start Step section, click Add New Step.
WebCenter Sites displays the Add New Workflow Process Step form.

Figure 10-10 Add New Workflow Process Step Form
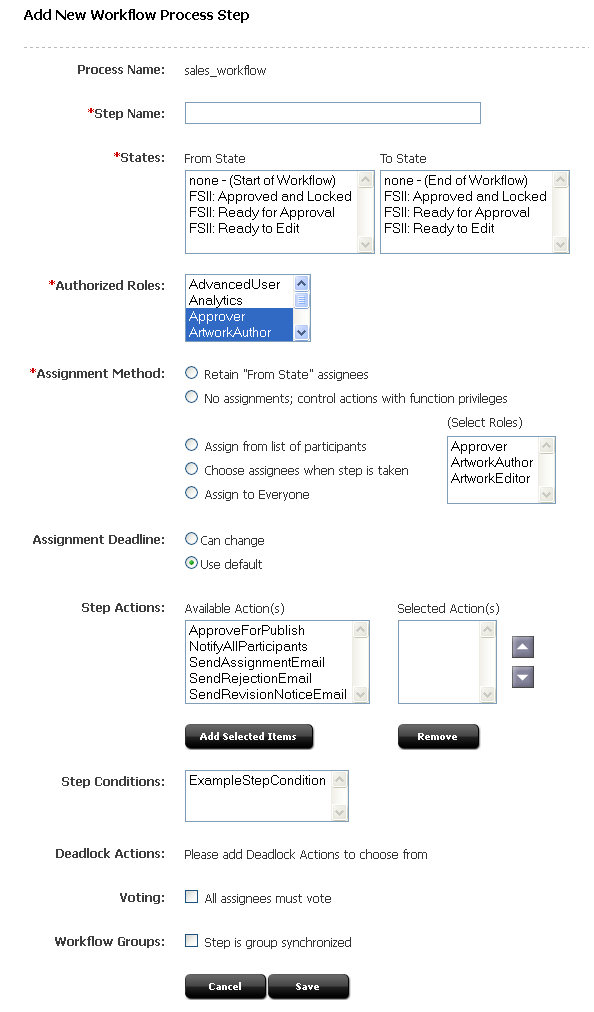
Description of ''Figure 10-10 Add New Workflow Process Step Form''
-
In the Step Name field, enter a unique, meaningful name of up to 64 characters.
-
Configure the states as follows:
-
In the From State list, select none (start of workflow).
-
In the To State list, select the name of the first state in the workflow process.
-
-
In the Authorized Roles list, select the roles that are allowed to take this step by assigning this workflow to an asset.
-
In the Assignment Method section, specify which roles will be assigned the asset by selecting one of the following options:
-
Retain "From State" assignees, which, for a start step, means that the user who assigns the workflow to the asset is assigned the asset
-
No assignments; control access with function privs
-
Assign from list of participants
-
Choose assignees when step is taken
If you select either Assign from list of participants or Choose assignees when step is taken, select the appropriate roles from the list that is to the right of those options. (For definitions of these options, see Section 10.2.5, "Determine the Steps".)
-
Assign to everyone
-
-
In the Assignment Deadline section, determine whether the workflow administrator (or another user holding the appropriate function privileges) can override the Estimated Time (deadline) set for the state that this step moves the asset to.
-
(Optional) In the Step Actions list, select one or more step actions that should be invoked when this step is taken.
-
(Optional) In the Step Conditions list, select a step condition, if appropriate.
-
(Optional) Check Voting to select that all assignees must vote to approve.
-
(Optional) Check Workflow Groups to have the step group synchronized.
-
Click Save.
The start step is added and the Steps for Workflow Process form is displayed.
-
Click Save.
WebCenter Sites saves the process and displays it in the Inspect form. Note that this step appears as the Start Step in the form.
-
Continue to the next procedure.
Step C: Create the Subsequent Steps
Use the following procedure to create the rest of the subsequent steps, including the end step:
-
In the Inspect form of the workflow process, click Edit in the action bar.
-
At the bottom of the Edit form, click Add/Edit Steps.
-
In the Steps for Workflow Process form, click Add New Step.
WebCenter Sites displays the Add New Workflow Process Step form.
-
In the Step Name field, enter a unique, meaningful name of up to 64 characters.
-
Configure the states as follows:
-
In the From State list, select the name of the state that you selected as the To State for the previous step.
-
In the To State list, select the name of the next state in the workflow process. (Note that if you want to create an iterative step, select the same state in the From State and the To State lists.)
-
-
In the Authorized Roles list, select the roles that are allowed to take this step by finishing the assignment. The roles that you select from this list should either match or contain a subset of the roles that you selected for the Assignment Method in the workflow step that immediately precedes this workflow step.
-
In the Assignment Method section, specify which roles will be assigned the asset by selecting one of the following options:
-
Retain "From Step" assignees
If the From State and the To State are different, the first person who takes this step (finishes the assignment) is assigned the asset, even if the previous step assigned the asset to more than one participant.
If the From State and the To State are the same, every user who was assigned the asset by the last step is assigned the asset again with this step.
-
No assignments; control access with function privs
-
Assign from list of participants
-
Choose assignees when step is taken
If you select either of the last two options above, select the appropriate roles from the list that is to the right of those options. (For definitions of these options, see Section 10.2.5, "Determine the Steps")
-
Assign to everyone
-
-
In the Assignment Deadline section, determine whether the workflow administrator (or other user if you configure the appropriate function privileges) can override the Estimated Time (deadline) set for the state that this step moves the asset to.
-
(Optional) In the Step Actions list, select one or more step actions that should be invoked when this step is taken.
-
(Optional) In the Step Conditions list, select a step condition, if appropriate.
-
If the step moves the asset from a state in which more than one participant was working on the asset and you want all participants to finish their assignments before the step can complete, select the All Assignees must vote option.
-
If there are any other steps in this process with the same From State and any of those steps are also all-voting steps (All Assignees must vote is selected), select a Deadlock Action. For information about deadlocks and avoiding them, see Section 10.1.5, "Managing Deadlocks" and Section 10.2.3.3, "About Delegate Actions."
-
If this workflow process will be used for workflow groups and you want all the assets to progress at the same time to the To State that you selected in step 4 of this procedure, select the Step is group synchronized option. it is recommended that you create only one synchronized step in the process.
-
Click Save.
The step is saved and the Steps for Workflow Process form is displayed.
-
Click Save.
WebCenter Sites saves the process and displays it in the Inspect form.
-
Repeat this procedure for each step—except the end step—that you want to create for this process.
To create the end step, continue with "Step D: (Optional) Create the End Step".
To configure function privileges, continue to "Step E: (Optional) Configure Function Privileges".
Step D: (Optional) Create the End Step
An end step ends the workflow which means that the asset is no longer in a process and no longer has function privileges controlling access to it, if you are using function privileges. Use the following procedure to create an end step for the workflow process:
-
In the Inspect form of the workflow process, click Edit in the action bar.
-
In the Edit Process form, click Add/Edit Steps (a button at the bottom of the form).
-
In the Steps for Workflow Process form, click Add New Step.
WebCenter Sites displays the New Workflow Process Step form.
-
In the Step Name field, enter a unique, meaningful name of up to 64 characters.
-
Configure the states as follows:
-
In the From State list, select the name of the state that you selected as the To State for the previous step.
-
In the To State list, select none (end of workflow).
-
-
In the Authorized Roles list, select the roles who are allowed to take this step by finishing an assignment. The roles that you select from this list should either match or contain a subset of the roles that you selected for the Assignment Method of the workflow step that immediately precedes this workflow step in the process.
-
(Optional) In the Step Actions list, select one or more step actions that should be invoked when this step is taken.
-
(Optional) In the Step Conditions list, select a step condition, if appropriate.
-
If the step moves the asset from a state in which more than one participant was working on the asset and you want all participants to finish their assignments before the step can complete, select the All Assignees must vote option.
-
If there are any other steps in this process with the same From State and any of those steps are also all-voting steps (All Assignees must vote is selected), select a Deadlock Action. For information about deadlocks and avoiding them, see Section 10.1.5, "Managing Deadlocks" and Section 10.2.3.3, "About Delegate Actions."
-
If this workflow process will be used for workflow groups and you want this step to be performed on all the assets in the group at the same time, select the Step is group synchronized option. it is recommended that you create only one synchronized step in the process.
-
Click Save.
The start step is added and the Steps for Workflow Process form is displayed.
-
Click Save.
WebCenter Sites saves the process and displays it in the Inspect form.
If you do not need to configure function privileges, this workflow process is completed. If you do need to configure function privileges, continue to the next procedures.
Step E: (Optional) Configure Function Privileges
To configure function privileges
-
Find the desired workflow process and open its Inspect form.
-
In the action bar, click Edit.
-
Click Add/Edit Function Privileges at the bottom of the form.
-
In the Functions for Workflow Process form, scroll down to the function for which you want to set a privilege.
-
Click New next to the desired function.
WebCenter Sites displays the Add Function Privilege form:
Figure 10-11 Add Function Privilege Form
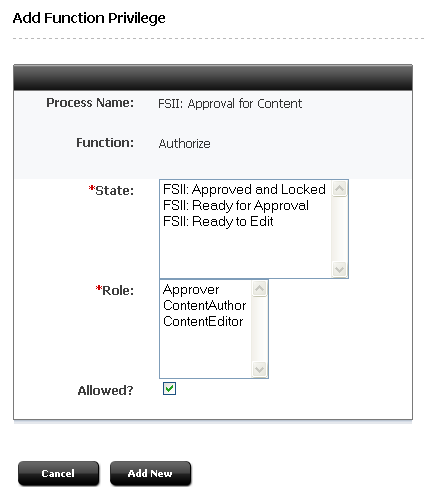
Description of ''Figure 10-11 Add Function Privilege Form''
-
Select the appropriate state from the State list.
-
In the Roles list, select the roles that are allowed or not allowed to perform this function when an asset is in this state.
-
Do one of the following:
-
To allow users with the selected roles to perform the function, select the Allowed check box.
-
To restrict users with the selected roles from performing the function, clear the Allowed check box.
-
-
Click Add New.
WebCenter Sites saves the privilege and re-displays the Functions for Workflow Process form.
-
Repeat steps 3–8 for each function privilege that you need to configure. For more information about function privileges, see Section 10.2.6, "Determine the Function Privileges."
-
After you have configured all of your function privileges, click Save.
WebCenter Sites saves the workflow process and re-displays the Workflow Process form.
The workflow process is complete.
10.3.6.2 Editing Workflow Processes
-
In the Workflow tab, expand Processes and double-click the workflow process you want to edit.
-
In the action bar, click Edit.
-
Make your changes as follows:
-
To modify the name, description, or any of the other global settings, make your changes directly in the form.
-
To edit the steps, see "Editing Steps".
-
To edit the function privileges, see Section 10.3.6.4, "Editing Function Privileges."
-
-
When you are finished, click Save.
10.3.6.3 Editing Steps
-
In the Workflow tab, expand Processes and double-click the workflow process you want to work with.
-
In the action bar, click Edit.
-
In the Workflow Process form, click Add/Edit Steps (at the bottom).
-
In the Steps for Workflow Process form, click Edit next to the step you want to edit.
-
In the Edit Workflow Process Step form, make your changes, then click Save.
WebCenter Sites saves the process and displays it in the Inspect form.
10.3.6.4 Editing Function Privileges
To edit a function privilege, you must delete it and then re-create it.
-
In the Workflow tab, expand Processes and double-click the workflow process you want to work with.
-
In the action bar, click Edit.
-
In the Workflow Process form, click Add/Edit FunctionPrivs (at the bottom).
-
In the Functions for Workflow Process form, click Remove next to the function that you want to change.
-
In the dialog box that appears, click OK.
-
Click New next to the function you just removed.
-
In the Add Function Privilege form, make your selections and click Save.
-
In the Functions for Workflow Process form, click Save.
WebCenter Sites saves the workflow process and displays it in the Inspect form.
10.3.6.5 Copying Workflow Processes
You can copy a workflow process, which can save you some steps in configuring additional processes.
-
In the Workflow tab, expand Processes and double-click the workflow process you want to copy.
-
In the action bar, select Copy Process from the drop-down list.
WebCenter Sites displays the Copy Workflow Process form:
-
In the Process Name field, enter a unique name for the process.
-
In the Description field, enter a short, informative description of the process.
-
Click Save.
-
Edit the process as necessary. See the following procedures for help:
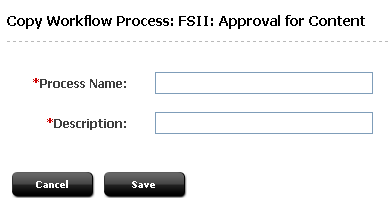
10.3.6.6 Deleting Workflow Processes
-
In the Workflow tab, expand Processes and double-click the workflow process you want to delete.
-
In the action bar, click Delete.
WebCenter Sites displays a waning message.
-
Click Delete Process.
The process has been deleted.
10.3.6.7 Deleting Steps
-
In the Workflow tab, expand Processes and double-click the workflow process you want to work with.
-
In the action bar, click Edit.
-
In the Edit Process form, click Add/Edit Steps (at the bottom of the form).
-
In the Steps for Workflow Process form, click Remove next to the step you want to delete.
-
In the dialog box that appears, click OK.
-
Click Save.
WebCenter Sites saves the workflow process and displays it in the Inspect form.
10.3.6.8 Deleting Function Privileges
-
In the Workflow tab, expand Processes and double-click the workflow process you want to edit.
-
In the action bar, click Edit.
-
In the Workflow Process form, click Add/Edit FunctionPrivs (at the bottom of the form).
-
In the Functions for Workflow Process form, click Remove next to the function privilege you want to delete.
-
Click Save.
WebCenter Sites saves the workflow process and displays it in the Inspect form.
10.3.7 Testing Your Workflow Process
Before you move your workflow process to the management system and implement it there, test it on your development system.
-
Log in as a user with administrator access and configure start menu items that assign workflow processes to assets, if necessary.
-
Log in as a user who has a role that has been authorized to take the start step of the workflow process. Create an asset, select the workflow process (only if the start menu item does not assign it), and then finish the assignment.
-
Log in as the participant who has the assignment now. Finish the assignment and then log in as the next participant. Continue through the entire workflow in this manner.
-
Verify that the email messages that should be sent are being sent.
-
Verify that your workflow sends the asset through the process correctly.
10.4 Moving Your Work
Typically you create and fine-tune a workflow process on a development system to ensure that it functions exactly as you need it to before you introduce that workflow process to the management system.
When your workflow is ready to be used by content providers, use the Initialize Mirror Target feature to move your workflow components to the management system.
For information about this feature, see Section 18.1, "Migrating a Site from One System to Another."
10.5 Clearing Workflow Assignments
People go on vacation, get reassigned to new work groups, and move on to different jobs. What should happen to their workflow assignments in these situations? One option for handling work assignments that cannot be finished by the original assignee is to delegate the assignments to someone else. However, even with the delegate feature, you, the administrator, might still be called on to clear assignments from some user's assignment list.
To clear assignments for a user
-
In the Workflow tab, double-click Clear Assignments.
-
In the Search for Assignments form, enter the desired user name. For example:
Figure 10-13 Search for Assignments Form
Description of ''Figure 10-13 Search for Assignments Form''
-
Click Show Assignments.
WebCenter Sites displays a list of assets that are currently assigned to that user.
For example:
-
In the Clear Assignments form, select the Clear check box next to each assignment you want to clear.
-
(Optional) In the Clear assignment comment field, enter a brief explanation of the reason for which you are clearing the selected assignments. The explanation you enter in this field appears in the Action Taken field in the Workflow History section of the asset's Status form.
-
Do one of the following:
-
If you want the asset to be removed from workflow if it is not assigned to anyone else, select Yes.
-
If you want the asset to remain on the assignment list of any other user who is also assigned the asset, select No.
-
-
Click Clear Assignments.
WebCenter Sites displays a Clear Assignments Report summarizing your changes.