18 Additional Publishing Procedures
In addition to the configuration steps described in the preceding sections of this chapter, administrators and developers also perform, whenever necessary, the publishing procedures described in this chapter.
This chapter contains the following sections:
Note:
The following feature is deprecated in WebCenter Sites 11g Release 1 (11.1.1.8.0): Mirror publishing. This feature is replaced by RealTime publishing.18.1 Migrating a Site from One System to Another
During the development phase for your sites, your site designers and developers develop sites and asset types with all their supporting configuration (subtypes, associations, start menu items, and so on), code templates, and assist the administrators in customizing the user interface, when necessary, by writing elements for workflow and so on. Your site designers and developers do this work on the development system.
When the site is ready for the content providers, you can use the Mirror Destination Configuration feature to migrate it to the management system and the delivery system.
This section contains the following topics:
18.1.1 Moving a Site from a Development System to a Management System
Complete the following procedure once:
-
Log in to the WebCenter Sites interface on the management (destination) system as the fwadmin user.
-
If you have any custom support tables—a lookup table for a field in an asset type, for example—create those tables on the management (destination) system.
-
On the management system, create all the users.
-
On the source system, log in to the WebCenter Sites interface.
-
Create a Publishing Destination for the destination system that uses the RealTime publishing method.
For help with this step and the following two steps, see Section 20.2, "Configuring Your System for RealTime Publishing."
-
Initialize the publishing destination.
-
Configure the publishing destination.
-
On the destination (management) system, configure the users for the site. For help with this step, see Section 8.2.1, "Granting Users Access to a Site (Assigning Roles to Users)."
-
If you created a flex family, log back in to the source system. Approve and then publish all of the data structure flex assets to the management (destination) system.
You can either approve each asset individually or use the Approve Multiple Assets feature on the Admin tab. For information about this feature, see Section 18.2, "Approving Multiple Assets."
-
Approve and then publish all of the rest of the appropriate assets for the destination system: template, page, collection, query, CSElement, and SiteEntry assets, and so on.
-
If there are any elements or page entries in the
SiteCatalogtable that are not CSElement or SiteEntry assets, use CatalogMover to mirror those items to the management system. For help with CatalogMover, see the Oracle Fusion Middleware WebCenter Sites Developer's Guide.
18.1.2 Moving a Site to a Delivery System
When you move a site to a delivery system, there is no need to mirror start menu items, workflow, saved searches, and so on.
Complete the following steps:
-
Log in to the WebCenter Sites interface on the delivery (destination) system as the fwadmin user.
-
If you have any custom support tables—a lookup table for a field in an asset type, for example—create those tables on the delivery (destination) system.
-
On the source system, log in to the WebCenter Sites interface.
-
Create a Publishing Destination for the destination system that uses the Mirror to Server publishing method.
For help with this step, see Section 16.3.5, "Create a Mirror Destination."
-
Initialize the mirror destination.
For help with this step, see Section 16.3.6, "Initialize the Destination."
-
Configure the mirror destination.
For help with this step, see Section 16.3.7, "Configure the Mirror Destination."
Do not select start menu items, saved searches, or any of the workflow options.
-
If you created a flex family, log back in to the source system. Approve and then publish all of the data structure flex assets to the management (destination) system.
You can either approve each asset individually or use the Approve Multiple Assets feature on the Admin tab. For information about this feature, see the Section 18.2, "Approving Multiple Assets."
-
Approve and then publish all of the rest of the appropriate assets to the destination (delivery) system: template, page, collection, query, CSElement, and SiteEntry assets, and so on.
-
If there are any elements or page entries in the
SiteCatalogtable that are not CSElement or SiteEntry assets, use CatalogMover to mirror those items to the management system. For help with CatalogMover, see the Oracle Fusion Middleware WebCenter Sites Developer's Guide. -
If there are any images in the online site that are not assets, be sure to copy them to the delivery system.
18.2 Approving Multiple Assets
Each publishing destination has an option to Approve Multiple Assets. It is especially useful for upgrades and for the first publishing session to a destination.
Note that the Approve Multiple Assets feature is not the BulkApprover utility. The BulkApprover utility approves only those assets that have been imported into the WebCenter Sites database with the BulkLoader utility. Both BulkLoader and BulkApprover are described in the Oracle Fusion Middleware WebCenter Sites Developer's Guide.
-
In the Admin tab, expand Publishing, then expand Destinations, and then expand the destination that you want to approve assets for.
-
Under that destination, double-click the Approve Multiple Assets option.
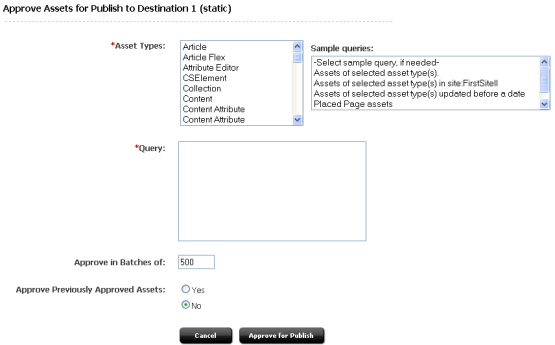
The Approve Assets form appears:
Figure 18-1 Approve Assets for Publish to Destination Form
Description of ''Figure 18-1 Approve Assets for Publish to Destination Form''
-
In the Asset Types section, from the list on the left, select the asset types that you want to approve.
-
From the Sample Queries list on the right, select a query. If the exact query that you need is not present, select the query that is most like the one that you want.
WebCenter Sites creates a SQL query based on the items that you selected and displays it in the Query box.
-
(Optional) If necessary, edit the SQL query.
-
Click in the Approve in Batches of field and enter a numeric value. The default is set to 500.
Note:
When you click the Approve for Publish button, the approval system approves batches of assets. The number of assets in each batch is determined by value in the Approve in Batches of field. Because the approval process is not a background process, it is possible that the browser session could time out while the batch is being approved.When using the Approve Multiple Assets feature, to ensure that the session does not time out, adjust the following settings:
-
The
cs.timeoutproperty in thefuturetense.inifile, which sets the browser session timeout value. Start by setting this value to 1800 (which means 30 minutes). (See the Oracle Fusion Middleware WebCenter Sites Property Files Reference.) -
The value you specify in the Approve in Batches of field. Start by using the default of 500 and lower it if necessary.
-
-
Specify the Approve Previously Approved Assets option as follows:
-
If you want WebCenter Sites to ignore all previous approvals and re-approve all selected assets, select Yes. This is the option to use if previous approvals may have become invalid for some change such as a change in default templates for that destination.
-
If you want WebCenter Sites to approve only the assets that have not yet been approved, select No. This is the correct choice when you are sure that previously approved assets are still valid.
-
-
Click Approve for Publish.
18.3 Creating Destinations
The procedures for creating destinations are described in the previous section. For information about creating new destinations, use one of the procedures in the following list, as appropriate:
-
To create an export destination, see Section 15.4.3, "Configure an Export Destination."
-
To create a mirror destination, see Section 16.3.5, "Create a Mirror Destination."
-
To create an export assets destination, see Section 17.2.3, "Configure an Export Assets to XML Destination."
18.4 Editing Destinations
-
In the Admin tab, expand Publishing, then expand Destinations.
-
Double-click on the destination that you want to edit.
The Publish Destination form appears for the selected destination.
-
Click the Edit icon, and then make the appropriate changes.
For information about the values that can be entered in the fields in this form, see the delivery-type specific procedures in the previous sections:
-
For an Export to Disk destination, see Section 15.4.3, "Configure an Export Destination."
-
For a Mirror to Server destination, see Section 16.3.5, "Create a Mirror Destination."
-
For an Export Assets to XML destination, see Section 17.2.3, "Configure an Export Assets to XML Destination".
18.5 Deleting Destinations
-
In the Admin tab, expand Publishing, then expand Destinations.
-
Double-click on the destination that you want to delete.
-
Click the Delete icon.
WebCenter Sites displays a verification message.
-
Click Delete Destination.
18.6 Creating Export Starting Points
Export starting points are defined in Section 15.3.5, "Export Starting Points". For information about creating them, see Section 15.4.5, "Create the Export Starting Points".
18.7 Scheduling Publish Events
You can set up publishing events for all of your publishing destinations. Because publish events run as background processes and there is no publish queue, you can set up publish events for different destinations that run at the same time, if necessary.
Note the following:
-
There can be only one publish event schedule for each destination.
-
If any of your systems serve as both source and destination, be sure that incoming and outgoing publishing sessions do not overlap. For example, you publish from the development system to the management system and you publish from the management system to the delivery system. Never schedule a publish event from the development system to the management system for a time when the management system is publishing to the delivery system.
-
In the Admin tab, expand Publishing, then expand Destinations.
-
Double-click on the destination that you want to schedule a publish event for.
-
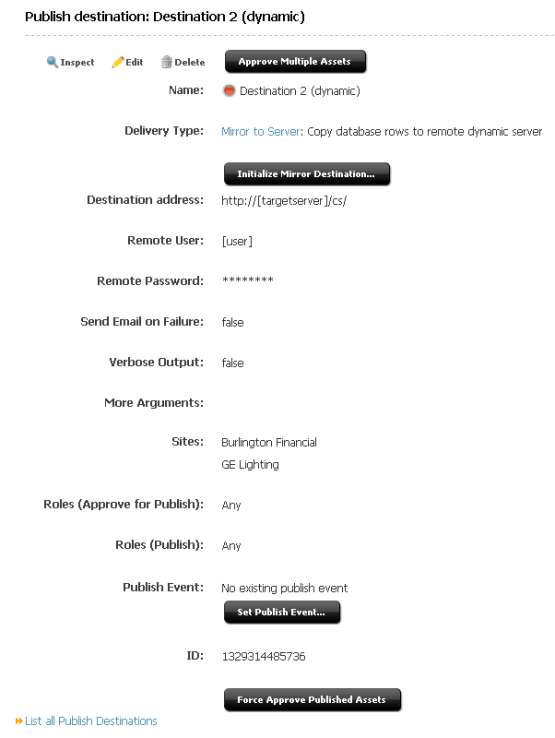
In the Publish Destination form, click the Set Publish Event button.
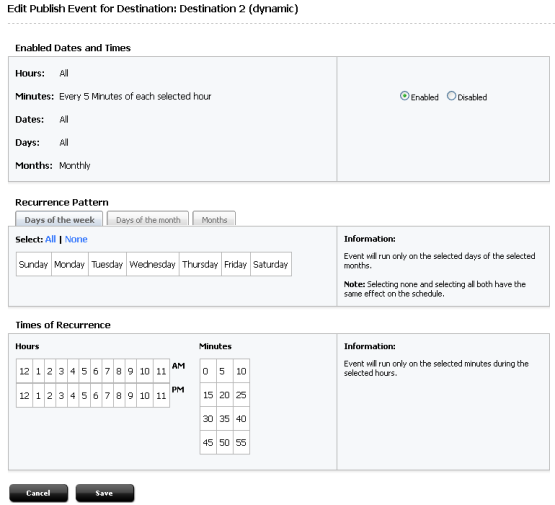
WebCenter Sites displays the Edit Publish Event form:
Figure 18-3 Edit Publish Event for Destination Form
Description of ''Figure 18-3 Edit Publish Event for Destination Form''
Now you select days, months, hours, and minutes to set a schedule.
The form for setting a publish event is similar to the form for setting a timed action event in workflow. See Section 10.3.4, "Setting Up the Timed Action Event" for more information.
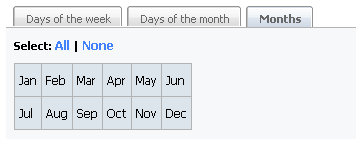
For example, if you want to set a schedule so that WebCenter Sites publishes the assets approved for this destination at 7 a.m., 4 p.m., and 8 p.m. every day of the week except Sunday, you would complete these steps:
-
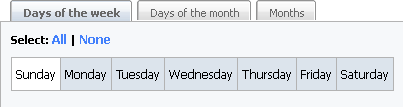
In the Recurrence Pattern, Days of the week tab, click on Monday and drag to Saturday to select all days of the week except Sunday. The days highlight in gray as you select them.
-
Skip the Days of the month tab, since you have already selected the days you want.
-
In the Months tab, click All to select all months. All months become highlighted in gray.
-
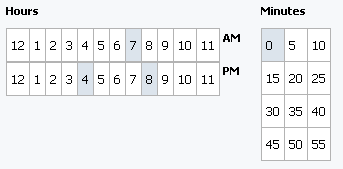
In the Times of Recurrence section, Hours selector, click on 7am, 4pm, and 8pm.
-
In the Minutes selector, click on 0.
-
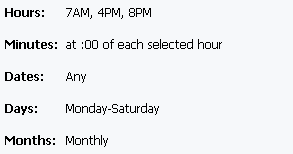
Double-check the dates and times selected in the Enabled Dates and Times section of the form.
It should look like the sample shown below:
-
In the Enabled Dates and Times section, click Enabled.
-
Click the Save button.
A summary of the schedule now appears in the Publish Event section of the Publish Destination form.
18.8 Reading the Schedule Abbreviations
Once scheduled events are created, these events are displayed in string format in the WebCenter Sites interface.
In the Edit Publish Events form the schedule is displayed in easy-to-read format on the Enabled Dates and Times section at the top of the page. In the Publish Destination forms, the schedule is displayed in the Publish Event field as a string.
Here is the key to the schedule string:
hours:minutes:seconds weekdays/days of month/months of year
This information is displayed as follows:
-
Hours are displayed as numbers from 0 (midnight) through 23 (11 p.m.) and are separated from the minutes with a colon.
When multiple hours are selected, the selected hours display with commas separating them.
In the previous example (see "Example Schedule"), 7 a.m., 4 p.m., and 8 p.m. were set as the times to publish. This displays as 7,16,20:
-
Because you can set minutes in increments of 5, minutes are displayed as numbers 0 – 55 in five minute increments. Minutes are separated from the seconds with a colon.
If the schedule describes more than one minutes increment, the scheduled increments are listed with commas separating them.
When minutes are displayed as a 0, it means the event runs on the hour.
The hours and minutes for the example are displayed like this: 7,16,20:0:
-
Seconds are always set to zero. Therefore, the complete expression of the time in the display of the example is: 7,16,20:0:0
-
The time and the days are separated with a space.
-
Days of the week are expressed as numbers 0 (Sunday) through 6 (Saturday) and end with the slash (/) character.
-
If either no days or all days were selected, the publish event runs every day of the week. An asterisk (*) character appears in the field in that case.
-
If more than one day is scheduled, the selected days are displayed with commas separating them.
The example schedule includes all the days of the week except Sunday. Therefore, the days of the week are appended to the display as follows: 7,16,20:0:0 1,2,3,4,5,6/
-
-
Days of the month are also displayed as numbers (1–31) and end with the slash (/) character.
-
The list of days is separated with a comma.
-
If no days of the month were selected, the publishing event runs every day of the month. An asterisk (*) character appears in the field in that case.
-
If you specify both days of the week and days of the month, the event runs when either setting matches the current day.
The example schedule does not specify days of the month. Therefore, the value for this item is appended to the display as an asterisk: 7,16,20:0:0 1,2,3,4,5,6/*/
-
-
At the end of the string are the months, displayed as numbers from 1 (January) through 12 (December).
-
The list of months is separated with a comma.
-
If all the months are selected, the publishing event will run every month. An asterisk (*) character appears in the field in that case.
The example schedule specified all the months. Therefore, the final result is:
7,16,20:0:0 1,2,3,4,5,6/*/*
-
18.9 Editing Publish Events
-
In the Admin tab, expand Publishing, then expand Destinations.
-
Double-click on the destination that you want to schedule a publish event for.
-
In the Publish Destination form, click Set Publish Event.
WebCenter Sites displays the Publish Event form. The text at the top of the form describes how the event is currently configured.
-
Edit the event as needed and click Schedule. To clear your selections, click Cancel.
18.10 Overriding the Schedule
If you want to start a publishing session immediately, complete the following steps:
-
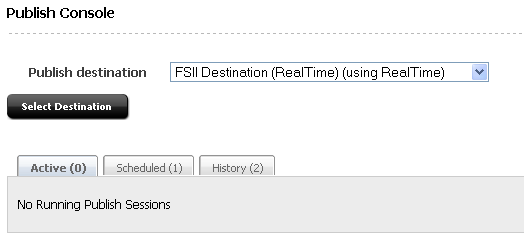
In the WebCenter Sites interface, click the Publishing button in the toolbar.
-
In the Publishing Console, from the drop-down list, select the destination that you want to publish to.
-
Click the Select Destination button.
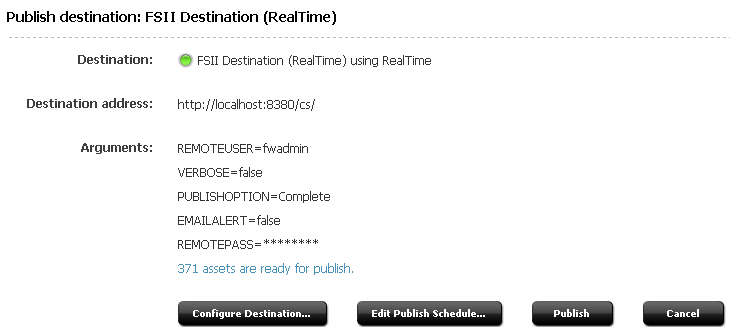
WebCenter Sites determines whether there are any assets that can be published to the destination and displays a summary form like this one:
If there are assets that can be published to the destination, the Publish button is displayed. If there are no assets to publish, there is no Publish button.
-
Click Publish.
WebCenter Sites starts the publishing session.
Note that if a publishing session for this destination is already underway, the publish event that you just tried to run fails and WebCenter Sites displays a status message describing that another session for the same destination is in progress. If you still want to run this event, wait until the current session completes and then repeat this procedure.
18.11 Assigning Approval or Preview Templates
When assets are approved for a Export to Disk publishing destination, the approval system examines the template assigned to the asset to determine its dependencies.
However, when the system publishes the asset, it does not necessarily use the template that is assigned to the asset. This is because the code in another element could determine that a different template is used for that asset in certain cases.
Consider the sample site. An article asset from this sample site can be rendered by several different templates, depending on the context.
So when someone approves an article asset for the site, which template should the approval process use to determine the dependencies for the article? The one that contains the most representative set of dependencies for all of the templates.
What if the template that contains the most representative set of dependencies is not the template that you want to assign to the asset? Set it as the Default Approval Template for assets of that type.
Note that when you assign default templates to assets that are published to mirror destinations, those templates are not used to calculate dependencies, but they are used when someone previews the asset from the Status form.
-
In the Admin tab, expand Publishing, then expand Destinations.
-
Expand the destination that you want to configure default templates for and then select the Set Default Templates item.
-
WebCenter Sites displays a Default Templates form.
-
Click Edit Configuration.
The system displays a form similar to this one:
-
For each asset type that you need to configure, select the template and wrapper page that you want WebCenter Sites to use as the approval or preview template for assets of that type. If there are subtypes configured for an asset type, you can specify a default template for each subtype of that asset type.
-
Click the Save button.
You are returned to the Default Templates form for that destination.

18.12 Monitoring Sessions in the Publishing Console
You use the Publish Console to monitor publishing sessions. To open the Publish Console, click the Publishing button at the top of the WebCenter Sites interface:
The console displays a summary of all the publishing activity, including any sessions that are currently running, scheduled, or completed.
18.13 Verifying Publishing Readiness
To determine whether a publishing session is ready or whether there are any problems with unapproved assets
-
In the Publish Console, select the destination from the drop-down list.
-
Click the Select Destination button.
A summary form appears. It lists any assets that need to be published but are not ready (they are held) and assets that can be published. For example:
-
To see the details, click on the link.
WebCenter Sites displays lists of the assets that are either approved or approved and still held for dependency reasons. On one tab is the list of Approved Assets, and the other tab are the assets that are in the On-Demand Queue.
For example:
If you need to resolve an issue, click the link to the asset and make any changes that are necessary (and perhaps approve it):

-
To place assets in the On-Demand Queue, select them and click Add to On-Demand Queue. To remove assets from the On-Demand Queue (from the On-Demand Queue tab) select the assets and click Remove from On-Demand Queue.
-
To publish the assets in the On-Demand Queue, click Publish On-Demand Queue from either tab.
-
For information about why assets can be held, see Table 13-4, "Approval States Assigned by the Approval System".
-
For procedures that describe how to work with assets, see the Oracle Fusion Middleware WebCenter Sites User's Guide.
18.14 Managing Publishing History Information
Publishing sessions that are completed are listed in the Publish History section of the Publish Console, which is displayed when you click the Publishing button. Each publish session in the list has a status; Running, Done, or Failed.
Each item in the list has two icons:
-
The inspect icon (the circled letter "i"), which displays a summary of that session. Examining the summary is the first step in troubleshooting a failed session.
-
The delete icon (the trash can), deletes the session. When you click this icon, WebCenter Sites deletes the row from the
PubSessiontable, the publishing log file for the session, and any messages for the session from thePubMessagetable.Note that the greater the number of publishing sessions listed in this section, the longer it takes WebCenter Sites to open the Publish Console.
If a session shows its status to be Failed, click the inspect icon, note any error messages, and then consult Section 18.16, "Troubleshooting."
The publishing history log files are displayed in the History tab of the Publishing Console as summaries of publishing sessions.
The text in a history file is a list of all the references that were published during that session. The term reference means something different for each publishing method:
-
For Mirror to Server publishing, a reference is an asset. Each asset that is published is listed by its asset type and its ID.
-
For Export to Disk publishing and Export Assets to XML, a reference is a generated file. Each file that is created is listed by its file name.
To see the Publishing History log, select the particular session from the History tab to view the Publishing Status form for that session.
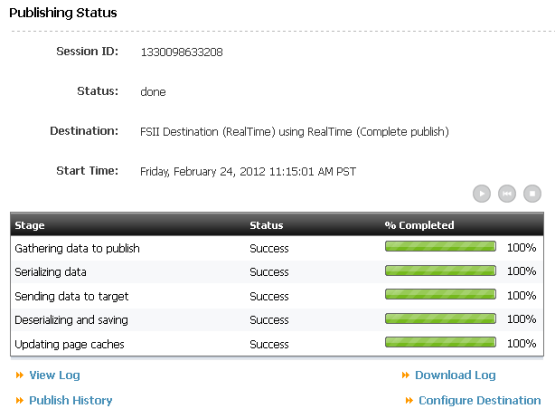
Click View Log to see the history log. You can also click Download Log to download the log and view it separately.
If there was a problem with the session, an error message is written to the PubMessage table and it is displayed as the history instead. If you see an error message in the history for a publishing session, see the section called Section 18.16, "Troubleshooting" and attempt to resolve the problem.
18.15 Publishing All Approved Assets
The publishing system conducts incremental publishing sessions. That is, during any session, only those assets that have been approved since the last session for this destination are published.
However, you may find a situation in which you need to publish all the approved assets in your entire site. (For example, after data repair on the delivery system.) When this is the case, use the Force Publish All Items Next Time button in the Edit Destination form.
When you click this button, it is the equivalent of changing the status of all approved assets to that of "never been published." That means that the next publishing session to the destination will publish all approved assets, regardless of whether they have already been published and have not changed since they were published.
18.16 Troubleshooting
This section describes error messages and other system indicators that reveal configuration, system, or data errors and suggests corrective actions for each. It contains the following topics:
18.16.1 About Publishing System Error Messages
The publishing system reports information about publishing sessions in the following ways:
-
Displays a status for each session in the Publish History list in the Publish Console. If you see a status of Failed, Not Found, or false, there was a problem with the publishing session.
-
Writes information about the assets that were published to the log file for the publishing session. When you click the inspect icon for a publishing session in the Publish Console, the history log file for that session is displayed.
The
request.folderproperty in the in thebatch.inifile defines where the publishing history log files are located. Each log file is named as follows:PubSession ID + Output.html
For example, if the PubSession ID for the session you are interested in is 9876544, then the log file is named
9876544Output.html, and it is located in the directory specified by therequest.folderproperty. -
Writes error messages about the publishing session to the
PubMessagetable. These messages are displayed in the Messages text area when you examine the publishing history in the Publishing Console for a specific publishing session.You can use the PubSession ID to look up messages in the
PubMessagetable about a specific publishing session. Note that when you select the Verbose parameter on the destination configuration, status messages are also written to thePubMessagetable. -
Writes other information about the session to the
PubSessiontable. For example, to determine what time a publishing session started, look up the session by its PubSession ID in thePubSessiontable. -
Writes error messages to the
futuretense.txtfile on both the source and the destination (target) systems.
You can also find error messages about failed publishing sessions in the following locations:
-
The application server log files on both the source and the destination systems.
-
The
stdoutandstderrlogs on both the source and the destination system.
18.16.2 Numeric Messages
This section contains descriptions and suggested corrective actions for the numeric error messages that the publishing system might report in any of the log files mentioned in the list above.
Note:
The following list is not a complete list of all the error messages that your WebCenter Sites system can report. For a complete list of all error messages, see the error conditions chapter in the Oracle Fusion Middleware WebCenter Sites: Tag Reference.This section contains the following topics:
18.16.2.1 -2
This error indicates that either the mirror user name or password is not identified correctly. The publishing system on the source began the publishing process, but the destination system couldn't authenticate the user that is identified as the mirror user.
Correct the mirror user information. See the procedure Section 16.3.3, "Identify the Mirror User to the Source System" for help.
18.16.2.2 -3
This error indicates that the mirror user does not have the correct permissions to save the assets to the WebCenter Sites database on the destination system. In other words, the destination system user identified to the source as the mirror user does not have all the ACLs it needs.
Edit the mirror user's account and assign it the appropriate ACLs.
See the procedure Section 16.3.2, "Set Up the Destination System" for a list of the ACLs that the mirror user needs.
If you still cannot determine which ACL is missing from the mirror user's account, examine the futuretense.txt file on the destination system. There should be an entry that describes which table the mirror process failed to update and the name of the table may help you determine which ACL is missing.
For example, if the mirror session is failing on a visitor table, it is likely that your mirror user does not have the Visitor or VisitorAdmin ACL assigned to it.
18.16.2.3 -103
This error indicates that one of the tables whose data is being mirror published does not exist on the destination system. This error typically occurs when there is an asset type on the source that does not yet exist on the destination. It is also possible that someone created a custom table to support a function that was custom designed for your site but that table has not yet been created on the destination system.
Examine the sites.log file on the destination system and look for the lines that list the -103 error. The text in the message should mention which table is missing.
Then use the appropriate tool to create the table on the destination system. That is, if it is a basic asset type, use AssetMaker. If it is a flex asset type, use Flex Family Maker. If it is a custom table, use Sites Explorer.
18.16.2.4 -611
This error message is one of the two generic mirror publishing error messages (the other is -12011). Typically -611 means that there was a problem when the publishing system tried to access the destination system and there should be other error messages reported, too.
Examine the sites.log file and application server logs on the destination system to look for additional messages.
18.16.2.5 -612
This error message indicates that the definition of a mirror destination is incorrect in some way. Perhaps the syntax of the destination address is incorrect or there is a typographical error of some kind.
Log into the WebCenter Sites interface on the source, examine the definition of the destination, and determine that it is correct. For help, see Section 16.3.5, "Create a Mirror Destination."
18.16.2.6 -12011
This error message is one of the two generic messages (along with -611) which mean that the mirror process failed. It is unlikely that this message will appear without other error messages being reported. Typically the other errors will give more information about what went wrong.
Examine the messages in the PubMessage table and the sites.log file on the source to look for additional error messages.
18.16.2.7 -12044
This error indicates that the publishing system could not begin the publishing session because it could not contact the destination to start the session. That is, there was no response from the destination; some part of the destination system is offline.
Start by verifying that the web server and application server are running on the destination system. If they are not, start them. Verify that the two systems can connect to each other through the network (perhaps the network went off-line, for example).
18.16.2.8 -12045
This error indicates that the publishing system was able to start the session, but it then failed in some way.
Examine the sites.log file on the destination system and look for error and exception messages in the log.
18.16.2.9 -12046
This error indicates that there was a problem at the end of a publishing session when the publishing system began to clean up the temporary tables that it creates for each session. When the cleanup process began, the connection with the destination failed. That is, the source system could get no response from the destination when the publishing process tried to clean up the temporary tables.
Determine whether the web server and application server on the destination system are running. If they are not, start them. Check for network connection problems, as well.
18.16.2.10 -12047
This error indicates that the publishing system was able to begin the cleanup process but it then failed in some way during the operation.
Examine the sites.log file on the destination and look for error exception messages and exceptions that describe the problem.
18.16.2.11 -13054
This error occurs for complex and flex assets only. In this case, the publishing system began publishing a complex or flex asset but the data did not reach the destination. It can mean that the data itself was corrupt or that the HTTP request connection failed.
Check the sites.log file on the source system. If the problem was the data itself, there will be additional messages in this log file that can help you determine which asset caused the problem. However, if the HTTP request was dropped before the destination system could respond, there will not be an additional message in the log.
18.16.2.12 -13055
This error occurs for complex and flex assets only. In this case, the data for the flex or complex asset was delivered, but the destination system could not save the asset to its WebCenter Sites database.
This message indicates that there is a problem with your data. For example, if you are attempting to publish from more than one source to the same destination, there can be ID collisions and other problems with data integrity that will cause this error.
Examine the sites.log and application server log files on the destination system. There is often a stack trace message in the stderr log that describes what went wrong.
18.16.3 Other Indicators of System or Configuration Issues
This section describes symptoms your Sites system may exhibit when the publishing system discovers configuration errors or system problems.
This section contains the following topics:
-
Section 18.16.3.1, "Publishing Session Does Not End and Displays an Odd Status"
-
Section 18.16.3.3, "Pages Are Not Refreshed After the Publishing Session Ends"
-
Section 18.16.3.4, "DB2 Systems, Troubles When Publishing Assets with Associations"
18.16.3.1 Publishing Session Does Not End and Displays an Odd Status
When a publishing session cannot begin or end, typically the batch user has not been configured correctly. Examine the Status listed for the publishing session. If the Status is Not Found or false, it is likely that your batch host is not configured correctly.
Note that the Initialize Mirror Destination feature does not use the batch user. If you can initialize a destination correctly, but the publishing session has errors, it is likely that the batch user settings are incorrect.
See Section 15.4.1, "Create the Batch User Account (If One Does Not Exist)" and verify that you have configured the batch user correctly:
-
The batch user identified by the
xcelerate.batchuserproperty must have the appropriate read/write privileges. These are listed in that procedure. -
The name of the batch user identified by the
xcelerate.batchuserproperty must be spelled correctly and the password identified by thexcelerate.batchpassproperty must be correct. -
The server identified by the
xcelerate.batchhostproperty must identify the correct server. This property should identify the application server that hosts the source system, not the destination, and not the load balancer if you are using a load balancer. Note that if the port number is something other than 80, you must also specify the port number. For example:myserver:7001If the WebCenter Sites environment is clustered, only one batch host is supported. The
xcelerate.batchhostproperty must be set on each cluster member to point to the dedicated host.If you see the message "Cannot retrieve output for publish session" in the publishing history, it is likely that the server name is incorrect.
-
The port number for the batch host server must also be identified correctly. If you see the message "Cannot retrieve output for publish session" in the publishing history, it is likely that either the port number is incorrect, or if a port number is not specified, that the default port (80) is incorrect.
18.16.3.2 The System Stops Altogether
If your system simply stops, this behavior indicates that there may not be enough disk space available for the publishing system to function.
Check the stdout and stderr files. If there are any Java write errors, you are out of disk space.
-
For Export to Disk publishing and Export Assets to XML, you need enough disk space in your file system to store all the files that are being generated.
-
For Mirror to Server publishing, you need space equal to four times the size of the data that is being mirrored available on both the source and the destination system or the mirror operation will fail.
Note that the publishing process will also fail if the Java temp directory is not large enough.
18.16.3.3 Pages Are Not Refreshed After the Publishing Session Ends
If you are using Satellite Server—either the co-resident Satellite on a management or development system or a remote Satellite Server for a delivery system—and you notice that cached pages are not being regenerated after a publishing session, it is likely that you have configured Satellite Server incorrectly.
Examine the sites.log file on the destination system and look for messages like these:
-
"Number of satellite servers must match number of usernames and passwords."
This message indicates that there is something wrong with the values specified for the
cs.satellitehosts,cs.satelliteuser, andcs.satellitepasswordproperties in thefuturetense.inifile. -
"-100.FormPoster failed flushing URL."
This message indicates that either a Satellite servlet wasn't running or that the destination system couldn't reach a Satellite servlet that it tried to reach:
Open the futuretense.ini file, examine the properties on the Satellite tab, and note the values set for the user names, passwords, and host names. Open the satellite.ini files for the co-resident Satellite Server and your remote Satellite Server applications. Compare the values specified for the cs.satellitehosts, cs.satelliteuser, and cs.satellitepassword properties in the futuretense.ini file to the values set for the username and password properties in the satellite.ini files. They must match.
Remember that the order in which you specify host names in the futuretense.ini file must match the order in which you identify user names and passwords.
18.16.3.4 DB2 Systems, Troubles When Publishing Assets with Associations
When you notice that there are problems with publishing assets that have associations and your system uses a DB2 database, it is likely that the LOCKLIST parameter is not set correctly.
The WebCenter Sites installation guide that describes DB2 installations recommends that this property be set to at least 1000. If you find that you are having difficulties publishing assets with associations, increase this value.