20 Integrating Oracle WebCenter Sites with Flat Schema LDAP Servers
This chapter provides instructions for using Oracle's integrator to automatically integrate WebCenter Sites with a supported LDAP server. The integrator configures a flat schema for authentication and authorization services for the WebCenter Sites web application.
This chapter contains the following sections:
20.1 WebCenter Sites-LDAP Integrator
Oracle's LDAP integrator requires a fully functional WebCenter Sites web application and a pre-installed, supported LDAP server.
The integrator works by first prompting you for parameters relating to your WebCenter Sites installation and LDAP server. When you provide the requested information and click Install, the integrator uses your inputs to perform the following steps:
-
The integrator sets LDAP connection properties in the WebCenter Sites
futuretense.ini,futuretense_xcel.ini, anddir.inifiles in order to:-
Establish communication between the LDAP server and the WebCenter Sites Directory Services API.
-
Enable the LDAP server to recognize the user that WebCenter Sites will invoke to query the LDAP server.
-
Configure a flat schema.
-
Modify the LDAP database to use WebCenter Sites ACLs in LDAP format.
For a listing of the LDAP connection properties that are set by the integrator, see Chapter 21, "Integrating Oracle WebCenter Sites with Hierarchical Schema LDAP Servers." (Note that the properties for flat and hierarchical schema are identical; only the values differ.)
-
-
In its final steps, the integrator does one of the following, depending on the option you selected:
-
If you selected the Automatic option, the integrator loads the LDAP server with the WebCenter Sites information — users, ACLs, roles, and sites to which the roles apply.
-
If you selected Manual, the LDAP integrator requires an LDAP user with write permissions to manually write users, ACLs, and roles (including their relevant sites) to the LDAP server, either directly or via an
ldiffile. This information is written once the integrator completes its process.
-
-
Regardless of which option you selected (Automatic or Manual), you will have to complete the integration by resetting (in the LDAP server) the passwords of WebCenter Sites users.
20.2 Running the WebCenter Sites-LDAP Integrator
To integrate with flat schema LDAP, complete the steps in the following sections:
20.2.1 Prerequisites
Before integrating WebCenter Sites with LDAP, prepare your system:
-
The LDAP integrator can run only on a WebCenter Sites full product release. Perform LDAP integration before any hot-fixes or patches are installed.
-
Make sure WebCenter Sites is installed on one of the supported platforms and is fully functional. Currently supported platforms are listed in the Oracle WebCenter Sites Certification Matrix here:
http://www.oracle.com/technetwork/middleware/webcenter/sites/downloads/index.html.For WebCenter Sites installation instructions and verification tests, refer to the Oracle Fusion Middleware WebCenter Sites Installation Guide.
-
Back up the entire WebCenter Sites system. If the integration fails, you can recover the
ldiffile and import it manually to restore the WebCenter Sites users and permissions. -
Make sure the LDAP server is ready for integration:
-
If a supported LDAP server is not installed, install it now. (For the list of currently supported LDAP servers, refer to the Oracle WebCenter Sites Certification Matrix available here:
http://www.oracle.com/technetwork/middleware/webcenter/sites/downloads/index.html.) -
Note the following parameters. You will supply values for them during the integration process:
-
LDAP host name (or IP address)
-
LDAP port number
-
People parent DN
-
Group parent DN
-
Base DN, if you are using Sun JES Directory Server
-
-
Determine whether the user connecting to LDAP will be the same user that is logged in to WebCenter Sites. If the connecting user is not a WebCenter Sites user, you will need to provide a user name and password.
-
-
During the integration process, you will be prompted to select either the Automatic or Manual integration option.
-
If you have write permissions to the LDAP server, select Automatic. The integrator will write the WebCenter Sites users, ACLs, roles, and sites to the LDAP server.
-
If you do not have write permissions to the LDAP server, you will select Manual and continue to run the integrator. When the integrator completes its process, an LDAP user with write permissions must be available to complete the integration.
-
20.2.2 Integration Steps
In this section you will run the WebCenter Sites-LDAP integrator (included on the WebCenter Sites CD) to integrate WebCenter Sites with a supported LDAP server of your choice.
To integrate WebCenter Sites with LDAP
-
If you have not already done so, decompress the WebCenter Sites installation archive to a temporary directory and change to that directory.
-
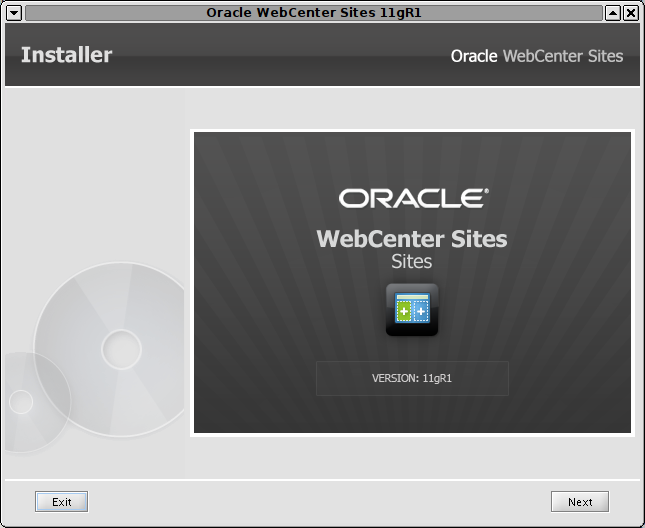
Run the WebCenter Sites integrator (Figure 20-1) by executing the following command:
-
On Windows:
configureLDAP.bat -
On Unix:
./configureLDAP.sh
-
-
In the "Pre-Installation Requirements" screen (Figure 20-2), make sure you have satisfied the requirements shown, then click Next.
Figure 20-2 Pre-Integration Requirements
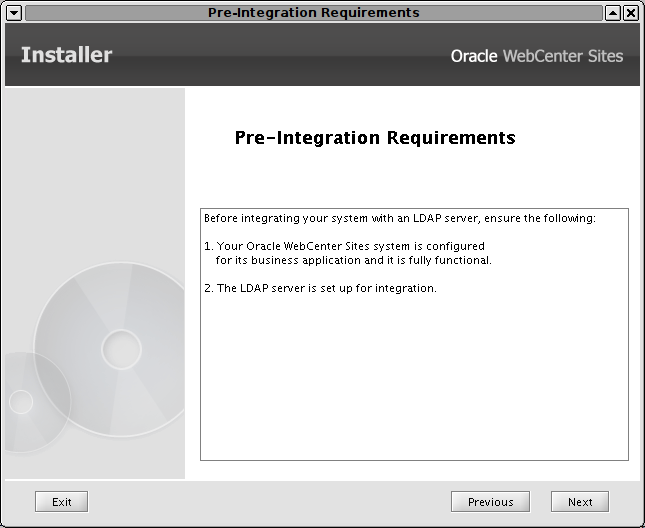
Description of ''Figure 20-2 Pre-Integration Requirements''
-
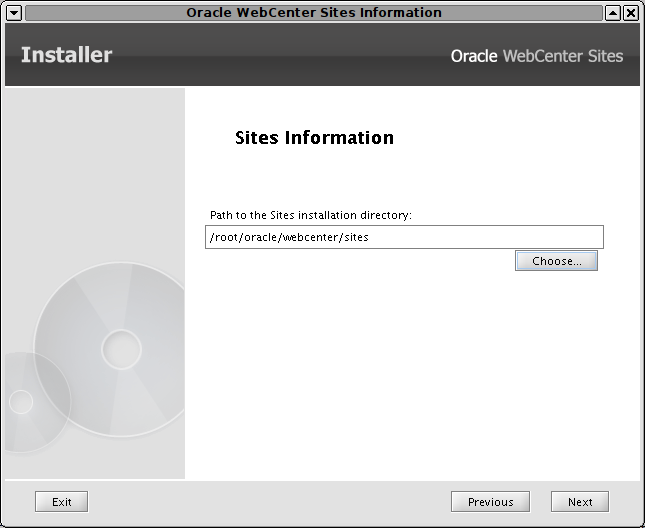
In the "Sites Information" screen (Figure 20-3), enter the location of the directory in which WebCenter Sites has been installed.
-
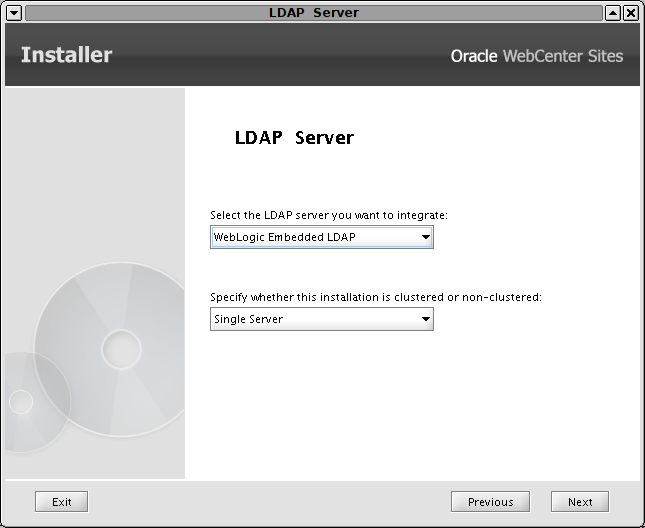
In the "LDAP Server" screen (Figure 20-4), do the following:
-
Select the LDAP server you are using.
-
Specify whether you are integrating with a standalone instance of WebCenter Sites, or a member of a WebCenter Sites cluster.
-
Click Next.
-
-
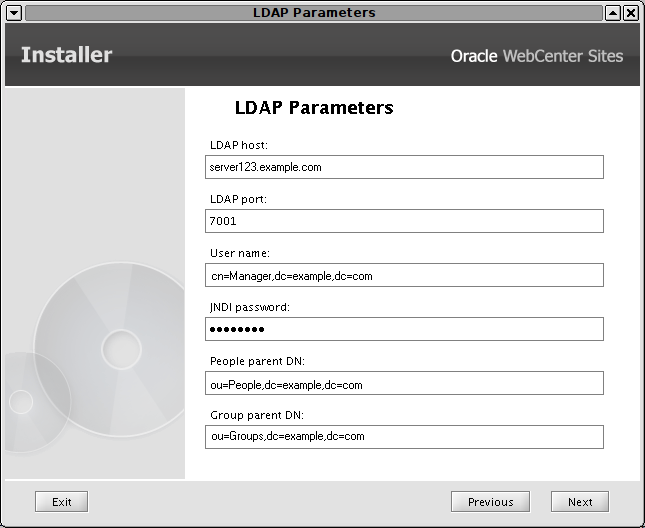
In the "LDAP Parameters" screen (Figure 20-5), enter the following information.
-
LDAP Host — host name or IP address of your LDAP server.
-
LDAP Port — port number on which your LDAP server is listening for connections. The default port,
389, is displayed in the field. Do not change this default value unless you are creating a specialized integration. -
User name — name of the LDAP user used to access your LDAP server. (This field does not appear if you selected WebLogic Embedded LDAP in step 5.)
The value you enter determines whether WebCenter Sites accesses the LDAP server through a WebCenter Sites user or an independent user. Do one of the following:
-
Leave this field blank if you want the LDAP user to be the same user that is logged into WebCenter Sites. The integrator will set the value of the
jndi.connectAsUserproperty (indir.ini) totrue. -
Enter a value if you want the LDAP user to be a user that you specified within your LDAP server. Your value must be a fully qualified, fully distinguished LDAP user name. The integrator will assign the user name to the
jndi.loginproperty (indir.ini). It will also setjndi.connectasUsertofalse.Valid entry:
cn=<username>,dc=<domain>,dc=<extension>Example:
cn=Manager,dc=example,dc=com
-
-
JNDI Password — password of the LDAP user who will access the LDAP server. Enter a value only if you provided a user name in the preceding field.
Note:
If you selected WebLogic Embedded LDAP in step 5, enter the password you provided when you enabled the WebLogic Embedded LDAP Server.The integrator will assign this password in an encrypted form to the
jndi.passwordproperty (indir.ini). -
People parent DN — DN of the People parent node in your LDAP server. WebCenter Sites users will be stored under this node. (This field does not appear if you selected WebLogic Embedded LDAP in step 5.)
Valid entry:
ou=People,dc=<domain>,dc=<extension>Example:
ou=People,dc=example,dc=com -
Group parent DN — DN of the Groups parent node in your LDAP server. WebCenter Sites ACLs will be stored under this node. (This field does not appear if you selected WebLogic Embedded LDAP in step 5.)
Valid entry:
ou=Groups,dc=<domain>,dc=<extension>Example:
ou=Groups,dc=example,dc=com -
Click Next.
-
-
In the "Existing Sites Password" screen (Figure 20-6), enter the user name and password for your installation's WebCenter Sites System Administrator account. (The default values are
ContentServer/password.) Re-enter the password for verification, then click Next.Figure 20-6 Existing Oracle WebCenter Sites Password

Description of ''Figure 20-6 Existing Oracle WebCenter Sites Password''
Note:
Make sure the information you enter here exactly matches the information used in your WebCenter Sites system. If you enter incorrect information, your WebCenter Sites system will not function properly. -
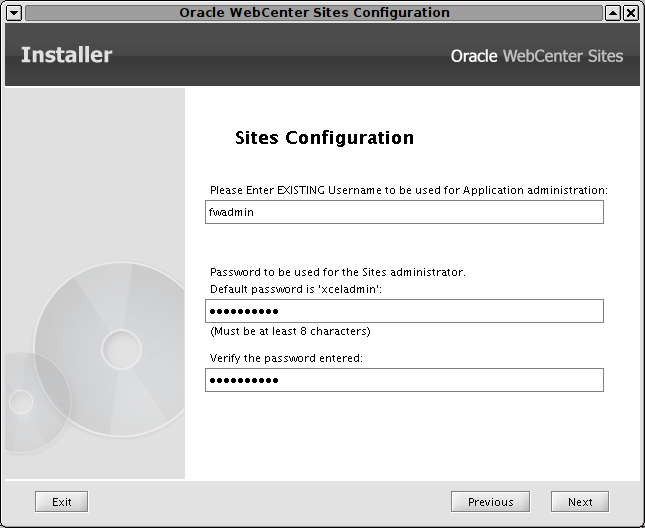
In the "Sites Configuration" screen (Figure 20-7), enter the user name and password of your installation's WebCenter Sites Application Administrator account. (The default values are
fwadmin/xceladmin). Re-enter the password for verification, then click Next.Note:
Make sure the information you enter here exactly matches the information used in your WebCenter Sites system. If you enter incorrect information, your WebCenter Sites system will not function properly. -
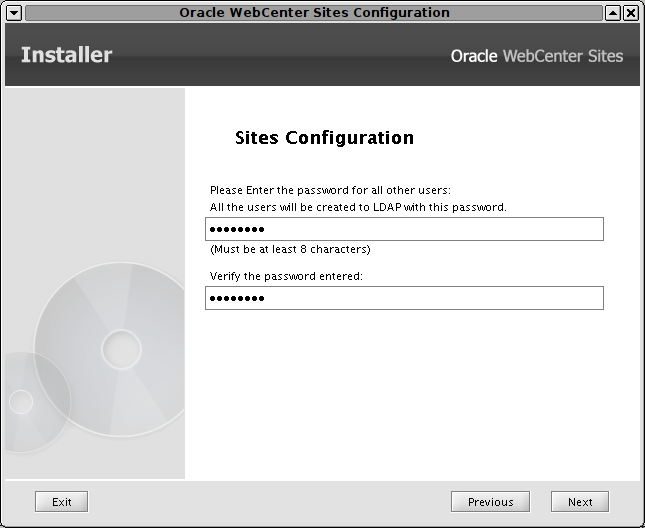
In the next "Sites Configuration" screen (Figure 20-8), enter the password that will be assigned to all users on your WebCenter Sites system (except the WebCenter Sites System Administrator, WebCenter Sites Application Administrator, and
DefaultReaderaccounts).Note:
For added security, WebCenter Sites passwords are one-way encrypted, which means they cannot be decrypted and duplicated in the LDAP server.The password that you provide in this screen is a dummy password that will be assigned to all WebCenter Sites users (except the WebCenter Sites System Administrator, WebCenter Sites Application Administrator, and
DefaultReader). At the end of the integration process, the users' original passwords must be re-assigned to them. Special instructions also apply to OpenLDAP with encrypted passwords. (Instructions for re-assigning passwords are given in Section 20.3, "Completing the Integration.")Re-enter the password for verification, then click Next.
-
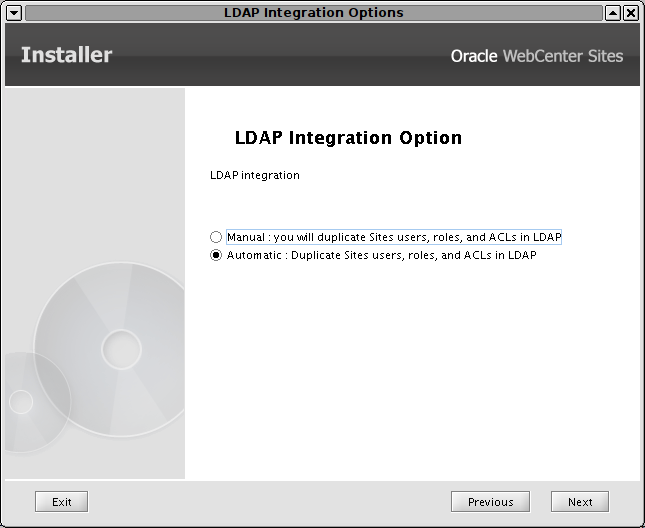
In the "LDAP Integration Option" screen (Figure 20-9), do one of the following and click Next:
-
If you have write permissions to the LDAP server, select Automatic.
The integrator will write WebCenter Sites users, ACLs, roles, and sites to the LDAP server. (All users will be assigned the password you specified in step 9.)
-
If you do not have write permissions to the LDAP server, select Manual.
Note:
If you chose the WebLogic option and the WebCenter Sites application is not running on the same domain as the LDAP server, select Manual.When the integrator completes its task, an LDAP user with write permissions will have to write the WebCenter Sites users, ACLs, roles, and sites to the LDAP server, either directly or via an
ldiffile.Note:
If you chose the WebLogic or OpenLDAP option, the integrator will create anldiffile in the<cs_install_dir>/ldifdirectory.
-
-
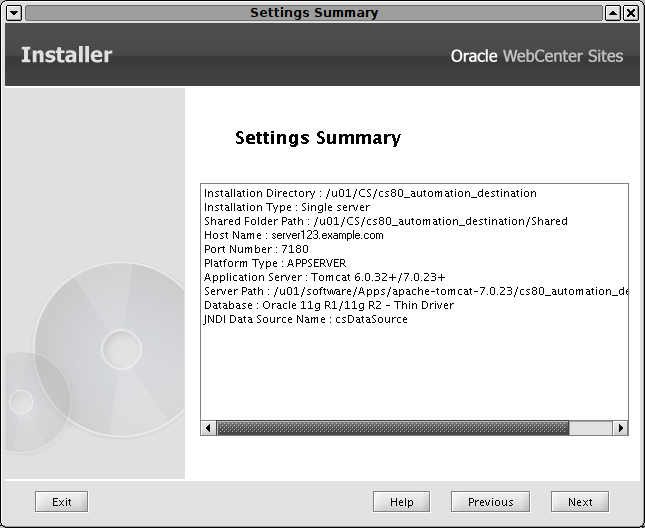
In the "Settings Summary" screen (Figure 20-10), review the choices you have made. If you need to make changes, click the Back button to return to the appropriate screen. Otherwise, click Next to proceed with the integration.
-
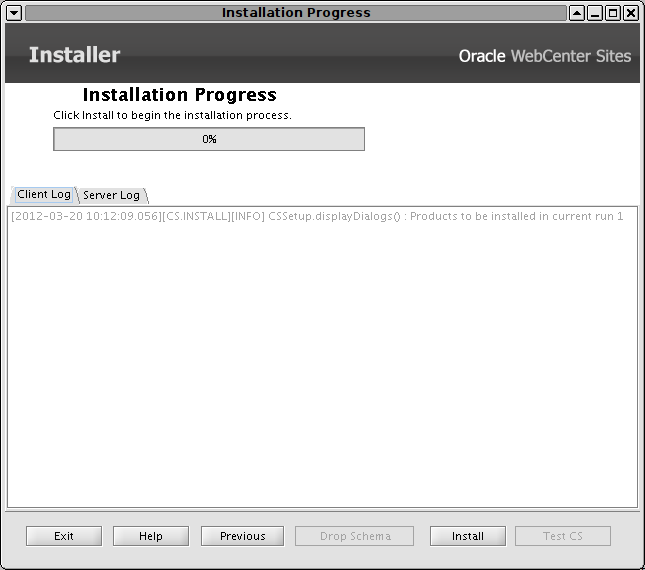
In the "Installation Progress" screen (Figure 20-11), click Install and wait for the integration process to complete.
When the "Successful" pop-up dialog appears, the integrator's process is complete.
-
Test your LDAP integration by logging in to WebCenter Sites, then continue with the next step.
20.3 Completing the Integration
Note:
To complete the steps in this section, you must have write permissions to the LDAP server.If you chose the Manual integration option in the previous section, you will now load the LDAP server with WebCenter Sites users, ACLs, roles, and sites. Regardless of your choice, you will also reset the passwords of WebCenter Sites users.
To complete the WebCenter Sites-LDAP integration
-
If the LDAP integrator's Automatic option was chosen (in step 10), skip to step 3. Otherwise, continue with the next step.
-
If the LDAP integrator's Manual option was chosen (in step 10), load the LDAP server with WebCenter Sites users, ACLs, roles, and sites, using one of the following options:
-
Import an
ldiffile.Note:
If you are integrating with WebLogic or OpenLDAP, anldiffile was created in the<cs_install_dir>/ldifdirectory by the integrator. If you chose the WebLogic option, and the WebCenter Sites application is not running on the same domain as the LDAP server, edit theldiffile and replace any instances of your CS WebLogic domain (Variables.CSInstallAdminDomainName) with your LDAP server domain.For any other LDAP server, you must create your own
ldiffile.When integrating WebCenter Sites with Active Directory LDAP provider, the integration script generates a
.vbsfile as well. After importing the LDIF file on the Active Directory Server, run the VBS script to set roles/ACLs and passwords. -
Write users, ACLs, roles, and sites directly to the LDAP server. For information about which users, ACLs, roles, and sites to write, see the following steps in Chapter 21, "Integrating Oracle WebCenter Sites with Hierarchical Schema LDAP Servers":
-
-
In the LDAP server, reset the passwords for all WebCenter Sites users as follows:
-
All LDAP servers: Set the users' passwords to their original values, except for the WebCenter Sites System Administrator, WebCenter Sites Application Administrator, and
DefaultReaderaccounts.If you do not change the passwords users will not be able to log in to WebCenter Sites with their originally assigned passwords.
-
OpenLDAP with encrypted passwords: If you are using OpenLDAP and have configured it to use encrypted passwords, you must change the passwords for all WebCenter Sites users including passwords for the WebCenter Sites System Administrator, WebCenter Sites Application Administrator, and
DefaultReaderaccounts.This step is required because the LDAP integrator writes user passwords to the LDAP directory as plaintext, whereas OpenLDAP expects password hashes when password type is configured as
SSHA. If you fail to complete this step, your WebCenter Sites system will not function properly.
For instructions on changing user passwords on supported LDAP servers, see Section 18.5, "Modifying User Passwords."
-
20.4 Post-Integration Steps: When CM Sites Have Not Been Created
If CM sites were not created on the given system, then after integrating WebCenter Sites with LDAP you will be unable to log in. The solution is to manually create the following new group entries in your LDAP server and assign fwadmin to each of these groups:
    Management Site-SiteAdmin
    Management Site-GeneralAdmin
    Management Site-WorkflowAdmin
    Management Site-AdvancedUser
In addition, create the SitesUser group only for installations running in content management mode. This group enables the fwadmin user to access the WebCenter Sites Contributor interface:
Management Site-SitesUser
dn: cn=Management Site-SiteAdmin,ou=Groups,dc=fatwire,dc=com
objectClass: top
objectClass: groupOfUniqueNames
uniqueMember: cn=fwadmin,ou=People,dc=fatwire,dc=com

dn: cn=Management Site-GeneralAdmin,ou=Groups,dc=fatwire,dc=com
objectClass: top
objectClass: groupOfUniqueNames
uniqueMember: cn=fwadmin,ou=People,dc=fatwire,dc=com

dn: cn=Management Site-WorkflowAdmin,ou=Groups,dc=fatwire,dc=com
objectClass: top
objectClass: groupOfUniqueNames
uniqueMember: cn=fwadmin,ou=People,dc=fatwire,dc=com

dn: cn=Management Site-AdvancedUser,ou=Groups,dc=fatwire,dc=com
objectClass: top
objectClass: groupOfUniqueNames
uniqueMember: cn=fwadmin,ou=People,dc=fatwire,dc=com

dn: cn=Management Site-SitesUser,ou=Groups,dc=fatwire,dc=com
objectClass: top
objectClass: groupOfUniqueNames
uniqueMember: cn=fwadmin,ou=People,dc=fatwire,dc=com
20.5 Testing the Integration
Test your LDAP-integrated system by opening a browser and entering the following URL:
http://<servername"://CatalogManager?ftcmd=login&username=ContentServer&password=" target="_blank"http://<servername>:<port>/<context>/CatalogManager?ftcmd=login&username=ContentServer&password=<password>
where
<servername> is the name of the machine that is hosting the WebCenter Sites system
<port> is the port number of that server
<username> is user-defined (WebCenter Sites, in this example)
<password> is user-defined (password, in this example)
-
If your browser displays a "
Login Successful" message, you have integrated your LDAP plug-in correctly. -
If you do not see the "
Login Successful" message, verify that you created theContentServeruser in the LDAP server, and that all properties are set to the correct values.