| Oracle® Communications IP Service Activator VPN User's Guide Release 7.2 E47719-01 |
|
|
PDF · Mobi · ePub |
| Oracle® Communications IP Service Activator VPN User's Guide Release 7.2 E47719-01 |
|
|
PDF · Mobi · ePub |
This chapter describes how to set up Layer 2 Martini VPNs for Oracle Communications IP Service Activator.
A Layer 2 Martini point-to-point connection is a Pseudo-Wire (PW) or tunnel configured between two endpoints across an IP network.
The connection uses MPLS labels to encapsulate and transport various Layer 2 data formats, including Ethernet (Port), Ethernet (VLAN), Frame Relay, ATM Cell, and ATM AAL5 across an IP network. The pseudo-wire provides a transparent connection, so users see no change in their Layer 2 data. (The pseudo-wire does not aim to meet QoS aspects of the connection, particularly in the ATM case.) The Layer 2 endpoints can be interfaces, sub-interfaces, or other endpoint identifiers (VCI/VPI on ATM, DLCI on Frame Relay, or VLAN ID on Ethernet).
A Layer 2 Martini VPN is an association of Layer 2 Martini point-to-point connections.
Layer 2 Martini VPNs enable the encapsulation and transport of legacy data types over IP networks. As service providers upgrade their network core, connections between legacy networks can be maintained. Customers needing traditional connectivity over a third-party network can be served using the same IP core network, regardless of the packet types they need to transport. Additionally, the pseudo-wire saves the complexity of carrying the customers routes across the network.
Support of Ethernet technologies permits operators to use inexpensive Metro- Ethernet solutions in the local area network, reducing the rollout cost of new networks.
Similarly, Martini solutions can reduce the rollout costs associated with mobile networks in transition from 2G to 3G. Using pseudo-wire, their 2G connection-oriented networks can traverse their new 3G IP core network. This saves the operational costs of supporting two different networks.
The Martini draft, IETF's Pseudo-Wire Emulation Edge-to-Edge (PWE3), describes a mechanism that creates a bidirectional point-to-point connection between two PE routers. This connection is called a Pseudo-Wire or a virtual circuit label-switched path (VC-LSP) and consists of two unidirectional Label Switched Paths (LSPs). For further information, refer to RFC 4905.
Creating a PW, illustrated in Figure 3-1, is a two-step process. The first step requires a label distribution protocol (LDP) targeted-peering relationship to be established between the PE routers. Because routers can only exchange labels with their LDP peers, this step is required so that the typically non-adjacent PE routers can exchange labels.
Figure 3-1 Layer 2 Martini Point-to-Point Links
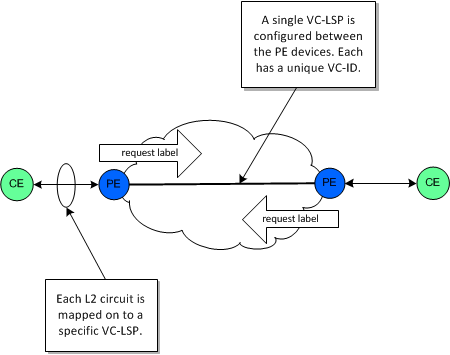
The second step is to request a label for the Layer 2 connection using an extension to the basic LDP signalling. A Layer 2 Forwarding Equivalence Class (FEC) is included in the label request that describes the circuit being connected together over the MPLS core. The returned label is mapped to the circuit described by the Layer 2 FEC and is pushed on the bottom of the label-stack for each of the frames that traverses the network. The PE at either end of the PW repeats this process of label requesting.
Layer 2 circuit emulation (PWE) over MPLS network supports multiple encapsulation types, such as Ethernet (Port), Ethernet (VLAN), ATM Cell, ATM AAL5, and Frame Relay.
A PW is identified by a combination of its VC ID and a Group ID. The Group ID acts as a VC-LSP grouping mechanism (that is, to identify a virtual interface value). The VC ID identifies the PW within the particular group. The Group ID can be seen to equate to the Layer 2 VPN identifier, though its use depends on the specific implementation.
Each Layer 2 frame or other data unit that arrives at the CE-facing interface of the PE is forwarded across the MPLS network with the label negotiated for the PW used to demultiplex it at the destination PE. Because each PE sent the label in response to the Layer 2 FEC, there is a unique mapping.
In addition to the PW label, there is also a control word added to each incoming frame. This includes control flags and a sequence number, used to maintain the frame sequence in order-sensitive traffic.
The full processing of a frame includes the following steps:
A frame arrives at the PE; its preamble and Frame Check Sequence (FCS) is removed.
The control word is added to the front of the frame.
The PW label is added as the bottom-most label in the stack.
The PE performs a lookup against the IP address for the destination PE, and a transport label that reaches the destination PE is pushed onto the top of the stack. This may be either an RSVP tunnel or LDP LSP.
The Transport label is swapped as the frame traverses the network and will be (in most cases) penultimate-hop-popped (removed) before reaching the destination PE.
The destination PE will use the exposed PW label to determine the PW of the frame and from that determine the egress port—it is likely that this will be a single-step lookup in the label table.
The control word may be used at this point to check the stream order and other relevant administrative functions.
The FCS and preamble will be reformed and the frame transmitted on the CE-facing interface.
The exact processing varies according to the Layer 2 traffic type being supported.
This section gives an overview of the different device types and data encapsulations supported by Oracle Communications IP Service Activator in the configuration of Layer 2 Martini VPNs. It also gives specific details for VPN types in which there are variations from the typical configuration.
IP Service Activator supports the configuration of Layer 2 Martini VPNs on MPLS-enabled switching devices, which encapsulate and transmit a number of different types of data.
These devices can be roughly categorized as either MPLS-enabled switching devices or routers.
MPLS-enabled switching devices support Layer 2 and Layer 3 switching features, MAC learning, and VLAN bridging.
Routers support none of the switching features described above but support standard IP routing between interfaces.
Table 3-1 describes the data types that can be encapsulated on Layer 2 Martini VPNs on MPLS-enabled switching devices.
Table 3-1 Data Types on Layer 2 Martini VPNs on MPLS-enabled Switching Devices
| Encapsulated Data | Endpoint | Comments |
|---|---|---|
|
Ethernet (port) |
Ethernet port |
Martini VLAN ID header is stripped on the pseudo-wire and re-applied (if required) on the exit interface. |
|
Ethernet (VLAN) |
VLAN endpoints |
Configured under Ethernet interfaces (not sub-interfaces). |
All Layer 2 endpoints (such as DLCIs, VLANs, VPI/VCIs) and their parents (logical and physical interfaces) must have the Access role assigned to them.
For Ethernet (Port) encapsulation on MPLS-enabled switching devices, a main interface is used. Endpoint VLAN IDs must be the same on both sides of the pseudo-wire.
For Ethernet (VLAN) encapsulation on MPLS-enabled switching devices, sub-interfaces are not used as the Layer 2 Martini VPN endpoints. You must create new VLAN endpoints or use existing VLAN endpoints. The endpoint VLAN IDs on both sides of the pseudo-wire must be the same.
Table 3-2 describes the data types that can be encapsulated on Layer 2 Martini VPNs on router equipment.
Table 3-2 Data Types on Layer 2 Martini VPNs on Routers
| Encapsulated Data | Endpoint | Comments |
|---|---|---|
|
Ethernet (Port) |
Ethernet interfaces |
All VLAN tags are preserved across the connection. Frames that enter the tunnel labeled VLAN n leave the tunnel labeled VLAN n. |
|
Ethernet (VLAN) |
VC identifiers |
The VC identifier value represents the VLAN ID. The same VLAN ID must be used at both ends of the connection. |
|
ATM Cell |
Sub-interface with VC identifier |
n/a |
|
ATM AAL5 |
Sub-interface with VC identifier |
n/a |
|
Frame Relay |
Main interface with VC identifier |
The VC identifier value attached to the main interface must be created manually. |
All Layer 2 endpoints (such as DLCIs, VLANs, VPI/VCIs) and their parents (logical and physical interfaces) must have the Access role assigned to them.
ATM Cell Layer 2 Martini tunnel endpoints must have the same VPI/VCI. ATM AAL5 tunnel endpoints are not required to have the same VPI/VCI.
For Ethernet VLAN on routers, VC identifiers are used to represent the VLAN ID. VC identifiers are configured on Ethernet sub-interfaces and used as the Layer 2 Martini VPN endpoints.
For Frame Relay encapsulation on routers, sub-interfaces are not used as the Layer 2 Martini VPN endpoints. You must manually preconfigure or use existing PVCs (permanent virtual circuits) on the main interface.
For inter-operability between MPLS-enabled switching devices and routers, VLAN mode (which retains the VLAN tag across the Martini VC-LSP) must be selected on the MPLS-enabled switching devices. You must also connect to a VLAN VC identifier with the same VLAN ID.
Creating Layer 2 Martini VPNs involves the following steps:
Add the Layer 2 Martini connections.
Set the options in the L2 Martini Pt-Pt property page.
Assign the endpoints to the new Layer 2 Martini tunnel.
Before creating a Layer 2 Martini VPN, perform the following preconfiguration tasks:
Check capabilities of interfaces, sub-interfaces, or provisioned sub-interfaces on the devices to confirm that they support the endpoints of the Martini tunnel.
Enable MPLS on all required interfaces.
Configure the use of the LDP
Enable TDP (tag distribution protocol) tag-switching
On PE devices, configure an IGP, such as OSPF or EIGRP, in order to distribute IP routes. These are required for IP connectivity and to enable labels to be allocated by the separate LDP or TDP.
Configure tag-switching of IPv4 packets on the WAN-facing (core-facing) interfaces. (These are not the same interfaces on which sub-interfaces for the Layer 2 Martini VPN tunnel endpoints are to be configured.)
Enable tag-switching of IPv4 packets on the specified device or interface.
If tag-switching is on the interface (WAN facing interface), it should be configured at the interface context.
Configure devices used in Layer 2 Martini VPNs to use the Gateway role. Configure interfaces used as endpoints to use the Access role.
For vendor-specific information, refer to the vendor's documentation.
Before creating a Layer 2 Martini VPN, check the capabilities of the interfaces, sub-interfaces, or provisioned sub-interfaces on the devices to determine if they will support the endpoints for the Martini tunnel.
To check the interface capabilities for supporting a Layer 2 Martini VPN:
Right-click on the interface and select Properties.
Display the Capabilities property page.
Under Outbound Capabilities, expand Martini.
Ensure that the type of encapsulation you wish to use in your Layer 2 Martini VPN is supported by the interface.
Confirm that the role for the interface is set to Access.
If any physical interface encapsulation incompatibilities pre-exist on the router, IP Service Activator detects them when the device driver or cartridge is building a new configuration for Martini circuits. An error is displayed in the IP Service Activator client, and you are given the option to manually correct the interface encapsulation.
In order to expedite the configuration process, ensure that the following manual configuration exists on the router:
For 802.1Q VLANs or VLAN-based Layer 2 circuits, or both, ensure that VLAN-tagging is enabled on physical interfaces and that each logical sub-interface has a VLAN ID configured.
For physical Ethernet interfaces to be used in port-based Martini circuits, ensure that there is no VLAN-tagging and either only unit 0 or none of the logical sub-interfaces is present.
In order to create a Layer 2 Martini VPN, you need Layer 2 endpoints.
You can create sub-interfaces manually, through the Configuration Template Module or by using the Interface Configuration Module and cartridges (if available for the vendors of interest). For MPLS-enabled switching devices, you can also use the VLAN configuration policy and cartridge (if available for the vendors of interest) to configure VLAN endpoints. For information about configuration policies, see IP Service Activator QoS User's Guide.
You must provision the Layer 2 endpoints with the correct encapsulation for the type of Layer 2 Martini VPN you are creating. You can then create the Layer 2 Martini VPN object, set the options, and assign the relevant endpoints to the VPN.
For an overview of prerequisite tasks, see "Preconfiguration Tasks for Creating Layer 2 Martini VPNs".
To create a Layer 2 Martini VPN:
In the Hierarchy pane, click the Service tab.
Click the Customers folder.
From the displayed customers list, select the required customer.
Right-click the Point to Points folder and select Add L2 Martini Pt-Pt from the context menu.
The L2 Martini Pt-Pt dialog box appears.
Select the L2 Martini Pt-Pt property page and specify the following values:
Name: specify a name for the Layer 2 Martini VPN. The name may contain alphanumeric characters only and may not include spaces.
Remarks: add any additional remarks (optional).
Type: choose the appropriate encapsulation type, matching the encapsulation selected when you preconfigured the sub-interface endpoints:
ATM AAL5
ATM Cell
Ethernet
Ethernet VLAN
Frame
Martini VC ID: if Automatic is selected, IP Service Activator provides a VC ID for you. Otherwise, specify a VC ID.
Select the Ownership property page and specify the details to restrict access to the Layer 2 Martini VPN object (optional).
Add Layer 2 endpoints (interfaces, sub-interfaces, provisioned sub-interfaces or VC interfaces) to the Layer 2 Martin VPN by doing one of the following:
Drag the desired Layer 2 endpoint objects into the new Layer 2 Martini VPN object. This selects them as the Layer 2 endpoints.
or:
Use the Layer 2 Site objects, for Ethernet port and Ethernet VLAN encapsulations on MPLS-enabled switching devices, where you specify the VLAN IDs and to which you link the Ethernet port. For information on Layer 2 sites, see "Setting Up Layer 2 Sites" and "Associating a Physical Component with a Layer 2 Site".
On the TLS Site page of the Layer2 Site dialog box, select Martini Service from the Service Type list.
For details about the L2 Martini Pt-Pt dialog box, see the L2 Martini Properties page in IP Service Activator online Help.
After the Layer 2 Martini point-to-point connection details are set up and the relevant devices are managed, apply the entire configuration by committing the transaction.
When you commit the transaction, the Martini VPN concretes that will be created are listed in the Concretes page of the Transaction dialog box.
Any validation errors are reported in the Fault page of the Transaction dialog box and the Current Faults pane.
If you wish to cancel the transaction after reviewing the Martini VPNs' concretes that will be created and the faults generated by the transaction, click Cancel.
If you wish to proceed with the transaction, click OK. Configuration details are sent to the proxy agent/network processor and on to the appropriate device driver/cartridge.
You can view a list of the Martini VPNs that have been propagated to the network and installed on an interface or sub-interface.
To view implemented Martini VPN details:
In the Hierarchy pane, click the Service tab.
Click the Customers folder.
From the displayed customer list, select the required customer.
Click the Point to Points folder.
The list of implemented Martini VPNs is displayed.
Double-click the required Martini VPN.
The Details pane for that Martini VPN is displayed on the right.
Click the Pt to Pt connections tab to view the Martini VPNs that are implemented on the selected object. All Martini VPNs' concretes appear on a yellow background.
Martini VPN details are listed under the following headings:
Point to Point: The name of the point-to-point Martini VPN
Interface Name: The interface associated with the Martini VPN
State: The current state of the Martini VPN:
Inactive: The Martini VPN has been created but has not been propagated to the proxy agents
Active: The Martini VPN has been propagated to the proxy agents
Rejected: The Martini VPN configuration was rejected
Installed: The Martini VPN configuration has been installed on the designated interface
Conflict There is a configuration error in the Martini VPN
ID: The internal ID number by which the Martini VPN is identified
|
Copyright © 2010, 2013, Oracle and/or its affiliates. All rights reserved. Legal Notices |
|