| Skip Navigation Links | |
| Exit Print View | |

|
Sun Blade X4-2B HTML Documentation Collection |
Sun Blade X4-2B Server Module Overview
Oracle System Assistant Overview
Oracle System Assistant Example
Oracle ILOM CMM Web Interface Example
About Server Module SP Oracle ILOM
Server Module SP Oracle ILOM Web Interface Example
Server Module SP Oracle ILOM CLI Example
1. Review Product Documentation
Sun Blade 6000 Modular System Documentation Library
Sun Blade X4-2B Documentation Library
2. Receive and Unpack the Server Module
3. Insert the Server Module Into a Chassis
Insert the Sun Blade X4-2B Server Module Into a Chassis
4. Access Server Module Management Tools
Set Up Server Module Remote Using Ethernet Network Connection
Set Up Server Module Using Local Serial Connection
Set Up Server Module Using Local KVM Connection
Determining Server Module Oracle ILOM SP IP Address
Display Server Module Oracle ILOM SP IP Address (Web Interface)
Display Server Module Oracle ILOM SP IP Address (CLI)
Access Server Module SP Oracle ILOM
Log In to Oracle ILOM SP (Web Interface)
Log In to Oracle ILOM SP (CLI)
5. Set up Server Module Software and Firmware (Oracle System Assistant)
Accessing Oracle System Assistant
Launch Oracle System Assistant (Oracle ILOM)
Launch Oracle System Assistant (Locally)
Set Up Software and Firmware (Oracle System Assistant)
6. Configure Server Module Drives for OS Installation
Identifying REM Host Bus Adapters
SG-SAS6-R-REM-Z Host Bus Adapter
Configuring Storage Drives: SG-SAS6-R-REM-Z (Oracle System Assistant)
SG-SAS6-REM-Z Host Bus Adapter
Configure Storage Drives SG-SAS6-REM-Z (Oracle System Assistant)
Configure Storage Drives (LSI Configuration Utilities)
Configure Storage Drives (LSI WebBIOS Configuration Utility)
Set RAID Volume (Virtual Drive) as Bootable SG-SAS6-R-REM-Z HBA (LSI WebBIOS Utility)
Create a RAID Volume using LSI SAS 2 BIOS Configuration Utility
7. Set Up an Operating System and Drivers
Configuring Preinstalled Oracle Solaris OS
Preinstalled Oracle Solaris 11.1 Image BIOS Boot Mode Restriction
Preinstalled Operating System RAID Limitations
Oracle Solaris OS Documentation
Configure Preinstalled Oracle Solaris 11
Configuring Preinstalled Oracle VM Software
Preinstalled Oracle VM Image BIOS Boot Mode Restriction
Oracle VM Server Configuration Worksheet
Configure Preinstalled Oracle VM Server
Getting Started With Oracle VM
Configuring Preinstalled Oracle Linux OS
Preinstalled Oracle Linux Image BIOS Boot Mode Restriction
Oracle Linux Configuration Worksheet
Configure the Preinstalled Oracle Linux OS
Register and Update Your Oracle Linux OS
Registering Oracle Linux and Activating Automatic Update
Getting Server Firmware and Software Updates
Firmware and Software Access Options
Getting Firmware and Software From MOS or PMR
Download Firmware and Software Using My Oracle Support
Gathering Information for the Physical Media Request
Request Physical Media (Online)
Request Physical Media (By Phone)
Installing Updates Using Other Methods
Powering Off the Server Module
Graceful Shutdown (Power Button)
Graceful Shutdown (Oracle ILOM Web Interface)
Graceful Shutdown (Oracle ILOM CLI)
Immediate Shutdown (Power Button)
Immediate Shutdown (Oracle ILOM CLI)
Reset the Server (Oracle ILOM CLI)
Reset the Server (Oracle ILOM Web Interface)
Troubleshooting Installation Issues
Troubleshooting Server Power States
Technical Support Information Worksheet
Locating the Server Module Serial Number
Before You Begin
Before you connect to the host console from a remote system, verify that the remote system meets the following requirements:
An operating system, such as Oracle Solaris, Oracle Enterprise Linux, or Windows, is installed in the remote system.
If the remote system is running Oracle Solaris OS, disable volume management. Disabling allows the remote console to access the physical floppy and CD/DVD-ROM drives.
If the remote system is running Windows OS, disable Internet Explorer Enhanced Security.
The remote system is connected to a network with access to the CMM Ethernet management port.
Java Runtime Environment (JRE) 1.5 or later is installed.
If CD-ROM redirection is enabled, 32-bit Java is installed.
The Remote Console system is operational.
The server module Oracle ILOM service processor is operational. Refer to Oracle ILOM 3.1 documentation, see http://www.oracle.com/goto/ILOM/docs.
To connect to the host console from a remote system.
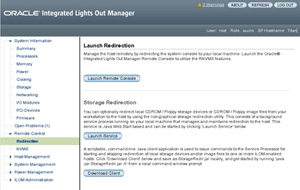
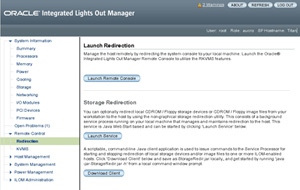
The Launch Redirection screen appears.


Hostname Mismatch warning dialog box when using a Windows system for Remote Console system redirection: Click the Yes button to clear.

Remote Control login dialog box:
Reenter your user name.
Reenter your password.
Click OK.

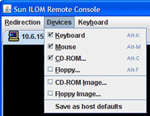
The Oracle ILOM Remote Console screen appears.
The following table describes devices to redirect.
|

Next Steps