1 Installation Overview
This chapter provides a high-level overview of the steps needed to perform an Oracle Communications MetaSolv Solution (MSS) 6.2 installation. The chapters that follow provide full information on each step. Figure 1-1 shows the high-level installation process.
Figure 1-1 Overview of the MSS 6.2 Installation Process
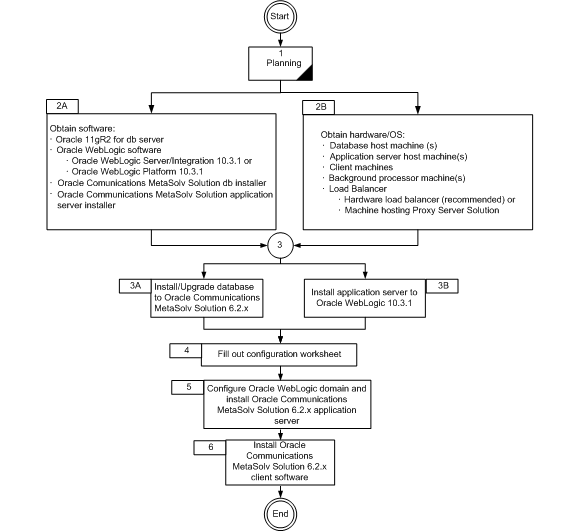
Description of "Figure 1-1 Overview of the MSS 6.2 Installation Process"
Step 5 in Figure 1-1 shows that the installation and deployment of the MSS 6.2 application server begins after the installation of Oracle WebLogic application server and the Oracle database on the host server machine.
The Oracle client is required for two MSS utilities: NPAA/NXX Split utility and Location and Routing Gateway (LERG). Once the Oracle WebLogic domain is configured, the MSS installer identifies the configuration and sets the appropriate parameters for the installation. Values are pulled from the Oracle WebLogic application server and Oracle database to provide configuration information for MSS. This minimizes the amount of information you must research and enter into the installer.
If You Are a New Customer
MSS 6.2 is the GA release for the software stream. The current release requires the following installation tasks:
-
Database: Install the 6.2 database. See "Setting Up The 6.2.x Database" for complete information.
-
Application server: Install the WebLogic application server 10.3.1 software release. See Oracle WebLogic Server documentation on the following Web site:
http://docs.oracle.com/cd/E12840_01/wls/docs103/sitemap.html -
Client workstation: See "Installing The Client Workstation" for information on installing individual workstations.
If You Are an Existing Customer
The upgrade path for the MSS database differs from the path for the application server. This section explains the upgrade path for each component.
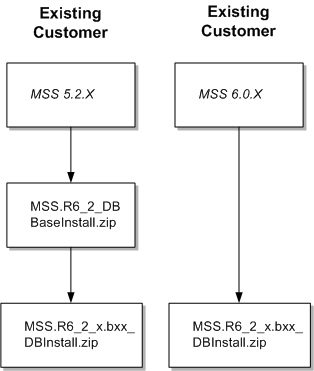
Database Upgrade Path
Figure 1-2 shows the upgrade path for the MSS database if you are on a pre-6.2 version.
Application Server Upgrade Path
Due to platform changes made in MSS 6.2.0, it is necessary to perform a full installation of the application server the first time you upgrade to the 6.2.x release stream, refer to "Installing and Deploying MetaSolv Solution on a Single Server" or "Installing and Deploying MetaSolv Solution on a Clustered Server".
The upgrade option in the installer can be used to install subsequent maintenance releases and patches. Refer to the specific maintenance release or patch file for detailed instructions. If you are installing a patch, refer to "Upgrading Oracle Communications MetaSolv Solution".
Related Software Dependencies
ASR and LSR require the following actions:
-
If you use ASR or LSR, you must reinstall them after the new version of MSS is installed.
-
If you currently have open LSR 6 orders, these will be view only in MSS 6.2.x. To avoid this problem, you can close any open orders before you move to MSS 6.2.x, or you can upgrade the orders to LSOG 9 or LSOG 10 before or after installing MSS 6.2.x.
Downloading the Installation Files
Before you begin the installation, download the MSS files for the platform you are using from the Oracle software delivery Web site:
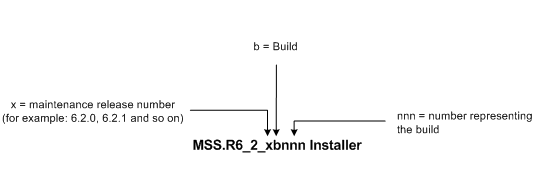
Identifying the Installation Files
This section explains which installation files you need to download from the Oracle software delivery Web site. Generic file names are used to identify the files in this section. Figure 1-3 shows the naming format used on the Oracle software delivery Web site.
Where to Download the Files
Download the application server/client installation files to the appropriate platform (Windows, Sun Solaris, AIX, Linux or HP) directly to the application server machine you intend to install on. The client files are downloaded and installed from the application server machine.
Data Migration
If you are moving to MSS 6.2.x from a pre-MSS 6.0 release, it might be necessary for you to perform a data migration. The Broadband Module available before MSS 6.0 has been discontinued, and customers who use the Broadband Module must migrate data to use Oracle's network templates, which replace the broadband functionality. Two tools are available to assist with the migration effort:
-
Pre-Migration Analysis Tool (PMAT): This tool can be run against your pre-MSS 6.0 database to determine the amount of data that potentially may need to be converted. This include circuits (bandwidth, virtual, facilities, specials), product catalog, and orders. This tool is located on the Oracle software delivery Web site.
-
Next-Generation Migration Tool: This tool is part of MetaSolv Solution Utilities. This tool automates the process of migrating network elements, migrating network systems, migrating connections, and the circuit conversion to next gen connections and any related order conversion.
The MetaSolv Solution 6.0 Migration Guide can be found on the Oracle software delivery Web site.
Basic Installation Steps
Each of the steps shown here for installing MSS contains additional tasks and information that you must know to proceed with the installation. The chapters in this book discuss each basic step.
-
Plan the installation by completing the following tasks:
-
Plan for the hardware and software you will need to implement MSS.
See MetaSolv Solution Planning Guide for information on minimum technical requirements.
-
Complete the pre-installation checklist in this chapter.
The checklist contains planning tasks that should be done before you begin the installation process.
-
-
Obtain the appropriate hardware and software.
-
Prepare the database and application server environments by completing the following tasks:
-
Install Oracle Database 11gR2.
-
Install the MSS 6.2.x database.
To complete this step, you must run the appropriate MSS database scripts. If you do not currently have the 6.2.x database installed, see "Setting Up The 6.2.x Database" for information on getting your database to the 6.2.x release level so that you can apply the current maintenance release.
-
Install third-party software on machines that will host the application server.
To complete this step, you must:
Install Oracle WebLogic Platform 10.3.1 on each machine hosting MSS. You can install your system in different configurations, but each machine must have Oracle WebLogic software installed.
-
-
Complete the worksheets that define properties for the installation machines.
Worksheets are included for each installation configuration type that MSS provides. The worksheets let you identify, in advance, information that is needed during the installation.
-
Install and deploy MSS 6.2.x on the Oracle WebLogic application servers by completing the following tasks:
-
Create the Oracle WebLogic domain and define the administration server and its clustered servers, or the single server.
When you create the domain and define the server(s) that belong to the domain, the Oracle WebLogic software creates the necessary files on the servers you indicate.
-
Install and deploy MSS 6.2.x.
To complete this step, you must:
-
Run the installer to copy MSS files to every machine that will host an Oracle WebLogic application server(s).
-
In the situation where the administration server is on a separate machine, it is not necessary to load MSS on that machine.
-
Deploy MSS from the single server or administration server to the managed servers.
-
-
-
Install on the client workstation.
You must perform an initial client installation to perform post-installation tasks that require the use of the client.
To complete this step, you must:
-
Install the client on a workstation.
You can use a program called the Zero Admin Client (ZAC) to install or you can install manually. Instructions are provided for both methods.
-
Install utilities or other separate MSS components.
Most software components can be installed using ZAC or a manual method.
-
-
Complete post installation tasks.
Tasks include:
-
Loading graphics to the database from a utility program.
-
Running a client utility to determine the health of the database.
-
Customizing the application with your company logo (optional).
-
Setting up user authentication.
-
Preinstallation Checklist
The following list indicates the information you need to research and understand before you start the installation process for MSS and the third-party software it requires. As you identify names, IP addresses, and so on, keep a written record of the information. You will need it during the system installation.
-
See MetaSolv Solution Planning Guide for the proper hardware and software for the application server, database server, and client machines.
-
Back up any customized reports and stored procedure exits. See the discussion on customizing the application in the MetaSolv Solution System Administrator's Guide for more information.
-
Identify the following:
-
Application server machines, names, and IP addresses.
-
Database server machine, name, IP address, database SID name, and database port (default = 1521).
-
See "Planning Worksheets" for help identifying and completing this information for the installation type you select.
-
-
Do a DNS and reverse DNS lookup for each application server machine from a user workstation.
-
DNS lookup: From a user workstation, use the
nslookupcommand for the application server machine DNS name.For example:
nslookup serversun1 -
Reverse DNS lookup: From a user workstation, use the
nslookupcommand for the application server machine IP address.For example:
nslookup 192.168.1.225
If the name or IP address is not found, contact your system administrator.
-
-
Test network connectivity between the following machines:
-
Application server machine to the database server machine
-
Log on to the application server machine and ping the database server machine using either the DNS name or the IP address. Do this for each application server machine.
-
Database server machine to the application server machine
-
Log on to the database server machine and ping the application server machine using either the DNS name or the IP address. Do this for each application server machine.
-
-
If your firewall does network address translation (NAT) and MSS end users reside outside the firewall, define an external DNS name for the Oracle WebLogic Server. Contact your network/transport and system administrator groups to verify and define the external DNS, if necessary.
To add an external DNS name:
-
Log on to the Oracle WebLogic Administration Server Console.
-
In the Change Center pane, click on Lock & Edit.
-
In the Domain Structure tree, expand Environment and then select Servers.
The Summary of Servers pane appears.
-
Click on the server_name (admin server).
The Settings for server_name pane appears.
-
Click on the General tab and then click the Advanced link.
The following pane appears.
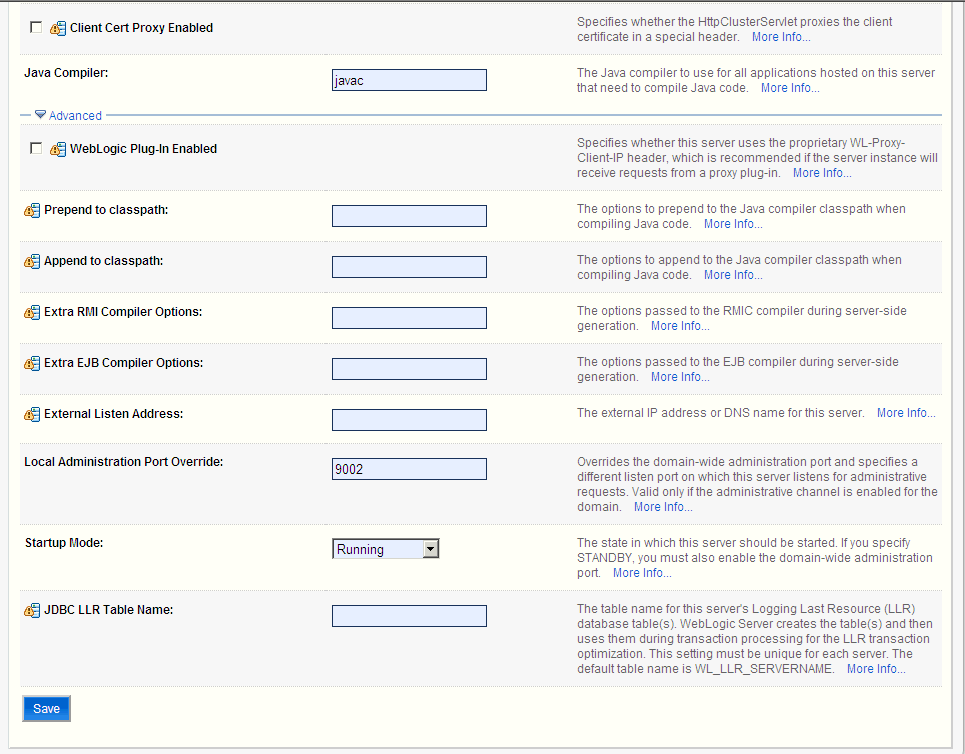
-
Enter the address into the External Listen Address field and click Save.
-
If you are using an external load balancer, the following conditions must be met:
-
Server affinity: Sticky Session must be enabled.
-
Cookie persistence: The load balancer must NOT modify WebLogic cookies.
-
-
Choose the installation configuration you plan to use for the application server(s):
-
Single server: You can have multiple single server instances.
-
Clustered servers: This configuration provides failover benefits.
-
-
Download the MSS 6.2.x files from the Oracle software delivery Web site.
-
If cluster is configured, create a DNS entry including all clustered managed servers' listening IP addresses in the same cluster. This DNS entry will be used as Cluster Address for the cluster during domain configuration in production environment.
-
Installing on a UNIX/Linux Platform
The following list contains special tasks required for graphics on a UNIX machine:
-
To run the installation using a graphical user interface:
-
On a workstation, start Hummingbird Exceed or another X-Windows emulator.
-
On the UNIX machine, set the
DISPLAYenvironment variable to send the graphical display to the workstation. -
$DISPLAY=mymachinename:0.0;export DISPLAY
-
-
Enable xhost for application servers that run on a UNIX machine.
To enable the lookup of graphic settings on the application server, you must enable xhost on the machine. Run the following command on the application server machine while logged on as root:
xhost +