6 Upgrading Oracle Communications MetaSolv Solution
This chapter explains how to upgrade Oracle Communications MetaSolv Solution (MSS) to a newer version. The topics in the chapter cover downloading and installing a maintenance release or patch to the following MSS components:
-
Database
-
Application server
-
Client workstation
Note:
This chapter focuses on upgrading to a future maintenance release or patch of MSS 6.2.x, using the Upgrade option of the MSS Installer.If MSS 6.2.x has not been previously installed, refer to "Installing and Deploying MetaSolv Solution on a Single Server" or "Installing and Deploying MetaSolv Solution on a Clustered Server" to install MSS 6.2.x and then return to this chapter to perform subsequent maintenance release or patch installations.
If MSS 6.2.x has been previously installed and if desired, the maintenance release or patch can be installed using the Full Installation option of the MSS Installer. Refer to "Installing and Deploying MSS" in "Installing and Deploying MetaSolv Solution on a Single Server" or "Installing and Deploying MSS" in "Installing and Deploying MetaSolv Solution on a Clustered Server" to install the maintenance release or patch using this option.
MSS Application Server Upgrade Process
The high-level application server upgrade process is described below:
-
Un-deploy custom developed JPDs.
-
Un-deploy MSS 6.2-related applications.
-
Install MSS 6.2.x.
-
Install/deploy MSS 6.2.x-related applications.
-
Re-compile custom-developed JPDs with jdk160.
-
Deploy custom-developed JPDs.
-
Update/restore configuration files.
Downloading the Maintenance Release or Patch Software
Software for MSS patches is downloaded from the My Oracle Support Web site. For information on downloading product software, see "Downloading the Installation Files".
Download the file for the appropriate patch you are installing. The following bullet shows how the download link for the file appears on the Oracle software delivery Web site.
-
MSS.R6_2_x.bnnn_AppServerInstaller: This file contains an installer that installs to application server machines. The files it installs on the application server include both the application server software and the client software, which is distributed from the application server. The installer is compatible with Windows, Solaris, AIX, HP, or Oracle Linux operating systems.
Installing a Maintenance Release or Patch on the Database
Your database must be at the 6.2 level to install a 6.2.x maintenance release or patch. See "Setting Up The 6.2.x Database" for steps on how to upgrade the database to MSS 6.2.x. Then, follow the steps in this chapter to apply a subsequent maintenance release or patch.
To learn about database changes included in a given release, see MetaSolv Solution Database Change Reference. This document can be downloaded from the Oracle software delivery Web site.
Note:
Before upgrading your database to MSS 6.2.x, refer to Technical Bulletin ID # 435884.1 to determine how it affects your upgrade. To locate this bulletin, go to the My Oracle Support Web site:and click on the Knowledge tab
Figure 6-1 shows the upgrade path for the database.
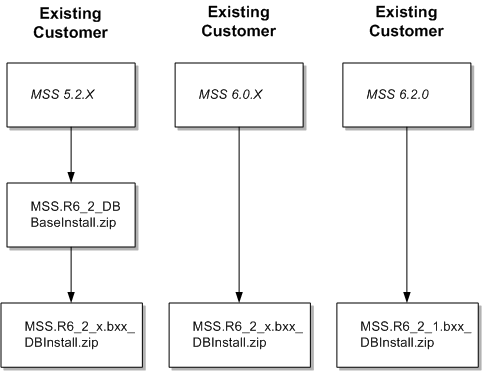
Extracting the MSS Database Scripts
Extracting the contents of the MSS.R6_2_1.bxx_DBInstall.zip file copies SQL scripts, procs, and reports to a directory you choose on a client machine or on the database server. Figure 6-2 shows the directory structure that results from the extract, based on the paths specified in the ZIP file.
Figure 6-2 Structure of Database Upgrade File
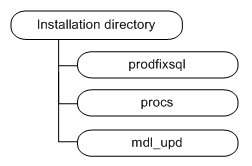
Description of "Figure 6-2 Structure of Database Upgrade File"
The MSS database scripts reside in the MSS.R6_2_1.bxx_DBInstall.zip file (where xx is the build number). This zip file contains database scripts used to upgrade an existing MSS 6.0.2 or higher database to MSS 6.2.x.
To extract the MSS database scripts to the database server machine:
-
Locate and select the MSS.R6_2_1.bxx_DBInstall.zip file.
-
Right-click the file, select Open With, then select WinZip Executable.
-
From the main menu bar, select Actions and then select Select All.
-
From the main menu bar, select Actions and then select Extract.
-
Browse to the directory to which you want to extract the database scripts. Oracle recommends extracting the scripts to a directory on your database server.
To successfully install a maintenance release or patch on the database, you must run the two following master SQL files:
-
pfixSQL_Master located in the prodfixsql directory
-
master located in the procs directory.
All 6.2.x maintenance releases carry cumulative changes from previous maintenance releases. That means you only have to run the pfixSQL_Master and master SQL files for the maintenance release you are installing to get all changes since the 6.0.2 GA release.
Updating the Database by Running SQL Scripts
The prodfixsql directory has a number of SQL scripts that update your database.
To update the database:
-
Change your Start in: directory to the location where you want the audit logs to appear and connect (from that location) to SQL*Plus using the ASAP user ID.
-
At the prompt, enter:
@driveletter:installation_directory/prodfixsql/pfixSQL_Master.sql
The SQL scripts run against the database and make the appropriate changes for the maintenance release or patch. When the prompt reappears, the contents of the prodfixsql directory where the SQL files were stored have been applied.
Note:
Before running the SQL scripts, refer to Technical Bulletin ID # 435879.1 to determine how it affects your upgrade. To locate this bulletin, go to the My Oracle Support Web site:and click on the Knowledge tab.
-
Verify that the contents of the prodfixsql directory have been applied to your database correctly, review the log file for each prodfixsql file that was applied.
The log files reside in the Start in: directory. Search the files in the directory for ORA-.
-
Open the dm_rprt.txt file and look for processes that have passed, failed, or not run.
If you find processes that failed or did not run, contact Oracle Global Customer Support.
Updating Stored Procedures
Use SQL*Plus to apply the contents of the install_directory\procs directory to the database. These steps update the stored procedures for your database.
To update stored procedures:
-
Set the current directory to:
drive letter:install_directory\procs
-
Connect to SQL*Plus using the ASAP user ID.
-
At the prompt, enter:
spool master.log
@master
The stored procedures have been applied when the SQL> prompt reappears.
-
Enter:
spool offrun
Running Reports
The mdl_upd directory contains SQL files that include any modifications to the database structure in a service pack. To apply these updates to the reports, copy the contents of this directory into either the db/inst_60 or db/upg_60 directory. After applying the files in the prodfixsql directory, you can validate the database structure by running the mdl_upd_cur.sql and/or mdl_upd_cmp.sql file. These processes provide the reports mdl_upd_cur.txt and mdl_upd_cmp.txt identical to the mdl_cur.sql and mdl_cmp.sql files. See MetaSolv Solution System Administrator's Guide for more information on reports.
Note:
This task is not required. If you choose not to apply updates to the reports before you run them, extra database objects can appear in the reports.Upgrading the MSS Application Server
The installer (MSS.R6_2_1.bnnn_AppServerInstaller .jar) for the application server portion of MSS is the same for both maintenance release and patch installations. Download the installer for the appropriate platform (Windows, Solaris, AIX, or HP) and the appropriate upgrade type (maintenance release or patch) from the Oracle software delivery Web site.
Installation Options for the Application Server
Oracle recommends the following for the application server installation of the MSS 6.2.x maintenance release and patches:
-
First time installing or upgrading the MSS 6.2.x release stream: Select the MSS 6.2.x Full Installation option in the application installer. Significant changes were made in the WebLogic Server configuration for these maintenance releases, and using the full installation guarantees that all changes are installed on your machine. Refer to "Installing and Deploying MetaSolv Solution on a Single Server" or "Installing and Deploying MetaSolv Solution on a Clustered Server" to install MSS 6.2.x.
The files in the following directories (under the MSLV_Home/server_name/appserver directory) are updated if you select the Full Installation option and it will be necessary to backup the following files and directories:
-
bin
-
cab
-
classes
-
config
-
flow_through_package
-
portal
-
samples
-
samples/customExtensions
-
utils
-
-
Patches and Subsequent Maintenance Releases: select the MSS 6.2.x Upgrade option when you install a patch or subsequent maintenance release. Review the ReadMe file and manually apply any required configuration changes.
The following application server configuration files are updated if you select the Upgrade option and it will be necessary to backup these files:
-
jmaster.ini
-
lerg.ini
-
loggingconfig.xml
-
npasplit.ini
-
tbs.ini
-
tbs_util.ini
-
zac_config_jobmgr
The following files are not updated if you select the Upgrade option:
-
Application server start up files:
-
startMSLVmanaged.sh or startMSLVmanaged.cmd
-
startMSLVsingle.sh or startMSLVsingle.cmd
-
startservername.sh or startservername.cmd
-
-
Gateway configuration files
-
gateway.ini
-
integration.xml
-
-
WebLogic Server configuration parameters
-
JacORB configuration parameters
-
Single Server Upgrade Basic Steps
-
Prepare for the upgrade. This includes downloading files and collecting information.
-
Install /Deploy MSS 6.2.x.
-
Complete post-upgrade tasks.
-
(Optional) Tune the server.
-
(Optional) Make changes to the configuration files.
-
Single Server Upgrade
Follow the procedures in this section to upgrade the server.
Note:
Before upgrading your application server to MSS 6.2.x, refer to Technical Bulletin ID # 435745.1, to determine how it affects your upgrade. Failure to do so results in the server failing to start after installing the application. To locate this bulletin, go to the My Oracle Support Web site:and click on the Knowledge tab.
Note:
You will need to manually modify the loggingconfig.xml and the integration.xml files or you will receive an error on your appserver console. Additionally, if using custom extensions, you will need to manually modify the gateway.ini file. For information on custom extensions, see MetaSolv Solution Custom Extensions Developer's Reference.Preparing for the Upgrade
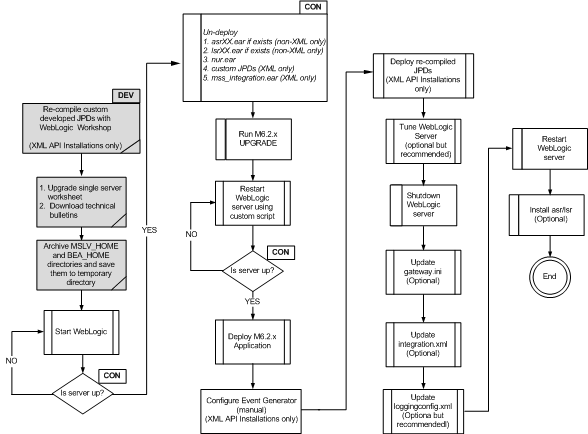
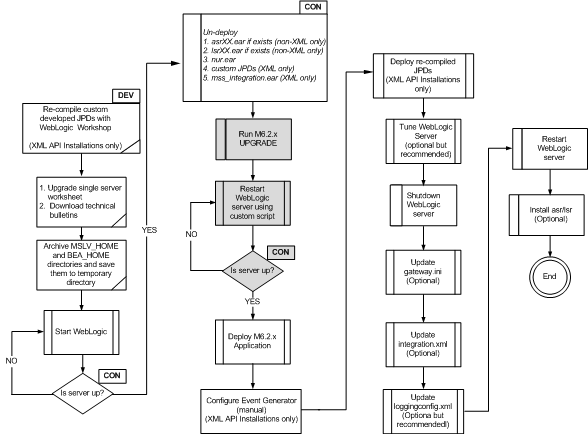
The highlighted sections of Figure 6-3 show the steps for preparing for the upgrade.
To prepare for the upgrade:
-
Download the MSS upgrade (either a maintenance release or a patch) from the Oracle software delivery Web site.
-
FTP the MSS upgrade file to the target server machine.
-
Complete the appropriate single server worksheets in Appendix C.
-
Archive the MSLV_Home and BEA_Home directories and save the archive file to a temporary directory.
Undeploy Previously Installed Applications
The highlighted sections of Figure 6-4 show the steps for undeploying previously installed applications.
To undeploy previously installed applications:
-
Start the WebLogic server and log on to the WebLogic Server Administration Console.
-
To undeploy the application, do the following:
-
From the Domain Structure tree, click on Deployments.
-
In the Change Center pane, click on Lock & Edit.
-
From the Summary of Deployments pane, click the check box for nur.ear.
-
Click on Stop and select Force Stop Now.
-
Click on Delete.
-
Click on Yes to delete the deployment.
-
In the Change Center pane, click on Activate Changes.
-
-
Repeat step 2 for each application that is to be deleted, refer to the following list:
-
asrXX.ear (if deployed) - (non-XML installations only)
-
lsrXX.ear (if deployed) - (non-XML installations only)
-
custom JPDS - (XML instllations only)
-
mss-integration.ear - (XML installations only)
-
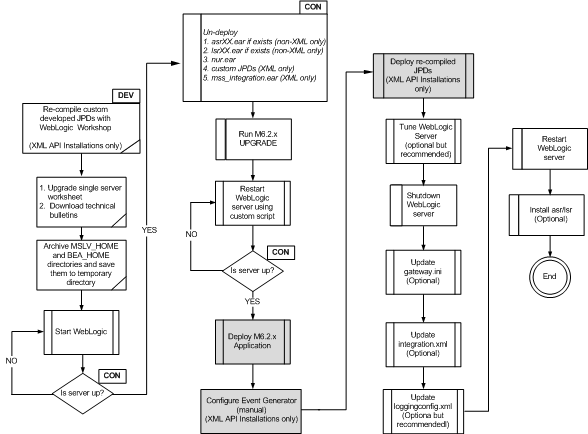
Installing the Upgrade
The highlighted sections of Figure 6-5 show the steps for installing the upgrade.
To install the upgrade, do the following:
-
From the directory where the maintenance release or patch file was downloaded, enter the following command:
java -jar releaseNo.buildNo_AppServerInstaller.jar
For example:
java -jar MSS.R6_2_1.b150_AppServerInstaller.jarNote:
For 64-bit systems, use the following java_options parameter: -d64.The Select MetaSolv home directory window appears.
-
From the Look In list, click the down arrow and select a directory in which the installer files can be stored and used during the installation process, then click Select.
A directory named installer is automatically created in the selected directory. Oracle recommends choosing your MSLV_Home directory for this task.
The installer auto-launches the installation process by invoking setup.sh (UNIX/Linux) or setup.cmd (Windows) in the MSLV_Home/installer directory.
Worksheet references and example values:
Field name Worksheet reference number Example value File Name (MSLV_Home)
COMM-0090 /opt/m62Single/single The Oracle Communications MetaSolv Solution Installation window appears.
-
Click Next.
The Oracle Communications MetaSolv Solution Installation - Choose Install Type window appears.
-
Select Upgrade and click Next.
The Oracle Communications MetaSolv Solution Installation - Select Server window appears.
-
Select MetaSolv_Home and do the following:
-
Verify the Admin Host name.
-
Verify the port number for the Admin Host.
-
Verify the user name and enter the password.
Worksheet references and example values:
Field name Worksheet reference number Example value Admin Host Admin-0250 srvrchscal Port# Admin-0260, Admin-0270 7001 (HTTP port), 7002 (HTTPS port) User ID COMM-0020 weblogic Pass COMM-0030 web_logic -
(Optional) If you want to upgrade MSS using the SSL port, select the Connect to WebLogic using SSL check box. In the Key Store Location field, enter the path or click Browse to search for the keystore location.
See the Oracle WebLogic Server documentation for information about configuring keystores.
-
-
Click Go.
The installer queries the Admin Host machine and returns with values you entered during the configuration of the WebLogic domain. This process can take a few moments.
The Oracle Communications MetaSolv Solution Installation window appears with the domain and any servers in the domain appearing in the left pane.
-
Select the server in the left pane.
-
Click Install.
The Installation Summary window appears.
-
After the installation completes, the Installation Complete window appears.
The installer installs the appropriate MSS files to the server. When the files are installed, the location of the startup file created for the server is displayed.
Caution:
Do not exit the installer. -
Note the location of the startup file for the application server, then minimize the installer window.
-
Shut down the server, and restart it using the custom script installed by the installer and listed on the window.
To start the servers, navigate to the m62domain directory. At the command prompt, enter the command:
For UNIX/Linux:
startmslv01.sh
For Windows:
startmslv01.cmd
To shut down the servers, navigate to the m62domain directory. At the command prompt, enter the command:
For Unix/Linux:
stopmslv01.shFor Windows:
stopmslv01.cmd
Note:
To start or stop the administration server and managed servers (in a cluster environment) using the SSL port, you must add an s after http in the ADMIN_URL argument in the startup/stop server scripts for the administration server and for each managed server. For example:https://host_name:admin_sslport
-
Start the WebLogic Server Administration Console by typing the following information into the Address field of Internet Explorer:
http://host_admin:port number/consoleYou can monitor the deployment from the console. To check the servers, click Servers in the left pane of the Console, and the right pane will show the status of all servers.
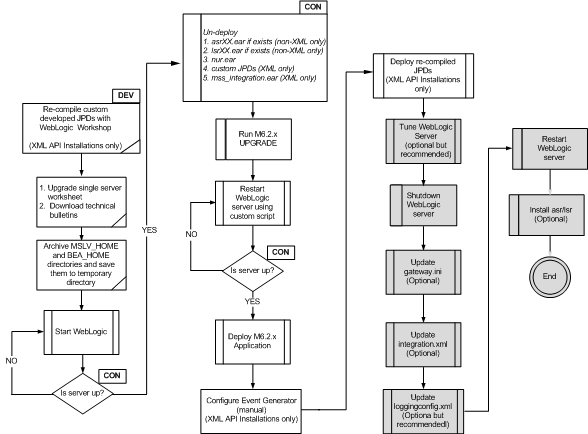
Deploying the Application
The highlighted sections of Figure 6-6 show the steps for deploying the upgrade.
To deploy the upgrade, do the following:
-
After the startup commands have been run and the application server has been started, maximize the installer window and click Deploy Application.
The Oracle Communications MetaSolv Solution Installation window appears listing the server you can select for deployment.
This process can take a few moments. If the server is not started, a status appears on the window indicating the installer is waiting for the server to be in running mode. When the server is in running mode, you can begin the deployment.
-
Select a server in the Target Servers list box, and click Deploy.
The deployment process begins. You can follow the progress of the deployment by viewing the text that appears in the right pane of the installation window.
When the deployment is complete, the Deployment Completed window appears.
-
Click OK.
-
Click Exit.
The Exit? window appears.
-
Click OK to exit.
For non-XML API upgrades, proceed to the next section.
For XML API upgrades, continue to step 6.
-
Set up an event generator by doing the following:
-
Start the WebLogic Integration Administration Console by pointing your browser to:
http://<host_admin:port number>/wliconsoleThe initial console window appears.
-
Click Event Generators.
The View All File Event Generators window appears.
-
On the left panel under JMS, click Create New.
The Create a New JMS Event Generator information appears in the right panel.
-
Enter the following values on the Create a New JMS Event Generator window:
-
Generator Name: InternalOutBoundGenerator
-
Destination Type: javax.jms.Queue
-
Destination JNDI Name: mss.internal.event.queue
-
JMS Connection Factory JNDI Name: weblogic.jws.jms.QueueConnectionFactory
-
Message Selector: Leave this field blank
-
Default Rule Channel: /MSS/internalOutboundEventChannel (xml)
-
-
Click Submit.
The JMS Event Generator Definition summary appears.
-
To return to the main WebLogic Integration Administration Console window, click Home in the tabs listed at the top of the pane.
Completing Post-Upgrade Tasks
The highlighted sections of Figure 6-7 show the steps for completing post-upgrade tasks.
To complete the post-upgrade tasks, do the following:
-
Tune the Oracle WebLogic server.
See "Tuning Servers For Performance" for information on tuning.
-
Shut down the Oracle WebLogic Server and update the following files:
-
gateway.ini file.
-
integration.xml file.
-
loggingconfig.xml
See "Configuration Files" for more information.
-
-
Start the Oracle WebLogic Server.
-
Run TBSGraphicsLoad.exe from a client workstation to load specific graphics to the database. See "Loading New and Updated Graphics to the Database" for more information.
-
Re-install LSR or ASR, if required.
Clustered Server Upgrade Basic Steps
-
Prepare for the upgrade. This includes downloading files and collecting information.
-
Install/Deploy MSS 6.2.1.
-
Complete post-upgrade tasks.
Clustered Server Upgrade
Follow the procedures in this section to upgrade the clustered servers.
Preparing for the Upgrade
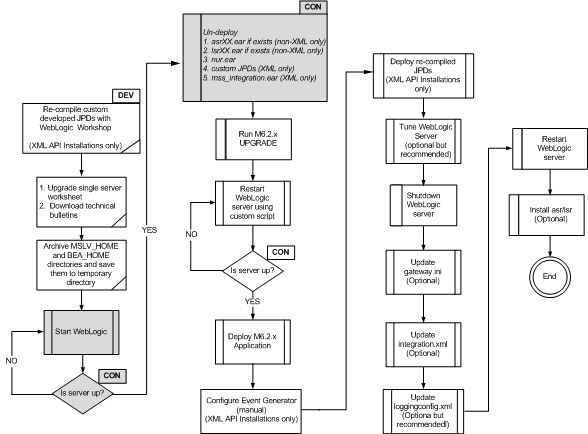
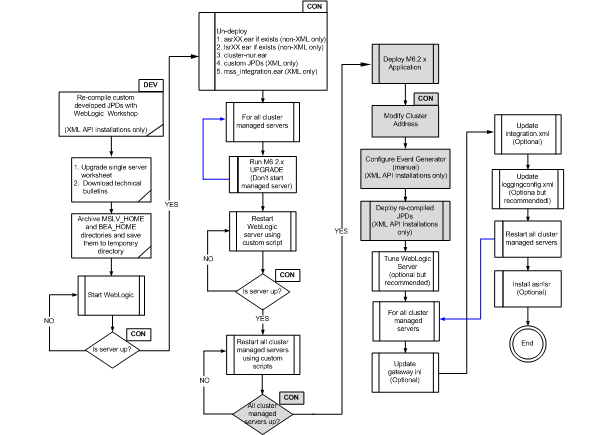
The highlighted sections of Figure 6-8 show the steps for preparing for the upgrade.
To prepare for the upgrade:
-
Download the MSS upgrade (either a maintenance release or a patch) from the Oracle software delivery Web site.
-
FTP the MSS upgrade file to the target server machine.
-
Complete the appropriate single server worksheets in Appendix C.
-
Archive the MSLV_Home and BEA_Home directories, on the administration server and all clustered servers, and save the archive files to a temporary directory.
Undeploy Previously Installed Applications
The highlighted sections of Figure 6-9 show the steps for undeploying previously installed applications.
To undeploy previously installed applications:
-
Start the WebLogic server and log on to the WebLogic Server Administration Console.
-
Verify that all the clustered servers are running.
-
From the Domain Structure tree, expand Environment and click Servers.
-
-
To undeploy the application, do the following:
-
From the Domain Structure tree, click on Deployments.
-
In the Change Center pane, click on Lock & Edit.
-
From the Summary of Deployments pane, click the check box for cluster-nur.ear.
-
Click on Stop and select Force Stop Now.
-
Click on Delete.
-
Click on Yes to delete the deployment.
-
In the Change Center pane, click on Activate Changes.
-
-
Repeat step 3 for each application that is to be deleted, refer to the following list:
-
asrXX.ear (if deployed) - (non-XML installations only)
-
lsrXX.ear (if deployed) - (non-XML installations only)
-
custom JPDS - (XML installations only)
-
mss-integration.ear - (XML installations only)
-
Installing the Upgrade
The highlighted sections of Figure 6-10 show the steps for installing the upgrade.

To install the upgrade, do the following:
-
For each clustered server, from the directory where the maintenance release or patch file was downloaded, enter the following command:
java -jar releaseNo.buildNo_AppServerInstaller.jar
For example:
java -jar MSS.R6_2_1.b150_AppServerInstaller.jarNote:
For 64-bit systems, use the following java_options parameter: -d64.The Select MetaSolv home directory window appears.
-
From the Look In list, click the down arrow and select a directory in which the installer files can be stored and used during the installation process, then click Select.
A directory named installer is automatically created in the selected directory. Oracle recommends choosing your MSLV_Home directory for this task.
The installer auto-launches the installation process by invoking setup.sh (UNIX/Linux) or setup.cmd (Windows) in the MSLV_Home/installer directory.
Worksheet reference and example value:
Field name Worksheet reference number Example value File Name (MSLV_Home) COMM-0090 /opt/m62Single/single The Oracle Communications MetaSolv Solution Installation window appears.
-
Click Next.
The Oracle Communications MetaSolv Solution Installation - Choose Install Type window appears.
-
Select Upgrade and click Next.
The Oracle Communications MetaSolv Solution Installation - Select Server window appears.
-
Select MetaSolv_Home and do the following:
-
Enter the Admin Host name.
-
Enter the port number for the Admin Host.
-
Enter a user name and password.
Worksheet references and example values:
Field name Worksheet reference number Example value Admin Host Admin-0250 srvrchscal Port# Admin-0260, Admin-0270 7001 (HTTP port), 7002 (HTTPS port) User ID COMM-0020 weblogic Pass COMM-0030 web_logic -
(Optional) If you want to upgrade MSS using the SSL port, select the Connect to WebLogic using SSL check box. In the Key Store Location field, enter the path or click Browse to search for the keystore location.
See the Oracle WebLogic Server documentation for information about configuring keystores.
-
-
Click Go.
The installer queries the Admin Host machine and returns with values you entered during the configuration of the WebLogic domain. This process can take a few moments.
The Oracle Communications MetaSolv Solution Installation window appears with the domain and any servers in the domain appearing in the left pane.
-
Select the server in the left pane.
-
Click Install.
The Installation Summary window appears.
-
After the installation completes, the Installation Complete window appears.
The installer installs the appropriate MSS files to the server. When the files are installed, the location of the startup file created for the server is displayed.
Caution:
Do not exit the installer. -
Note the location of the startup file for the application server, then minimize the installer window.
-
Repeat steps 1 through 10 for all clustered server machines.
-
Shut down the administration server, and restart it using the custom script installed by the installer and listed on the window.
To start the servers, navigate to the m62domain directory. At the command prompt, enter the command:
-
For UNIX/Linux:
startmslv01.sh
-
For Windows
startmslv01.cmd
To shut down the servers, navigate to the m62domain directory. At the command prompt, enter the command:
-
For UNIX/Linux:
stopmslv01.sh
-
For Windows
stopmslv01.cmd
Note:
To start or stop the administration server and managed servers (in a cluster environment) using the SSL port, you must add an s after http in the ADMIN_URL argument in the startup/stop server scripts for the administration server and for each managed server. For example:https://host_name:admin_sslport
-
-
Start the WebLogic Server Administration Console by typing the following information into the Address field of Internet Explorer:
http://host_admin:port number/consoleYou can monitor the deployment from the console. To check the servers, click Servers in the left pane of the Console, and the right pane will show the status of all servers.
-
Restart all the clustered servers using the custom scripts installed by the installer and listed on the window.
-
Verify that all the clustered servers are running.
-
From the Domain Structure tree, expand Environment and click Servers.
-
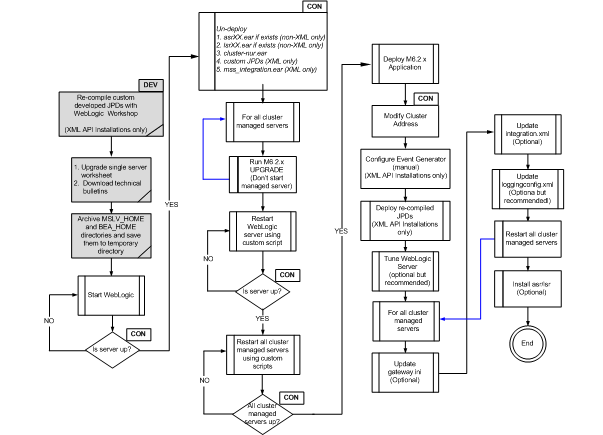
Deploying the Application
The highlighted sections of Figure 6-11 show the steps for deploying the upgrade.
To deploy the upgrade, do the following:
-
After the startup commands have been run and the application server has been started, maximize the installer window and click Deploy Application.
The Oracle Communications MetaSolv Solution Installation window appears listing the server you can select for deployment.
This process can take a few moments. If the server is not started, a status appears on the window indicating the installer is waiting for the server to be in running mode. When the server is in running mode, you can begin the deployment.
-
Select a server in the Target Servers list box, and click Deploy.
The deployment process begins. You can follow the progress of the deployment by viewing the text that appears in the right pane of the installation window.
When the deployment is complete, the Deployment Completed window appears.
-
Click OK.
-
Click Exit.
The Exit? window appears.
-
Click OK to exit.
-
From the WebLogic Server Administration Console, modify the cluster address by performing the following:
-
From the Domain Structure tree, expand Environment and click Clusters.
-
Click on the cluster name.
The Configuration tab and the General tab are selected by default.
-
Change the SSL port for the cluster address to a DNS entry containing all clustered servers' listening IP addresses. All clustered servers in the production environment should listen on the same port. If not, navigate to Servers, select each clustered server, click the Configuration tab followed by the General tab, and change the Listen Port. Modify the JNDI URL in the gateway.ini file for each clustered server.
For non-XML API upgrades, proceed to the next section.
For XML API upgrades, continue to step 7.
-
-
Set up an event generator by doing the following:
-
Start the WebLogic Integration Administration Console by pointing your browser to:
http://<host_admin:port number>/wliconsoleThe initial console window appears.
-
Click Event Generators.
The View All File Event Generators window appears.
-
On the left panel under JMS, click Create New.
The Create a New JMS Event Generator information appears in the right panel.
-
Enter the following values on the Create a New JMS Event Generator window:
-
Generator Name: InternalOutBoundGenerator
-
Destination Type: javax.jms.Queue
-
Destination JNDI Name: mss.internal.event.queue
-
JMS Connection Factory JNDI Name: weblogic.jws.jms.QueueConnectionFactory
-
Message Selector: Leave this field blank
-
Default Rule Channel: /MSS/internalOutboundEventChannel (xml)
-
-
Click Submit.
The JMS Event Generator Definition summary appears.
-
To return to the main WebLogic Integration Administration Console window, click Home in the tabs listed at the top of the pane.
Completing Post-Upgrade Tasks
The highlighted sections of Figure 6-12 show the steps for completing post-upgrade tasks.
To complete the post-upgrade tasks, do the following:
-
Tune the Oracle WebLogic server.
-
See "Tuning Servers For Performance" for information on tuning.
-
Start the WebLogic Server Administration Console and in the left pane under your domain, select Clusters >cluster_name.
-
Change the cluster address to the DNS host name.
Note:
Do not use the comma-separated list of single address host names or IP addresses in a production environment. These can be used in a development or test environment -
Shut down the Oracle WebLogic Server and update the following files:
-
gateway.ini file.
-
integration.xml file.
-
loggingconfig.xml
See "Configuration Files" for more information.
-
-
Restart all cluster managed servers.
-
Run TBSGraphicsLoad.exe from a client workstation to load specific graphics to the database. See "Loading New and Updated Graphics to the Database" for more information.
-
Re-install LSR or ASR, if required.
Updating Client Workstations
If you are using ZAC to install and update client workstations, a maintenance release or patch update to the workstation is automatic the first time a user logs on to MSS after the maintenance release or patch has been installed on the application server.