| Oracle Virtual Operator Panel User's Guide Release 2.1 E48640-01 |
|


 Previous |
 Next |
This chapter describes how to use the MD-VOP Library Panel menus.
Use MD-VOP menu commands to perform functions on one or more selected tape drives.
The Library Panel includes the following menus:
|
Note: Depending on your access level, some menus may not be displayed. |
The File menu includes the following commands:
Reconnect to Selected Drives in This Library
MD-VOP attempts to reconnect to the selected tape drives in the library. Use this function after a network or tape drive issue is encountered.
Reconnect to Unconnected Drives
MD-VOP attempts to reconnect to those tape drives with a failed network connection.
Refreshes tape drive icons to the last known state.
Clears the current library transcript (log).
Clears all tape drive transcripts (logs) for the selected library
The Drive Operations menu includes the following commands, used to control the function of one or more selected tape drives. These commands may have disruptive consequences. Therefore, you are prompted to continue before a command is executed.
|
Note: Online, offline, load, and IPL stop all active backup jobs to the selected libraries. |
Health Analysis of Selected Drives in This Library
Performs a health check on selected tape drives. To view the results of this analysis, click the Drive Health View tab in the MD-VOP Library Panel. See "Drive Health View" for more information. The Health Analysis does not affect drive functionality.
Set Selected Drives Online in This Library
Places selected tape drives in online state. This is the normal operational state.
Set Selected Drives Offline in This Library
Places selected tape drives in offline state. This state is designed for tape drive maintenance.
Load Tape Cartridges in This Library
Loads selected tape drives. A tape cartridge must be inserted in the tape drive, but not loaded.
Unload Tape Cartridges in This Library
Unloads selected tape drives. The tape cartridge is dismounted. The tape remains in the tape drive, but is not threaded.
IPL Selected Drives in This Library
Performs an IPL (Initial Power Load) of the selected tape drives. An IPL can result in the following:
During an IPL, the tape drive is reported as not available to MD-VOP
If a tape is present, the tape drive unloads the tape.
If a tape is present, it may have an invalid MIR (degraded high speed access).
Any I/O on the data path stops. Depending on the backup/archive application, the tape drive may require several minutes to recover.
The Retrieve menu includes the following commands, used to obtain or remove logs from selected tape drives. These commands are non-disruptive.
|
Note: This menu is only available in the system administrator version of MD-VOP |
Retrieve ID Files in This Library
Retrieves a file that contains information about the global functioning of the selected tape drives.
Retrieve Dump Logs in This Library
Retrieves a memory dump that contains the full state of the selected tape drives at the moment. A dump is a SNO (Should Not Occur) meaning that the firmware detected a state that could not be addressed.
Retrieve Event Logs in This Library
Retrieves a log that contains the Fault System Codes (FSC) and events for the selected tape drives.
Retrieve Perm Logs in This Library
Retrieves a log containing non-dump events.
Retrieve All Logs in This Library
Retrieves all logs for the selected library based on the library IP address.
Delete Dump Logs in This Library
Deletes the dump logs from the selected tape drives.
Delete Event Logs in This Library
Deletes the event logs from the selected tape drives.
Delete Perm Logs in This Library
Deletes the perm logs from the selected tape drives.
Delete All Logs in This Library
Deletes all logs from the selected tape drives.
|
Note: It is recommended that you save logs before deleting them, as they can help in troubleshooting tape drive issues. |
The Configuration menu includes the following commands, used to configure the time on all selected tape drives in the library and load firmware from a file to the tape drives.
|
Note: This menu is only available in the system administrator version of MD-VOP. |
Synchronizes time on the tape drives with that of the server. This is a non-disruptive operation.
Firmware Update from File in This Library
Loads firmware from a user-specified file to a tape drive. See "Performing a Firmware Update".
Before loading firmware from a file, consider the following:
Do not IPL (reboot) a tape drive during a firmware update. Doing so can potentially cause the tape drive to become unusable.
Only T10000, T9840D, and LTO 4 tape drives may be updated through the network interface.
The tape drives you select for a firmware update must be of the same drive type.
The tape drive checks the file being transferred and disregards firmware files that are not valid for that tape drive.
You can load up-level or down-level firmware, without the dependencies of intermediate firmware.
When the Code Load from File screen is displayed, the MD-VOP main interface is still visible and selectable, depending on the operating system. The interface will update, however, the menu items are disabled.
You must manually check a T9840D to be offline before performing a firmware update. Otherwise, the tape drive will immediately display a failed indication in the firmware display.
Firmware updates may fail, depending on network and other conditions. Once a firmware update completes, always check the selected tape drives to verify that the firmware was transferred successfully.
To load firmware, do the following:
Select one or more tape drives that are to receive new firmware. The tape drives you select must be of the same drive type.
Click the Drive Operations menu and select Set Selected Drives Offline.
Click the Configure menu and select Firmware Update from File in This Library. A Code Load from File screen appears.
Locate and click the firmware file, and click the Open button.
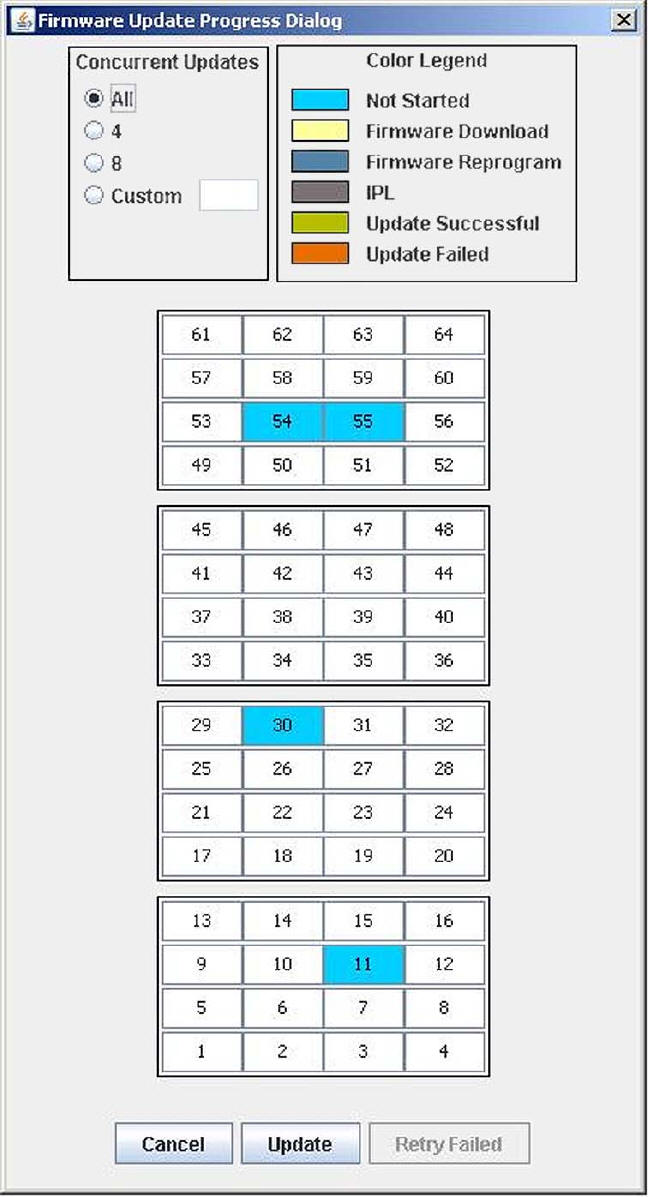
Click the Update button. The Firmware Update Progress dialog box appears, displaying the tape drives that are selected for a firmware update.
Click a radio button to select one of the following Concurrent Updates settings:
All
Update all selected tape drives at one time.
4/8
Update the selected tape drives in groups of four or eight, one group at a time.
Custom
Specify the number of tape drives to be updated at one time, before the next group is updated.
Click the Update button to begin transferring the firmware to the selected tape drives. The legend displays the results of each step of the process:
Not Started
The firmware update has not started.
Firmware Download
The firmware is transferring to the tape drive.
Firmware Reprogram (firmware update process has started)
The firmware process has started.
IPL
The tape drive has rebooted.
Update Successful
The Firmware update succeeded.
Update Failed
The firmware update failed.
The Encryption menu includes commands used to control mass encryption routines for tape drives in the selected library. This menu is only supported for Windows and Solaris operating systems.
|
Note: By default, the Encryption view is not displayed, unless you indicated to include it when you installed MD-VOP. You can activate this view using the MD-VOP Default Settings screen. See "Changing MD-VOP Default Settings" for more information. |
The Encryption menu includes the following commands:
|
Note: Before using these commands, you must complete the tasks described in "Encryption Command Requirements". |
Create OKM Agents in the Library
Using the DMOD numbers of the selected tape drives, MD-VOP locates the entry in the spreadsheet and uses the information to create a new OKM agent. Tape drives are not affected.
Modify OKM Agents in the Library
Using the DMOD numbers of the selected tape drives, MD-VOP locates the entry in the spreadsheet and uses the information to modify the existing OKM agent. Tape Drives are not affected.
Using the DMOD numbers of the selected tape drives, MD-VOP locates the entry in the spreadsheet, and uses the information to enroll the tape drives. The following actions occur:
MD-VOP interrogates selected tape drives to ensure that they meet entry conditions (e.g. offline, unloaded, and unenrolled).
MD-VOP interrogates the OKM to ensure that all agents meet entry conditions.
MD-VOP enrolls the tape drives with OKM.
MD-VOP interrogates the OKM to ensure that all agents are in the enrolled state.
Unenroll Drives in This Library
Using the DMOD numbers of the selected tape drives, MD-VOP locates the entry in the spreadsheet, and uses the information to unenroll the tape drives. The following actions occur:
MD-VOP interrogates selected tape drives to ensure that they meet entry conditions (e.g. offline, unloaded, and unenrolled).
MD-VOP interrogates the OKM to ensure that all agents meet entry conditions.
MD-VOP resets the tape drives.
MD-VOP sets the agents to unenrolled on the OKM.
Set Drives to Unencrypting in This Library
Unenrolls the tape drives from OKM.
Compare OKM, Spreadsheet, and Drives in This Library
Verifies that the OKM, spreadsheet, and tape drives are synchronized. Tape Drives are not affected.
Creates a spreadsheet template with drive fields populated for the selected tape drives. You must manually enter agent information.
Create Spreadsheet Template with Agent Lookup
Creates a spreadsheet template with drive fields populated for the selected tape drives. Agent information (except for passphrase) is populated with information retrieved from OKM.
License Drives in This Library
Performs license operation to enable encryption on multiple tape drives in parallel.
With exception of the License Drives in This Library command, Encryption menu commands require the following inputs before they can be issued:
You must select the tape drives on which to perform the command operation.
You are prompted to identify the tab-delimited .txt file or the encrypted .ect file that contains all of the drive and agent information. This information is used to exchange information with the security officer who controls OKM and the MD-VOP.
You are prompted to select the directory that contains the certificates obtained previously from Oracle Key Manager (OKM).
You must create a tab-delimited (.txt) file that includes the required information to correlate OKM data with the intended tape drives. Use any spreadsheet program to create this tab-delimited file.
|
Note: In most spreadsheet programs, default cell format settings cause the DMOD (tape drive serial number) to be displayed in scientific notation. To correct this, set the format to text. |
You must include the following columns in the OKM data file:
DMOD
Tape drive serial number
Key Group
OKM Agent ID
Passphrase
OKM Agent passphrase
OKM IP
IP address of the OKM attached to the tape drive
Optionally, you can include the following additional columns in the OKM data file:
OKM Site ID
Description of the OKM site server
Description
Description of the tape drive
Slot Number
Library location of the tape drive
Drive IP
IP address (IPV4) of the tape drive
Drive family type
Type of tape drive
Before using the MD-VOP encryption commands, you must obtain the CA certificate and Client certificate files from OKM.
Launch the OKM GUI (version 2.3 or later).
Connect to OKM in the Operator role.
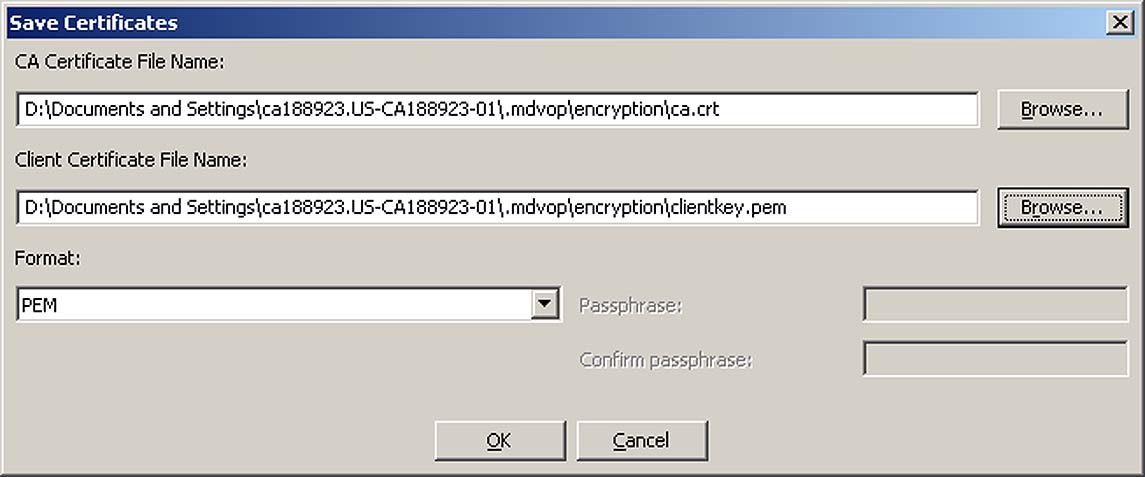
In the OKM GUI, click the System menu and select Save Certificates. The Save Certificates dialog box appears.
Enter the location on the MD-VOP host where certificates are to be stored. You must enter both the CA Certificate File Name and Client Certificate File Name.
Click the OK button to retrieve the certificate files from OKM.
The Reports menu includes the following commands, used to generate reports that describe the state of one or more tape drives. When you select one of these commands, MD-VOP prompts you for a location to save the report file.
|
Note: This menu is only available in the system administrator version of MD-VOP |
Generates a report that provides general status information for all tape drives in the library
Generates a report that provides information about the encryption settings for all tape drives in the library.
Generates a report that provides information about the health of all tape drives in the library. A separate report file is created for each selected tape drive.
Generates a report that provides ASR status information including a summary of activation and any alerts sent.
|
 Copyright © 2014, Oracle and/or its affiliates. All rights reserved. Legal Notices |
|