Release 1.2
Part Number E36379-01
Contents
Previous
Next
| Oracle Pedigree and Serialization Manager Process Guide Release 1.2 Part Number E36379-01 | Contents | Previous | Next |
This chapter covers the following topics:
Lot information is essential when managing and tracking serial data. The lot number is uniquely identified by the Lot Number, Source System, Location (optional), Product Code, Product Code Type, Product Code Variant, and Packaging Unit. The lot must be identified on a serial when it is commissioned, shipped, or returned. A valid lot expiration date is required for shipment and return of the serials.
Oracle Pedigree and Serialization Manager (OPSM) stores duplicate lots, where a separate lot definition is kept for each location and source system. The identification of the location on the lot is optional. When the lot is not identified, a duplicate lot will be stored for each source system interfacing with OPSM. When a transaction is recorded in OPSM, the source system and location identified on the transaction is used to retrieve the appropriate lot information.
Lot information can be created in OPSM using one of these methods:
Using the Maintain Lots page in OPSM. Lot information can be created, modified, or deleted using the OPSM lot pages.
For more information on maintaining lots in OPSM, see:
Using the Lot Synchronization process. Lot information can be merged from the Lot Interface table.
For more information see, Synchronizing Lots (Lot Interface Table.
Using the Lot Web Services in OPSM. Lot information can be merged.
For more information see, Lot Web Services.
The Oracle Serialization and Tracking Integration Pack for Oracle Pedigree and Serialization Manager and Oracle E-Business Suite 3.1 can be used to synchronize lot information from Oracle E-Business Suite to OPSM using one of the following methods:
Using the Application Integration Architecture (AIA) integration between Oracle E-Business Suite and OPSM.
This real-time synchronization process uses the OPSM mergeLot Web Service to insert the lot information into OPSM. If any exceptions occur during the processing you can view the web service exceptions using the Web Service Exceptions page in OPSM.
For more information on the real-time lot synchronization process between Oracle E-Business Suite and OPSM, see:
Oracle Serialization and Tracking Integration Pack for Oracle Pedigree and Serialization Manager and Oracle E-Business Suite 3.1 - Implementation Guide.
Using the batch lot synchronization process between Oracle E-Business Suite and OPSM. Using the Lot Synchronization page in OPSM you initiate the lot synchronization process between these two systems.
For more information on batch lot synchronization, see:
Oracle Serialization and Tracking Integration Pack for Oracle Pedigree and Serialization Manager and Oracle E-Business Suite 3.1 - Implementation Guide.
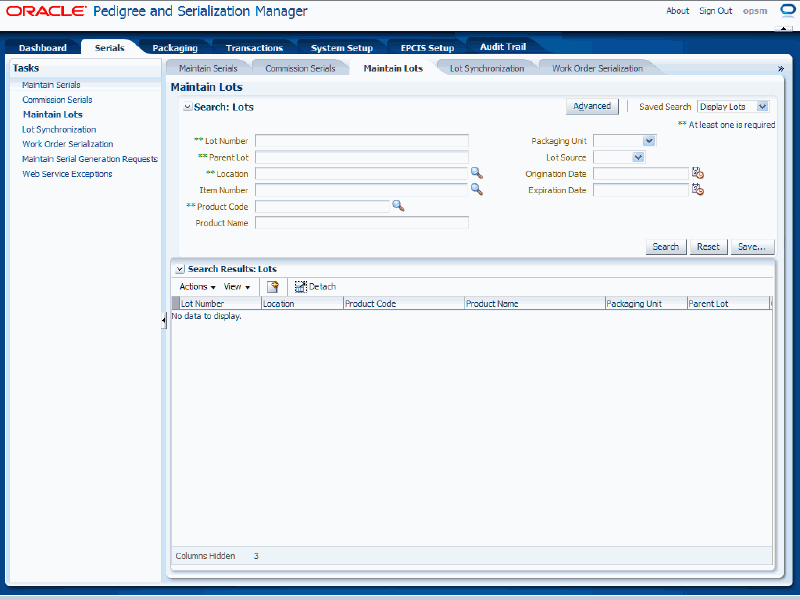
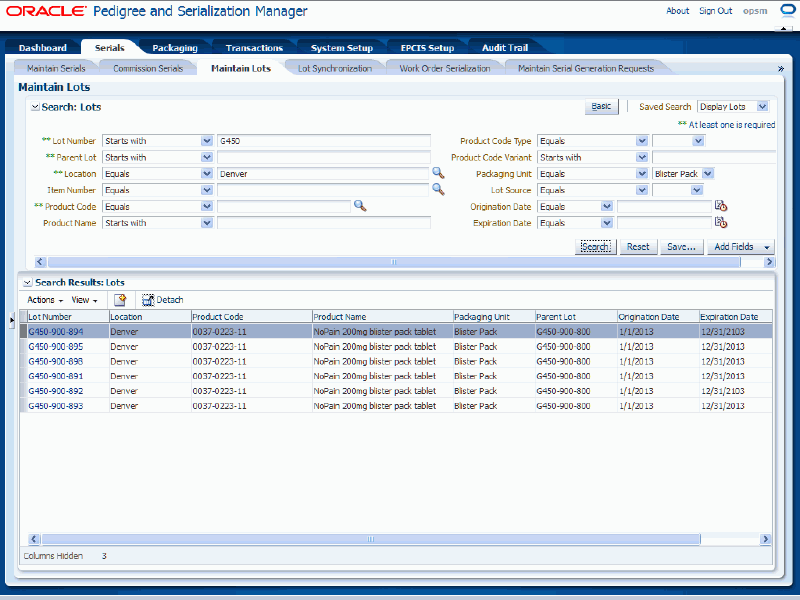
Use the Maintain Lots page in Oracle Pedigree and Serialization Manager (OPSM) to search for existing lots. You can view the lots in a multitude of ways by using the search criteria fields that include, lot number, parent lot, location, item number, product code, product name, packaging unit, lot source, origination date, and expiration date.
Plus, using the advanced search functionality you can search for a range of lots by using the operator field (equal to, contains, ends with, starts with, and so on) associated with the search criteria fields.
Use these procedures to search for lots:
To Search for Lots (Basic Search)
Navigate to the Maintain Lots page.
Maintain Lots page (Basic Search)
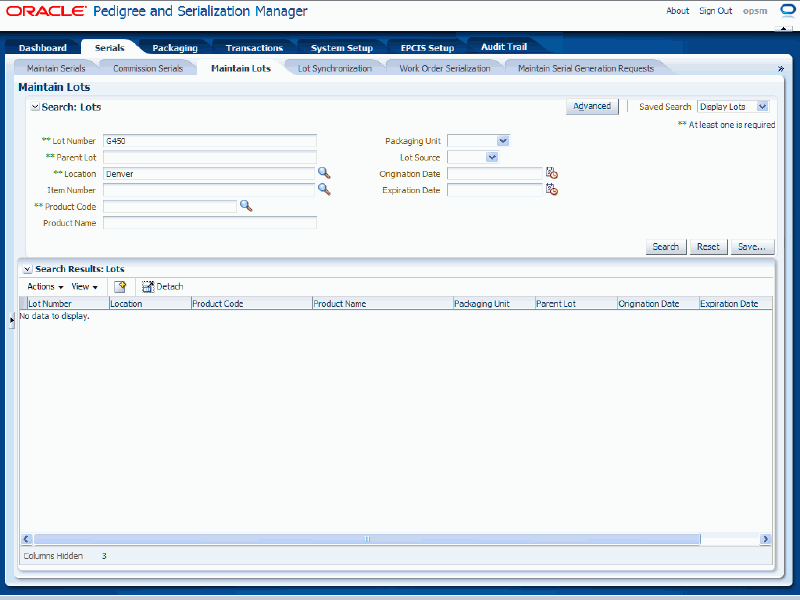
In the Search: Lots region, enter the search criteria for the lots using one or more of these fields:
| Field Name | Description |
|---|---|
| Lot Number | Enter the lot number. |
| Parent Lot | Enter the parent lot associated with the lot number. |
| Location | Select the location associated with the lot number. |
| Product Code | Select the product code associated with the lot number. |
Maintain Lots page (Basic Search)
(Optional) In the Search: Lots region, further specify the lots search criteria by entering one or more of these fields:
| Field Name | Description |
|---|---|
| Item Number | Select the item number for the lot. This is the transactional systems item number. It is used to find the Product Code to perform the search. The item number search is merely a way for you to search for the correct product code. When you select the Item Number, the Product Code and Product Name fields are automatically populated. If you clear the Item Number, then the Product Code and Product Name fields get cleared as well. You cannot enter both the Item Number and the product fields (Product Code and Product Name) on the search. |
| Product Name | Enter the product name associated with the product. |
| Packaging Unit | Select the packaging unit associated with the product. |
| Lot Source | Select the source for the lot. |
| Origination Date | Select the origination date for the lot. |
| Expiration Date | Select the expiration date for the lot. |
Click the Search button.
Maintain Lots page (Basic Search)
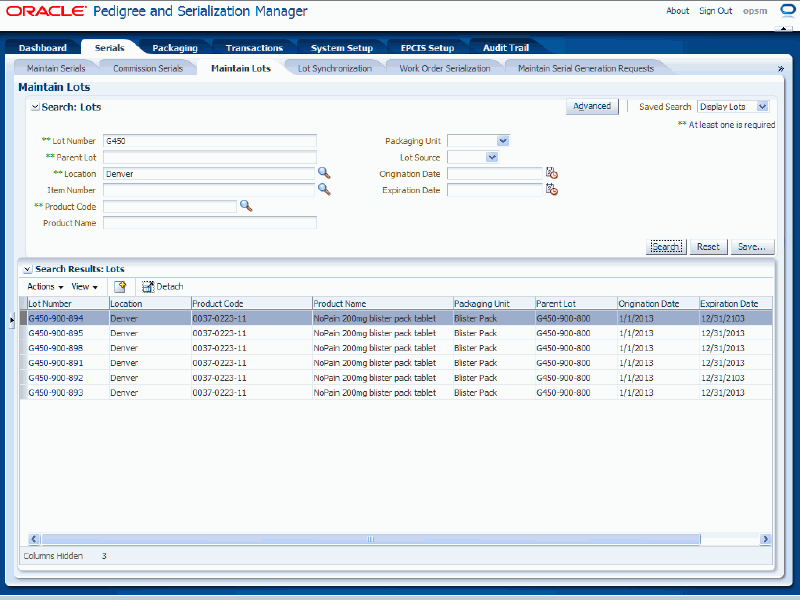
All of the lots that match the search criteria appear in the Search Results: Lots region in a table format. An Actions column appears in the table at the end of the row with an Edit Lot icon and a Delete Lot icon.
Click the Advanced button to perform an advanced search.
To Search for Lots (Advanced Search)
Use the Advanced Search functionality to perform a more detailed search for specific lots. Field operators associated with the search criteria fields can be used during an Advanced Search so that a range of lots can be easily retrieved.
Navigate to the Maintain Lots page.
Click the Advanced button located at the top of the page.
Note: Clicking the Advanced or Basic button will keep the values in the base criteria fields.
Maintain Lots page (Advanced Search)
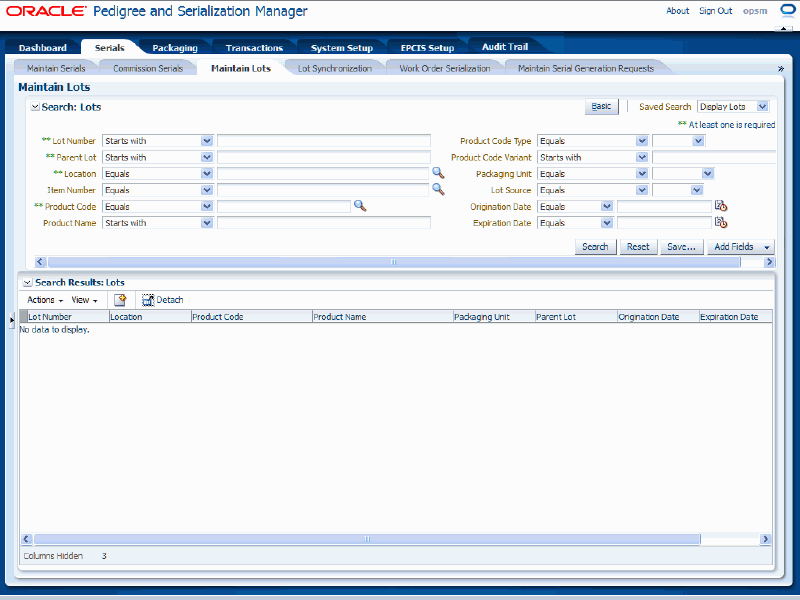
In the Search: Lots region, enter the search criteria for the lots using one or more of these fields:
| Field Name | Description |
|---|---|
| Lot Number | Select the field operator and then enter the lot number. Operators are:
|
| Parent Lot | Select the field operator and then enter the parent lot associated with the lot number. The field operators are the same as that for the Lot Number field. |
| Location | Select the field operator and then enter the location associated with the lot number. The field operators are the same as that for the Lot Number field. |
| Product Code | Select the field operator and then enter the product code associated with the lot number. The field operators are the same as that for the Lot Number field. |
(Optional) In the Search: Lots region, further specify the lots search criteria by entering one or more of these fields:
| Field Name | Description |
|---|---|
| Item Number | Select the field operator and then select the item number for the lot. This is the transactional systems item number. It is used to find the Product Code to perform the search. The item number search is merely a way for you to search for the correct product code. When you select the Item Number, the Product Code, Product Name, Product Code Type and Product Code Variant fields are automatically populated. If you clear the item number, then the Product Code, Product Name, Product Code Type, and Product Code Variant fields get cleared as well. You cannot enter both the item number and the product fields (Product Code, Product Name, Product Code Type and Product Code Variant) on the search. The field operators are the same as that for the Lot Number field. |
| Product Name | Select the field operator and then enter the product name associated with the product. The field operators are the same as that for the Lot Number field. |
| Product Code Type | Select the field operator and then select the product code type associated with the product. The field operators are the same as that for the Lot Number field. |
| Product Code Variant | Select the field operator and then enter the product code variant associated with product. The field operators are the same as that for the Lot Number field. |
| Packaging Unit | Select the field operator and then select the packaging unit associated with the product. The field operators are the same as that for the Lot Number field. |
| Lot Source | Select the field operator and then select the source for the lot. The field operators are the same as that for the Lot Number field. |
| Origination Date | Select the field operator and then select the origination date for the lot. Operators are:
|
| Expiration Date | Select the field operator and then select the expiration date for the lot. The field operators are the same as that for the Origination Date field. |
(Optional) To enter additional search criteria fields, click the Add Fields button and select the field you would like to add to the search criteria.
The selected field appears as a search criteria field.
Note: To remove the additional field, click the Remove icon next to the field. The field will be removed from the search criteria.
(Optional) Enter search criteria for the additional fields.
Click the Search button.
Maintain Lots page (Advanced Search)
All of the lots that match the search criteria appear in the Search Results: Lots region in a table format. An Actions column appears in the table with an Edit Lot icon and a Delete Lot icon.
Click the Basic button to have the page hide the advanced search criteria fields and re-display the basic search criteria fields.
Note: Clicking the Reset button clears the values in all of the criteria fields.
Use the View Lot page in Oracle Pedigree and Serialization Manager (OPSM) to view all the detail information for the lot.
Use this procedure to view lot detail information:
To View Lot Detail Information
Navigate to the Maintain Lots page.
Enter search criteria for the lots you want to view and click the Search button.
All of the lots that match the search criteria appear in the Search Results: Lots table in a table format.
Select the lot in the table that you want to view.
Click the Lot Number link.
View Lot page
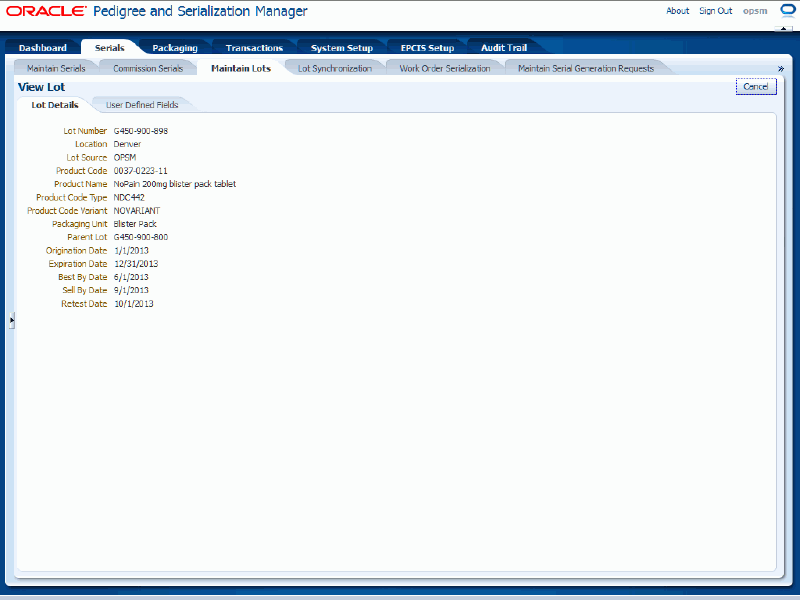
The View Lot page appears.
Select the different sub tabs (Lot Details and User Defined Fields) to the view that particular type of information for the lot.
Click the Cancel button to return back to the Maintain Lots page.
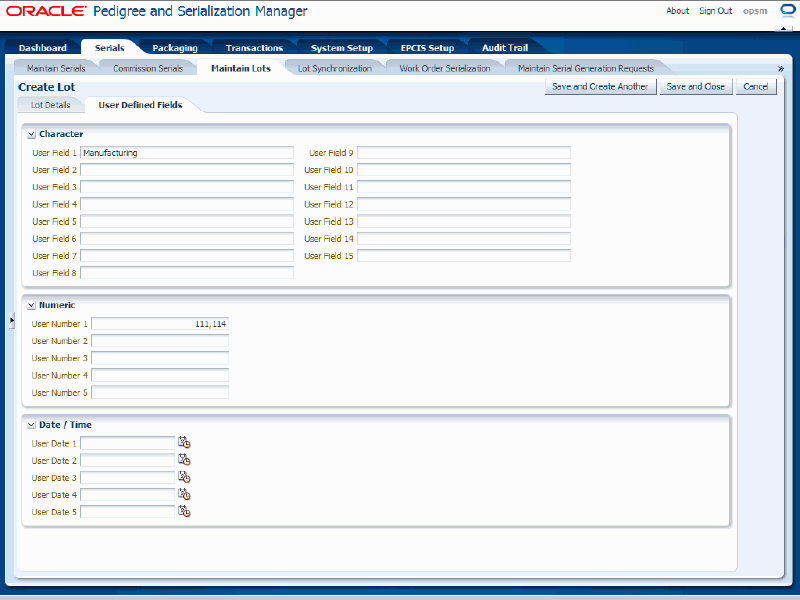
Use the Create Lot page in Oracle Pedigree and Serialization Manager (OPSM) to create lots. Lots can also be created through lot synchronization from the transactional system or through Lot Web Services.
Use this procedure to create lots:
Navigate to the Maintain Lots page.
Select Create from the Actions menu or click the Create icon located at the top of the Search Results: Lots region.
The Create Lot page appears.
Enter the following information:
| Field Name | Description |
|---|---|
| Lot Number | Enter the lot number. |
| Location | (Optional) Select the location for the lot. |
| Lot Source | Select the transactional system that was the source for the lot. Lot source appears by default from the location if location is entered for the lot and cannot be changed. If no location is entered for the lot, you can select a lot source from the drop down list. |
| Product Code | Select the product code for the lot. After you select the product code the system displays by default the product code type, product code variant, product name, and packaging unit associated with the product code. |
| Product Name | The product name appears by default from the product code you select. |
| Product Code Type | The product code type appears by default from the product code you select. |
| Product Code Variant | The product code variant appears by default from the product code you select. |
| Packaging Unit | The packaging unit appears by default from the product code you select. |
| Parent Lot | (Optional) Enter the parent lot for the lot. |
| Origination Date | (Optional) Select the date the lot originated. Origination Date must be earlier than Sell By Date, Best By Date, and Expiration Date. |
| Expiration Date | (Optional) Select the date the lot will expire. Expiration Date must be the same as or later than Sell By Date and Best By Date. |
| Best By Date | (Optional) Select the best by date for the lot. |
| Sell By Date | (Optional) Select the sell by date for the lot. |
| Retest Date | (Optional) Select the retest date for the lot. |
Create Lot page - Lot Details tab

Select the User Defined Fields tab.
Enter user-defined data using any of the fields in the Character, Numeric, and Date/Time regions of the page.
Create Lot page - User Defined Fields tab
Save your work. Choose one of these options:
Click the Save and Close button to save this lot and return back to the Maintain Lots page.
Click Save and Create Another button to save this lot and to stay on this page so you can create another lot. The system displays a message that the lot was saved successfully and it clears all of the values in the fields.
Note: You can also create duplicate lots. The system will issue a warning to the user that a duplicate lot will be created. Duplicate lots allow the definition of one or more lots with the same lot number and product detail record but for a different location.
Use the Edit Lot page in Oracle Pedigree and Serialization Manager (OPSM) to edit lot information for a lot.
Use this procedure to edit lots:
Navigate to the Maintain Lots page.
Enter search criteria for the lots you want to edit and click the Search button.
All of the lots that match the search criteria appear in the Search Results: Lots table in a table format.
Select the lot in the table that you want to edit.
Select Edit in the Actions menu or click the Edit Lot icon associated with the lot in the Actions column of the results table.
Edit Lot page - Lot Details sub tab
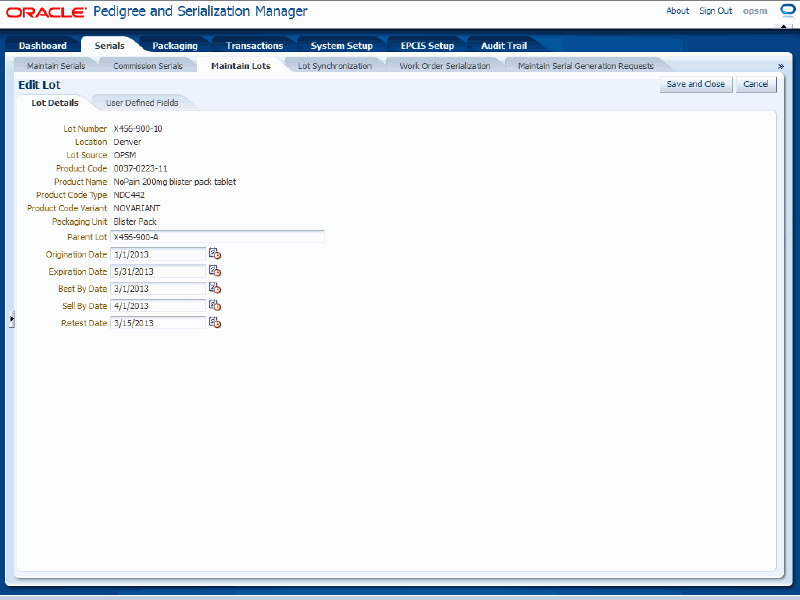
The Edit Lot page appears displaying all of the existing information for the lot.
Edit the lot fields.
You can only edit these fields:
Parent Lot
Origination Date
Origination Date must be earlier than Sell By Date, Best By Date, and Expiration Date.
Expiration Date
Expiration Date must be the same as or later than Sell By Date and Best By Date.
Best By Date
Sell By Date
Retest Date
User Defined fields using the User Defined Fields sub tab
Click the Save and Close button to save the changes you made to the lot information and to return back to the Maintain Lots page.
Note: The system will display a warning message if you are editing fields for a lot associated to a serial that has already been shipped.
Use the Maintain Lots page in Oracle Pedigree and Serialization Manager (OPSM) to delete lots. You cannot delete a lot if it has been associated to any serials in the system.
Use this procedure to delete lots:
Navigate to the Maintain Lots page.
Enter search criteria for the lots you want to delete and click the Search button.
All of the lots that match the search criteria appear in the Search Results: Lots table in a table format.
Select the lot in the table that you want to delete.
Note: You cannot delete a lot if it has been associated to any serials in the system.
Select Delete in the Actions menu or click the Delete Lot icon associated with the lot in the Actions column of the results table.
The system displays a message asking if you are sure to want to delete the lot.
Click the Yes button.
The lot is deleted from the system.
Oracle Pedigree and Serialization Manager (OPSM) provides a Lot Interface table that enables external systems to integrate with OPSM for Lot Synchronization. Synchronization of lot data, including lot expiration dates, is essential for accurate serial data management and tracking.
Using the Lot Synchronization page in OPSM you will initiate a process which will perform one of the following synchronization actions:
Extract Lots
Extract Lots and Merge Lots
Merge Lots
For more information on the lot definition process, see Understanding the Lot Definition process.
For more information on defining Lot Synchronization scenarios, see Defining Product Synchronization, Lot Synchronization, and Work Order Serialization Scenarios.
For more information on integrating Oracle E-Business Suite with OPSM, see the Oracle Serialization and Tracking Integration Pack for Oracle Pedigree and Serialization Manager and Oracle E-Business Suite 3.1 - Implementation Guide.
Use these procedures to:
Extract and merge lot information from an external system.
Extract log information from an external system.
Merge the extracted lots into OPSM.
Prerequisites
A lot extract scenario must be defined in OPSM.
An Oracle Data Integrator (ODI) extract application that conforms to the required specifications must exist and must be configured to communicate with OPSM.
For more information, see the Oracle Serialization and Tracking Integration Pack for Oracle Pedigree and Serialization Manager and Oracle E-Business Suite 3.1.
For Lot Merge:
The Lot Interface table must be populated by the extract system or another method.
To Extract and Merge Lot Information from an External System
Navigate to the Lot Synchronization page.
Lot Synchronization page

Click the Submit New Instance button in the upper right hand corner of the Lot Synchronization page.
Lot Synchronization dialog box
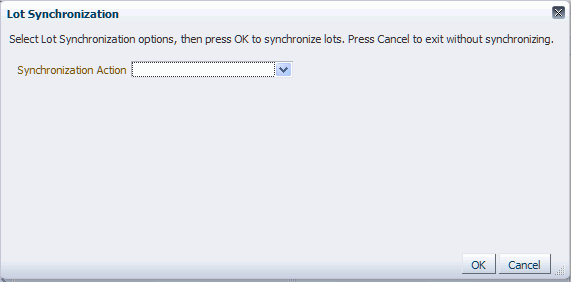
The Lot Synchronization dialog box appears.
Enter the following options for the Lot Synchronization process:
| Field Name | Description |
|---|---|
| Synchronization Action | Select Extract Lots and Merge Lots. After you select the Synchronization Action, the Extract Scenario Name, Source System, and Purge Interface Table fields become available. |
| Extract Scenario Name | Select the extract scenario name. Extract Scenario Names are user defined using Lookup Type PAS_LOT_EXTRACT. Oracle delivers four lookup codes for Lot Synchronization between OPSM and Oracle E-Business Suite for the PAS_LOT_EXTRACT lookup type. They are:
|
| Source System | Select the source system where you are going to synchronize lot information from into OPSM. Source Systems are user defined using the Lookup Type PAS_SOURCE_SYSTEM. |
| Purge Interface Table check box | Select this check box if you want to delete existing records in the interface table for the selected source system. |
Lot Synchronization dialog box
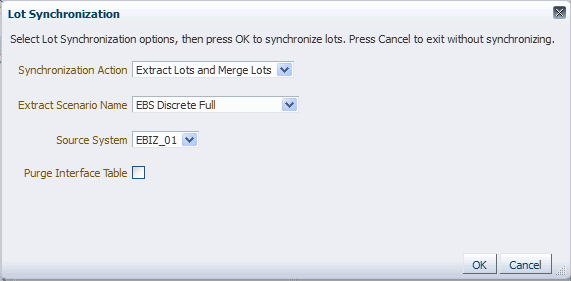
Click the OK button to initiate the Lot Synchronization process.
The Lot Synchronization process runs in the background. The system assigns a job instance Id for that specific run of the process. The Lot Synchronization page reappears.
The Lot Synchronization (Extract Lots) background process will invoke an Oracle Data Integrator (ODI) application to extract lot information from an external system. The lot information that is extracted from the source system will be uploaded into the target OPSM Lot Interface table (PAS_S_LOT_INTERFACE).
The Lot Synchronization (Merge Lots) background process takes lot information from the PAS_S_LOT_INTERFACE table and validates and inserts the transformed data into the OPSM lot table (PAS_S_LOTS).
Enter the following information in the Search: Job Instances region of the page:
| Field Name | Description |
|---|---|
| Job Instance ID | (Optional) Enter a specific job instance ID. |
| Job Status | (Optional) Select the job status for the job instances. Job Statuses are:
|
| Creation Date | Select a creation date for the job instance that is equal to the current date. |
| Created By | Enter the individual that initiated the process. |
Click the Search button.
Locate the job instance Id for the process and verify that the Job Instance Id completed successfully or completed with warnings.
The Job Status associated with job instance Id is at one of these statuses:
Complete: Job instance completed successfully with no errors or warnings.
Error(s) Exist: Job instance did not complete successfully.
In Progress: Job instance is in progress.
Submitted: Job instance has been submitted but not started.
Abnormal Termination: The job instance did not complete successfully due to a catastrophic failure (for example, the system went down during processing).
Warning(s) Exist: Job completed successfully but there are warning messages.
Scroll to the Job Instance Messages region and view the following:
Informational messages (blue circle with the letter "i"): These messages display the parameters used to initiate the process and the results of the process.
Warning messages (A yellow triangle with an exclamation point): These messages display the warning messages for the process.
You can also verify the results of the Lot Synchronization process (Extract and Merge Lots synchronization action) by navigating to the OPSM Maintain Lots page. The Maintain Lots page will display the lot information that was created in OPSM.
For more information on the job instances functionality, see Using Job Instances functionality.
For more information on the Maintaining Lots page, see Viewing Lot Detail Information.
To Extract Lot Information from an External System
Navigate to the Lot Synchronization page.
Lot Synchronization page
Click the Submit New Instance button in the upper right hand corner of the Lot Synchronization page.
Lot Synchronization dialog box
The Lot Synchronization dialog box appears.
Enter the following options for the Lot Synchronization process:
| Field Name | Description |
|---|---|
| Synchronization Action | Select Extract Lots. After you select the Synchronization Action, the Extract Scenario Name, Source System, and Purge Interface Table fields become available. |
| Extract Scenario Name | Select the extract scenario name. Extract Scenario Names are user defined using Lookup Type PAS_LOT_EXTRACT. Oracle delivers four lookup codes for Lot Synchronization between OPSM and Oracle E-Business Suite for the PAS_LOT_EXTRACT lookup type. They are:
|
| Source System | Select the source system where you are going to synchronize lot information from into OPSM. Source Systems are user defined using the Lookup Type PAS_SOURCE_SYSTEM. |
| Purge Interface Table check box | Select this check box if you want to delete existing records in the interface table for the selected source system. |
Lot Synchronization dialog box
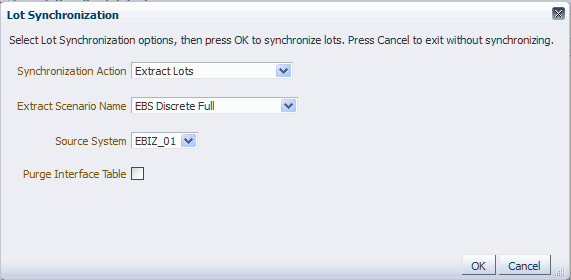
Click the OK button to initiate the Lot Synchronization process.
The Lot Synchronization process runs in the background. The system assigns a job instance Id for that specific run of the process. The Lot Synchronization page reappears.
The Lot Synchronization (Extract Lots) background process will invoke an Oracle Data Integrator (ODI) application to extract lot information from an external system. The lot information that is extracted from the source system will be uploaded into the target OPSM Lot Interface table (PAS_S_LOT_INTERFACE).
Enter the following information in the Search: Job Instances region of the page:
| Field Name | Description |
|---|---|
| Job Instance ID | (Optional) Enter a specific job instance ID. |
| Job Status | (Optional) Select the job status for the job instances. Job Statuses are:
|
| Creation Date | Select a creation date for the job instance that is equal to the current date. |
| Created By | Enter the individual that initiated the process. |
Click the Search button.
Locate the job instance Id for the process and verify that the Job Instance Id completed successfully or completed with warnings.
The Job Status associated with job instance Id is at one of these statuses:
Complete: Job instance completed successfully with no errors or warnings.
Error(s) Exist: Job instance did not complete successfully.
In Progress: Job instance is in progress.
Submitted: Job instance has been submitted but not started.
Abnormal Termination: The job instance did not complete successfully due to a catastrophic failure (for example, the system went down during processing).
Warning(s) Exist: Job completed successfully but there are warning messages.
Scroll to the Job Instance Messages region and view the following:
Informational messages (blue circle with the letter "i"): These messages display the parameters used to initiate the process and the results of the process.
Warning messages (A yellow triangle with an exclamation point): These messages display the warning messages for the process.
For more information on the job instances functionality, see Using Job Instances functionality.
To Merge the Extracted Lots into OPSM
Navigate to the Lot Synchronization page.
Click the Submit New Instance button in the upper right hand corner of the Lot Synchronization page.
The Lot Synchronization dialog box appears.
Enter the following options for the Lot Synchronization process:
| Field Name | Description |
|---|---|
| Synchronization Action | Select Merge Lots. After you select the Synchronization Action, the Source System, and Purge Interface Table fields become available. |
| Source System | Select the source system where you are going to synchronize lot information from into OPSM. Source Systems are user defined using the Lookup Type PAS_SOURCE_SYSTEM. |
| Purge Interface Table check box | Select this check box if you want to delete existing records in the interface table for the selected source system. |
Lot Synchronization dialog box
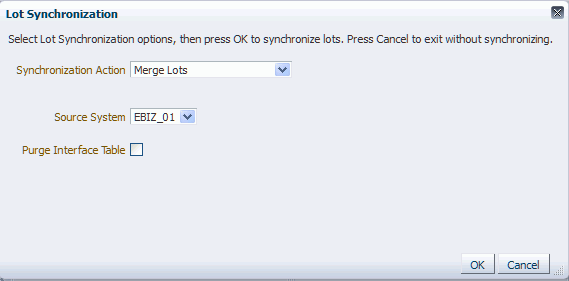
Click the OK button to initiate the Product Synchronization process.
The Lot Synchronization process runs in the back ground. The system assigns a job instance Id for that specific run of the process. The Lot Synchronization page reappears.
The Lot Synchronization (Merge Lots) background process takes lot information from the PAS_S_LOT_INTERFACE table and validates and inserts the transformed data into the OPSM Lot table (PAS_S_LOTS).
Enter the following information in the Search: Job Instances region of the page:
| Field Name | Description |
|---|---|
| Job Instance ID | (Optional) Enter a specific job instance ID. |
| Job Status | (Optional) Select the job status for the job instances. Job Statuses are:
|
| Creation Date | Select a creation date for the job instance that is equal to the current date. |
| Created By | Enter the individual that initiated the process. |
Click the Search button.
Locate the job instance Id for the process and verify that the Job Instance Id completed successfully or completed with warnings.
The Job Status associated with job instance Id is at one of these statuses:
Complete: Job instance completed successfully with no errors or warnings.
Error(s) Exist: Job instance did not complete successfully.
In Progress: Job instance is in progress.
Submitted: Job instance has been submitted but not started.
Abnormal Termination: The job instance did not complete successfully due to a catastrophic failure (for example, the system went down during processing).
Warning(s) Exist: Job completed successfully but there are warning messages.
Scroll to the Job Instance Messages region and view the following:
Informational messages (blue circle with the letter "i"): These messages display the parameters used to initiate the process and the results of the process.
Warning messages (A yellow triangle with an exclamation point): These messages display the warning messages for the process.
You can also verify the results of the Lot Synchronization process (Merge Lots) by navigating to the OPSM Maintain Lots page. The Maintain Lots page will display the lot information that was created in OPSM.
For more information on the job instances functionality, see Using Job Instances functionality.
For more information on the Maintaining Lots page, see Viewing Lot Detail Information.
Oracle Pedigree and Serialization Manager (OPSM) uses a JMS Queue for asynchronous processing of inbound mergeLot messages. When a message is placed into the JMS Queue by the producer, the message is picked up and processed by the OPSM BPEL composite (consumer). The BPEL composite calls the mergeLot Web Service. If the web service call fails or returns an error, a job instance along with a job instance message is created in OPSM. Errors related to mergeLot messages that fail to process successfully can be viewed in the Web Services Exception page.
This diagram illustrates the mergeLot Web Service process flow:
mergeLot Web Service Process Flow

You will use the Web Service Exceptions page to view exception messages that are generated when messages are processed by the mergeLot, createTransaction, captureEpcisDoc, Edit Serial by Primary Document, Edit Serial by Label, Edit Serial by List, and HTTP Post web services. Exception messages are only created for exceptions or errors that are detected by the web service. If the web service processes successfully during the integration process no message is recorded.
The Web Service Exceptions page is located under the Serials section and the Transactions section of the Task menu. The page is the same in both locations.
Important: If you call the OPSM Web Services directly without using the JMS Queue you are not able to view exception messages using the OPSM Web Service Exceptions page.
An OPSM process continually monitors the integration message queue and then pulls the JMS messages from the queue and dequeues them. It then invokes the appropriate web service. If the web service fails it creates a job instance message. Using the Web Service Exceptions page you can view the job instance messages created by the web service. A web service can fail because the data that is being passed in the message is invalid or the data being passed is incorrect for the message. In addition, you can view the overall system problem errors or web services not running errors using the Web Service Exceptions page.
Use this procedure to view web service exceptions:
Prerequisites
The Oracle Serialization and Tracking Integration Pack for Oracle Pedigree and Serialization Manager and Oracle E-Business Suite 3.1 provides the JMS Producer as part of the integration pack.
For more information on integrating Oracle E-Business Suite with OPSM, see the Oracle Serialization and Tracking Integration Pack for Oracle Pedigree and Serialization Manager and Oracle E-Business Suite 3.1 - Implementation Guide.
To View Web Service Exceptions
Navigate to the Web Service Exceptions page.
Web Service Exceptions page

The Web Service Exceptions page appears. You can only view WEBSERVICES job types on this page.
In the Search: Job Instances region, enter the search criteria for the job instances using one or more of these fields:
| Field Name | Description |
|---|---|
| Job Instance Id | (Optional) Enter a specific job instance Id. |
| Job Status | (Optional) Select the job status for the job instances. Job Statuses are:
Job statuses are defined using the system Lookup Type PAS_JOB_STATUS. |
| Web Service Name | (Optional) Select the Web Service name. Web Service names are:
When merging lots you will want to select mergeLot as the web service name. |
| Created By | (Optional) Enter the individual that created the job instances (initiated the process). |
| Creation Date | (Optional) Select the date the job instances were created. |
Otherwise, you can click the Search button without entering any search criteria and all available job instance Ids will appear.
Web Service Exceptions page
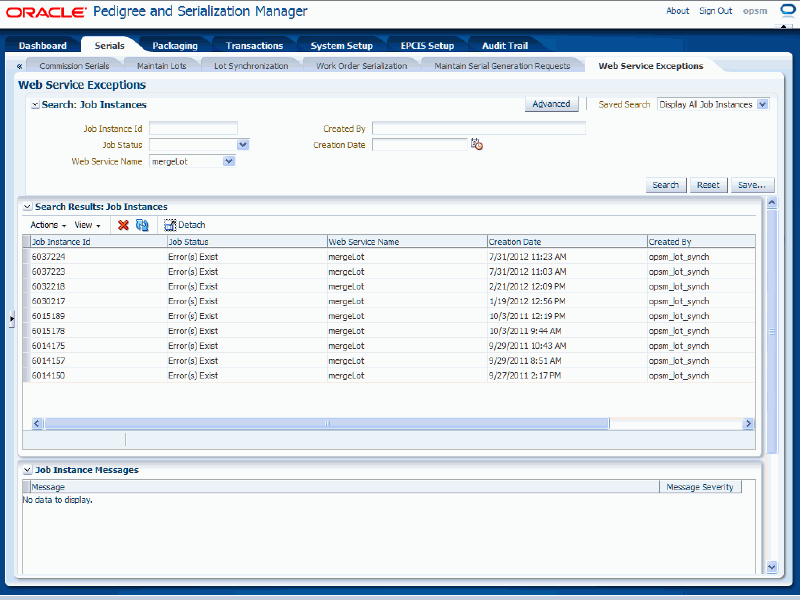
All of the exceptions that match the search criteria appear in the Search Results: Job Instances table of the page.
Select a Job Instance Id that you want to view the messages for in the Search Results: Job Instances table.
Web Service Exceptions page
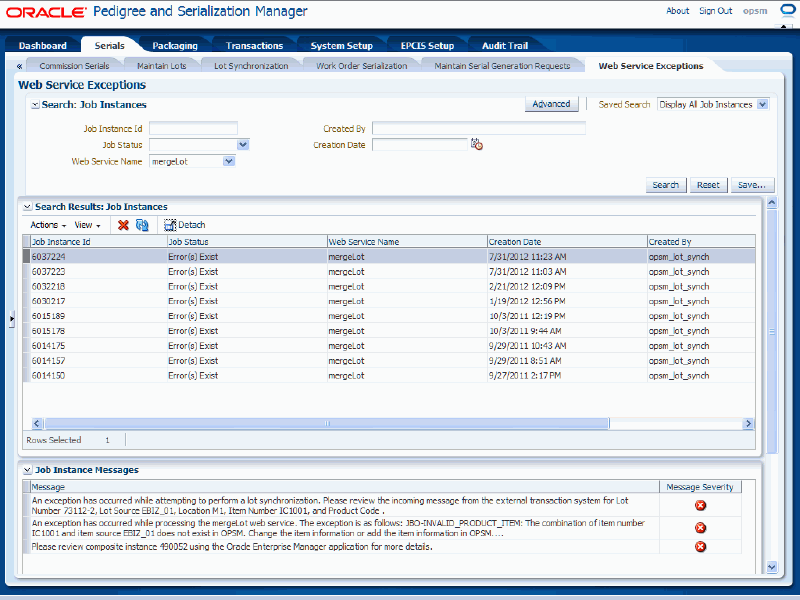
The job instance messages for that specific web service job instance appear in the Job Instance Messages region of the page. Three job instance messages appear for each job instance. The messages provide this information:
The first job instance message provides details indicating that the web service failed and provides the details (actual fields in the message) where the failure occurred. You can use this information to identify the message to re-send from the transactional system.
The second job instance message provides details indicating a partial explanation of the exception that was triggered by the web service. Only a portion of the exception text appears.
The third job instance message provides details indicating which composite ID contains more details about the exception. You can view this composite ID within the Oracle Enterprise Manager application to view the entire SOA composite and BPEL flow.
If the SOA composite produces a fault (runtime fault and so on), the BPEL CatchAll activity grabs the fault and writes a job instance record and corresponding job instance message record. This job instance message provides details indicating which composite ID contains more details about the SOA composite fault. You can view this composite ID within the Oracle Enterprise Manager application to view the entire SOA composite and BPEL flow.
For more information on the job instances functionality, see Using Job Instances functionality.
![]()
Copyright © 2013, Oracle and/or its affiliates. All rights reserved.