8 Model Nodes
Model nodes specify the models to build and the models to add to the workflow. The Models section in the Components pane contains the Models nodes. The models in the Components pane are:
8.1 Types of Models
The types of models available are:
-
Anomaly Detection Node: Builds Anomaly Detection models using a one-class Support Vector Machine (SVM).
-
Association Node: Builds models for market basket analysis.
-
Classification Node: Builds and tests classification models with the same target, case ID, cost, and split settings, where relevant. The models use the classification algorithms: Support Vector Machine (SVM), Naive Bayes (NB), Decision Tree (DT), and Generalized Linear Model (GLM).
-
Clustering Node: Builds clustering models using the clustering algorithms: k-Means, O-Cluster, and Expectation Maximization (EM). EM requires Oracle Database 12c or later.
-
Feature Extraction Node: Builds feature extraction models using the feature extraction algorithms: nonnegative matrix factorization, principal components analysis (PCA), and singular value decomposition (SVD). PCA and SVD require Oracle Database 12c or later.
-
Model Node: Adds models to a workflow that were not built in the current workflow. This node has no input data.
-
Model Details Node: Extracts model details from a model build node, a Model node, or any node that produces a model.
-
Regression Node: Builds and tests a collection of Regression models with the same target, case ID, cost, and split settings, where relevant. The models use the regression algorithms: SVM and GLM.
8.2 Automatic Data Preparation (ADP)
Data used for building a model must be properly prepared. Different algorithms have different input requirements. For example, Naive Bayes requires binned data.
ADP transforms the build data according to the requirements of the algorithm, embeds the transformation instructions in the model, and uses the instructions to transform the test or scoring data when the model is applied.
If you are connected to Oracle Database 12c, ADP prepares text data.
8.2.1 Numerical Data Preparation
Here are some examples of how ADP prepares numerical data:
-
For algorithms that require binned data (such as Naive Bayes), ADP performs supervised binning. Supervised binning is a special binning approach that takes into account the target to find good cut-points in the predictor.
-
For algorithms that require normalized data (such as Support Vector Machines), the numerical data is normalized.
-
For algorithms that can handle untransformed data (such as Decision Tree), you can use the numerical data to find splitters in the tree with an approach similar to supervised binning.
8.2.2 Manual Data Preparation
Manual data preparation is complicated to perform because you must understand the requirements of each algorithms, and you must carry the transformations so that you can properly prepare the test data or scoring data.
You must perform manual binning for data which has business meaning, such as recoding a numeric column of ages to desired ranges like YOUTH, ADULT and so on. Otherwise, automatic data preparation is recommended.
8.3 Data Used for Model Building
Oracle Data Miner does not necessarily use all the columns in a data source when it builds models. Build Model nodes use a set of heuristics to determine whether to exclude columns from the model building process or change the mining type from numerical to categorical only:
-
There are several reasons for not using a particular column for model building. If a column does not contain useful information, it is usually not used.
The exact list of attributes used as input to build the model depends on the algorithm used to build the model. If an algorithm does not support a data type, then Oracle Data Miner does not use attributes with that data type as input.
For models that have targets, such as Classification models, the target cannot be text.
-
The same mining types are used for all models.
If you are connected to Oracle Database 12c, then you can specify characteristics of Text attributes when you edit the build node.
See Also:
-
"Viewing and Changing Data Usage" for more information about attributes that are used to build the models and the mining type of each attribute.
8.3.1 Viewing and Changing Data Usage
You can view and change data usage for models in:
8.3.1.1 Input Tab of Build Editor
To edit a Build node:
-
Double-click the node or right-click the node and select Edit.
-
Click the Input tab. In the Input tab, the field Determine inputs automatically (using heuristics) is selected by default for all models. Oracle Data Miner decides which attributes to use for input and characteristics of the attributes. Oracle Data Miner also determines mining type and specifies that auto data preparation is performed for all attributes.
After the model is run, Oracle Data Miner generates Rules describing changes that it made, such as excluding an attribute or changing the mining type. To see detailed information about the heuristics, click Show.
Note:
You cannot view and edit data usage for an Association model using these steps.See Also:
8.3.1.1.1 Automatic Input
Oracle Data Miner does not use attributes that do not provide useful information. For example, attributes that are almost constant may not be suitable for input.
After the node runs, rules describe the heuristics used. Click Show to see detailed informations.
8.3.1.1.2 Manual Input
To specify inputs manually, deselect Determine inputs automatically (using heuristics). You can make the following changes:
-
To ignore an attribute: If you do not want to use an attribute as input, go to the Input column and click the output icon
 . Select the ignore icon
  and click OK. The attribute will not be used. It will be ignored.
Similarly, to use an attribute that you have ignored, click in the Input column and select . The attribute is used in model build. -
To change mining type of an attribute: Go to the Mining Type column and select an option from the drop-down list:
-
Numerical
-
Categorical
Text mining types are Text and Text Custom. Select Text Custom to create a column- level text specification.
-
-
To manually prepare data: By default, Automatic Data Preparation (ADP) is performed on all attributes. If you do not want Automatic Data Preparation performed for an attribute, then deselect the corresponding check box for that attribute in the Auto Prep column. If you turn off Auto Prep, then you are responsible for data preparation for that attribute.
Note:
If the mining type of an attribute is Text or Text Custom, then you cannot deselect ADP.
See Also:
"Automatic Data Preparation (ADP)"8.3.1.2 Advanced Settings
To view which columns are selected by Oracle Data Miner and what mining type is assigned to each selected column, follow these steps:
Note:
You cannot view and edit data usage for an Association Model using these steps.-
Connect the Data Source node to the Model node.
-
Right-click the Model node and select Run.
-
Open the Advanced Settings dialog box in one of these ways:
-
After the model build completes, right-click the Model node and select Edit.
The Edit dialog box opens. Click Advanced.
-
After the model build completes, right-click the Model node and select Advanced Settings.
-
-
The Advanced Settings has two grids:
-
The Model Settings grid: The grid at the top lists the models built by the node.
-
The lower part of the dialog box is a tabbed display of the following:
-
Data Usage: The Data Usage tab displays information about which columns are selected for Model build, the mining type used for model building for each column, Data Type, Input, Auto Data Prep, and Rules.
To view the details about the rules (Heuristics), click Show. -
Algorithm Settings
-
Performance Settings
-
-
-
To view which columns are used as input for the Model build, select the model. In the Data Usage tab, the attributes used in model build rules indicate the heuristics applied to the attribute. For example, the mining type may be changed. For details, click Show.
-
You can change data usage information on a per-model basis, or you can change the data usage for several models at the same time.
To change data usage for several models, select the models by pressing the Ctrl key and clicking it simultaneously. Make the changes and click OK. The changes are made to the data usage for all selected models.
Note:
You can also turn Auto Data Prep off. This is not recommended. If you turn Auto Data Prep off, then you must ensure that the input is properly prepared for each algorithm.See Also:
"Advanced Settings Overview"8.3.2 Specifying Text Characteristics
If you are connected to Oracle Database 12c, the Text tab in the Edit Model Build dialog box enables you to specify text characteristics.
If you specify text characteristics on the Text tab, then you are not required to use the Text nodes.
Note:
If you are connected to Oracle Database 11g Release 2 (11.2) or earlier, then use Text nodes. The Text tab is not available in Oracle Database 11g Release 2 and earlier.Text is available for any of the following data types: CHAR, VARCHAR2, BLOB, CLOB, NCHAR, or NVARCHAR2.
To examine or specify text characteristics for data mining, either double-click the build node or right-click the node and select Edit from the context menu. Click the Text tab.
The Text tab enables you to modify the following:
-
Categorical cutoff value: Enables you to control the cutoff used to determine whether a column should be considered as a Text or Categorical mining type. The cutoff value is an integer. It must be 10 or greater and less than or equal to 4000. The default value is 200.
-
Default Transform Type: Specifies the default transformation type for column-level text settings. The values are:
-
Token (Default): If Token is selected, the Default Settings are as follows:
-
Languages: Specifies the languages used in the documents. The default is
English.To change this value, select an option from the drop-down list. You can select more than one language. -
Stemming: By default, this option is not selected.
Not all languages support stemming. If the language selected is English, Dutch, French, German, Italian, or Spanish, then stemming is automatically enabled.
If Stemming is enabled, then stemmed words are returned for supported languages. Otherwise the original words are returned. -
Stoplists: Specifies the stoplist to use. The default setting is to use the default stoplist. You can add stoplists or edit stoplists.
If you select more than one language and the selected stoplist isDefault,then the default stop words for languages are added to the default stoplist from the repository. No duplicate stop words are added. -
Tokens: Specifies the maximum number of tokens across all documents. The default is 3000.
-
-
Theme: If Theme is selected, then the Default Settings are as follows:
-
Language: Specifies the languages used in the documents. The default is Arabic. To change this value, select one from the drop-down list. You can select more than one language.
-
Stoplists: Specifies the stoplist to use. The default setting is to use the default stoplist. You can add stoplists or edit stoplists.
If you select more than one language and the selected stoplist isDefault,then the default stop words for languages are added to the default stoplist (from the repository). No duplicate stop words are added. -
Themes: Specifies the maximum number of themes across all documents. The default is 3000.
-
-
-
Click Stoplists to open the Stoplist Editor. You can view, edit, and create stoplists.
You can use the same stoplist for all text columns.
8.4 Model Nodes Properties
You can view the Properties of a Model Build node in any one of the following ways:
-
Select the node and go to View and click Properties. Click the Properties tab if necessary.
-
Right-click the node and select Go to Properties from the context menu.
Properties for Model nodes have the following sections:
In earlier releases, Properties was called Property Inspector.
8.4.1 Models
The Models section displays a list of the models defined in the node. The default setting is to build one model for each algorithm supported by the node.
For each model, the name of the model, build information, the algorithm, and comments are listed in a grid. The Build column shows the time and date of the last successful build or if the model is not built or did not build successfully.
You can add, delete, or view models in the list. You can also indicate in which models are passed to subsequent nodes or not.
-
To delete a model from the list, select it and click
 .
. -
To add a model, click
 . The Add Model dialog box opens.
 -
To view a model that was built successfully, select the model and click
 .
.
You can tune classification models from Properties pane.
8.4.1.1 Output Column
The Output column in the Model Settings grid controls passing models to subsequent nodes. The default setting is to pass all models to subsequent nodes.
-
To ignore a model, that is, to not pass it to subsequent nodes, click
 . The Output icon is replaced with the Ignore icon .
 -
To cancel the ignore, click the Ignore icon again. It becomes the output icon.
8.4.1.2 Add Model
In the Add Model dialog box, you can add a model to a node.
To add a model to a note:
-
In the Algorithm field, select an algorithm from the drop-down list. For example, if you add a model to a clustering node, then the available algorithm are k-Means and O-Cluster.
A default model name is displayed. You can change the default model. -
In the Comments field, add your comments, if any. This is an optional field.
-
Click OK.
8.4.2 Build
For models that have a target (Classification and Regression), the targets are listed. All models in a node have the same target. This section displays the following:
-
Target: Displays the target. To change the target, select a new target from the drop-down list.
-
Case ID: Displays the case ID of the model defined in this node. All the models in the node have the same case IDs. To edit the case IDs, select a different case ID from the drop-down list.
-
Transaction ID: Displayed for Association models only. To change the transaction ID, click Edit.
-
Item ID: Displayed for Association models only. To change the value, select an option from the drop-down list.
-
Item Value: Displayed for Association models only. To change the value, select an option from the drop-down list.
8.4.3 Test
The Test section is displayed for Classification and Regression models. They are the only models that can be tested.
The Test section defines how tests are done. By default, all models are tested. All models in the node are tested in the same way.
8.4.4 Details
The Details section shows the node name and comments about the node. You can change the name of the node and edit the comments from this section. The new node name and comments must meet the requirements in Node Name and Node Comments.
8.5 Anomaly Detection Node
An Anomaly Detection node builds one or more models that detect rare occurrences, such as fraud, using the One-Class SVM algorithm.
There are two ways to detect anomalies:
-
Build and apply an Anomaly Detection model.
-
Use an Anomaly Detection Query, one of the Predictive Query nodes.
An Anomaly Detection build can run in parallel.
The following topics describe Anomaly Detection Nodes:
8.5.1 Default Behavior for Anomaly Detection Node
An Anomaly Detection node builds one model using the one-class SVM algorithm by default. All models in the node have the same case ID.
8.5.2 Create Anomaly Detection Node
First create a workflow and then identify or create a Data Source node. The input for a Model node is any node that generates data as an output, including Transform nodes and Data nodes.
Note:
If the data includes text columns, then prepare the text columns using a Build Text node. If you are connected to Oracle Database 12c, then use ADP.To create an Anomaly Detection node:
-
In the Components pane, click Workflow Editor. If the Components pane is not visible, then go to View and click Components.
-
In the Workflow Editor, expand Models, and click Anomaly Detection.
-
Drag and drop the Anomaly Detection node in to the Workflow pane.
Note:
The GUI displays that the node has no data associated with it. -
Move to the node that provides data for the build. Right-click and click Connect. Drag the line to the Anomaly Detection node and click again.
-
You can also specify a case ID, edit the data usage, and change the algorithm settings. To perform any of these tasks, right-click the node and select Edit.
-
The node is now ready to build. Right-click the node and click Run.
See Also:
"Edit Anomaly Detection Node"8.5.3 Edit Anomaly Detection Node
In the Edit Anomaly Detection Node dialog box, you can specify or change the characteristics of the models to build.
To open the Edit Anomaly Detection Node dialog box, either double-click an Anomaly Detection node, or right-click an Anomaly Detection node and select Edit.
The Edit Anomaly Detection Node dialog box has the following tabs:
-
Input
-
Text
See Also:
-
"Viewing and Changing Data Usage" for more information about the Input tab.
-
"Specifying Text Characteristics" for more information about the Text tab.
8.5.3.1 Build (AD)
The Build tab for Anomaly Detection lists the models to be built and the case ID. Specify the following:
-
Select the Case ID. Select one attribute from the Case ID list. This attribute must uniquely identify a case.
Note:
A case ID is not required. However, a case ID helps ensure build and test repeatability.A case ID is required to generate GLM diagnostics.
If you specify a case ID, then all models in the node have the same case ID.
-
In the Models Settings list, specify the models you want to build. You can also perform the following tasks:
-
To add a model, click
. The Add Model dialog box opens. -
To edit a model, select the model and click
 . The Advanced Model Settings dialog box opens.
 -
To delete a model, select the model and click
. -
To copy an existing model, select the model and click
 .
.
-
-
To complete the node definition, OK.
See Also:
8.5.3.2 Input
The Input tab specifies the input for model build.
Determine inputs automatically (using heuristics) is selected by default for all models. Oracle Data Miner decides which attributes to use for input. For example, attributes that are almost constant may not be suitable for input. Oracle Data Miner also determines mining type and specifies that auto data preparation is performed for all attributes.
After the node runs, rules are displayed explaining the heuristics. Click Show for detailed information.
You can change these selections. To do so, deselect Determine inputs automatically (using heuristics).
See Also:
"Data Used for Model Building"8.5.4 Data for Anomaly Detection Build
Oracle Data Miner uses heuristics to determine the attributes of the input data used for model build and also to determine the mining type of each attribute.
See also:
"Data Used for Model Building"8.5.5 Advanced Model Settings
To change or view advanced settings, right-click the node and select Advanced Settings.
The Advanced Settings dialog box lists all the models in the Model Settings section in the upper pane. You can add and delete models from the node.
-
To delete a model, select it and click
. -
To add a model, click
 . The Add Model (AD) dialog box opens.
 -
To modify data usage of a model, select the model in the upper pane. Make the necessary modifications in the Data Usage tab.
-
To modify the default algorithm, select the model in the upper pane. Make the necessary changes in the Algorithm Settings tab.
8.5.6 Anomaly Detection Node Properties
The Anomaly Detection node Properties enables you to view and change information about the models defined in the node.
To view the properties for an Anomaly Detection node, select the node.
If the Properties pane is closed, then go to View and click Properties. Alternately, right-click the node and select Go to Properties from the context menu.
Anomaly Detection Properties pane has the following sections:
See Also:
"Properties"8.5.6.1 Models (AD)
The Models section displays a list of the models defined in the node. The default is to build one model.
For each model, the name of the model, the build information, the algorithm, and comments are listed in a grid. The Build column shows the time and date of the last successful build or if the model is not built or did not build successfully.
You can add, delete, or view models in the list. You can also indicate in the which models are passed to subsequent nodes or not, as described in Output Column (AD).
-
To delete a model, select it and click
. -
To add a model, click
. The Add Model (AD) model dialog box opens. -
To view a model, click
. The appropriate model viewer opens. -
To duplicate a model, select a model to duplicate and click
.
8.5.6.2 Output Column (AD)
The Output column in the Model Settings grid controls passing models to subsequent nodes. The default is to pass all models to subsequent nodes.
-
To ignore a model, click
. The Output icon is replaced with the Ignore icon. -
To cancel the ignore, click the Ignore icon again. The icon changes to the Output icon.
8.5.6.3 Add Model (AD)
In the Add Model dialog box, you can add or change a model for the node. The algorithm is already selected for you. To add a model:
-
In the Algorithm field, the selected algorithm is displayed. You can change this and select a different algorithm from the drop-down list.
-
In the Name field, enter a name for the model.
-
In the Comments field, add your comments, if any. This is an optional field.
-
Click OK.
8.5.6.4 Build (AD)
The Build section displays the case ID for the models defined in this node. All of the models in the node have the same case ID.
To change the case ID, select a different attribute from the list.
8.5.7 Anomaly Detection Node Context Menu
Right-click an Anomaly Detection node. The following options are available in the context menu:
-
Edit. Opens Edit Anomaly Detection Node.
-
Advanced Settings. Opens Advanced Model Settings.
-
View Models. Opens Anomaly Detection Model Viewer for the selected model.
-
Parallel Query. See "About Parallel Processing" for more information.
-
Show Runtime Errors. Displayed only if there is an error.
-
Show Validation Errors. Displayed only if there are validation errors.
8.6 Association Node
The Association node defines one or more Association models. To specify data for the build, connect a Data Source node to the Association node.
All models in an Association node have the same input data.
Note:
The data for an Association model must be in transactional format.Association models could generate a very large number of rules with low confidence and support, or they could generate no rules at all.
An Association build can run in parallel.
This section contains the following topics:
8.6.1 Behavior of the Association Node
By default, an Association node builds one model using the Apriori algorithm. The Apriori algorithm assumes the following:
-
The data is transactional.
-
The data has many missing values. The apriori algorithm interprets all missing values as sparse data, and it has its own mechanisms for handling sparse data.
All models in the node have the same case ID, item ID, and item value. The case ID can be two columns. For example, the data sources SH.SALES, CUST_ID and TIME_ID combined can be the case ID.
No automatic data preparation is done for an Association node. If you select a value for Item Value that is different from the default <Existence>, you might have to prepare the data.
See Also:
"Data for AR Models"8.6.2 Create Association Node
First, create a workflow and identify or create a data source.
Note:
The data used to build an Association model must be in transactional format.To create an Association node:
-
In the Components pane, select Workflow Editor.
If the Components pane is not visible, then go to View and click Components. -
In the Workflow Editor, expand Models, and click Association.
-
Drag and drop the node from the Components pane to the Workflow pane.
The GUI shows that the node has no data associated with it and it cannot be built. -
Move to the node that provides data for the build. Right-click the node and click Connect. Drag the line to the Association node and click again.
-
The Edit Association Build Node opens.
-
For an Association node, specify the following:
-
Transaction ID: Click
to insert one or more Transaction IDs. -
Item ID: Select an option from the drop-down list.
-
Value: Existence (default)
-
-
Click OK.
-
After you finish the node definition, the node is ready for build. Right-click the node and click Run.
8.6.3 Edit Association Build Node
The Association Build Node editor enables you to specify or change the characteristics of the models to build. To open the Edit Association Build Node dialog box, either double-click an Association node, or right-click an Association node and select Edit.
Specify the following for all model nodes:
-
Transaction IDs: These are a combination of attributes that uniquely identifies a transaction. To specify a transaction ID, click
. The Select Columns (AR) opens. Move one or more attributes from the Available Attributes list to the Selected Attributes list. Click OK. -
Item ID: Identifies an item. Select an attribute from the list.
-
Item Value:
Existence(default). You can select an attribute from the drop-down list. This is an optional field.The item value column may specify information such as the number of items (for example, three apples) or the type of the item (for example, Macintosh apples).
If you select an attribute from the list, then the attribute must have less than 10 distinct values. The default value for the maximum distinct count is 10. You can change the value in Model Build Preferences for Association.
Note:
If you specify an attribute for Item Value, then you might have to prepare the data.
You can perform the following tasks:
-
Add a model: Click
. The Add Model dialog box opens. -
Delete a model: Select the model and click
. -
Edit a model: Select the model and click
. The Advanced Settings for Association Node dialog box opens. Here, you can specify Model settings or Algorithm settings. -
Copy an existing model: Select the model and click
.
At this point, you can click OK to finish the model definition.
8.6.3.1 Select Columns (AR)
To select attributes:
-
Select one or more attributes in the Available Attributes list.
-
Use the arrows between the lists to move the selections to the Selected Attributes list.
-
Click OK.
8.6.4 Advanced Settings for Association Node
You can access the advanced settings for an Association node:
-
Click
in the Edit Association Build Node dialog box. -
Right-click the node and click Advanced Settings.
This dialog box enables you to add or delete models and to modify the default algorithm settings for each model.
The upper pane of the dialog box lists all the models in the node. You can add and delete models.
-
To delete a model, select it and click
. -
To add a model, click
. The Add Model (AR) dialog box opens. -
To change algorithm settings, select a model in the upper pane. In the Algorithm Settings tab, you can change maximum rule length, minimum confidence, and minimum support.
Note:
It is possible for an Association model to generate a very large number of rules or no rules at all.8.6.5 Association Node Context Menu
Right-click an Association node. The following options are available in the Association node context menu:
-
Edit. Opens the Edit Association Build Node.
-
Advanced Settings. Opens Algorithm Settings for AR.
-
View Models. Opens AR Model Viewer for the selected model.
-
Parallel Query. See "About Parallel Processing" for more information.
-
Show Runtime Errors. Displayed only if there is an error.
-
Show Validation Errors. Displayed only if there are validation errors.
8.6.6 Association Build Properties
The Association Build node properties enables you to view and change information about the models defined in the node.
To view the properties of a node, click the node.
If the Properties pane is closed, then go View and click Properties. Alternately, right-click the node and select Go to Properties.
Association Build node Properties pane has the following sections:
See Also:
"Properties"8.6.6.1 Models (AR)
The Models section displays a list of the models defined in the node. The default is to build one model.
For each model, the name of the model, build information, the algorithm, and comments are listed in a grid. The Build column shows the time and date of the last successful build or if the model is not built or did not build successfully.
You can add, delete, or view models in the list. You can also indicate which models are passed to subsequent nodes or not, as described in Output Column (AR).
-
To delete a model from the list, select it and click
. -
To add a model, click
. The Add Model (AR) dialog box opens. -
To view a model that is built successfully, click
. The appropriate model view opens. -
To make a copy of a model, select the model and click
.
8.6.6.2 Add Model (AR)
The algorithm is already selected for you. To add a model to the list:
-
Accept or change the model name.
-
In the Comments field, add comments, if any. This is optional.
-
Click OK. This adds the new model to the list. The new model has the same build characteristics as existing models. It also has the default values for advanced settings.
8.6.6.3 Output Column (AR)
The Output column in the Model Settings grid controls the passing of models to subsequent nodes. By default, all models are passed to subsequent nodes. You can perform the following tasks:
-
To ignore a model, click
. The icon changes to . -
To cancel an ignored model, click the ignore icon
again. The icon changes to the Output icon.
8.6.6.4 Build (AR)
All models in the node have the same transaction ID, item ID and item value. The Build section displays those for the models defined in the node:
-
Transaction IDs: Click Edit to change the transaction ID.
-
Item ID: You can select a different item ID from the drop-down list.
-
Item Value: You can select a different item value from the drop-down list.
8.7 Classification Node
There are two ways to make classification predictions:
-
By building and testing a classification model. This can be done by using a classification node, and then applying the model to the new data to make classifications.
-
By using a prediction query, which is one of the predictive queries.
The Classification node defines one or more classification models to build and to test. To specify data for the build, connect a Data Source node to the Classification node.
The models in a Classification node all have the same target and case ID.
You can only specify one target.
A Classification build can run in parallel.
The section consists of the following topics:
8.7.1 Default Behavior for Classification Node
The default behavior for Classification node is described related to the following:
-
Algorithms used: For a binary target, the Classification node builds models using the following four algorithms:
If the target is not binary, then GLM is not built by default. You can explicitly add a GLM model to the node.
The models must have the same build data and same target.Note:
If do not want to create a particular model, then delete the model from the list of models. The blue check mark to the left side of the model name selects models to be used in subsequent nodes. It does not select models to build. -
Testing of models: By default, the models are all tested. The test data is created by randomly splitting the build data into a build data set and a test data set. The default ratio for the split is 60:40. That is, 60 percent build and 40 percent test. Oracle Data Miner uses compression when it creates the build and test tables when appropriate.
-
Connecting nodes: You can connect both a build Data Source node and a test Data Source node to the Build node.
-
Testing models: You can test Classification models using a Test node along with separate test data.
-
Interpreting test results
-
Tuning models: After testing a classification, you can tune each model.
-
Case ID: The case ID is optional. However, if you do not specify a case ID, then the processing will be slower.
See Also:
-
"Classification Model Test Viewer" for more information about how to interpret test result.
8.7.2 Create a Classification Node
Before creating a Classification node, first create a workflow. Then, identify or create a data source for the Classification node.
To create a classification node and to attach data to it:
-
In the Components pane, go to Workflow Editor. If the Components pane is not visible, then go to View and click Components.
-
In the Workflow Editor, expand Models, and click Classification.
-
Drag and drop the node from the Components pane to the Workflow pane.
The GUI shows that the node has no data associated with it. Therefore, it cannot be built. -
Move to the node that provides data for the build. Right-click and click Connect. Drag the line to the Classification node and click again.
-
The Edit Classification Build Node dialog box opens. You must specify a target. All models in the node have the same target. The target cannot be text.
-
To specify a separate Data Source node for test, connect a second Data Source node to the build node. This is optional.
-
After you finish the edit operation and connect the optional test data source, the node should be ready to build. Right-click the node and select Run from the menu.
If you specified a test data source, when the node runs, then the connection from the build data source is labeled Build and the connection from the test data source is labeled Test.
8.7.3 Data for the Classification Build
Oracle Data Miner uses heuristics to determine the attributes of the input data used for model build and also to determine the mining type of each attribute.
See Also:
"Data Used for Model Building"8.7.4 Edit Classification Build Node
To open the Edit Classification Build Node dialog box, either double-click a Classification Node, or right-click a Classification node and select Edit.
The Edit Classification Node dialog has the following three tabs:
-
Input
-
Text
See Also:
-
"Specifying Text Characteristics" for more information about the Text tab.
-
"Viewing and Changing Data Usage" for more information about the Input tab.
8.7.4.1 Build (Classification)
The Build node enables you to specify or change the characteristics of the models to build. To edit the characteristics of the models to build, follow these steps:
-
In the Target field, select the target from the drop-down list. The list consist of attributes from the table or view specified in the Data Source node that is connected to the build node.
You must specify a target. All models in the node have the same target.
-
In the Case ID field, select one attribute from the drop-down list. This attribute must uniquely identify a case.
If you specify a case ID, all models in the node will have the same case ID.Note:
If you do not specify a case ID, then the processing will be slower because a table must be generated.The case ID is required to generate GLM diagnostics.
A case ID is required if a column in the input data is a nested column. That is, very dense and deep (lots of name-value pairs). If there is no case ID, then the sorting operations may fail.
-
In the Models Settings section, select which models you want to build. For a Classification node with a binary target, Naive Bayes (NB), Decision Tree (DT), Support Vector Machine (SVM), and Generalized Linear Models (GLM) models are specified by default.
-
To delete a model, select the model and click
. -
To edit a model, select the model and click
. -
To add models, click
. -
To copy an existing model, select the model to be copied and click
.
-
By default, the model is tested using a test data set created by splitting the build data set. If you do not want to test the model in this way, go to the Classification Node Test section in Classification node Properties pane. You can instead use a Test Node and a test data source to test the model.
8.7.4.1.1 No Case ID
If a case ID is not supplied, Oracle Data Miner creates a table for the all the input data that contains a generated case ID using the row number. This table is used as the source to create the build and test random sample views. The generated case ID is constant for all queries. This ensures that consistent test results are generated.
8.7.4.2 Delete Models
To delete a model from the list, select it and click ![]() .
.
8.7.4.3 Add Models
To add a model to the list, click ![]() . The Add Model (Classification) dialog box opens.
. The Add Model (Classification) dialog box opens.
8.7.4.3.1 Add Model (Classification)
In the Add Models dialog box:
-
In the Algorithm field, select an algorithm.
-
In the Name field, a default name is displayed. You can use the default or rename the model.
-
In the Comments field, you can enter comments, if any. This is an optional field.
-
Click OK to add the model to the node.
8.7.5 Advanced Settings for Classification Models
The Advanced Settings dialog box enables you to inspect and change the following:
-
Data usage
-
Algorithm settings
-
Performance settings
To change or view advanced settings, click ![]() in the Edit Classification Build Node dialog box dialog box. Alternately, right-click the Classification Build node and click Advanced Settings.
in the Edit Classification Build Node dialog box dialog box. Alternately, right-click the Classification Build node and click Advanced Settings.
The Advanced Settings dialog box lists all of the models in the node in the upper pane. You can add models and delete models in the upper pane of the dialog box.
In the lower pane, you can view or edit the following for the model selected in the upper pane:
-
The settings that can be changed depend on the algorithm:
8.7.6 Classification Node Properties
The Classification node properties enables you to view and change information about model build and test.
Specify a target before building Classification models. You can specify a case ID. If you do not specify a case ID, then the processing will be slower.
If you are unable to view Properties, then go to View and click Properties. Alternately, right-click the node and click Go to Properties.
Classification node Properties pane has these sections:
See Also:
"Properties"8.7.6.1 Classification Node Models
The Classification node lists the models that are built when the node runs. By default, the Classification Build node creates three classification models. Each one uses a different classification algorithm:
-
Support Vector Machine (SVM)
-
Naive Bayes (NB)
-
Decision Tree (DT)
-
Generalized Linear Models (GLM). This algorithm is used as default, only if the target is binary. For multi-class targets, you can also specify the GLM algorithm if you add a model.
Model Setting lists the models that are built.
You can perform the following tasks:
-
Add: To add a model, click
. The Add Model dialog box opens. -
Delete: To delete the models, select it and click
. -
Compare Test Results: If models were tested, then you can compare test results by selecting two or more models and clicking
 .
. -
View: If a model built successfully, then you can view the model by selecting the model and clicking
. The Model viewer depends on the algorithm used to create the model. -
Duplicate: To copy a model, select the model and click
. -
Tune Models: To tune models, select the model and click
 .
.
You can also indicate which models are passed to subsequent nodes or not.
See Also:
8.7.6.1.1 Classification Node Output Column
The Output column in the Model Settings grid controls the passing of models to subsequent nodes. By default, all models are passed to subsequent nodes.
-
To ignore a model, that is, not to pass it to subsequent nodes, click
. The icon changes to the Ignore icon -
To cancel the ignore, click the Ignore icon again. It changes to the output icon.
8.7.6.2 Classification Node Build
The Build section displays the target and the case ID. The Build node must be connected to a Data Source node. You can perform the following tasks:
-
Target: You can select a target from the Target drop-down list.
-
case ID: To change or select a case ID, select one attribute from the case ID drop-down list. This attribute uniquely identifies a case.
case ID is an optional field. If you do not select a case ID, then the processing will be slower.
8.7.6.3 Classification Node Test
The Test section specifies the data used for test and which tests to perform.
You can set the following settings:
-
Perform Test: Select this option to test the Classification Node. The default setting is to test all models built using the test data that is created by randomly splitting the build data into two subsets. By default, the following tests are performed:
-
Performance Metrics
-
Performance Matrix
-
ROC Curve (Binary Class only)
-
Lift and Profit
Lift and profit for the top 5 target classes by frequency. Click Edit. The Target Values Selection dialog box opens. -
Generate selected Test Results for Tuning: If you plan to tune the models, then you must test the models in the build node, not in a Test node.
-
-
Test Data: Select any one of the following options, by which Test Data is created:
-
Use all Mining Build Data for Testing
-
Use Split Build Data for Testing
Split for Test (%)
Create Split as:Table(default) -
Use a Test Data Source for Testing: Select this option to connect the Test Data Source to the Build node, after you connect the Build data.
-
Note:
Another way to test a model is to use a Test Node.8.7.6.3.1 Target Values Selection
The Target Values Selection dialog box displays the number of target values selected. The default option Automatic is to use the top five target class values by frequency. You can change the number of target values by changing the frequency count. You can also select the option Use Lowest Occurring.
-
Automatic: By default, use the top five target class values by frequency.
-
Frequency Count: You can change the number of target values by changing the values in this value.
-
Use Lowest Occurring
-
Use Highest Occurring
-
-
Custom: Select this option to specify specific target values. Then, move the values from Available Values to Selected Values.
8.7.7 Classification Build Node Context Menu
To view the context menu, right-click a Classification node. The following options are available in the context menu:
-
Edit. Opens the Edit Classification Build Node.
-
Advanced Settings. Opens Advanced Settings for Classification Models.
-
Parallel Query. See "About Parallel Processing" for more information.
-
Show Runtime Errors. Displayed only if there is an error.
-
Show Validation Errors. Displayed only if there are validation errors.
8.7.7.1 View Test Results
Select a model and then view the test results for the model.
See Also:
"Compare Classification Test Results"8.7.7.2 Compare Test Results
You can compare all successfully built models in the node by comparing the text results.
See Also:
"Compare Test Results Viewer"8.8 Clustering Node
A Clustering node builds clustering models using the k-Means, O-Cluster, and Expectation Maximization algorithms.
Note:
Expectation Maximization models require Oracle Database 12c or later.There are two ways to cluster data:
-
By building a Clustering model: Use a Classification node. Then apply the model to new data to create clusters.
-
By using a Clustering Query, which is one of the predictive queries.
A Clustering build can run in parallel.
This section contains the following topics:
8.8.1 Default Behavior for Clustering Node
A Clustering node builds three models using the following algorithms:
-
k-Means Algorithm (KM)
-
Expectation Maximization (EM). For EM, Oracle Database 12c is required.
A case ID is optional.
The models all have the same build data.
Note:
If do not want to create a model, then delete the model from the list of models. The blue check mark to the left of the model name selects models to be used in subsequent nodes, such as Apply. It does not select models to build.8.8.2 Create Clustering Build Node
Before creating a Clustering Build node, first create a workflow. Then, identify or create a Data Source node.
To create a Clustering node and attach data to it:
-
In the Components pane, go to Workflow Editor.
If the Components pane is not visible, then go to View and click Components. -
In the Workflow Editor, expand Models, and click Clustering.
-
Drag and drop the node from the Components pane to the Workflow pane.
The GUI shows that the node has no data associated with it. Therefore, it cannot be built. -
Move to the node that provides data for the build. Right-click the node and click Connect. Drag the line to the Classification node and click again.
-
Right-click the Clustering node and click Run. The node runs and builds the models.
8.8.3 Data for Clustering Build
Oracle Data Miner uses heuristics to:
-
Determine the attributes of the input data used for building models
-
Determine the mining type of each attribute
See Also:
"Data Used for Model Building"8.8.4 Edit Clustering Build Node
To open the Edit Clustering dialog box, double-click a Clustering node. Alternately, you can right-click a Clustering node and select Edit.
The Edit Clustering Node dialog box has three tabs:
-
Input
-
Text
See Also:
-
"Viewing and Changing Data Usage" for more information about the Input tab.
-
"Specifying Text Characteristics" for more information about the Text tab.
8.8.4.1 Build (Clustering)
The Build tab enables you to specify or change the characteristics of the models to build. To edit the characteristics of the models to build, follow these steps:
-
In the Case ID field, select an attribute from the drop-down list.This attribute must uniquely identify a case.
Note:
A case ID is not required. However, a case ID helps ensure build and test repeatability.If you specify a case ID, then all models in the node have the same case ID.
-
In the Models Settings list, select the models you want to build. For a Clustering node, you can build models using the following algorithms:
-
k-Means (KM)
-
Expectation Maximization (EM).
For this algorithm, Oracle Database 12c release 1 (12.1) is required.
You can perform the following tasks:
-
Delete: To delete any models, select the models and click
. -
Add: To add a model, click
. -
Copy: To copy a model, select the model and click
.
-
8.8.4.2 Delete Model (Clustering)
To delete a model from the list, select it and click ![]() .
.
8.8.4.3 Add Model (Clustering)
To add a model to the list, click ![]() . The Add Model dialog box opens.
. The Add Model dialog box opens.
In the Add Model dialog box:
-
In the Algorithm field, select an algorithm, either KM, OC or EM. For EM Oracle Database 12c is required.
-
Expectation Maximization. For this option, Oracle Database 12c Release 12.1 is required.
-
In the Name field, a default name is displayed. You can use the default name or rename the model.
-
In the Comment field, enter comments, if any. This is an optional comment.
-
Click OK to add the model to the node.
8.8.5 Advanced Settings for Clustering Models
To access advanced settings, click ![]() in the Edit Clustering Build Node dialog box. Alternately, right-click the node and select Advanced Settings. The Advanced Settings dialog box list all the models in the upper pane.
in the Edit Clustering Build Node dialog box. Alternately, right-click the node and select Advanced Settings. The Advanced Settings dialog box list all the models in the upper pane.
You can perform the following tasks:
-
Inspect and change the data usage and algorithm
-
Add models to the node
-
Delete models from the node
In the lower pane, you can view and edit the following, for the model selected in the upper pane:
-
Data usage on the Data Usage tab
-
Algorithm settings on the Algorithm Settingstab
The settings that can be changed depend on the algorithm:
See Also:
"Advanced Settings Overview"8.8.6 Clustering Build Node Properties
Clustering Build node properties enables you to view and change information about model build. If you are unable to view the Properties pane, then go to View and click Properties. Alternately, right-click the node and click Go to Properties.
The Clustering Build node properties has these sections:
8.8.6.1 Models (Clustering)
Models lists the models that are built when the nodes are run. the default is to build two clustering models using the KM, OC, and EM algorithms.
The Model Settings grid lists the models in the node. You can perform the following tasks:
-
Search models
-
Indicate which models are passed on to subsequent nodes.
See Also:
"Clustering Node Output Column"8.8.6.1.1 Clustering Node Output Column
The Output column in the Model Settings grid controls the passing of models to subsequent nodes. By default, all models are passed to subsequent nodes.
-
To ignore a model, that is, to not pass it to subsequent nodes, click
. The Output icon changes to . -
To cancel the ignore, click the Ignore icon again. The icon changes to the Output icon.
8.8.6.1.2 View Models
If a model built successfully, then you can view the model by selecting the model and clicking ![]() . The Model Viewer opens. The Model Viewer depends on the algorithm used to create the model:
. The Model Viewer opens. The Model Viewer depends on the algorithm used to create the model:
8.8.6.2 Build (Clustering)
Displays the optional case ID for the clustering models. To change the case ID, select an attribute from the list.
8.8.7 Clustering Build Node Context Menu
To view the Clustering Build node context menu, right-click the node. The following options are available in the context menu:
-
Edit. Opens the Edit Association Build Node.
-
Advanced Settings. Opens Advanced Settings for Association Node.
-
View Models. Opens the appropriate viewer (KM Model Viewer or OC Model Viewer) for the selected model.
-
Parallel Query. See "About Parallel Processing" for more information.
-
Show Event Log. Displayed only if the running of the node fails.
8.9 Feature Extraction Node
A Feature Extraction node uses the Nonnegative Matrix Factorization (NMF) algorithm, to build models. There are two ways to extract features:
-
Build a feature extraction model, using a Feature Extraction node.
-
Use a Feature Extraction Query, one of the predictive queries.
If Oracle Data Miner is connected to Oracle Database 12c, a Feature Extraction node uses the PCA and SVD algorithms to build models.
Note:
Principal Components Analysis and Singular Value Decomposition models require Oracle Database 12c.A Feature Extraction Build can run in parallel.
This section contains the following topics:
See Also:
8.9.1 Default Behavior for Feature Extraction Node
By default, a Feature Extraction node builds one model using the Non-Negative Matrix Factorization (NMF) algorithm.
If you are connected to Oracle Database 12c, the node builds two models by default:
-
NMF model
-
PCA model
You can add SVD models.
All models in the node use the same build data and have the same case ID, if you specify a case ID.
8.9.2 Create Feature Extraction Node
Before creating a Feature Extraction node, first, create a workflow. Then, identify or create a Data Source node.
To create a Feature Extraction node:
-
In the Components pane, go to Workflow Editor.
If the Components pane is not visible, then go to View and click Components. -
In the Workflow Editor, expand Models, and click Feature Extraction.
-
Drag and drop the node from the Components pane to the Workflow pane. A Feature Build node is added to the workflow.
The GUI shows that the node has no data associated with it. Therefore, it cannot be built. -
Move to the node that provides data for the build. Right-click and click Connect. Drag the line to the Feature Extraction node and click again.
-
You can edit the node. To edit the node, right-click the node and click Edit. The Edit Feature Extraction Build Node dialog box opens.
-
The node is ready to build. Right-click the node and click Run.
8.9.3 Data for Feature Extraction Build
Oracle Data Miner uses heuristics to:
-
Determine the attributes of the input data used for model build
-
Determine the mining type of each attribute
See Also:
"Data Used for Model Building"8.9.4 Edit Feature Extraction Build Node
To edit a Feature Build node, either double-click a Feature Build node, or right-click the node and select Edit. The Edit Feature Extraction Build Node dialog box opens. The same dialog box opens when you drop a Feature Build node on a workflow.
The Edit Feature Extraction Build dialog box has three tabs:
-
Input
-
Text
See Also:
-
"Viewing and Changing Data Usage" for more information about the Input tab.
-
"Specifying Text Characteristics" for more information about the Text tab.
8.9.4.1 Build (Feature Extraction)
In the Build tab, you can perform the following tasks:
-
Case ID: Specify case ID for Feature Extraction is optional. Specify one by selecting an attribute from the drop-down list.
-
Add Model:
-
Delete: To delete a model, select the model and click
. -
Copy: To copy an existing model, select the model and click
.
See Also:
"Add Model (Feature Extraction)"8.9.4.2 Add Model (Feature Extraction)
To add a model, click ![]() . The Add Model (Feature Extraction) dialog box opens.
. The Add Model (Feature Extraction) dialog box opens.
-
In the Algorithm field, select an algorithm. The default algorithm is NMF.
-
In the Name field, the default name is displayed. You can accept the default name or change it.
-
In the Comments field, enter comments, if any. This is an optional field.
-
Click OK. The model is added to the list. The new model has the same build characteristics as existing models. The new model has the default values for advanced settings.
8.9.5 Advanced Settings for Feature Extraction
The advanced settings selection enables you to inspect and change the data usage and algorithm settings for each model in the node.
-
Inspect and change data usage.
-
Change algorithm settings for each model in the node.
To change or view advanced settings, click ![]() in the Edit Feature Extraction Build Node dialog box. Alternately, right-click the node and select Advanced Settings. The advanced settings selection enables you to inspect and change the data usage and algorithm settings for each model in the node.
in the Edit Feature Extraction Build Node dialog box. Alternately, right-click the node and select Advanced Settings. The advanced settings selection enables you to inspect and change the data usage and algorithm settings for each model in the node.
In the upper pane, all models are listed. You can perform the following tasks:
-
Delete: To delete a model, select it and click
. -
Add: To add a model, click
.
In the lower pane, you can view or edit the following for the model selected in the upper pane:
-
The settings depend on the algorithm:
PCA and SVD are available if Oracle Data Miner is connected to Oracle Database 12c.
8.9.6 Feature Extraction Node Properties
The Feature Extraction node properties enables you to view and change information about the models defined in the node.
To view the properties for a node, click the node. If the Properties pane is closed, then go to View and click Properties. Alternately, right-click the node and click Go to Properties.
The Feature Extraction node Properties pane has the following sections:
See Also:
"Properties"8.9.6.1 Build (Feature Extraction)
The Build section displays the case ID for the models defined in this node. All the models in the node have the same case ID.
A case ID is not required.
To edit the case ID, select a different attribute from the list.
8.9.7 Feature Extraction Node Context Menu
To view the Feature Extraction node context menu, right-click the node. The following options are available in the context menu:
-
Edit. Opens the Edit Feature Extraction Build Node dialog box.
-
Advanced Settings. Opens Advanced Settings for Feature Extraction dialog box.
-
View Models. Opens NMF Model Viewer for the selected model.
-
Parallel Query. See "About Parallel Processing" for more information.
-
Show Runtime Errors. Displayed only if there is an error.
-
Show Validation Errors. Displayed only if there are validation errors.
8.10 Model Node
A Model node enables you to add models to a workflow that were not built in the workflow. For example, you can specify a model that was built using either of the ODM APIs.
The models in a Model node must satisfy the model constraints.
The Model node takes no input. A Model node can be an input to any node that accepts models, such as the Apply and Test nodes, at least for some function types. For example, if a model node contains Classification or Regression models, it can be input to a test node. Test data must be prepared in the same way that the build data was prepared.
This section about Model nodes contains the following topics:
Model nodes rely on database resources for their definition. It may be necessary to refresh a node definition if the database resources change, for example, if the resources are deleted or re-created.
See Also:
8.10.1 Create a Model Node
To add a model node to a workflow and add models to the model node:
-
Open the Components pane and select the Workflow Editor. If the Components pane is not visible, then go to View and click Components.
-
In the Workflow Editor, expand Models, and click Model.
-
Drag and drop the node from the Components pane to the Workflow pane.
-
The Edit Model Selection dialog box opens automatically. The models in the Model node must have the same mining function and the same target (Classification and Regression models only).
See Also:
"Edit Model Selection"8.10.2 Edit Model Selection
In the Edit Model Section dialog box, you can select one or more models to include in the Model node or to remove models from the Model node. To edit the models in the node, double-click the Model node or right-click the Model node and select Edit.
Note:
All the models in a model node must satisfy the Model Constraints.You can perform the following tasks:
-
Select models from the Available Compatible Models list and move them to the Selected Models list using the controls between the lists.
The selected models are checked for compatibility. The models in a model node must satisfy the model constraints.
The selected models are part of the model node. You can view the models using the Model node properties. -
Include models from other schemas. To include models, select Include Models from Other Schemas.
-
Filter the Available Compatible Models list in the following ways:
-
Select a model function from the Model Function list. The options are:
-
All
-
Anomaly Detection
-
Association Rules
-
Regression
-
Clustering
-
Feature Extraction
-
-
Sort the models by name, function, algorithm, target, target data type, creation date, or comments. To sort, click the column header in the list of available models.
-
-
Add and remove models:
-
Add models by moving them from Available Compatible Models list to the Selected Models list.
-
Remove models by moving them from the Selected Modes list to the Available Compatible Models list. You can also remove models using the Models tab.
-
See Also:
8.10.2.1 Model Constraints
A Model node consists of models that are similar. The models in a Model node must satisfy the following;
-
All models must have the same function type (Classification, Regression, Clustering, Anomaly Detection, Association Rules, or Feature Extraction). You cannot include models that have different function types.
You can add models that are built using different algorithms if the models have the same function type.
-
Classification or Regression models must have the same target attribute. The target attributes must all have the same data type.
CHARandVARCHAR2are considered to be the same data type for Classification models. -
Classification models must have the same list of target values.
8.10.3 Model Node Properties
To access the properties of the Model node, click the node. If the Properties pane is closed, then go to View and click Properties. Alternately, right-click the node and click Go to Properties.
In the Model node Properties pane, you can:
-
Add models to the Model node
-
Delete models from the Model node
-
View models in the Model node
The Properties pane for a model node source node has the following sections:
See Also:
"Properties"8.10.3.1 Models (Model Node)
The Models section shows the mining function that the models use and lists all the models included in the node in a grid.
You can search for models, add models to the node, and delete models.
You can perform the following tasks:
-
Add Models: To add models:
-
Click
. The Edit Model Selection dialog box opens. -
In the Edit Model Selection dialog box, select the models to add to the node. You can add models from other schemas too. However, any models that you add must be compatible with the models already in the node.
-
Click OK. This adds the models to the node. You can go to the Properties pane for the Model node to view the models.
-
-
Delete Models: To delete a model, select it and click
. -
View Models: To view a model, select it and click
. -
Refresh models: To refresh models, click
 . If data on the server changes, it may be necessary to refresh the node.
See Also:
"Refresh Nodes"8.10.4 Model Node Context Menu
To view the Model node context menu, right-click the node. The following options are available in the context menu:
-
Edit. Opens the Edit Model Selection dialog box.
-
Run.Validates that the models specified in the node exist.
-
Show Runtime Errors. Displayed only if there is an error.
-
Show Validation Errors. Displayed only if there are validation errors.
8.11 Model Details Node
The Model Details nodes are the most useful for application developers. The Model Details node performs the following functions:
-
Extracts model details from a Model Build node, a Model node or any node that outputs a model.
-
Reveals information about model attributes and their treatment by the algorithm. The output depends on the type of models selected and the specific type of model details you specify.
-
The output of the Model Details node is a data flow. To enable the data to persist, use a Create Table or View node.
A Model Details node can run in parallel.
This section on Model Detail node contains the following topics:
8.11.1 Model Details Node Input and Output
The input for a Model Details node is one or more of the following:
-
Build node (any model type)
-
Model Node
All models in Build nodes or Model nodes must have the same mining function type. For example, if one is a Classification model, then all of them must be Classification models.
The output for a Model Details node is a data flow based on the model detail specifications. To enable the data to persist, use a Create Table or View node.
8.11.2 Create Model Details Node
To create a Model Details node, follow these steps:
-
Identify the input node or nodes for model details. The input node must be one or more of the following:
-
Any Model Build node
-
Any Model node
Note:
All the models selected must have the same mining function type. For example, if one of the nodes is a Classification node, then all other nodes must build Classification models. -
-
In the Components pane, go to Workflow Editor. If the Components pane is not visible, then go to View and click Components.
-
In the Workflow Editor, expand Models, and click Model Details.
-
Drag and drop the node from the Components pane to the Workflow pane.
You may want to place the Model Details node close to the Build or Model nodes that provide input. -
Move the cursor to the workflow. Right-click one of the input nodes, and select Connect. Drag the link to the Model Details node. Repeat if you must connect more nodes.
-
The default specification for model details depends on the model. To use the default specification, right-click the Model Details node and click Run.
-
To change the specification for the Model Details node, right-click the node and select Edit. Alternately, you can change the specifications in the Properties pane of the node.
8.11.3 Edit Model Details Node
The Model Details Node editor enables you to view or specify the models details provided by the node. To open Edit Model Details Node, double-click a Model Details node. Alternately, right-click a Model Details node and select Edit.
You can perform the following tasks:
-
Automatic Specification: If this option is selected (the default), then the system determines the specification. You cannot change the output types, algorithm types, or selected models.
-
Function: Displays the function type of the input nodes connected, for example, if a Classification node is connected to Model Details, the function is Classification. If no input nodes are connected, then it is undefined.
-
Model Type: It is a list of the algorithms available, including
All. -
Output: Displays the default output of Model Details for the algorithm.
-
Column: Click columns to view the list of the columns (name and data type) for the selected output type.
-
Add: To add model type or edit output type, deselect Automatic Specification. To add another model type, select the model type and click
. The Edit Model Selection Details dialog box opens. You can accept the default specifications or edit them.
8.11.3.1 Edit Model Selection Details
The top pane of the Edit Model Selection Details dialog box contains general information:
-
Function: Displays the function type of the input nodes connected, for example, if a Classification node is connected to Model Details, the function is Classification. If no input nodes are connected, then it is undefined.
-
Model Type: Displays algorithms. If there are models already selected (listed in the Selected Models grid), then the Model Type field is disabled to match the already selected models. If you move all models out of the Selected Models grid, the Model Type field is enabled again. If the Model Type is enabled, then you can select models. The default is
All Models. -
Output Type: Displays the list of possible output types (model queries) that are available for the specified model types. The values for each algorithm selection are as follows:
-
-
Decision Tree (initial default): Full Tree (default), Full Tree XML, Leaf Nodes, Model Signature
-
SVM Classification: Coefficients (Default), Model Signature
-
SVM Regression, Coefficients (Default), Model Signature
-
Naive Bayes: Pair Probabilities (Default), Model Signature
-
Association Rules: Rules (Default), Global Details, Itemsets
-
Anomaly Detection: Coefficients (Default), Model Signature
-
GLM Classification: Statistics (Default), Row Diagnostics, Model Signature, Global Details
-
GLM Regression: Statistics (Default), Row Diagnostics, Model Signature, Global Details
-
KM or OC Clustering: Full Tree (Default), Rules, Attribute Histograms, Centroid, Model Signature
-
Expectation Maximization (EM): Full Tree (Default), Attribute Histograms, Centroid Components, Global Details, Model Signature, Projections, Rules.
EM requires Oracle Database 12c or later.
-
NMF: Features Transactional (Default), Model Signature
-
SVD: Features Transactional (Default), Global Details, Model Signature, Projections, Singular Values
SVD requires Oracle Database 12c or later.
-
PCA: Features Transactional (Default), Eigen Values, Global Details, Model Signature, Projections
PCA requires Oracle Database 12c or later.
Output values are also available for multiple model types. For example, you can select Centroid for all clustering models.
-
-
Columns: Click to see a list of the columns (name and data type) for the selected output type.
The lower portion of the dialog box displays the following:
-
Available Compatible Models: Lists the available models, that is, models that match the algorithm selection. The grid, for each model, displays the model Name, the input node for the model, and the algorithm used to build the model.
-
Selected Models: Lists the selected models. The grid, for each model, displays the model name, the input node for the model, and the algorithm used to build the model.
8.11.4 Model Details Automatic Specification
How specifications change automatically depends on whether automatic selection is on or off:
-
By default, Automatic Specification is selected. Automatic Specification results in the following behavior:
-
When the first input node is connected to a Model Details node, the input node is searched for models in a default order of priority. For the first model type found, all the nodes matching models are added to the Model Details Specification along with the default Output Type.
-
On subsequent connections, the models that match the type in the Model Details node are automatically added. A message is displayed telling you that models are being added automatically.
-
When an input node is disconnected, all model specifications provided by that node are automatically removed from the Model Details node.
-
When an input node is edited, any models added are automatically added to the Model Details node if the added model matches the model type contained in the node. If models are deleted from an input node, then they are deleted from the Model Details node.
-
When a parent node is edited so that all models are removed, the model node is set to undefined. When a new model is added to the parent node, the model node remains undefined because it is too unpredictable about what model and output type would be selected by default given that there may be many parent nodes connected to a model node.
-
When an input node is edited and the model is changed so that it is no longer consistent with its specification in the model details node, the model specification is removed.
-
-
Automatic Specification is
Offor deselected, and it results in the following behavior:-
Models are not added automatically.
-
You must edit the Model Details node.
-
Validations are performed as usual, so models that are now inconsistent or missing are marked as invalid. Also, if models are missing and a node is added that contains a match with that model, then it is made valid and associated to the new node.
-
You must manually fix or remove invalid model references.
-
8.11.4.1 Default Model and Output Type Selection
The specification that is automatically added depends on the mining function of the model as follows:
-
Classification
-
Decision Tree: Full Tree
-
GLM: Statistics
-
NB: Probabilities
-
SVM: LINEAR KERNEL ONLY Coefficients
-
-
Clustering
-
KM: Full Tree
-
OC: Full Tree
-
EM: Full Tree
-
-
Regression
-
GLM: Statistics
-
SVM: LINEAR KERNEL ONLY Coefficients
-
-
Anomaly Detection
-
SVM: LINEAR KERNEL ONLY Coefficients
-
-
Association
-
Apriori: Rules
-
-
Feature Extraction
-
NMF, SVD, or PCA: Features transactional
-
8.11.5 Model Details Node Properties
The Model Details node properties enables you to view the model for which details were extracted. To display the Properties pane for a node, click the node. If the Properties pane is closed, then go to View and Properties. Alternately, right-click the node and click Go to Properties.
Model Details node Properties has the following sections:
See Also:
"Properties"8.11.5.1 Models (Model Details)
The Model section lists the models that you want to save details about. You can add and remove models from the list.
8.11.5.2 Output (Model Details)
The Output tab lists the columns produced by the Model Details node. For each column, the alias (if any) and the data type are displayed.
See Also:
"Model Details Automatic Specification"8.11.5.3 Cache (Model Details)
The default is to not generate cache to optimize the viewing of results. You can generate cache. If you generate cache, then you can specify the sampling size. The default sampling size is 2000 rows.
8.11.6 Model Details Node Context Menu
To view the Model Details node context menu, right-click the node. The following options are available in the context menu:
-
Edit. Opens Edit Model Details Node.
-
Parallel Query. See "About Parallel Processing" for more information.
-
Show Runtime Errors. Displayed only if there is an error.
-
Show Validation Errors. Displayed only if there are validation errors.
8.11.6.1 View Data (Model Details)
To view the complete Model Details output, right-click the node and select View Data.
The output is displayed in a multitab display:
-
Data
The data that constitutes the model details. What the data represents depends on the model. For example, the data could represent a tree or rules.
You can sort and filter the columns of this tab.
-
Columns
Data Type and Mining Type of the columns in the output.
-
SQL
SQL used to generate the model details.
See Also:
"Model Details Per Model"8.11.7 Model Details Per Model
The exact data displayed in a Model Details node depends on the particular models.
All models that can be applied (scored) can have model signature as output.
See Also:
-
"Default Model and Output Type Selection" for more information about the default model details.
-
"Edit Model Selection Details" for more information about the possible selections for the Model Details node for each algorithm.
8.12 Regression Node
There are two ways to make regression predictions:
-
By building and testing a Regression model: Use a Regression node, and then apply the model to new data to make classifications.
-
By using a Prediction Query, which is one of the predictive queries.
The Regression node defines one or more Regression models to build and to test. To specify data for the build, connect a Data Source node to the Regression node. You can also connect a second data source to the Regression build node to specify test data.
The models in a Regression Node all have the same target and case ID.
You can only specify one target.
A Regression build can run in parallel.
This section consists of the following topics:
8.12.1 Default Behavior for Regression Node
For a binary target, the Regression node builds four models using the following algorithms:
-
Generalized Linear Model (GLM)
-
Support Vector Machine (SVM)
The models have the same build data and the same target.
By default, the models are all tested. The test data is created by randomly splitting the build data into a build data set and a test data set. The default ratio for the split is 60 percent build and 40 percent test. When possible Data Miner uses compression when creating the test and build data sets.
You can instead use all the build data as test data.
To use separate test data, connect a test data source to the build node or use a Test node.
After you test models, you can view test results.
You can compare test results for two or more Regression models using the Compare Test Results selection of the context menu.
The case ID is optional. However, if you do not specify a case ID, then the processing will be slower.
8.12.2 Create a Regression Node
Before creating a Regression node, first, create a workflow. Then, identify or create a data source.
To create a regression node and attach data to it:
-
In the Components pane, go to Workflow Editor. If the Components pane is not visible, then go to View and click Components.
-
In the Workflow Editor, expand Models, and click Regression.
-
Drag and drop the node from the Components pane to the Workflow pane.
The GUI shows that the node has no data associated with it. Therefore, it cannot be built. -
Move to the node that provides data for the build. Right-click, and click Connect. Drag the line to the Regression node and click again.
-
The Edit Regression Build Node dialog box opens. You must specify a target (all models in the node have the same target). A target cannot be text.
-
To specify a separate Data Source node for test, connect a second Data Source node to the Build node. This is optional.
-
After you finish editing the node, and connecting the optional test Data Source node, the node should be ready to build. Right-click the node and click Run.
If you specified a test Data Source node when the node runs, then the connection from the build data source is labeled Build and the connection from the test data source is labeled Test.
8.12.3 Data for a Regression Build
Oracle Data Miner uses heuristics to:
-
Determine the attributes of the input data used for model build.
-
Determine the mining type of each attribute.
See Also:
"Data Used for Model Building"8.12.4 Edit Regression Build Node
To open the Edit Regression Build Node dialog box, double-click a Regression Build node, or right-click a Regression Build node and select Edit.
The Edit Build dialog box has three tabs:
-
Input
-
Text
See Also:
-
"Viewing and Changing Data Usage" for more information about the Input tab.
-
"Specifying Text Characteristics" for more information about the Text tab.
8.12.4.1 Build (Regression)
The Build tab enables you to specify or change the characteristics of the models to build. To edit the characteristics of the model to build, follow these steps:
-
In the Target field, select a target from the drop-down list. The list consist of attributes from the table or view specified in the Data Source node that is connected to the build node.
You must specify a target. All models in the node have the same target.
-
In the Case ID field, select one attribute from the drop-down list. This attribute must uniquely identify a case.
Note:
A case ID is not required. However, if you do not specify a case ID, then the processing will be slower.A case ID is required to generate GLM diagnostics.
If you specify a case ID, all models in the node have the same case ID.
-
In the Models Settings list, select which models you want to build. You can build Support Vector Machine (SVM) and Generalized Linear Models (GLM). You can delete any of these models by selecting the model and clicking
-
To delete any model, select the model and click
. -
To add models, click
. The Add Model (Regression) dialog box opens. -
To edit a model, click
. The Advanced Settings for Regression Models dialog box opens. -
To copy an existing model, select the model and click
-
-
Click OK.
The default is to test the model using a test data set created by splitting the build data set. If you do not want to test the model in this way, go to the Test section in of Regression node Properties pane. You can instead use a Test Node and a test data source to test the model.
8.12.4.2 Add Model (Regression)
To add a model to the node:
-
In the Algorithm field, select an algorithm.
-
In the Name field, a default name is displayed. You can use the default or rename the model.
-
In the Comment field, add comments if any. This is an optional field.
-
Click OK. The new model is added to the node.
8.12.5 Advanced Settings for Regression Models
The Advanced Settings dialog box enables you to:
-
Inspect and change data usage and algorithm settings for each model in the node
-
Add and delete models
To change or view Advanced Settings, click ![]() in the Edit Regression Build Node dialog box. Alternately, right-click the node and select Advanced Settings.
in the Edit Regression Build Node dialog box. Alternately, right-click the node and select Advanced Settings.
The upper panes lists all the models in the node. You can perform the following functions:
-
Delete: To delete a model, select the model and click
-
Add: To add a model, click
. The Add Model (Regression) dialog box opens.
In the lower pane, you can view and modify data usage and algorithm settings for the model selected in the upper pane. You can edit the following:
-
The settings that can be changed depend on the algorithm:
8.12.6 Regression Node Properties
The Regression node properties enables you to view and change information about the model builds. To view the Properties pane of a Regression node, click the node. If Properties pane is closed, then go to View and Properties. Alternately, right-click the node and click Go to Properties.
Before building Regression models, ensure the following:
-
Specify a Target.
-
Specify a case ID. This is optional. However, if you do not specify a case ID, then the processing will be slower.
This section contains the following topics:
See Also:
"Properties"8.12.6.1 Models (Regression)
The Model section lists the models that are built. By default, three Regression models are built using three different algorithms (SVM, NB, and DT). You can also specify the GLM algorithm if you add a model.
You can perform the following tasks:
-
Delete: To delete a model, select the model and click
. -
Add: To add a model, click
-
Compare Test Results: If models were tested, then you can compare test results. Select two or more models and click
-
View Model: If a model built successfully, then you can view the model. Select the model and click
. The corresponding viewer opens. -
Indicate Models Status: Indicates whether models are passed to subsequent nodes.
See Also:
8.12.6.1.1 Output Column
The Output column in the Model Settings grid controls the passing of models to subsequent nodes. By default, all models are passed to subsequent nodes. To ignore a model (that is, to not pass it to subsequent nodes, click
-
To ignore a model, that is, to not pass it to subsequent nodes, click
. The icon changes to , the Ignore icon. -
To cancel the ignore, click the Ignore icon again. It changes to the Output icon.
8.12.6.2 Build (Regression)
The Build section displays the following:
-
Target: The Build node must be connected to a Data Source node. You then select the target from the target list. To change the target, select a different target from the drop-down list.
-
Case ID: Select an attribute from the drop-down list. This attribute must uniquely identify a case. The case ID is optional. If no case ID is selected, then
<None>is displayed. However, if no case ID is specified, then the processing will be slower.
8.12.6.3 Test (Regression)
The Test section specifies the data used for testing and the tests performed. By default, all models that are built using test data are tested. The test data is created randomly splitting the build data.
The following settings are available in the Test section:
-
Perform Test: By default, all models that are built using test data are tested. The test data is created randomly splitting the build data.
The default test results are:-
Performance Metrics
-
Residuals
You can deselect both.
-
-
Test Data: Test Data is created is one of the following ways:
-
Use all of the Mining Build Data for Testing
-
Use Split Build Data for Testing
Split for Test (%)
Create Split as:View(default). The split creates a view that is not parallel. -
Use a Test Data Source for Testing: Select this option to provide a separate test Data Source and connect the test data source to the build node after you connect the build data. Alternately, you can test a model by using a Test node.
-
See Also:
8.12.7 Regression Node Context Menu
To view the Regression node context menu, right-click the node. The following options are available in the context menu:
-
Edit. Opens the Edit Regression Build Node dialog box.
-
Advanced Settings. Opens the Advanced Settings for Regression Models dialog box.
-
Parallel Query. See "About Parallel Processing" for more information.
-
Show Runtime Errors, displayed only if there is an error
-
Show Validation Errors, displayed only if there are validation errors
8.13 Advanced Settings Overview
The Advanced Settings dialog box enables you to edit data usage and other model specifications, add and remove models from the node.
You can open the Advanced Settings dialog box in one of these ways:
-
Right-click any model node and click Advanced Settings from the context menu.
-
Double-click the node to open the editor. Then click
.
The dialog box has two panes, as illustrated in this example of Advanced Settings for a Classification Build node: 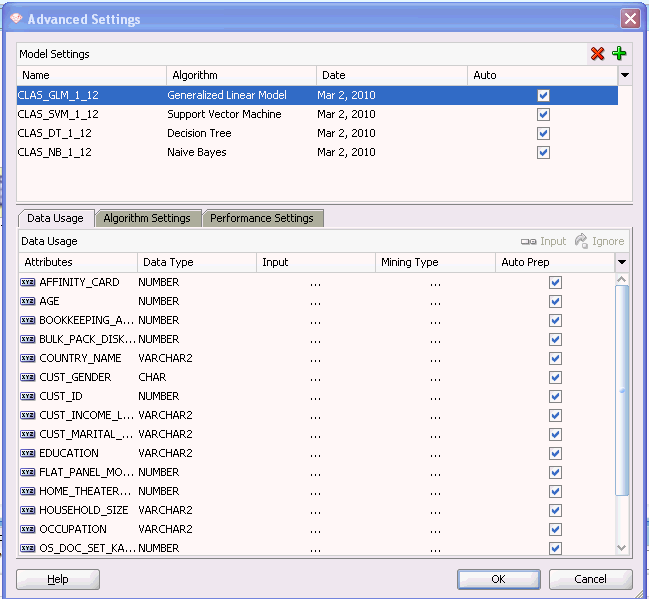
Description of the illustration advsettings_class.gif
The Upper Pane of Advanced Settings enables you to delete models and add models. You can also select models in the upper pane to change data usage. The Lower Pane of Advanced Settings, which has one, two, or three tabs, enables you to edit model specifications.
8.13.1 Upper Pane of Advanced Settings
The upper pane of the Advanced Settings lists all of the models in the node. The Model Settings grid provides the following information about each model:
-
Model Name
-
Algorithm
-
Date of Last Build
-
Auto
-
Data Usage
-
Column Excluded By...
To view the input and mining type for attributes, select the model in the upper pane and deselect Auto. If Auto is selected (the default), then the system automatically determines the attributes used to build the model.
Data Miner does not necessarily select all attributes to use in building a model. For example, if most of values of an attribute are the same, then the attribute is not selected.
To see which attributes are selected, deselect Auto. Select a model. The lower pane indicates the selected attributes with a check mark in the Input column.
If Auto is not selected, you can override the system's choices in the Data Usage tab. If Auto is not selected you can also view Input and Mining Type. This enables you to see which Attributes are used for model build, and to change them if necessary.
The Model Settings grid enables you to delete or add models to the node.
-
Delete: To delete a model, select the model and click
. -
Add: To add a model to the node, click
. The Add Models dialog box for the node opens. In the Add Models dialog box, select an algorithm, either accept the default name or specify a different name, and add optional comments.
See Also:
-
"Viewing and Changing Data Usage" for a description of how to change data usage for several columns at the same time.
8.13.2 Lower Pane of Advanced Settings
Select a model in the upper pane. The lower pane of the Advanced Settings displays the related information in the following tabs:
-
Data Usage: For all models except Association
-
Algorithm Settings: For all models
-
Performance Settings: For Classification models only
These tabs display the specification used to build the selected model. You can change the specification.
8.13.2.1 Data Usage
The Data Usage tab is not supported for the Association node. To modify any values, to see which attributes are not used as input, or to see mining types, select View in the lower pane.
You can change data usage information for several models at the same time.
The Data Usage tab contains the data grid. The data grid lists all attributes in the data source. For each attribute, the grid lists displays the following:
-
Name: This is the name of the attribute.
-
Data Type: This is the Oracle Database data type of the attribute.
-
Input: Indicates if the attribute is used to build the model. To change the input type, click Automatic. Then click the icon and select the new icon. For models that have a target, such as Classification and Regression models, the target is marked with a red target icon.
-
The
icon indicates that the attribute is used to build the model. -
The
icon indicates that the attribute is ignored, that is, it is not used to build the model.
-
-
Mining Type: This is the logical type of the attribute, either Numerical (numeric data), Categorical (character data), nested numerical, or nested categorical, text or custom text. If the attribute has a type that is not supported for mining, then the column is blank. Mining type is indicated by an icon. Move the cursor over the icon to see what the icon represents.
To change the mining type, click Automatic and then click the type for the attribute. Select a new type from the list. You can change mining types as follows:-
Numerical can be changed to Categorical. Changing to Categorical casts the numerical value to string.
-
Categorical.
-
Nested Categorical and Nested Numerical cannot be changed.
-
-
Auto Prep: If Auto Prep is selected, then automatic data preparation is performed on the attribute. If Auto Prep is not selected, then no automatic data preparation is performed for the attribute. In this case, you are required to perform any data preparation, such as normalization, that may be required by the algorithm used to build the model. No data preparation is done (or required) for target attributes. The default is to perform automatic data preparation.
-
Rules: After a model runs, Rules describe the heuristics used. For details, click Show.
There are two types of reasons for not selecting an attribute as input:
-
The attribute has a data type that is not supported by the algorithm used for model build.
For example, O-Cluster does not support nested data types such as
DM_NESTED_NUMERICALS. If you use an attribute with typeDM_NESTED_NUMERICALSto build a O-Cluster model, then the build fails. -
The attribute does not provide data useful for mining. For example, an attribute that has constant or nearly constant values.
If you include attributes of this kind, then the model has lower quality than if you exclude them.
8.13.2.2 Algorithm Settings
The Algorithm Settings section displays the values of algorithm settings. The settings are determined by the algorithm used to build the model.
8.13.2.3 Performance Settings
The performance settings are available for Classification models only.
The Performance Settings tab defines the performance objective for Classification model build. To view or change performance settings for a model, select the model in the upper pane. Weights are listed in the Weights grid. Select one of these settings:
-
Balanced: (default) Attempts to achieve the best overall accuracy across all the target class values. This is done in different ways depending on the algorithm selected. Generally, it requires the model build process to be biased using weight values that provide extra weight to target values that occur less frequently.
-
Natural: Enables the model to build without any bias, so that the model uses its natural view of the data to build an accurate model. In this case, rare target class values are probably not going to be predicted as frequently as they would predict the model that was built using the balanced option.
-
Custom: Enables you to enter a set of weights for each target value. One way to get started defining custom weights is to click Balanced or Natural, just above the Weights grid. Either of these options generate weights similar to those that would result in either Balanced or Natural performance. You can then change these weights to different values.
To save the values, click OK.
See Also:
"Lift Detail"8.14 Mining Functions
Mining functions represent a class of mining problems that can be solved using data mining algorithms. When creating a data mining model, you must first specify the mining function and then choose an appropriate algorithm to implement the function if one is not provided by default.
Oracle Data Mining supports these mining functions:
8.14.1 Classification
Classification is a data mining function that assigns items in a collection to target categories or classes, that is, items are classified according to target categories. The goal of classification is to accurately predict the target class for each case in the data. For example, a Classification model could be used to identify loan applicants as low, medium, or high credit risks.
The target categories for a classification are discrete and not ordered. The simplest type of classification problem is binary classification. In binary classification, the target attribute has only two possible values: for example, high credit rating or low credit rating. Multiclass targets have more than two values: for example, low, medium, high, or unknown credit rating.
The following topics describe the classification:
8.14.1.1 Building Classification Models
A Classification model is built from historical data for which the classifications are known. To build (train) a Classification model, a classification algorithm finds relationships between the values of the predictors and the values of the target. Different classification algorithms use different techniques for finding relationships. These relationships are summarized in a model. The model can then be applied to a different data set in which the class assignments are unknown.
Algorithm settings control model build. Settings depend on the algorithm.
Use a Build Node to build one or more Classification models.
Classification models are tested by default.
8.14.1.2 Comparing Classification Models
You can compare Classification models by comparing the test metrics for the models.
8.14.1.3 Applying Classification Models
Scoring or applying a Classification model results in class assignments and the probability that the assignment is the correct one. For example, a model that classifies customers as low, medium, or high value would also predict the probability that the classification is correct.
Use an Apply Node to score a Classification model, that is to apply the model to new data.
8.14.1.4 Classification Algorithms
Oracle Data Mining provides the following algorithms for classification:
-
Decision Tree automatically generates rules, which are conditional statements that reveal the logic used to build the tree.
-
Naive Bayes uses Bayes' Theorem, a formula that calculates a probability by counting the frequency of values and combinations of values in the historical data.
-
Generalized Linear Models (GLM)
Generalized Linear Models is a popular statistical technique for linear modeling. Oracle Data Mining implements GLM for binary classification and for regression.
GLM provides extensive coefficient statistics and model statistics, and row diagnostics. GLM also supports confidence bounds, which are the upper and lower boundaries of an interval in which the predicted value is likely to lie.
-
Support Vector Machine is a powerful, state-of-the-art algorithm based on linear and non-linear regression. Oracle Data Mining implements SVM for binary and multiclass classification.
Oracle Data Mining implements SVM for binary and multiclass classification.
8.14.2 Regression
Regression is a data mining function that predicts a number. Profit, sales, mortgage rates, house values, square footage, temperature, or distance could all be predicted using regression techniques. For example, a Regression model could be used to predict the value of a house based on location, number of rooms, lot size, and other factors.
This section on Regression contains the following topics:
Regression models are tested by default.
See Also:
"Testing Regression Models"8.14.2.1 Building Regression Models
Use a Build Node to build one or more Regression models. Algorithm settings control the model build. Settings depend on the algorithm.
A regression task begins with a data set in which the target values are known. For example, a Regression model that predicts house values could be developed based on observed data for many houses over a period of time. In addition to the value, the data might track the age of the house, square footage, number of rooms, taxes, school district, proximity to shopping centers, and so on. House value would be the target, the other attributes would be the predictors, and the data for each house would constitute a case.
In the model build (training) process, a regression algorithm estimates the value of the target as a function of the predictors for each case in the build data. These relationships between predictors and target are summarized in a model, which can then be applied to a different data set in which the target values are unknown.
8.14.2.2 Applying Regression Models
Scoring, or applying, a Regression model results in class assignments and the probability that the assignment is correct for each case. For example, a model that predicts a value for each cased also predicts the probability that the value is correct.
Use an Apply Node to score a Regression model, that is to apply the model to new data.
8.14.2.3 Regression Algorithms
Oracle Data Mining provides the following algorithms for regression:
-
Generalized Linear Models (GLM)
Generalized Linear Models is a popular statistical technique for linear modeling. Oracle Data Mining implements GLM for binary classification and for regression.
GLM provides extensive coefficient statistics and model statistics, and row diagnostics. GLM also supports confidence bounds.
-
Support Vector Machine is a powerful, state-of-the-art algorithm based on linear and non-linear regression.
SVM regression supports two kernels: the Gaussian Kernel for non-linear regression, and the Linear Kernel for linear regression. SVM also supports active learning.
8.14.3 Anomaly Detection
Anomaly Detection is a kind of classification problem. Standard classification algorithms require the presence of both positive and negative examples (counterexamples) for a target class. One-Class Support Vector Machine (SVM) classification requires only the presence of examples of a single target class.
The model learns to discriminate between the known examples of the positive class and the unknown negative set of counter examples. The goal is to estimate a function that is positive if an example belongs to a set and negative or zero, if the example belongs to the complement of the set.
Note:
Solving a one-class classification problem can be difficult. The accuracy of one-class classifiers cannot usually match the accuracy of standard classifiers built with meaningful counterexamples.This section about Anomaly Detection models contains the following topics:
8.14.3.1 Building Anomaly Detection Models
Oracle Data Mining uses SVM as the one-class classifier for Anomaly Detection (AD). When SVM is used for anomaly detection, it has the classification mining function but no target.
To build an AD model, use an Anomaly Detection node connected to an appropriate data source.
8.14.3.2 Applying Anomaly Detection Models
One-class SVM models, when applied, produce a prediction and a probability for each case in the scoring data. If the prediction is 1, then the case is considered typical. If the prediction is 0, then the case is considered anomalous. This behavior reflects the fact that the model is trained with normal data.
8.14.4 Clustering
Clustering finds natural groupings of data objects, that is objects that are similar in some sense to one another. The members of a cluster are more like each other than they are like members of other clusters. The goal of clustering analysis is to find high-quality clusters such that the inter-cluster similarity is low and the intra-cluster similarity is high.
The following topics discuss clustering:
8.14.4.1 Using Clusters
You can use Clustering, like Classification, to segment the data. Unlike classification, Clustering models segment data into groups that were not previously defined. Classification models segment data by assigning it to previously defined classes, which are specified in a target. Clustering models do not use a target.
Clustering is useful for exploring data. If there are many cases and no obvious groupings, then you can use clustering algorithms to find natural groupings. Clustering can also serve as a useful data preprocessing step to identify homogeneous groups on which to build supervised models.
Clustering can also be used for anomaly detection. After the data has been segmented into clusters, you might find that some cases do not fit well into any clusters. These cases are anomalies or outliers.
Clusters are not necessarily disjoint; an item can be in several clusters.
8.14.4.2 Calculating Clusters
Oracle Data Mining performs hierarchical clustering. The leaf clusters are the final clusters generated by the algorithm. Clusters higher up in the hierarchy are intermediate clusters.
Explain O-Cluster versus k-Means.8.14.4.3 Algorithms for Clustering
Oracle Data Mining supports these algorithms for clustering:
-
Expectation Maximization. Requires Oracle Database 12c or higher.
8.14.5 Association
Association is a data mining function that discovers the probability of the items in a collection that happen at the same time. The relationships between items that happen at the same time are expressed as association rules.
Association rules are often used to analyze sales transactions. For example, it might be noted that customers who buy cereal at the grocery store often buy milk at the same time. In fact, association analysis might find that 85 percent of the checkout sessions that include cereal also include milk.
This application of association modeling is called market-basket analysis. It is valuable for direct marketing, sales promotions, and for discovering business trends. Market-basket analysis can also be used effectively for store layout, catalog design, and cross-sell.
Association modeling has important applications in other domains as well. For example, in e-commerce applications, association rules may be used for web page personalization. An association model might find that a user who visits pages A and B is 70 percent likely to also visit page C in the same session. Based on this rule, a dynamic link could be created for users who are likely to be interested in page C.
Association modeling analyzes data that consists of Transactions.
8.14.5.1 Transactions
Association is transaction-based. A case consists of a transaction such as a market-basket or web session. The collection of items in the transaction is an attribute of the transaction. Other attributes might be the date, time, location, or user ID associated with the transaction.
In transactional data, a collection of items is associated with each case. However, in most cases, only a tiny subset of all possible items are present in a given transaction. The items in the market-basket represent only a small fraction of the items available for sale in the store.
When an item is not present in a collection, it may have a null value or it may be missing. Many of the items may be missing or null, because many of the items that could be in the collection are probably not present in any individual transaction.
8.14.6 Feature Extraction and Selection
Sometimes too much information can reduce the effectiveness of data mining. Some columns of data attributes assembled for building and testing a model may not contribute meaningful information to the model. Some may actually detract from the quality and accuracy of the model.
Irrelevant attributes add noise to the data and affect model accuracy. Irrelevant attributes increases the size of the model and the time and system resources needed for model building and scoring.
Feature Selection selects the most relevant attributes.
Feature Extraction combines attributes into a new reduced set of features. Feature Selection selects the most relevant attributes.
See Also:
8.14.6.1 Feature Selection
Finding the most significant predictors is the goal of some data mining projects. For example, a model might seek to find the principal characteristics of clients who pose a high credit risk.
Attribute importance is also useful as a preprocessing step in classification modeling. Decision Tree and Generalized Linear Models benefit from this type of preprocessing. Oracle Data Mining implements Feature Selection for optimization within both of these algorithms
Oracle Data Miner provides the Attribute Importance setting in the Filter Columns transformation to identify important features using the Oracle Data Mining importance function.
8.14.6.2 Feature Extraction
Feature Extraction is an attribute reduction process. Unlike Feature Selection, which ranks the existing attributes according to their predictive significance, Feature Extraction actually transforms the attributes. The transformed attributes, or features, are linear combinations of the original attributes.
The Feature Extraction process results in a much smaller and richer set of attributes. The maximum number of features may be user-specified or determined by the algorithm. By default, it is determined by the algorithm.
Oracle Data Mining supports these algorithms for Feature Extraction:
-
Singular Value Decomposition and Principal Components Analysis. Requires Oracle Database 12c or higher.