Oracle Server X5-8 Getting Started Guide
This guide provides the basic steps for installing and powering on your Oracle Server X5-8 for the first time.
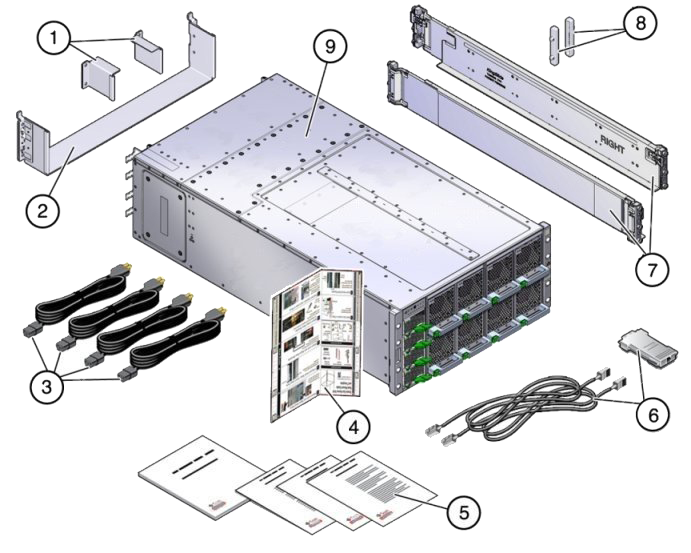
Check the Contents of the Shipping Kit

|
Install Optional Components
Optional components for your server might be packaged and shipped separately. If applicable, install optional components such as DIMMs or storage drives before mounting the server in a rack. For installation procedures for optional components, refer to the Oracle Server X5-8 Service Manual.
For a complete list of optional components, see the product notes at: http://www.oracle.com/goto/x5-8/docs-videos
Mount the Server Into a Rack
For rackmounting instructions, refer to the Rack Mount Guide and Template shipped with the server and the Oracle Server X5-8 Installation Guide.
Connect the Cables and Power Cords
This procedure contains instructions for cabling the server and using Oracle System Assistant to set up and configure your server.
Alternatively, you can use Oracle Integrated Lights Out Manager (ILOM) for some server setup and configuration tasks. For instructions, refer to the Oracle ILOM Documentation Collection. For more information about Oracle System Assistant and Oracle ILOM, see System Management.
-
To cable the server for local connection to Oracle System Assistant,
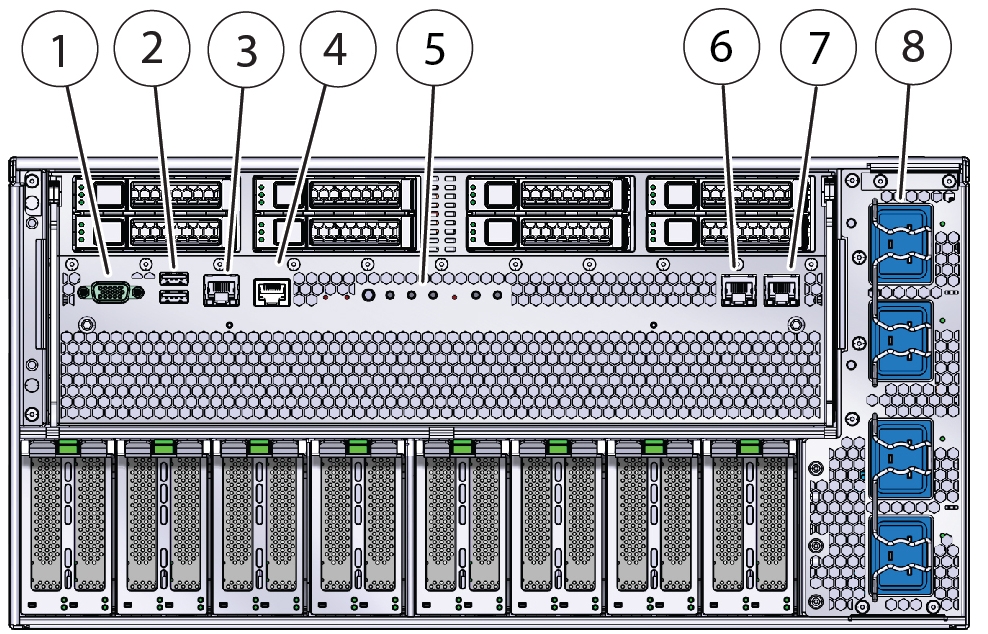
connect the following to the back panel of the server:
- A USB keyboard to one of the USB connectors.
- A USB mouse to one of the USB connectors.
- A VGA monitor to the VGA port.
-
For network access, connect an Ethernet cable between the server’s
NET ports (Net 0 or Net 1) on the back panel of the server and the
network.
 1DB-15 video port5Front indicator module2USB connectors (2)6Net 0 port3Net management port7Net 1 port4Serial management port8AC power connectors (200-240 VAC only)
-
Connect the power cords to the four AC power connectors and to separate
power sources.
When the power cords are connected:
- The power supply indicators light and the SP OK indicator blinks rapidly as the SP boots.
- The SP OK indicator lights solid green once the SP has booted.
-
After the SP has booted, the Power/OK indicator blinks slowly,
indicating that the host is operating on standby power.
In standby power, the server is not yet initialized or powered on.
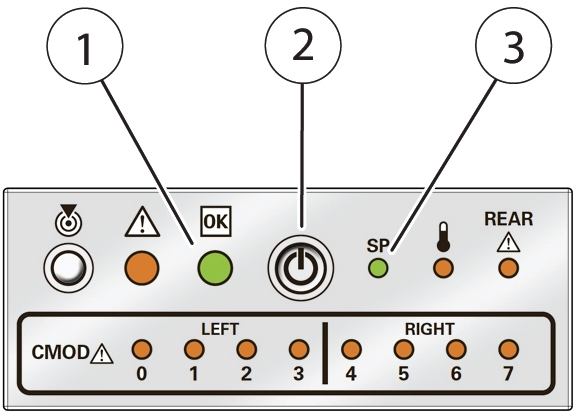
The following illustration shows the power button and indicators.
 1Power/OK indicator2Recessed power button3SP OK indicator
-
Continue setting up software and firmware. See Set Up the System Using Oracle System Assistant.
If you are deploying multiple servers, use Oracle Enterprise Manager Ops Center at: http://docs.oracle.com/cd/E27363_01/index.htm
Set Up the System Using Oracle System Assistant
Oracle System Assistant is installed on a USB drive inside your server unless you chose a non-standard configuration.
Note - This procedure provides instructions for accessing the server locally. You can also access Oracle System Assistant using the Oracle ILOM Remote Console. For instructions on accessing Oracle System Assistant remotely and further information on setting up the server using Oracle System Assistant, refer to the Oracle X5 Series Servers Administration Guide.
-
Launch Oracle System Assistant.
-
Press the front panel Power button to power on the server.
The server boots, and power-on self-test (POST) and BIOS boot messages appear on the monitor.
Note - Be attentive: You need to interrupt the boot process. -
When prompted in the initial BIOS screen, press the F9 key.
The Oracle System Assistant application boots and the System Overview screen appears, showing system information, and task buttons in the left panel.
-
Press the front panel Power button to power on the server.
-
Perform the following set up tasks in order:
ClickTo doConfigure networkSet up the server network connection.Get UpdatesDownload the latest server firmware and software.Update FirmwareUpdate the Oracle ILOM, BIOS, disk expander, or host bus adapter (HBA) firmware on the server.Configure Hardware > Service Processor ConfigurationConfigure Oracle ILOM.Configure Hardware > RAID ConfigurationConfigure RAID
Note - Do not perform this step if the server has a preinstalled operating system.
-
Do one of the following:
- If your system has a preinstalled operating system, see the Oracle Server X5-8 Installation Guide for information on how to configure the preinstalled operating system.
-
If your system does not have a preinstalled operating system, see
the following table for additional information.
OS Setup OptionRefer toInstall Oracle Solaris, Oracle VM, Linux, or Windows.Use Oracle System Assistant (recommended) which automatically installs supported drivers, or refer to the operating system installation guide.Install supported OS drivers.If you did not use Oracle System Assistant to install the OS, refer to the installation guide for the OS.
If you do not have access to Oracle System Assistant to install drivers, you can download the latest Oracle Server X5-8 software release from the My Oracle Support website at: http://support.oracle.com.
System Management
Available single server system management options include:
|
For more information, see: http://www.oracle.com/goto/system-management