Setting Up Your Recruiting Structure
To set up your recruiting structure, use the Region component (REGION_TABLE), Region Postal component (RGN_POSTAL_TABLE), Region SetID Effective Date Update component (RUN_AD505), Recruiting Category component (RECRUIT_CAT_TABLE), Recruiting Center component (ADM_RECRCTR_TBL), and Application Center component (ADM_APPLCTR_TBL).
An admissions recruiter can be anyone in your campus community (for example, staff, faculty, student, and alumni) who helps with the recruiting and admissions process. Recruiters can recruit at different levels. For example, they can recruit by region, career, program, or plan and sub-plan. You can assign recruiters to prospects and applicants. You can assign recruiters, prospects, and applicants to geographic regions and various recruiting categories to match recruiters to prospects.
This section provides an overview of building your recruiting structure and discusses how to:
Set up region codes.
Set up region trees.
Activate region trees.
Set up recruiting categories.
Set up recruiting centers.
Set up AAWS application fee waiver basis codes.
Set up application processing centers.
Map academic shifts to admit terms.
|
Page Name |
Definition Name |
Navigation |
Usage |
|---|---|---|---|
|
Region Table |
REGION_TABLE |
|
Define the geographic regions that your academic institution uses for recruiting and admissions. |
|
Region Postal Table |
REG_POSTAL_TABLE |
|
Define postal codes for use in your region tree. You can define any number of postal codes for your regional recruiting purposes. Postal codes are used as the detail values, or leaves, of your region tree. It is vital to keep the region postal codes that you define on this page synchronized with the detail values on your region tree. Plan out your postal code values and enter them here before entering them into the region tree. |
|
Region SetID Effdt Update (region setID effective date update) |
RUNCTL_AD505 |
|
Run the Region SetID Effdt Update process, which activates region trees. |
|
Recruiting Category Table |
RECRUIT_CAT_TABLE |
|
Set up your recruiting categories. |
|
Recruiting Center Table |
ADM_RECRCTR_TABLE |
|
Create the admission recruiting centers for your institution. |
|
Application Fee Waiver Basis |
SAD_FEE_WVR_BAS |
|
Set up basis codes for AAWS application fee waiver. |
|
Application Center Table |
ADM_APPLCTR_TABLE |
|
Set up your application centers. |
|
Academic Shift Mapping |
SAD_SHIFT_MAP |
|
Map academic shifts to admit terms. |
Access the Region Table page ().
A region can be a continent, a country, a state, a portion of a state, a mix of states, or any regional grouping that is for recruiting. You can link applicants, prospects, schools, and recruiters to geographic regions. Use this linkage for informational purposes and for assigning recruiters to prospects and applicants according to where the person attends school or resides. Regions are required if you plan to use PeopleSoft Tree Manager to assign recruiters to prospects and applicants. Plan your regions and your region tree before defining codes.
Before assigning recruiters to regions, set up a region tree for your academic institution using PeopleSoft Tree Manager. This section covers setting up region trees for your recruiting structure.
A region tree is a detailed and hierarchical representation of all the geographic regions that you use for recruiting purposes. Each region is represented on the region tree as a node that appears hierarchically. A city can reside within a county, a county within a state, and a state within a country. However, the lowest level on the tree must be postal code ranges.
Your system uses region trees when you assign recruiters to prospects and applicants. The region tree hierarchical structure enables you to include and exclude recruiters from a variety of regions within your recruiting structure. For example, you can have a West Coast recruiter who does not go to the state of California, except for the city of San Jose, but only for the postal code range of 95000-95199 within that city. In other words, you assigned the recruiter to the West Coast region but excluded her from the California region. Then you assigned her to the San Jose region but excluded her from every postal code range except 95000-95199.
You assign a region to applicants in the Application Entry component, to prospects in the Prospect Data component, and to recruiters in the Recruiters component. When you assign recruiters to individual prospects and applicants (also in the Application Entry and Prospect Data components) the system uses the region tree to match recruiters to prospects and applicants, based on where they reside on the tree. For example, suppose that you assign an applicant to the region San Jose. Suppose further that you don't have any recruiters assigned at that level, but that you do have recruiters assigned to the region Santa Clara County. San Jose is a lower node of Santa Clara County. Thus, recruiters assigned to Santa Clara County are responsible for San Jose, and any other lower-level node on the region tree.
Using region trees, you can also assign recruiters to prospects and applicants in batch, using the Recruiter Assignment process. This process matches recruiters to prospects and applicants based on the postal code of the prospect's or applicant's home or last school attended.
Entering Regions in the Region Table Page
Although you can define new regions directly in PeopleSoft Tree Manager as you build your region tree, plan and define your regions in advance on the Region Table page. That way, all regions are available as you build your tree. You can always add additional regions through Tree Manager. When you define regions, print your region codes so that they are available while building your tree. You can also draw a map of your tree and include the actual region codes. Having a printed code list is valuable because you cannot prompt for defined region codes in PeopleSoft Tree Manager. Also, you are less likely to create duplicate or similar codes if you have a printed list.
Setting Up Postal Codes on the Region Postal Code Table Page
Before you can define postal code values (detail values) on your tree, you must set up all of your postal codes on the Region Postal Table page. To verify that a detail exists on the Region Postal Table page, right-click that detail in the region tree. If you receive a message that the value is not found, then you must go to the Region Postal Table page and set it up. It is extremely important to keep the region postal codes on the Region Postal Table page synchronized with the detail values of your region tree. Postal codes cannot overlap regions. If you enter the zip + 4 postal code for prospect or applicant addresses, include the four digit extension when defining your postal code ranges for the regions. Example: The begin postal code should be defined as 914360000 and the end postal code should be defined as 914669999.
For manual and batch recruiter assignment, the number of numeric digits in the postal code ranges of a region tree should be the same. For instance, if you have set up a region tree with five digit postal code ranges, such as USA94000 - USA95599, ensure that you do not define a nine digit postal code range for the same region tree.
If you have set up a region tree with five digit postal code ranges, the system uses the first five digits of the applicant's or prospect's home or school postal code.
If you have set up a region tree with nine digit postal code ranges, the system uses the nine digits of the applicant's or prospect's home or school postal code. If the applicant's or prospect's postal code consists of five digits, the system adds four zeros to the applicant's or prospect's postal code to make it nine digits for the assignment process.
If the applicant's or prospect's home or school postal code consists of a dash, the system removes the dash before comparing the postal code with the region tree's postal code ranges.
Defining a Region Tree for Recruiting and Admissions
You base your region tree on a special tree structure, shipped with Recruiting and Admissions, called REGION. This structure uses the country and postal code of either the applicant's school or the applicant's home address as detail nodes of the tree and the structure looks to the regions stored in the region table for all other tree nodes.
To set up your region tree, select Search for a Tree Name of REGION. Select a delivered REGION tree. Then select the Save As link on the page.
The Tree Definition dialog box opens. The following values should appear:
The tree name is REGION.
The status is Active.
The structure ID is REGION.
Note: Your region tree must be based on the REGION structure that is provided with your system. Your system relies on this structure when matching recruiters to prospects and applicants.
The All Detail Values in This Tree check box is cleared.
The Allow Duplicate Detail Values check box is cleared.
The Strictly Enforced option is selected.
Enter your institution's setID and an effective date. When you click Save As, you return to the PeopleSoft Tree Manager page, with the name of your region tree. The name of your region tree is the setID plus the effective date.
Delivered Region Tree Examples
Recruiting and Admissions comes with three sample region trees that you can view to get an idea of a finished region tree. Each one is named REGION; they are listed, in order, under the following setIDs:
PSCCS
GLAKE
PSUNV
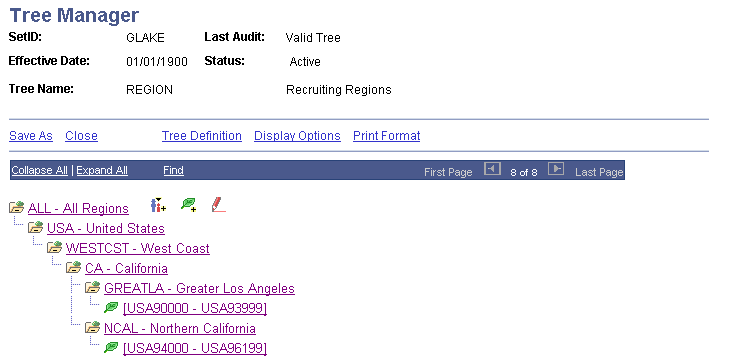
Image: PeopleSoft Tree Manager displaying part of the sample GLAKE region tree
This is an example of part of the delivered GLAKE region tree.
See product documentation for PeopleTools: Tree Manager
After you create a region tree or update an existing tree with a new effective date, you must activate it by running the Region SetID Effdt Update process.
Note: Region trees do not work unless you run this process.
Access the Region SetID Effdt Update page ().
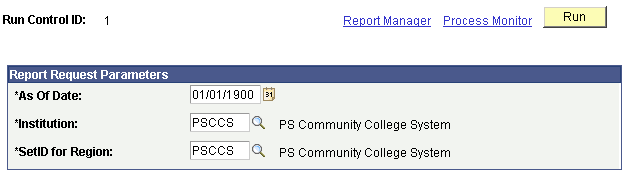
Image: Region SetID Effdt Update page
This example illustrates the fields and controls on the Region SetID Effdt Update page. You can find definitions for the fields and controls later on this page.
|
Field or Control |
Definition |
|---|---|
| As Of Date |
Enter a date equal to the effective date of the region tree. |
| Institution |
Enter the institution for which the region tree will be used. |
| SetID for Region |
Enter the setID that was used when creating the region tree. |
Click the Run button and select AD505 to run the process. The process activates the most recent region tree with an effective date that is less than or equal to the date entered in the As Of Date field.
Access the Recruiting Category Table page ().
Warning! You must create a recruiting category of REGN (region) so that you can use the flexibility of regional recruiting assignments. To automatically assign recruiters to prospects and applicants by region, define a REGN code in this table. The description can be anything, but the code must be REGN.
Recruiting categories enable you to track prospect and applicant interests. By assigning prospects and applicants to recruiting categories, you can give them the proper attention during the recruiting and admissions processes. You link recruiters to recruiting categories when setting up recruiters.
|
Field or Control |
Definition |
|---|---|
| Recruitment Group |
Assign the recruiting category to a recruitment group. Values are Academic, Alumni, Athletics, Music, Region,and Special. Recruitment groups are delivered with your system as translate values. You can modify these translate values. Important! Do not change or delete the translate value Region. It is required for automated region and recruiter assignment. |
| Move to Application |
Select to copy this recruiting information to the application record when the prospect who is assigned to this category becomes an applicant. |
| Academic Career Indicator |
Select to limit the recruiting category to one career. For example, you can create a recruiting category called EXTV for those prospects who are currently business executives and define it so that it is only available to your BUSN (graduate business) academic career. Enter the career to which you want the category limited in the Academic Career field. |
| Academic Career |
If you want this category to be available for only one academic career, select the Academic Career Indicator check box and enter the career here. If you want this recruiting category to be available to all careers, clear the Academic Career Indicator check box and leave this field blank. This field determines the recruiting categories that appear in the Recruiting Category field on the Application Recruiters and Prospect Recruiters pages. Define academic careers on the Academic Career Table page. |
Note: When assigning a prospect or applicant to a recruitment group and category, you can indicate a further level of a person's interests by using a recruitment subcategory.
Access the Recruiting Center Table page ().
The recruiting center helps to identify the prospects and recruiters who belong to a particular recruiting office. If you process applications in the same office as you process prospects, your application and recruiting centers are probably identical. If you have a decentralized recruiting structure, you can create a recruiting center for each office so that you can identify which office has responsibility for a specific prospect or applicant.
|
Field or Control |
Definition |
|---|---|
| Academic Career |
Select an academic career if you want this recruiting center associated with only one academic career. If you want the recruiting center available to all academic careers, leave this field blank. |
Access the Application Fee Waiver Basis page ().
Image: Application Fee Waiver Basis page
This example illustrates the fields and controls on the Application Fee Waiver Basis page. You can find definitions for the fields and controls later on this page.
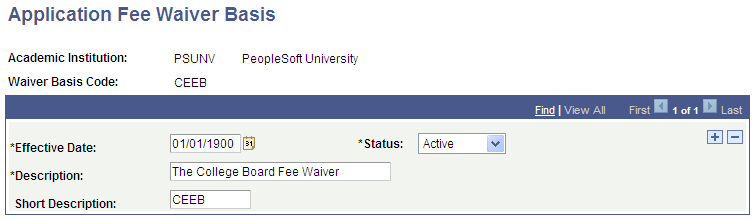
Use this page to set up waiver basis codes for AAWS application fee waivers.
The values that you set up here are available for selection in the Waiver Basis Code field in the AAWS Application Fee and Waiver Processing group box on the Application Center Table page.
See Reviewing and Editing Staged Admission Application Transactions
Access the Application Center Table page ().
Image: Application Center Table page
This example illustrates the fields and controls on the Application Center Table page. You can find definitions for the fields and controls later on this page.

Note: You assign applications and link recruiters to application centers. This helps you to identify the applications and recruiters who belong to a particular admissions office.
Application centers are where admissions applications are processed. By defining application centers, you can track which office is handling a specific application. This is especially useful if you have decentralized processing for academic careers.
|
Field or Control |
Definition |
|---|---|
| Academic Career |
Select an academic career if this application center is for only one academic career. If you want this application center available to all careers, leave this field blank. Define academic careers on the Academic Career Table page. |
| Application Fee Code |
Select the appropriate application fee code for this application center. Define application fee codes on the Application Fees page in PeopleSoft Student Financials. If you do not charge an application fee, you can leave this field blank. |
| Deposit Fee Code |
Select the appropriate deposit fee code used for this application center. Define deposit fee codes on the Deposit Fees page in Student Financials. If you do not charge deposits, you can leave this field blank. |
| Calculate Deposit Fee in Batch |
Select if you want to allow users to save applications without calculating a deposit fee. When you enter a status of Admitted on the Application Program Data page, the system does not prompt you to calculate the deposit. Rather, you use the Deposit Fees Calc (deposit fees calculation) batch process (SFPBADEP) to calculate the deposit fee. This enables you to automate the deposit fee calculation process. If you clear this check box, the system does prompt you to calculate a deposit fee when you enter a status of Admitted on the Application Program Data page. |
AAWS Application Fee and Waiver Processing
AAWS application fee processing uses staging data in the Application Transactions component.
Use this group box to set up the options for AAWS application fee and waiver processing.
|
Field or Control |
Definition |
|---|---|
| SF Merchant ID and SF eCheck Merchant ID |
Select a SF Merchant ID (for credit card) or a SF eCheck Merchant ID or both for AAWS fee processing. Based on this setup, during the AAWS fee calculation and payment process, a List of Values web service determines which payment methods are available to an applicant on the external User Interface site. A merchant ID is a user-defined element that defines the rules for interfacing with a third party payment processor. Define Student Financials merchant IDs on the SF Merchants page (Set Up SACR, Common Definitions, Self Service, Student Financials, SF Merchants). |
| When is Fee Payment Required |
If you select Pay Later, the payment processing must be handled outside of AAWS processing. The online application can be submitted and be posted to the core production Application Maintenance component but your institution must follow up with the applicant and process the payment outside of AAWS processing. |
| Allow Application Fee Waiver |
If you select Yes, the Valid Waiver Basis Codes group box and Application Fee Waiver Process fields become available. |
| Valid Waiver Basis Codes |
You can select from waiver basis codes that have been set up on the Application Fee Waiver Basis page (Set Up SACR, Product Related, Recruiting and Admissions, Applicants, Application Fee Waiver Basis). |
| Application Fee Waiver Process |
|
Access the Academic Shift Mapping page ().
Image: Academic Shift Mapping page
This example illustrates the fields and controls on the Academic Shift Mapping page. You can find definitions for the fields and controls later on this page.
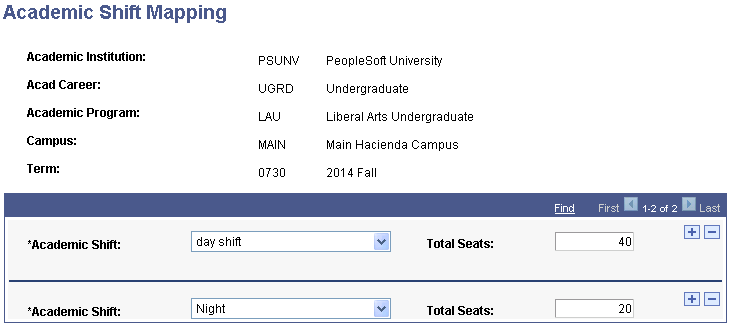
Use this page to map academic shifts to admit terms.
If the Use Shift by Admit Term check box is selected on the Academic Institution 3 page, only the values defined here for the particular admit term are available in the Academic Shift field on various pages in Admissions and Student Records.
The Total Seats field is informational only.