Adding New Applications Manually
If the applicants you are entering do not already exist in your database, the system creates them and assigns them identification numbers.
The first two pages in this component store information regarding the applicant as a person. This data is shared between all applications for an applicant, as well as with prospect personal data. Updating biographical data here updates it throughout the database. The last three pages in this component, however, are application-specific pages, meaning they store information unique to this application. In other words, applications share biographical data but application data is unique to each application.
Avoid entering duplicate applications. Specify on the Installation Defaults - AD page at what level you want the system to warn you that a potential duplicate application exists.
See Setting Up Admission Installation Defaults.
The Student Admissions , Add Application component is the second of three very similar components:
Student Recruiting , Create/Update Prospects component.
Student Admissions, Add an Application component.
Student Admissions, Maintain Applications component.
Create/Update Prospect and Add an Application have a Biographical Data page and a Regional page. All three components have other pages with similar names such as Prospect Program Data page and Application Program Data page. Use these components to enter or maintain similar information at different times during your business processes: for entering prospects, for entering application data, and for maintaining application data.
This section lists prerequisites and discusses how to:
Enter or update applicant biographical data.
Enter or update applicant regional data.
Enter application program data.
Enter or update additional information.
Update or add application regional data.
Use the Calculate Deposit Fees page.
Enter application data.
Use the Application Fees page.
Use the Application Items page.
Enter recruiting information for an application.
Enter or update applicant additional details.
Add communications, checklists and comments for applicants.
Before you begin entering application data, determine if the person is already in your Student Administration database. Often an applicant already has a system ID because an administrator already entered the person as a prospective student. For example, if a person sent test scores to your institution, it is likely that he or she is already in the system.
To see if the applicant is already in your system, select
|
Page Name |
Definition Name |
Navigation |
Usage |
|---|---|---|---|
|
Biographical Details |
SCC_BIO_DEMO_PERS |
|
Enter an applicant's biographical information. |
|
Addresses |
SCC_BIO_DEMO_ADDR |
|
Enter an applicant's address. |
|
Regional |
SCC_BIO_DEMO_REG |
|
Enter region specific information, if applicable, based on country code. |
|
Application Program Data |
ADM_APPL_PROG_ENT |
|
Enter program data and academic plan data pertaining to this application. You can also create an enrollment deposit and matriculate an applicant from this page. You must track applications at least at the plan level, but any lower level tracking depends on your office policies. |
|
Additional Information |
SAD_APPL_CAF_TAB |
|
Add or update common attributes for program, plan and subplan. |
|
Application Regional |
SAD_APPL_REG_DATA |
|
Add or update country-specific data regarding the application. |
|
Evaluation |
ADM_APPL_EVAL1_SEC |
Click the Evaluation link on the Application Program Data page. |
Add an evaluation status for this program. |
|
Deposit Fees |
ADM_APPL_DEP_FEE |
Click the Calculate Deposit Fees link on the Application Program Data page. |
Calculate a deposit fee when entering a new application. You can calculate the deposit owed for enrollment and post that charge to the person's account directly from the Application Program Data page as part of adding a new application. If the application has a program status of admitted, the Calculate Deposits Fees link becomes available if a value is defined on the Application Center Table. |
|
Deposit Fees (entry) |
ADM_APPL_ENTRY2_S |
Click the Calculate Deposit Fees button or the Deposit Fees link on the Deposit Fees page. |
Enter deposit fees for the applicant. Note: When this deposit posts in PeopleSoft Student Financials, the system updates the program action to matriculation if you selected the Create Student check box on the Status Update page. |
|
Application Data |
ADM_APPL_DATA |
|
Enter additional information regarding the application and to calculate an application fee. The system stores data on this page at the application level, as opposed to storing it under a person or academic program. This data is relevant to all academic programs being applied to with this application. |
|
Application Fees |
APP_FEE_CALC_MSG |
Click the Calculate Application Fees link on the Application Data page. |
Calculate the application fee that the person owes. If fees were calculated in the AAWS on line application and a payment was sent to the GL, fees are not recalculated when you click this link. |
|
Tender Details |
ADM_APPL_TNDRCC_SP |
Click the Show Tender Details link on the Application Fees page. The Tender Details page is accessible when you select the Credit Card tender category on the Application Fees page. |
Enter credit card information. |
|
Tender Details |
ADM_APPL_TENDER_SP |
Click the Show Tender Details link on the Application Fees page. The Tender Details page displays when you select the Check or Cash tender category on the Application Fees page. |
Enter check or cash information. |
|
Currency Conversion |
APPL_FEE_CURR_SP |
Click the Currency Detail link on the Application Fees page. |
Obtain details on the currency conversion. |
|
Application Items |
ADM_APPL_ENTRY3_S |
Click the Transaction Summary link on the Application Data page to view information about the application fee for this application. |
Review information about the application fee for an applicant. |
|
Tender Details |
PAYMENT_TENDER_SP |
Click the Show Tender Details link on the Application Items page. |
View tender details. |
|
Application School/Recruiting |
ADM_APPL_RECRUIT |
|
Enter recruiting information about an applicant. |
|
Additional Details |
SAD_PESC_OTHER_SCH |
|
Enter and view information about previous schools the applicant has attended. |
Access the Biographical Details page ().
Use this page to enter and update the known biographical and demographic data for an applicant.
If, by performing search/match, you find that the person does not yet have an ID in your database, the key dialog prompt says NEW in the ID field because you are adding a new person as well as a new application. The application number will be all zeros.
Note: Leave the Application Number field as all zeros in order for the auto-numbering feature to work properly.
If you find the person in your search/match and used the Carry ID option, your key dialog prompt lists that person's ID. The application number is still all zeros.
If the person exists in your database, it is a good idea to see if an application has already been entered. You do not want to enter a duplicate application. Go to the Maintain Applications component to determine if the person has any current applications.
If you find a matching ID during your search process, the Biographical Data page displays existing data about this person. If you do not find a matching ID during your search process, then you add a new person as well as a new application. The page is blank except for those fields populated according to your user defaults.
After running a search/match, select Student Admissions, Application Entry, Add Application to add a new application.
Access the Regional page ().
Use this page to enter biographical information specific to your installation country. If this person is already in your database and has existing information, you can view it on this page.
Access the Application Program Data page ().
Image: Application Program Data page
This example illustrates the fields and controls on the Application Program Data page. You can find definitions for the fields and controls later on this page.
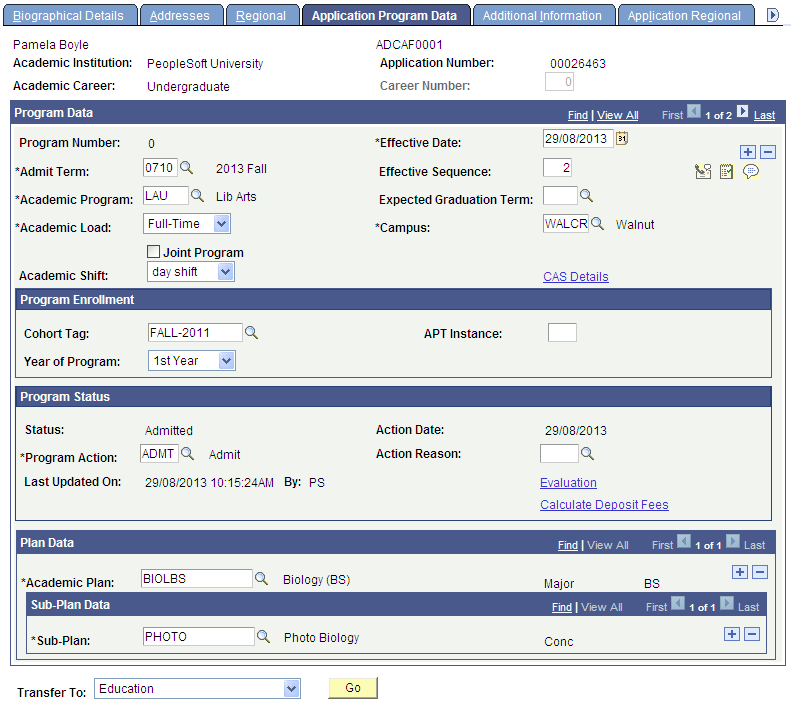
Note: The system fills in most of the fields on the Application Program Data page according to your user defaults. If the applicant had a prospect record and your setup dictates that data from the prospect record is to be copied to the application, the system populates some fields according to those defaults. For example, depending on your default setup, the system might populate academic career, institution, admit term, academic load, and academic program data based on the values in the matching prospect record.
Note: Admissions application records use the Last Admit Term to determine if the program, plan, or subplan should appear in the prompt. If the Last Admit Term is populated on the Academic Program Table (ACAD_PROG_TBL), Academic Plan Table (ACAD_PLAN_TBL), or Academic SubPlan Table (ACAD_SBPLN_TBL) and the term is less than or equal to the term selected for the ID, the system does not display the value in the prompt.
|
Field or Control |
Definition |
|---|---|
| Effective Date |
Enter an effective date for the application to this academic program if different than the default date. If you are entering the application after the start date of the admit term, you need to back date the effective date to a date prior to the start date of the admit term in order to term activate the student once they are matriculated. |
| Admit Term |
Enter the admit term in which the applicant is expected to enroll, if he or she is admitted for this application. Define admit terms on the Term Table page. This is a user default field. |
| Expected Graduation Term |
Enter the term in which the student expects to graduate. |
| Academic Program |
Enter or update the academic program to which the person is applying. Define academic programs on the Academic Program page. This is a user default field. After you matriculate the applicant, the system copies the application program data to the program/plan tables in PeopleSoft Student Records. |
| Academic Load |
Select the academic load that the applicant will be taking on if admitted for this application. Values for this field are delivered with your system as translate values. You can modify these translate values. Values are Full-Time and Part-Time. |
| Joint Program |
Select the Joint Program check box if the applicant is applying to a joint program. |
| Dual Program |
This field becomes available when you select the Joint Program check box. Enter the joint academic program. Define dual programs on the Academic Program page. |
| Campus |
Enter or update the campus to which the person is applying within your academic institution. Define campuses on the Campus Table page. This is a user default field. |
| Academic Shift |
Indicates the attendance pattern under which an applicant has applied and is being considered for admission. The field appears if the Use Shift check box is selected on the Academic Institution 3 page. If only the Use Shift check box is selected, the Academic Shift field is optional and the values available here are those defined on the Academic Shift page. If the Use Shift by Admit Term check box is also selected on the Academic Institution 3 page, then the values available here are those defined on the Academic Shift page and then mapped to an admit term on the Academic Shift Mapping page. If a match is found, you must select a value for the Academic Shift field. |
| Status |
Because you are entering a new application, this field automatically displays Applicant. |
| Program Action |
Because you are entering a new application, this field automatically displays Application. This value can be changed. Program actions are predefined on the Admissions Action Table page and should not be modified. |
| Action Date |
The default for the action date is your system date. This is the date that the action was actually entered into the system (contrast this with the effective date). |
| Action Reason |
If there are action reasons associated with the program action that you selected, you can select the appropriate reason value. Action reasons enable you to record a brief explanation of why the program action took place. For example, for the action WADM (Administrative Withdrawal), you could define a reason of Incomplete Application. Define action reasons on the Program Action Reason Table page. |
| Last Updated On and By |
The date on which the page was last updated and the name of the person who last updated the page. |
| Career Number |
Available if the Program Action field contains the value Readmit Application. If you want to readmit this applicant for this application into an existing career, you can select the proper career number here. You must also have an admit type where the Readmit Processing Required check box has been selected on the Admit Type Table page. The system readmits the person into the career that corresponds to the career number that you select. |
| Academic Plan |
Enter the academic plan within the academic program being applied to with this application. An academic plan can be any area of study, such as English, math minor, physics, or undeclared. Define academic plans on the Academic Plan Table page. This is a user default field. |
| Sub-Plan |
If a subplan exists for the academic plan, enter the subplan here. Define academic subplans on the Academic Sub-Plan Table page. This is a user default field. |
| Calculate Deposit Fees |
Click this link to calculate an enrollment deposit. The Calculate Deposit Fees Page appears. If your application center has designated a deposit fee code that requires a deposit, and you enter a program status of Admit, the Calculate Deposit Fees link appears. You can not exit the component until you calculate the enrollment deposit. Application centers are designated on the Application Data page. |
| Evaluation |
Select this link to enter the status of the application. Values for this field are defined on the Evaluation Status Table. |
| Create Program |
To matriculate the applicant at the same time you are entering the new application, select Matriculation in the Program Action field. The Create Program button becomes available. Click the Create Program button to save the component. Also, note that if you select Matriculation in the Program Action field, you are required to click the Create Program button (which, again, saves the component) before exiting the component. After you matriculate a person, the system creates a record in Student Records. All fields on this page are unavailable because to access the information you need access to pages in Student Records. Therefore, if you must make a change to this person's record after matriculation, you must do so through Student Records. The Recruiting and Admissions application enables you to record multiple academic programs for one application under an academic career. After you have saved the Application Entry component, however, you must use the Program Addition page to add an additional program. Note that the Prog Number field shows the number of the program in the order it was entered. For example, if you only have one program, it displays 0. The next program displays 1. Before matriculating the applicant, you might want to move to the next page in the Application Entry component first to record additional information about the applicant before you perform the matriculation process. |
| Go |
Click this button to go to another component. |
Program Enrollment
This group box appears only if the Enable Program Enrollment check box is selected on the Academic Institution 9 page.
See Enabling Program Enrollment and Activity Management Defaults
For information about Program Enrollment, refer to the Student Records - Program Enrollment documentation.
Access the Additional Information page ().
Image: Additional Information page (1 of 2)
This example illustrates the fields and controls on the Additional Information page (1 of 2).
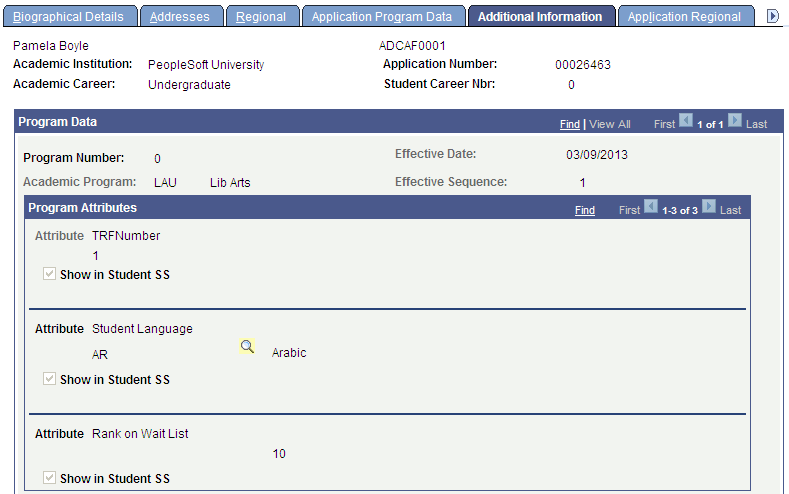
Image: Additional Information page (2 of 2)
This example illustrates the fields and controls on the Additional Information page (2 of 2).
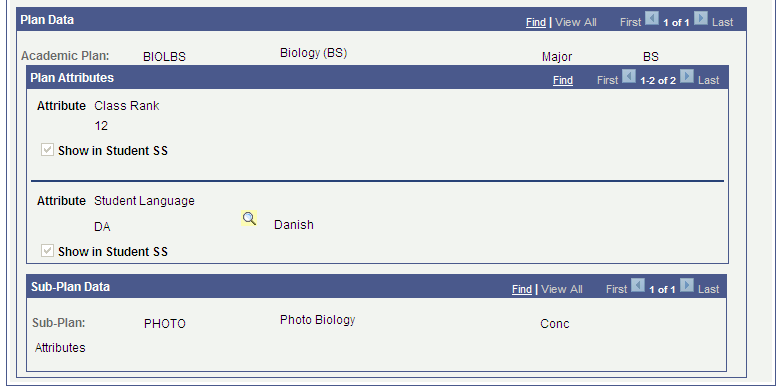
The Common Attribute Framework allows you to associate attributes with a functional area by a Record Context (Set UP SACR, Common Definitions, Common Attributes Setup, Record Context).
Define attributes on the Common Attribute page (Set Up SACR, Common Definitions, Common Attributes Setup, Common Attribute).
See Understanding Common Attribute Framework
The following Record Contexts are delivered:
ADM_APPL_PROG (Attribute Record: SAD_PROG_CAF)
ADM_APPL_PLAN (Attribute Record: SAD_PLAN_CAF)
ADM_APPL_SUBPLAN (Attribute Record: SAD_SUBPLAN_CAF)
The Additional Information page is available only if you associate at least one attribute with one of the record contexts.
If no sub-plan data exists, the Sub-Plan Data section of the Additional Information page does not appear. If the section does appear, an Attributes link opens a subpage where you can enter/view sub-plan attributes.
Defining Attributes for the Admissions/Student Records Program Stack
The Record Context allows you to set certain properties for a particular attribute in that context, including whether an attribute is repeatable or required.
Note: When an attribute is set to required, then from that point forward, a value must be entered to save the component. If a user inserts a new effective dated row (or makes a change in correction mode) to records which pre-date the implementation of the Common Attribute Framework attribute, the user must enter a value on the current row as well as any historical or future dated rows in order to save the component. For this reason, we strongly recommend that careful consideration be given when determining whether an attribute should be required.
Additionally if the required attribute is to be used in a web service, a value must be present in the request XML in order for the service to perform without error. For example, if an attribute field is defined as required on the ADM_APPL_PROG Record Context, then in AAWS that field would need to be required in the User Interface to collect a value allowing the SAD_SUBMITAPPL operation to complete successfully.
For further information about how to set attributes to required or repeatable, refer to the Campus Community – Common Attribute Framework documentation.
See Understanding Common Attribute Framework
If the attributes set up for Admissions also exist on the Student Program/Plan stack, the values carry over during the Matriculation process.
Access the Application Regional page ().
Image: Application Regional page: Australia
This example illustrates the fields and controls on the Application Regional page: Australia. You can find definitions for the fields and controls later on this page.
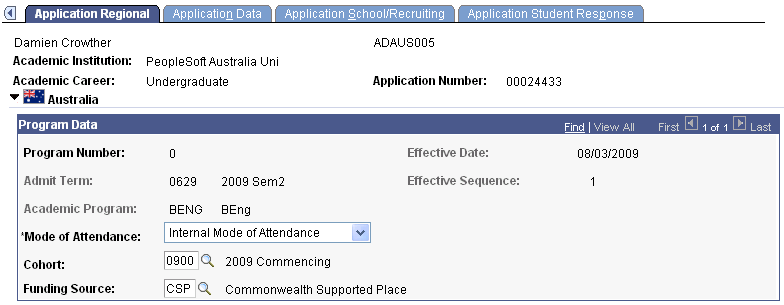
Image: Application Regional page: New Zealand
This example illustrates the fields and controls on the Application Regional page: New Zealand. You can find definitions for the fields and controls later on this page.
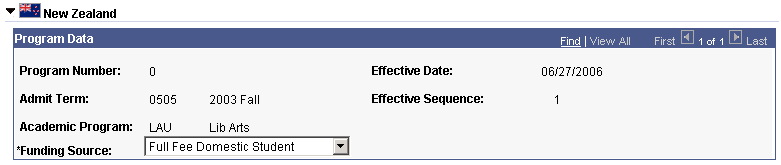
Image: Application Regional page: Netherlands (1 of 2)
This example illustrates the fields and controls on the Application Regional page: Netherlands (1 of 2). You can find definitions for the fields and controls later on this page.
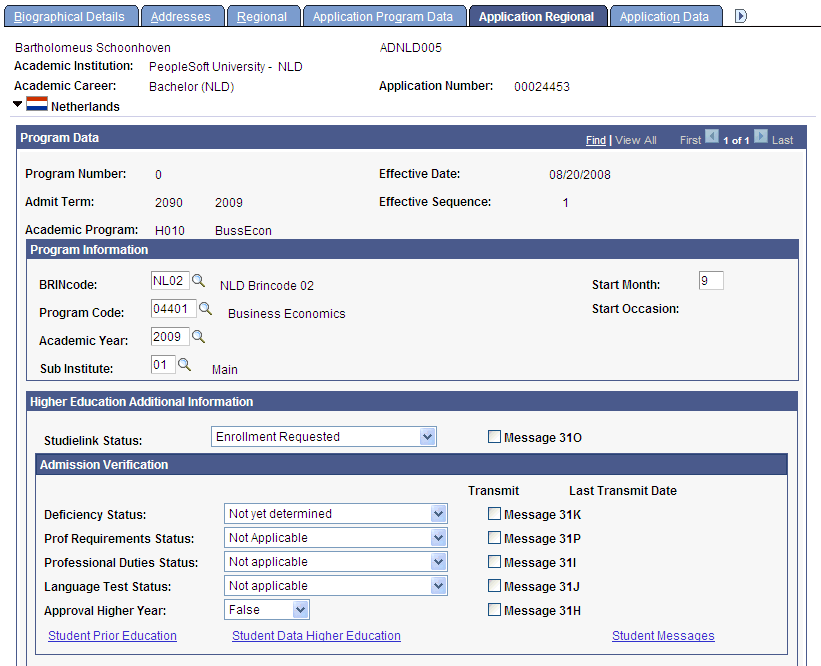
Image: Application Regional page: Netherlands (2 of 2)
This example illustrates the fields and controls on the Application Regional page: Netherlands (2 of 2). You can find definitions for the fields and controls later on this page.

You can add or update country-specific application data on this page. The page and the appropriate data appear based on the country options that you select on the following pages:
(AUS, NLD, NZL) Academic Institution Table, Academic Institution 6 page.
(NLD) Student Admin Installation, SA Features page.
(AUS) Australia and (NZL) New Zealand Functionality
|
Field or Control |
Definition |
|---|---|
| (AUS) Mode of Attendance |
The Mode of Attendance field is a required field that is populated on each student's application. This data is required for reporting admissions data to the TACs via the Enrollment Feedback process as well as reporting element 329 Mode of Attendance code in DEEWR Data Collections. The Mode of Attendance field resides on Application Entry, Application Maintenance, and Program Addition pages. It is a required field when you enter an application. After the student is matriculated, the mode of attendance is carried forward to the student program. |
| (AUS) Cohort |
(Optional) Select a cohort for the student that the system will use as the default value when you enroll the student. The system populates this value by default on the Australian regional enrollment data and the field is available to tuition calculation for HECS or tuition fees if the Australian Regional Installation Settings are selected. After the student is matriculated, the cohort is carried forward to the student program. |
| (AUS) Funding Source |
(Optional) Select a funding source for the applicant to represent the type of place being offered. The funding source can be mapped to the code reportable as element 724 in the DEEWR Applications & Offers Collection. |
| (NZL) Funding Source |
This field is populated at application data entry time and is used in the Single Data Return process. The system uses the funding source that you enter as a default on the enrollment record for the student. |
(NLD) Netherlands Functionality
|
Field or Control |
Definition |
|---|---|
| Form of Study |
Enter the form of study for which the applicant is registering. |
| Academic Level |
The academic level can be registered separately from the academic program record. |
| Funding Applies |
Select this option to indicate whether funding applies. |
| Prior Education |
Before a student can enroll in a program, the student has to meet certain requirements concerning his or her curriculum. One is these requirements is the fact that the student has obtained a diploma from their previous school. The diploma received will reflect a specific level of education. Individual exam results are relevant. On a student level all prior education, including information about the school(s), courses taken and subjects passed, have to be registered. |
For more information about fields in the Admission Verification, Payment Information, and Lot Drawing group boxes, refer to the “Reviewing Admissions Information, Reviewing Other Application Information” section in the following topic:
Reviewing and Updating Studielink Information
Note: To make changes to this page after it has been saved, you must do so through the Maintain Applications component. If you are only entering one program for the applicant, enter only one program action on the Application Program Data page. You must enter additional program actions through the Maintain Applications component. For example, suppose you enter the application initially with a program action of APPL in the Add Application component. When you admit the applicant, you would enter the program action of Admit in the Maintain Applications component.
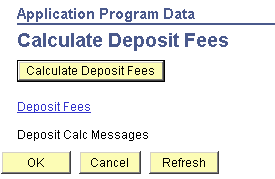
Access the Calculate Deposit Fees page (Click the Calculate Deposit Fees link on the Application Program Data page).
Image: Calculate Deposit Fees page
This example illustrates the fields and controls on the Calculate Deposit Fees page. You can find definitions for the fields and controls later on this page.
|
Field or Control |
Definition |
|---|---|
| Calculate Deposit Fees |
Click this button to access the Deposit Fees page where you can calculate an enrollment deposit fee. |
| Deposit Fees |
Click this link to access the Deposit Fees page where you can view details about a person's enrollment deposit. |
| Deposit Calc Messages (deposit calculation messages) |
Click this link to view messages that occur while attempting to calculate deposit fees. This link becomes available when the system generates a message. |
Access the Application Data page ().
Image: Application Data page
This example illustrates the fields and controls on the Application Data page. You can find definitions for the fields and controls later on this page.
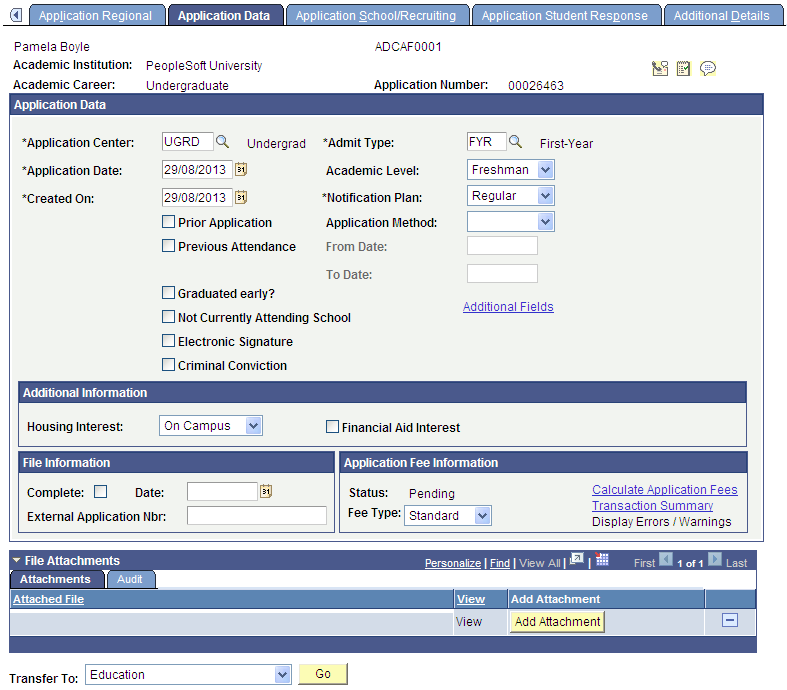
Note: The system populates most of the fields on this page according to your user defaults. If the applicant had a prospect record and your setup dictates that data from the prospect record is to be copied to the application, the system populates some fields according to those defaults.
|
Field or Control |
Definition |
|---|---|
| Application Center |
Enter the application center that will process this application. This information helps you track which office is managing specific applications. Define application centers on the Application Center Table page. This is a user default field. |
| Admit Type |
Enter the admit type for this application (for example, First-Year or Transfer,). Define admit types on the Admit Type Table page. This is a user default field. |
| Application Date |
The default for the application date is the system date that the application was received. You can override this default. |
| Academic Level |
Select the academic level to which the applicant is applying for admission. Values for this field are delivered with your system as translate values. You can modify these translate values. Values are Freshman, Graduate, Junior, Not Set, and Post-Baccalaureate. This is a user default field. |
| Created On |
The default for the created date is the system date on which you create this application record. |
| Notification Plan |
Specify whether this person should be on a regular or special notification track. This field is useful for informational reporting purposes. Values for this field are delivered with your system as translate values. You can modify these translate values. Values are Early Admit, Regular, and Rolling. |
| Prior Application |
Select this check box if this applicant previously applied to this career. This selection is useful for informational and reporting purposes. |
| Application Method |
Select a value to indicate how or in what form this application was received. Values for this field are delivered with your system as translate values. You can modify these translate values. Values are (none), Application Service, Diskette, Hard Copy, Web Application, EDI, and OUAC. This is a user default field. |
| Previous Attendance |
Select this check box if the applicant previously attended the institution. |
| From Date and To Date |
If the Previous Attendance check box is selected, enter the dates from which and to which the applicant previously attended the institution. |
| Graduated early? |
Select this check box if the applicant graduated early from the institution. |
| Not Currently Attending School |
Select this check box if the applicant is not currently attending school. |
| Electronic Signature |
Indicates that the applicant has submitted an electronic signature. |
| Criminal Conviction |
Select this check box if the applicant has a criminal conviction. |
| Additional Fields |
This link is available only if at least one attribute is associated with the delivered record context ADM_APPL_DATA (Attribute Record: SAD_APPL_CAF). Refer to the documentation about the Additional Information page. |
| Housing Interest |
Enter any housing interest indicated by the applicant. Values for this field are delivered with your system as translate values. You can modify these translate values. Values are (none), Commuter, Off Campus, and On Campus. This is a user default field. |
| Financial Aid Interest |
Select this check box if this applicant is interested in financial aid for the programs to which he or she is applying. This field is useful for informational and reporting purposes. For example, the financial aid office can run reports listing those applicants interested in financial aid. This is a user default field. |
| Complete |
Select this check box if this application is not missing any information and is considered complete by your office. |
| Date |
Enter the date that you marked this application as complete. |
| External Application Nbr (external application number) |
Enter the external application number if you received this application from a service with its own application-numbering scheme. |
| Fee Type |
Select the type of fee assigned to this application. Values for this field are delivered with your system as translate values. You can modify these translate values. Values are (none), International, and Standard. These fee types enable you to charge varying user-defined application fees. |
| Calculate Application Fees |
You can use the Application Fees Calculation process to calculate application fees based on the Application Fee Code structure which is attached to the Application Center. The fee is calculated based on core production data—application program data. Application fees may or may not be posted to the student account. An administrator can waive the fee. The waiver is associated with an item type defined on the Application Fee Code setup. Both the application fee and waiver are posted to the student account. If you calculate application fees based on core production data, then after selecting the fee type, click the Calculate Application Fees link to calculate the application fee owed. The Application Fees Calculation process runs and the Application Fees page appears. The system displays the calculated fee amount. When you return to the Application Data page, the Status field in the Application Fee Information group box displays Calculated. If your application fee is set up to post to PeopleSoft Student Financials, the Application Fees calculation process runs when you click the Run button on the Application Fees page. A COBOL posting program runs which creates an account for this person in PeopleSoft Student Financials. If you use the Admission Applications Web Services (AAWS), fee calculation does not rely on Admissions production data. If a fee is required, fee calculation occurs during the application submit process via the web service, using the data stored in the AAWS staging table. With the exception of the maximum amounts on the Minimum/Maximum Fee Code (which rely on the charges posted to the student account), the AAWS fee calculation process produces the same amounts as the production data Application Fee Calculation process. Note: Application fees and payments are not posted to the student account for AAWS. Regardless of any setup in the Application Fees component, all AAWS transactions are posted to the general ledger using the Direct to GL process. For AAWS application fee processing, if Yes is selected for the Application Fee Required field on the Application Center Table page and the Amount Sent to GL value is greater than zero, then when you click the Calculate Application Fees link, the fee is not recalculated. The link takes you to the Application Fees page where you can view the results of AAWS application fee and waiver processing. See Setting Up Application Processing Centers. See Reviewing and Editing Staged Admission Application Transactions See Payment Integration Web Service Operations |
| Status |
For AAWS fee and waiver processing, the value in this field is updated based on staging table data for SAD_APL_DAT_STG.APP_FEE_STATUS. |
| Transaction Summary |
Click this link to view information about the application fee for this application. The Application Items Page appears. |
| Display Errors/Warnings |
If any errors occurred during the calculation, click this link to view error details. |
| Go |
Click this button to go to another component. |
Note: After this page has been saved, you make changes to this application in the Application Maintenance component.
File Attachments
Use this group box to add, delete and view attachments for an admissions application.
|
Field or Control |
Definition |
|---|---|
| Add |
Click to access standard PeopleTools functionality to browse to a file and upload it |
| View |
Click the link to open the attachment in a new window. |
The Audit tab displays all updates to attachments, including user name and date/time.
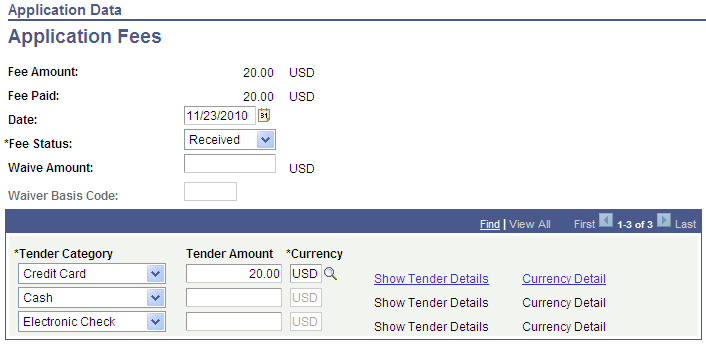
Access the Application Fees page (Click the Calculate Application Fees link on the Application Data page).
Image: Application Fees page
This example illustrates the fields and controls on the Application Fees page. You can find definitions for the fields and controls later on this page.
Note: You cannot authorize/capture credit card or electronic check payments through Admissions Application Fee Payment.
To adhere to PCI compliance regulations, you should not store credit card numbers in your database.
|
Field or Control |
Definition |
|---|---|
| Date |
The default for this date is your system date. Edit this field to reflect the date the application fee was entered or waived. |
| Fee Status |
Values for this field are delivered with your system as translate values. You can modify these translate values. Values are Deferred, Pending, Received, Waived, and Waiver. If you calculate fees from production data, using the Application Fee Calculation process, select a status for this application fee. If you are receiving the application fee, change the status of the fee to Received. After you change the status to Received, the fields in the lower section of the page become available. For information about how to use this page for AAWS application fee and waiver processing: See Reviewing and Editing Staged Admission Application Transactions |
| Waive Amount |
Enter the amount of the application fee that will be waived, if appropriate. For AAWS, if manual reconciliation is required, you enter the waive amount in the Application Data staging page and it appears here after the data is posted. |
| Waiver Basis Code |
The field is available for edit only if the value in the Fee Status field is Waived or Waiver. For information about how this field is populated by AAWS fee processing: See Reviewing and Editing Staged Admission Application Transactions |
| Tender Category |
Use this field to designate how the fee payment was received. Values for this field are delivered with your system as translate values. You can modify these translate values. Values are Credit Card, Electronic Check, Check, or Cash. You have the flexibility to receive payments in multiple tenders. For example, you can waive a portion of a fee and the student's remaining payment can be split between a credit card and a check. If you enter Credit Card, Electronic Check, or Check, the Tender Details page appears so you can enter further information. If you do not use AAWS fee processing, you can enter information about the echeck or credit card, although the authorize/settle must be completed outside of Campus Solutions. Hosted payment authorize/settle functionality is available only through AAWS fee processing. For AAWS fee processing, if payment is required at the time of the application, the value that appears here is carried through on posting from the Application Transactions staging component. You enter a value here only if the applicant is allowed to pay later or if the waiver request was denied in the Application Maintenance component and payment was received later. Note: For AAWS, partial payment is not allowed and applicants cannot split payments between credit card and check. |
| Tender Amount |
After entering a form of payment, enter the amount tendered. For information about AAWS fee processing, refer to the previous documentation about the Tender Category field. |
| Currency |
Enter the type of currency, such as USD (US Dollars). For information about AAWS fee processing, refer to the previous documentation about the Tender Category field. |
| Currency Conversion Details |
Click this link to obtain details on the currency conversion. The Currency Conversion Page appears. |
| Show Tender Details |
Click this link to view details about the application fee. The Tender Details page appears. |
Access the Application Items page (Click the Transaction Summary link on the Application Data page).
Image: Application Items page
This example illustrates the fields and controls on the Application Items page. You can find definitions for the fields and controls later on this page.
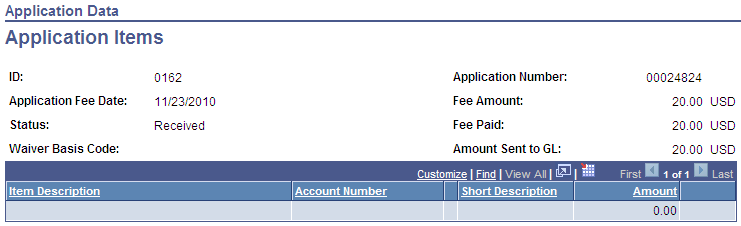
Use the Application Items page to view the results of application fee processing. Application fees are processed using production data or, for AAWS, via the web service, using staging data.
The Amount Sent to GL field applies to AAWS fee processing and is populated based on the value in the related field in the Application Transactions staging component.
Set up waiver basis codes on the Application Fee Waiver Basis page (Set Up SACR, Product Related, Recruiting and Admissions, Applicants, Application Fee Waiver Basis).
Note: To view a summary of a person's financial account, access the Customer Accounts page in PeopleSoft Student Financial.
See Reviewing and Editing Staged Admission Application Transactions
Access the Application School/Recruiting page ().
Image: Application School/Recruiting page
This example illustrates the fields and controls on the Application School/Recruiting page. You can find definitions for the fields and controls later on this page.
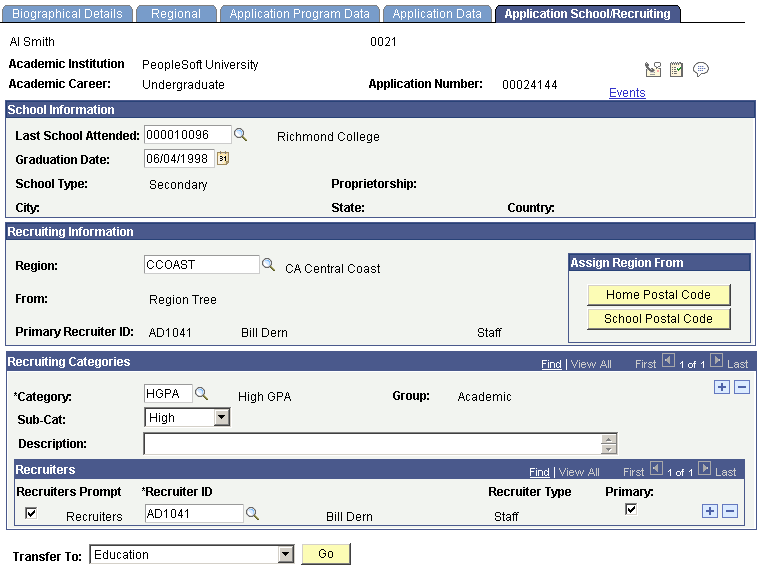
Note: If the applicant had a prospect record, and you selected the Move to Application option on the Prospect Recruiters page, and your setup dictates that data from the prospect record be copied to the application, the system automatically populates some of the fields on this page. For example, the Last School Attended and Graduation Date fields could be populated by the values in the matching prospect record.
School Information
|
Field or Control |
Definition |
|---|---|
| Last School Attended |
Enter the last school attended for this applicant. Because a person might have attended several schools in his or her external academic career, it is helpful to know which school was attended most recently. This is a user default field. Upon the first save of the application, the value entered in this field is added to the Education component automatically. After you enter a school, you might receive a message informing you that this school will not be added to the Academic History record, depending on how your institution has set this parameter on the Installation - AD page. Schools are stored for academic history in the Education component. The school you store here is for recruiting and informational purposes. |
| Graduation Date |
Enter the graduation date. A graduation date can be in the future if the person is still attending this school. |
Recruiting Information
|
Field or Control |
Definition |
|---|---|
| Region |
Enter a region if you want to choose a region from the region tree manually. Only regions from your region tree are available for selection. Define regions on the Region Table page. |
| Home Postal Code |
Click this button if you want the system to assign a region based on the postal code in the applicant's home address. The system uses the tree manager to assign a region based on the postal code. |
| School Postal Code |
Click this button if you want the system to assign a region based on the applicant's last school attended postal code. The system uses the tree manager to assign a region based on the postal code. |
| From |
This display-only field shows you how this region was defined: Region Tree: If you manually assigned a region. Address: Assigned if you click the Home Postal Code button. School: Assigned if you click the School Postal Code button. |
Recruiting Categories
Use the fields in this group box to target the applicant for special recruiting efforts during the admissions process regarding this application.
|
Field or Control |
Definition |
|---|---|
| Category |
Enter a recruiting category for the applicant under this career and application. For example, in the previous screen example, this applicant is being recruited according to the geographic region of her school. Define recruiting categories on the Recruiting Category Table page. These same categories are used in both the recruiting and application processes to target and report on students. If you plan to assign a recruiter to this applicant based on your region tree, you must enter a category of REGN (region). Only the recruiters assigned to the region appearing in the Region field will be available. |
| Group |
The group under which this category falls automatically displays when you move out of the Category field. |
| Sub-Category |
Select a recruiting subcategory. Values for this field are delivered with your system as translate values. You can modify these translate values. Values are (none), High, Low, and Medium. A subcategory can be used to indicate the priority of this recruiting category. |
| Description |
Enter any descriptive information regarding the recruiting category. |
Note: You can enter multiple recruiting categories and supporting information for an application.
Recruiters
This group box becomes available if you have entered a recruiting category. The recruiter assignment is tied to the recruiting categories. Use this section of the page to assign one or more recruiters, relevant to this category, for the applicant.
|
Field or Control |
Definition |
|---|---|
| Recruiters Prompt |
Select this check box if you want all recruiters in your database to be available when you prompt on the Recruiter ID field, regardless of the recruiting category to which recruiters are assigned. Clear this check box if you want only the recruiters assigned to the current recruiting category to be available when you prompt on the Recruiter ID field. (Note that the REGN category works differently). If you are adding recruiters for the recruiting category REGN, you select only from recruiters who were assigned the region that appears in the Region field. If you entered the region according to the last school attended using the School Postal Code button; the Prompt Table field displays Recruiters for School's Region. Select the prompt to bring up any recruiters assigned to that school. If no recruiters are assigned to that school, then your choices are any recruiters assigned to the region. If you entered the region according to the applicant's home address using the Home Postal Code button, the Prompt Table field displays Recruiters from Address Region. Click the prompt to bring up all recruiters assigned to the region. If you manually chose the region from the region tree, all recruiters assigned a recruiting category of REGN - Region are available when you prompt for values on the Recruiter ID field. The Prompt Table display field in this case displays Recruitment Category. |
| Recruiter ID |
Enter the ID number of the recruiter that you want to assign to this applicant. The region tree determines which recruiters to make available for selection, based on the region that you assigned to the applicant. You can override the region tree selection by selecting the Recruiters Prompt check box. If selected, all recruiters for the academic career are available. You can assign an applicant multiple recruiters for any recruiting category. |
| Primary |
Select this check box if this is the primary recruiter for this category. The ID of the person who has been marked primary displays in the Prmy Recruiter ID (primary recruiter ID) field. You can use this field to report on primary versus non-primary recruiters. |
| Events |
Click this link to sign an applicant up for attendee events. The Attendee Events page appears. |
| Go |
Click this button to go to another component. |
Note: After you save the information on these pages, all modifications must be made on the Application Recruiters page in the Application Maintenance component.
Access the Additional Details page ().
Image: Additional Details page
This example illustrates the fields and controls on the Additional Details page. You can find definitions for the fields and controls later on this page.
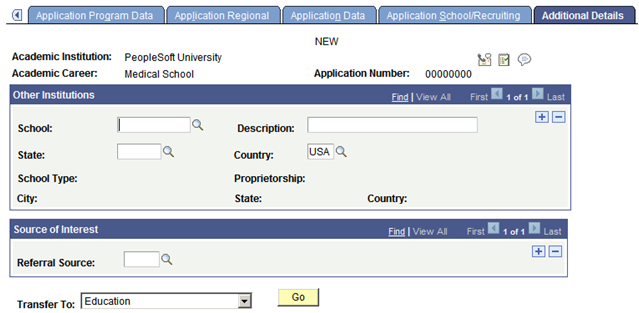
Use this page to enter additional details about the applicant, including information about other schools to which the applicant has applied for admission, and the applicant's referral source.
Other Institutions
You can either select a school using the School lookup field, or you can manually enter the Description, State, and Country fields.
|
Field or Control |
Definition |
|---|---|
| School |
Select from the external organizations defined by the institution. |
The Communication, Checklist and Comment buttons appear next to the Application Number field on the Application Data, Application School/Recruiting, and Application Recruiters pages, and next to the Expected Graduation Term field on the Application Program Data page.
Use the Communication, Checklist and Comment buttons from this component to open a new window for the entry pages for communication, checklist, and comments and initiate recruiting and admissions related items.
|
If the Communication, Checklist or Comments Pages are Accessed From the: |
The Variable Data for the Following Administrative Function is Supplied: |
Data that is Transferred |
|---|---|---|
|
Application Program Data page |
ADMP Admissions Program |
ID, academic career. student career number, application number, application program number. |
|
Application Data page |
ADMA Admissions Application |
ID, academic career, student career number, application center. |
|
Application School/Recruiting page |
EVNT Event |
ID |