Managing Course Root Activities
This section provides an overview of the Activity Manager and discusses how to:
Manage content tree activities.
Redirect class or exam references to Activity IDs.
Add sibling or child activities.
Add system references.
Manage activity details.
Establish Activity Manager common attributes.
The Activity Manager is the administrative component to access the coursework for a course via the course roots created within the Activity Generator. The course root structure is combined with the detail from each content type defined in the Activity Registry. The Activity Manager page displays the content tree for a course root and the associated Activity IDs.
Administrators, depending on their access, can alter the content tree structure, and edit content item details that were established in the Activity Registry. Administrators must have the same academic organization access as the course. The ability to edit the content tree structure of a course is tied to settings on the Activity Definition and Activity Registry pages. The ability to change content item details is based on standard PeopleTools page security.
For courses that will have class offerings, users will access the component searching by a term. If a course was created as an EOC, users will access the component searching by an academic period ID.
Note: Faculty and exam staff will access the activity manager structure in self service via the Activity Management WorkCenter.
|
Page Name |
Definition Name |
Navigation |
Usage |
|---|---|---|---|
|
Activity Manager |
SSR_ACM_MAIN |
|
View and manipulate the content tree structure for a single course root. |
|
Registry Content Tree |
SSR_ACM_REG_SBP |
Click the View Registry Tree link on the Activity Manager page. |
View the content tree as it was defined in the Activity Registry. |
|
Redirect Cross-Reference |
SSR_ACM_XREFMOVE |
Click the Update References icon on the Activity Manager page. |
Move a class or exam associated with a specific Activity ID to another Activity ID within the same content type or create a new Activity ID and associate the class or exam with the new activity. |
|
Create Activity |
SSR_AC_ACTYADDSEC |
Click the Add Sibling Activity or Add Child Activity icons on the Activity Manager page. |
Create a new Activity ID in the system that is associated with a parent ID. |
|
Add System References |
SSR_ACM_XREFADD |
Click the Information icon on the Activity Manager page. |
Generate a new Activity ID for the structure and move an existing content item to the new Activity ID. |
|
Activity Detail |
SSR_ACM_ACTYDTL |
Click an Activity ID link on the Activity Manager page. |
Access and edit the content item detail that was created in the Activity Registry. |
|
Attributes |
SCC_CAF_DYN_SEC |
Click the Attributes link on the Activity Detail page. |
Select to access common attribute fields that were defined on the Record Context page for the Activity Manager |
Access the Activity Manager page ().
Image: Activity Manager page (1 of 4): Common fields
This example illustrates the fields and controls on the Activity Manager page (1 of 4): Common fields. You can find definitions for the fields and controls later on this page.
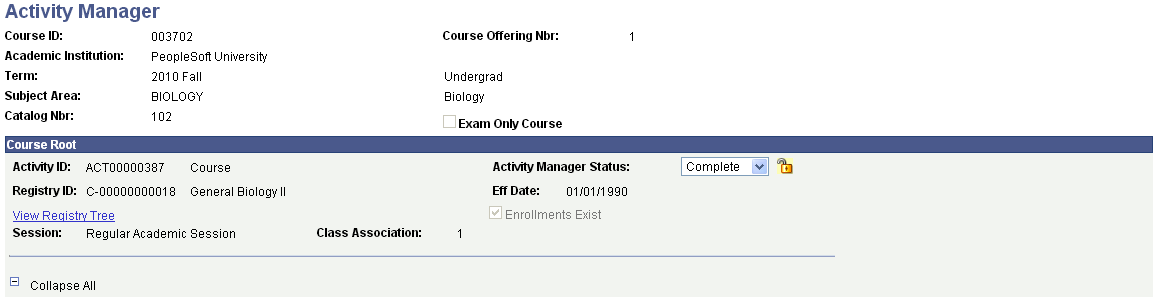
Image: Activity Manager page (2 of 4): Activity Management View tab
This example illustrates the fields and controls on the Activity Manager page (2 of 4): Activity Management View tab. You can find definitions for the fields and controls later on this page.
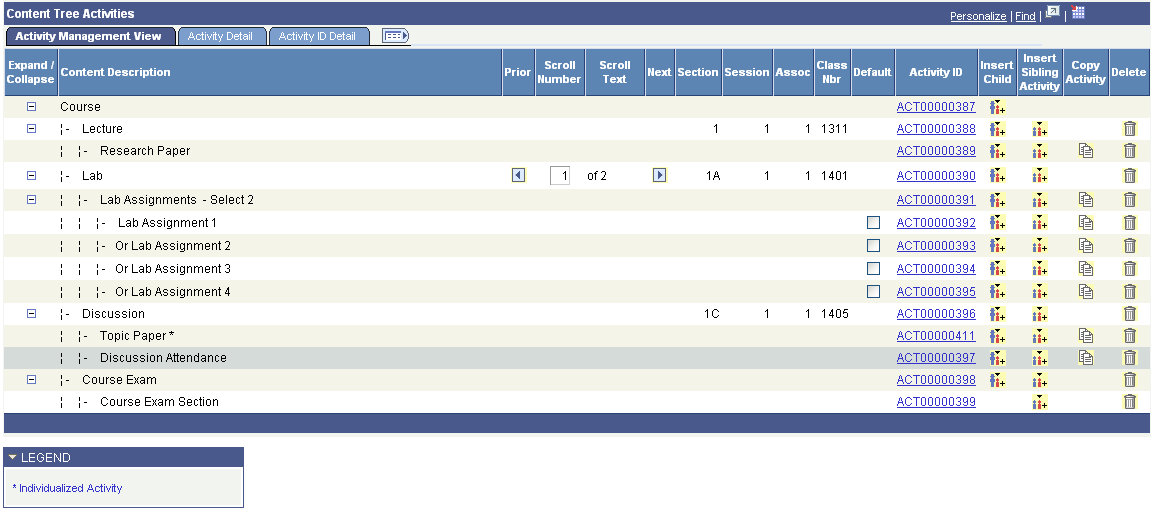
Image: Activity Manager page (3 of 4): Activity Detail tab
This example illustrates the fields and controls on the Activity Manager page (3 of 4): Activity Detail tab. You can find definitions for the fields and controls later on this page.
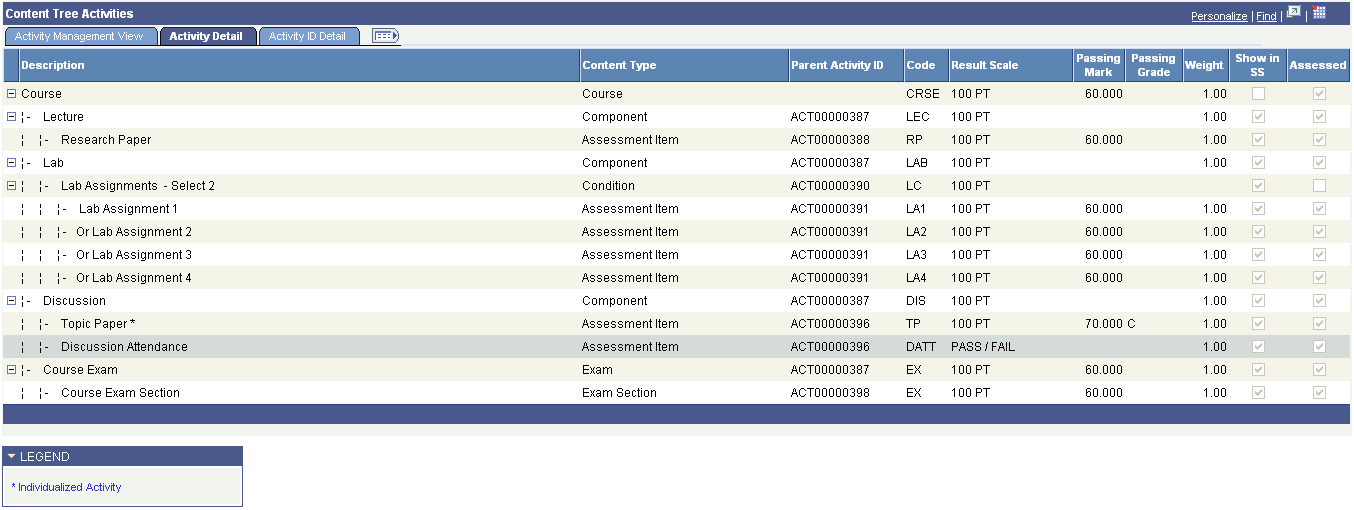
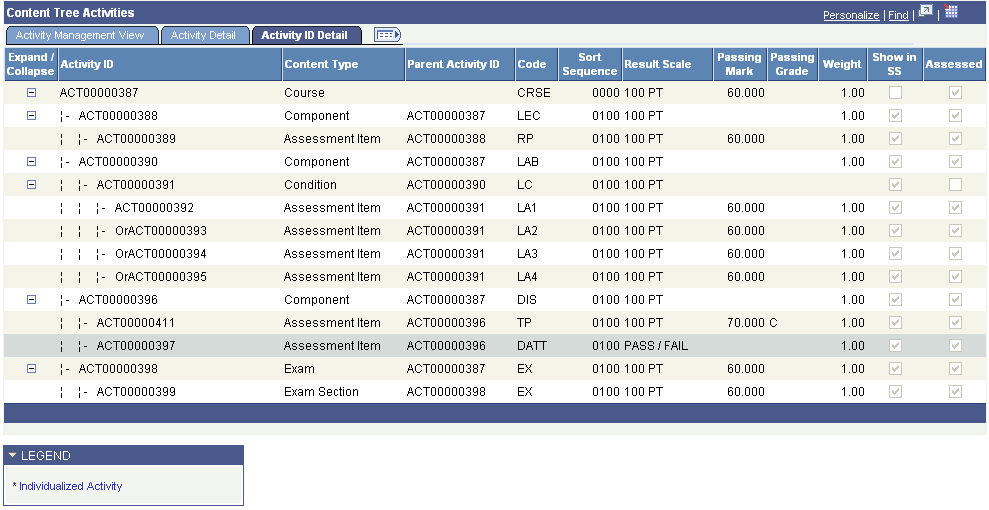
Image: Activity Manager page (4 of 4): Activity ID Detail tab
This example illustrates the fields and controls on the Activity Manager page (4 of 4): Activity ID Detail tab. You can find definitions for the fields and controls later on this page.
Course Root
|
Field or Control |
Definition |
|---|---|
| Exam Only Course |
This flag appears if the course was created as an EOC. |
| Activity ID |
The activity ID that was generated in the Activity Generator for this course root. |
| Activity Manager Status |
Delivered values are Complete and Pending. |
| Registry ID |
The registry ID that was created in the Activity Registry for this course. |
| IAM Exists , Enrollments Exist, or Results Exist |
This display-only field indicates to the user the status of the course root activity:
Each activity also carries one of these statuses. These can be viewed by selecting the Activity ID in the Content Tree Activities grid. When changes are made to the Activity Manager after students are enrolled and an IAM exists, the system will sync most of these changes to the IAM. For instance, a user may discover the no late penalty was defined for an assessment item. The user can make the add a late penalty in the Activity Manager (or the WorkCenter) and the system will sync a late penalty to all enrolled students' IAM. However, some structural restrictions to editing the AM do exist. For instance, when the status is IAM Exists, a user will be restricted from moving activities within the structure. When the status is Enrollments Exist, a user will not be able to delete a component from the structure. When the status is Results Exist, users will be unable to delete the activity. |
| View Registry Tree |
Click this link to access the Registry Content Tree page and view the content tree that was defined in the Activity Registry. |
| Session |
The session that is associated with this course root. |
| Class Association |
The class association appears if course root was generated using the Session and Class Association option. |
| Class Section |
The class section appears if the course root was generated using the Individual Graded Section option. |
| Class Number |
The class number appears if the course root was generated using the Individual Graded Section option. |
| Topic ID |
The topic ID appears if the course root has an associated topic ID. |
| Course Root Aggregates |
This grid appears when the Aggregate feature was used in the Activity Generator. It indicates which courses were aggregated together. |
Content Tree Activities – Activity Management View
|
Field or Control |
Definition |
|---|---|
| Activity ID |
This ID is generated by the Activity Generator for the given content types. Click an ID link to view and update content details for the activity on the Activity Details page. Note: You can introduce new activities into the structure using the Add Child, Add Sibling, and Copy icons on this page. When using any of these features, the system will generate a new Activity ID. |
Update References  |
Click this icon to access the Redirect Cross-Reference page, where you can manage system references (class references or exam reference records) for the particular activity. You can create a new activity to associate the class/exam or you can associate the class/exam to an existing activity for the content type. This icon is not available when either the Enrollments Exist or Results Exist fields appear. |
Add Child Activity  |
Click this icon to access the Create Activity page, where you can add child values to the content item, and then add the details on the Activity Detail page. This icon appears if the Allow Structural Update check box for this content type is selected in the Activity Registry for this course. If that check box is cleared, the icon also appears when any potential child items of the content item are set to Yes. For example, a Component content type may not be flagged for allowance to update, but because the content assessment item is updateable and can be a child to a component, the system will display the Add Child icon for the component. Note that the only valid content types that can be added as children are those for which the Allow Structural Update check box is selected, and the content type being added is valid for the structure. |
Add Sibling Activity  |
Click this icon to access the Create Activity page, where you can add sibling values to the content item, and then add the details on the Activity Detail page. This icon appears if the Allow Structural Update check box for this content type is selected in the Activity Registry for this course. Note that the only valid content types that can be added as siblings are those for which the Allow Structural Update check box is selected, and the content type being added is valid for the structure. |
Move Activity  |
Click this icon to move an Activity ID within the content tree structure for this course root. This icon appears if the Allow Structural Update check box for this content type is selected in the Activity Registry for this course. For example, an Attendance activity is associated with the course as a whole, but for this course root it only needs to be associated with the Lecture component. Use this feature to move the activity from the course to the lecture. When you select this icon, the Paste to as Child icon appears. |
Paste to as Child  |
This icon appears in conjunction with the Move Activity and Copy icons. After you select an item to move or copy, this icon appears on all rows that can accept the activity as a child. Click this icon to move the activity from its original location in the tree to the selected location. |
Copy  |
Click this icon to copy the content item activity detail and add a new activity to the content tree for this course root. This icon appears if the Allow Structural Update check box for this content type is selected in the Activity Registry for this course. When you select this icon, the Paste to as Child icon appears. |
Delete  |
Click this icon to delete the content item activity from the content tree for this course root. This icon appears if the Allow Structural Update check box for this content type is selected in the Activity Registry for this course. A delete action is not allowed when the item was set to Required By Institution in the Activity Registry. |
New References Available  |
This icon will appear on any Component row where a scheduled section exists but is not associated with a course root. Click this icon to access the Add System References page and select an available class section to associate with the existing course root. The system then adds an Activity ID for the component to the course root. |
Content Tree Activities – Activity Detail tab
This tab provides a different view of the content tree activities with general information about each activity/content item.
Content Tree Activities – Activity ID Detail tab
This tab provides the same information as the Activity Detail View tab, but is organized by Activity ID.
Access the Redirect Cross-Reference page (click the Update References icon on the Activity Manager page).
Image: Redirect Cross-Reference page
This example illustrates the fields and controls on the Redirect Cross-Reference page.
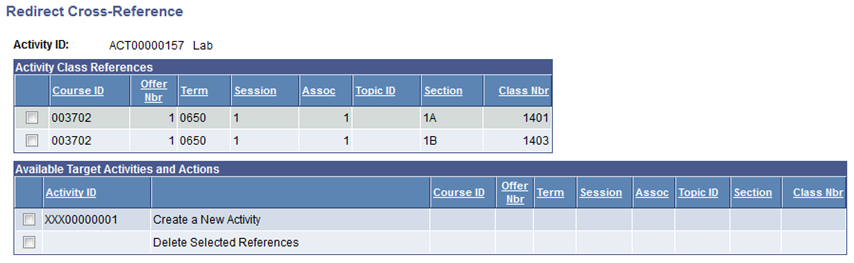
For example, the Lab content item for Course Root ACT00000157 has two class sections that point to the same Activity ID.
Image: Example of Labs that share an Activity ID
Both Sections 1A and 1B point to Activity ID ACT00000157.

Perhaps for this particular Course Root the school wishes to manage these two sections separately rather than under one Activity ID. The Update References icon can be selected for section 1B and within the Redirect Cross-Reference page, the section can redirected to a new Activity ID as follows:
Image: Update References page
This example illustrates the Update References page as explained above.

Select OK, and you will be taken to the Activity Detail page for the new Activity ID. Appropriate details should be entered and saved.
Image: Example of Lab with new Activity ID after redirecting the reference
Return to the main page and Section 1B will now be pointed to a new Activity ID.

Access the Create Activity page (click the Add Sibling Activity or Add Child Activity icons on the Activity Manager page).
Image: Create Activity page
This example illustrates the fields and controls on the Create Activity page.

Once you click OK you will be transferred to the Activity Details page where you can enter details about the new activity. Add activity detail and save the component to generate a new Activity ID. With the exception of the description and content code, the details for 4500 – Exam Section must be entered on the Section Manager component.
Special Consideration for Combined Sections
Combined sections can be setup to be displayed together under the same course root. If a combined section exists, the following page will display when the sibling icon is selected for a component content type.
Image: Create Activity for Combined Sections page
This example illustrates the fields and controls on the Create Activity for Combined Sections page.
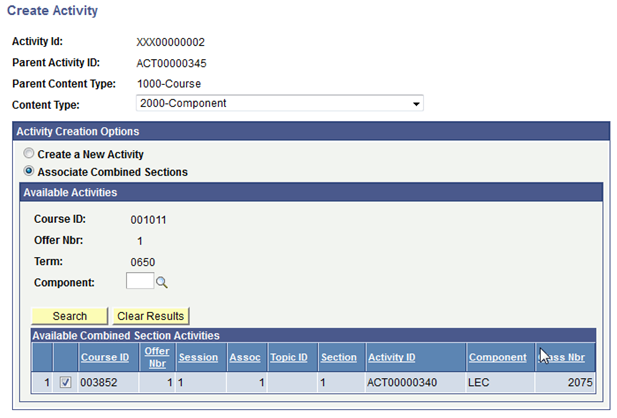
The available combined section(s) will be displayed. When you select the appropriate class section it will then be displayed with its corresponding combined section under the course root. This action should be performed for each course root.
Access the Add System References page (click the Information icon on the Activity Manager page).
Image: Add System References page
This example illustrates the fields and controls on the Add System References page. You can find definitions for the fields and controls later on this page.
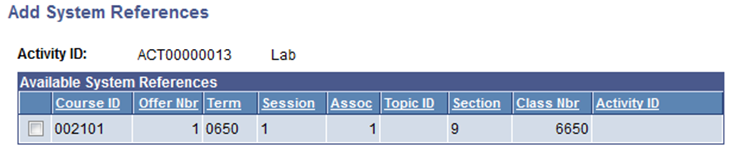
If any class sections were scheduled after activities were generated in the Activity Generator, the Information icon will appear. Identify against which activity you want to add the class and select the information icon. Once selected, the system transfers you to the Add System References page to see the class(es) that require an Activity ID. Select the appropriate class section(s) and click OK. The class section(s) will now reference the existing Activity ID. If it needs to reference its own Activity ID, use the Update Reference icon to create a new Activity ID.
Access the Activity Detail page (click an Activity ID link on the Activity Manager page).
Image: Activity Detail page
This example illustrates the fields and controls on the Activity Detail page. You can find definitions for the fields and controls later on this page.
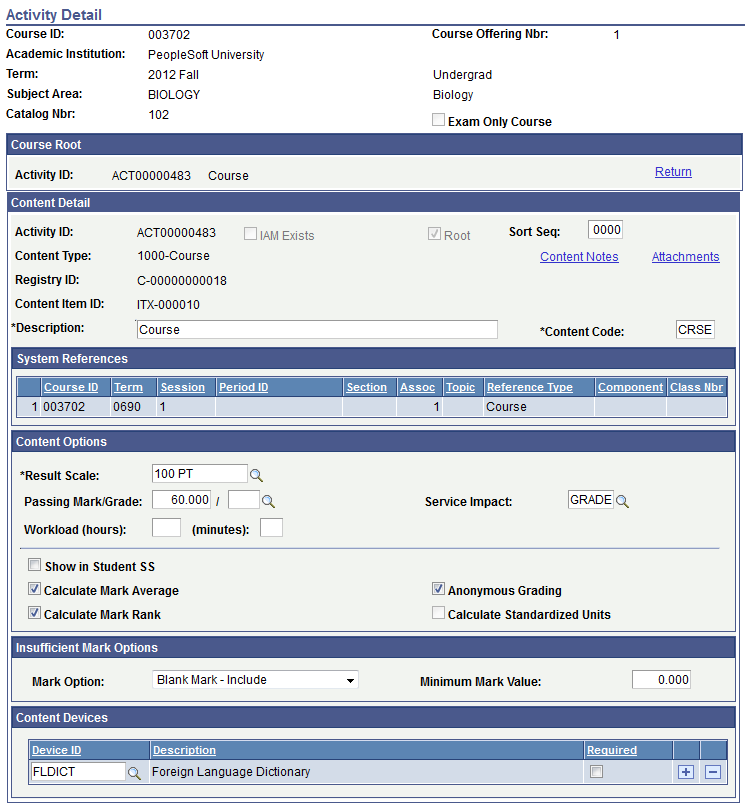
The fields on this page are very similar to those in the Activity Registry component. The sections and fields that appear here are dependent on the content type of the item and the detail that was entered in the Activity Registry component. The system populates this page with content item attributes from the Activity Registry page, but you can update, add, or delete them here for a particular Activity ID. Any updates to a course root in the Activity Manager will be reflected in downstream processing, meaning that any updates to an Exam or Exam Section done here will be used by the Section Manager. When student enrollment exists or results exist for a student in the system, some edits for the given term or academic period may be restricted.
Note: In the Content Options group box, you cannot edit standardized units defined in the Activity Registry. Any item identified as Required by Institution in the General Options group box cannot be deleted from the structure.
See Setting Up the Activity Registry
Individualized Content
When adding a new content item to the structure, the system displays an additional field in the Content Options group box on. Select the Individualized Content field if this content item will be specific to a student or subset of students enrolled in the class. This activity must be assigned to the specified students either manually in the Student IAM or by using the IAM Block Generator.
Image: Example of Content Options group box
This example illustrates the Content Options group box as explained above.

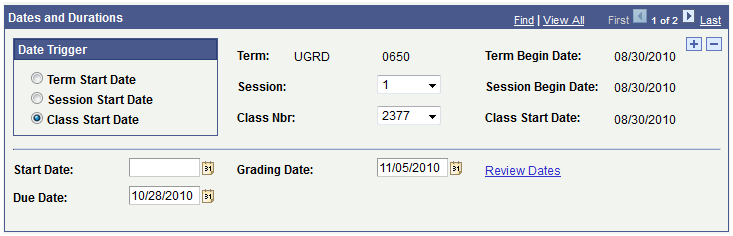
Dates and Durations
When an assessment item exists for multiple class sections and class start date is the date trigger for that assessment item, the following section appears, indicating the dates and duration for each class number. The dates can be overridden as necessary for each class.
Image: Example of Dates and Durations group box
This example illustrates the Dates and Durations group box as explained above.
Access the Attributes page (click the Attributes link on the Activity Detail page).
Image: Attributes page
The following screenshot provides an example of common attributes set up for the course content item in the Activity Manager:

The fields that appear on the Attributes page are customer-specific and are defined on the Common Attributes and Record Context pages. The record context used for the Activity Manager is the Activity Attributes (SSR_ACMCONT_ITM) record. The entity names used for the Activity Manager are prefixed by 'ACM'.
See Understanding Common Attribute Framework