Scheduling New Classes
This section provides an overview of new class scheduling, lists prerequisites, and discusses how to:
Define basic data for class sections.
Add class association attributes using the Schedule of Classes component.
Enter class fee information.
Define class meeting patterns.
Define auto enroll options and capacity.
Define class reserve capacity.
Link class notes to sections.
Link exam times to classes.
Define learning management system (LMS) data for classes.
Define textbooks for classes.
Interface class sections with the general ledger.
Student Records possesses a great feature for easing your data entry in the schedule of classes. The four primary components are: Schedule New Course, Schedule of Classes, Schedule Class Meetings, and Update Sections of a Class. The components are identical, except that their search mechanisms differ.
In the Schedule New Course component you can view all courses from the course catalog that can be scheduled. In the Schedule of Classes component you can view only those courses that have been scheduled for a term. In the Schedule Class Meetings component you can view the Meetings page, the Enrollment Cntrl (enrollment control) page, and the Exam page, and make edits without accessing the entire class and all of its sections in the schedule of classes. In the Update Sections of a Class component you can view only individual class sections of a course that have been scheduled for a term.
We review the Schedule New Course component first, because it is where you begin.
To schedule a class:
Define sections, special class fees, topics, attributes, and course administrator information on the Basic Data page.
Enter class meeting times, days, facilities, instructors, and room characteristics on the Meetings page.
Define class status, capacity, auto enroll, and resection to section numbers on the Enrollment Cntrl page.
Define reserve capacity and enrollment requisites on the Reserve Cap (reserve capacity) page.
Link notes to class sections on the Notes page.
If you are manually scheduling exams for class sections, enter exam information on the Exam page.
Define textbook assignments for each class section on the Textbook page.
Assign classes (class item types) to specific general ledger accounts on the GL Interface page.
Before you can schedule a new class, you must:
Define your academic calendar, repeat rules, and course catalog.
Define your facility IDs, topic IDs, and your instructor workload assignment types (if applicable).
Define your reserve capacity enrollment requirement groups (if applicable).
Define your note numbers (if applicable).
Define your exam time codes and exam types (if applicable).
Define your course material type values.
Define your GL values.
|
Page Name |
Definition Name |
Navigation |
Usage |
|---|---|---|---|
|
Schedule of Classes - Basic Data |
CLASS_ENTRY |
|
Define sections, add specific class fees, topics, attributes, and designate a course administrator. |
|
Associated Class Attributes |
SSR_ASSOC_CAF |
Click the Associated Class Attributes link on the Basic Data page. |
Add class association attributes. |
|
Class Fees Modal |
CLASS_FEE_TBL_MDL |
Click the Add Fee button on the Schedule of Classes - Basic Data page. |
Enter the charge method for the component of the class. |
|
Class Sub Fees Modal |
CLASS_SUBFEE_MDL |
Click the Add Fee button on the Schedule of Classes - Basic Data page. |
Enter the details of the course fee. |
|
Schedule of Classes - Meetings |
CLASS_MTG_PATTERN |
|
Define class meeting patterns and facilities, link instructors to classes, assign instructor workload values, specify room characteristics, and select academic shifts. |
|
Instructor Contact Hours |
CLASS_MTG_PAT_HRS |
Click the Contact Hours link on the Meetings page. |
Review total course contact hours, weeks of instruction, and other contact hours information. |
|
Combined Section Detail |
CLASS_CMBND_SEC |
If available, click the Combined Sections link on the Meetings or Enrollment Cntrl page. |
Review all of the classes in the combined section |
|
Schedule of Classes - Enrollment Cntrl (enrollment control) |
CLASS_ENRL_CNTL |
|
Set enrollment limits and capacity requirements, and identify sections for which you want the system to auto enroll students. |
|
Reserve Cap (reserve capacity) |
CLASS_RSRV_CAP |
|
Assign reserve capacities for class sections. You can define any number of reserve capacity groups for a class. Reserve capacities are defined through the Enrollment Requirement Group component. When a student enrollment request is processed, the system automatically searches through the reserve capacities in sequential order and places the student in the first group with an available spot for which the student qualifies based on the reserve capacity group rules. |
|
Schedule of Classes - Notes |
CLASS_NOTES |
|
Link existing class notes or free-form text notes to class sections. |
|
Exam |
CLASS_EXAM |
|
Manually schedule final exams for class sections. |
|
Textbook |
SSR_CLASS_TEXTBOOK |
|
Assign textbooks to class sections. |
|
LMS Data |
CLASS_LMS_SETUP |
|
Enter LMS information for this class. |
|
GL Interface |
CLASS_TBL_GL |
|
Map class section fees as item types to their proper General Ledger accounts. The system generates charges to the student's account based on the class and course code that you define in this component and offsets these charges based on the General Ledger that you define in this page. Your office needs to coordinate the information on this page with your controller's office. |
|
Journal Set ChartFields |
SSF_CF_WRKGRID_SEC |
Click the Jrnl Set ChartFields link on the GL Interface page. |
Continue to enter ChartField information that maps class section fees to their proper General Ledger accounts. |
Access the Schedule of Classes - Basic Data page ().
Image: Schedule of Classes - Basic Data page
This example illustrates the fields and controls on the Schedule of Classes - Basic Data page. You can find definitions for the fields and controls later on this page.

|
Field or Control |
Definition |
|---|---|
| Auto Create Component |
If you click this button, the system automatically creates one component for each of the components that you selected to auto create on the Course Catalog - Components page. The system populates the pages in the schedule of classes with the required data for each component. This saves you data entry and ensures that one section for each component is scheduled. If you have multiple class sections for each component type, you must still define the remaining class sections manually. |
| Class Section |
For each component that the system creates automatically, enter the class section number. The system defaults into the Class Schedule Entry page the field values of the preexisting class section. Note: If you have begun to schedule sections of a course and you then click the Auto Create Component button, the process only creates a section for those components that are set to Auto Create on the course catalog and have not yet been scheduled. |
| Session |
Enter the type of session to which the class sections of this course offering belong. If you want to schedule open entry/exit class sections, you must define them within an OEE session. Session values are delivered with your system as translate values. You can modify the codes and descriptions of these values except for OEE, where you can modify the descriptions only. Any modification to this code requires a substantial programming effort. In order for students to enroll in the OEE class sections that you define, you must either define the OEE Dynamic Date rule for each class section on the Dynamic Class Dates page or the Course Catalog - Offerings page. |
| Class Nbr (class number) |
The system creates a unique class number identifier that students can use when they enroll in a class. The class number appears on the Schedule of Classes report. The system increments this number automatically, based on the number that you specify on the Term Value page. |
| Class Section |
Enter the class section. It must be unique within course offering and session. |
| Start/End Date |
The system populates this field by default to the start and end dates of the session (as specified on the Session Table page). You can override the dates for an individual class. The schedule of classes start and end dates can extend beyond the boundaries of the session begin and end dates. |
| Component |
The system populates this field by default to the graded component on the Catalog Data page (such as Lecture, Laboratory, Discussion, and so on) of the course. You can have multiple components and sections within a course offering. |
| Class Type |
The class type of Enrollment indicates which section is the primary section at enrollment time. The class type of Non-Enrollment is used to indicate that the section choice is the student's secondary enrollment option, or that the section is used in auto-enrollment. Within a class, only one component can possess the class type of Enrollment. For example, at PSUNV Microbiology 240 has Lecture, Laboratory, and Discussion components. There are 5 lecture, 10 laboratory, and 15 discussion sections. We might select the discussion sections as the Enrollment sections, the lecture sections as the Non-Enrollment section using auto-enrollment, and the laboratory sections as Non-Enrollment sections with a student choice of lab section at enrollment time. |
| Associated Class |
Select an associated class number from the list box, or enter an associated class value of your own. By using associated class numbers, you link class sections that constitute a single course offering. For instance, in our previous example, we'd gather a certain number of lecture, lab, and discussion sections into one associated class number to indicate that the three components are related to one another. If you are scheduling a new section, the system populates the Associated Class field to 1 by default. When you schedule the first section of a course offering and use the prompt box, the system only displays this default value. You can use a prompt value, or you can manually enter any new one- to four-digit number into the field. Upon saving the page, the system extracts the necessary course data from the course catalog, creates a row in the Class Associations component for this class association number, and populates the row with the appropriate course catalog data. When a student enrolls in a class, the system verifies that the student has enrolled in a section with all required components of the course from within the same associated class number. If you add a new class associations value to a scheduled class, and you want to make changes to the class association data that the system extracts from the course catalog, you must make your changes on the Class Associations component. A special associated class number, 9999, enables you to associate a section with any other section. However, you can only use this associated class number for nongraded components. |
| Associated Class Attributes |
Click to access the Associated Class Attributes page and add class associations attributes. See Adding Class Association Attributes Using the Schedule of Classes Component |
| Units |
The units value is a related display based on the unit range defined on Class Associations component. When first scheduling a course, the system populates the Associated Class field to 1 by default. Once the section is saved, the unit value is defaulted from the Course Catalog to the Associated Class and is displayed on the Schedule of Classes. If the class association unit range is modified, the assigned unit value will accurately be reflected on the Schedule of Classes. On subsequent pages within the Schedule of Classes, the unit range will be displayed within the Class Sections group box. |
| Campus |
The system populates the Campus field by default from the Course Catalog - Offerings page, indicating the campus that offers the course. You cannot revise this default. If a specific campus was not identified in the course catalog and does not default, then you can, on a section-by-section basis, schedule classes at various campuses. Note: Because you cannot revise the campus value if one was provided on the course catalog level, it is best if you do not identify a specific campus on the Course Catalog - Offerings page unless absolutely necessary. |
| Location |
Enter the location of the campus. Location values are linked to campuses on the Campus Table page. A campus must be specified before you select a location. |
| Course Administrator |
Select the course administrator ID of the person in charge of the course (usually the primary instructor). This field is informational only. |
| Academic Organization |
The system populates the academic organization by default from the Course Catalog - Offerings page. The academic organization refers to the organization that offers the class. You can override this value. |
| Academic Group |
The system populates the academic group by default from the Course Catalog - Offerings page. Note: You can define global notes by academic group, which can appear on the Schedule of Classes report. In addition, academic group controls the valid meeting pattern values and their corresponding normal class duration values. |
| Instruction Mode |
The system populates this field by default to In Person, but you can override the value. The instruction mode indicates whether the class is taught In Person or using Interactive TV, World Wide Web, Correspondence, and so on. Instruction mode values are defined on the Instruction Mode page. Important! You can generate attendance rosters for only those classes with an instruction mode value of P. |
| Primary Instr Section (primary instructional section) |
Enter the primary instructional section number if applicable. This field is specifically used for distance learning classes. You can use this field to indicate in which section the instructor resides. This field is for informational purposes only. |
| Schedule Print |
The setting of this check box populates by default to the setting on the Course Catalog - Offerings page. Select this check box to display the class in the schedule of classes. If you clear this check box, the section does not display in student or visitor class search when accessed through PeopleSoft Campus Self Service. Students can enroll in these classes, but only if they enter the exact class number (without using the class search feature). |
| Student Specific Permissions |
Select this check box to set up student-specific class permissions. Student-specific permissions enable instructors or administrators to control section enrollment by granting advance add permission to individual students. Note: This applies only to add permissions. Drop permissions are always student specific, whether or not the check box is selected. |
| Include in Dynamic Date Calc (include in dynamic date calculation) |
Select this check box to include this component of the class section in the Dynamic Class Dates process. The value that you select here populates by default from the corresponding field for the course offering component on the Course Catalog - Components page. For nonprimary components of a course offering, this check box is optional. You can override the default value on a section-by-section basis. For primary components, however, the system automatically selects and makes unavailable this check box because the Dynamic Class Dates process always uses the scheduled class section of the primary component to calculate the landmark dates on a dynamic academic calendar. The process uses for the primary component the value as defined on the Class Associations - Class Components page. If you decide to include additional components of the class section in the Dynamic Class Dates process calculations, the process includes in its calculations the meeting times that fall within the start date and end date range of the primary component. For example, the lecture section is the primary component. The start and end dates for the lecture are 10 weeks apart, with the lecture meeting every Monday. For the dynamic class date rule, you use a rule scheme for drop dates that is based on the number of class meetings, and that each subsequent class meeting defines the next level drop deadline. If you include only the lecture in the Dynamic Class Date process calculations, the first drop deadline would be the second lecture, the second drop deadline would be the third lecture, and so on. However, you may also have a discussion component that meets once every Thursday for 10 weeks, starting the same week as the lecture. If you select to also include the discussion in the calculations, the first drop deadline would be the first discussion because it is the second class meeting. The second drop deadline would be the second lecture, the third drop deadline the second discussion, and the final drop deadline the third lecture. |
| Dynamic Date Calc Required (dynamic date calculation required) |
The system automatically selects this check box whenever you make a change to the class meeting pattern or class dates of a class section within a dynamically dated session because these changes can potentially impact the Dynamic Class Date process calculations. When you run the Dynamic Class Dates process using the Process Scheduler (Dynamic Class Dates page), you have the option to use this field as a parameter. You can thus, for example, recalculate the landmark academic calendar dates for only the classes in which the class meeting pattern has been changed. SeeUnderstanding Dynamic Academic Calendars |
| Generate Class Mtg Attendance (generate class meeting attendance) |
Select this check box to indicate that you want the system to always generate attendance rosters for this class. This value defaults from the Course Catalog - Components page each time that you schedule a new course. By selecting this check box, you flag the class so that when you generate attendance rosters through the Attendance Roster Generator page and you select the Obey Generate Class Mtg Attendance check box, the generator creates attendance rosters only for classes that have this flag selected and that meet your processing criteria. If you clear this check box on the Attendance Roster Generator page, the system generates attendance rosters for all classes that meet your processing criteria, regardless of the check box setting on the Basic Data page. You can generate attendance rosters through the Class Attendance page regardless of this check box value. |
| GL Interface Required |
Select this check box to include this class in the GL Interface process. If you select this check box, you must enter the necessary data into the GL Interface page of this component. |
|
Field or Control |
Definition |
|---|---|
| Add Fee |
To add a class section fee, you must click the Add Fee button for each new class section. |
Class Topic
|
Field or Control |
Definition |
|---|---|
| Course Topic ID |
Enter a course topic ID to link course topics to class sections. Select a topic ID for the section. Topic ID values are defined on the Catalog Data page. Additionally, you can also attach topics to specific class meeting patterns. |
| Print Topic in Schedule |
If you enter a topic ID, this check box becomes available for entry. The system selects this check box by default. You can change the setting. Note: In order for the topic to appear on the transcript, you must select the Print Course Topic check box on the Transcript Type - Enrollment/Statistics page. |
Equivalent Course Group
|
Field or Control |
Definition |
|---|---|
| Course Equivalent Course Group |
If the course is linked to an equivalent course group on the Catalog Data page, the system displays that information in this field and the Override Equivalent Course check box becomes available for entry. |
| Override Equivalent Course |
Select to override the Catalog Data setting for this class section. |
| Class Equivalent Course Group |
Enter another equivalent course group for the class section in this field. |
Class Attributes
|
Field or Control |
Definition |
|---|---|
| Course Attributes and Course Attribute Value |
Use the Course Attributes field to link attributes to class sections. The system populates this field and the related course attribute values from the course catalog. You can override or amend these values. Values for course attributes are defined on the Catalog Data page. Note: Course attributes are used primarily for institutional research and reporting purposes and to print repetitive text in the course catalog and schedule of classes. Course attributes are not used by the Academic Advisement application. |
Access the Associated Class Attributes page (click the Associated Class Attributes link on the Basic Data page).
Image: Associated Class Attributes page
This example illustrates the fields and controls on the Associated Class Attributes page. You can find definitions for the fields and controls later on this page.
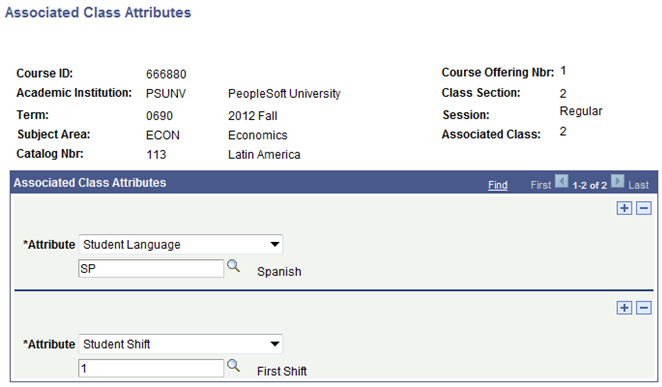
Use this page to add Class Association attributes as you add new class sections or maintain existing class sections.
|
Field or Control |
Definition |
|---|---|
| Attribute |
The name of the attribute. This value comes from the description of the attribute on the Common Attribute component. |
| Value |
This field changes depending on the type of attribute. This could be a numeric, date, time or text field. Alternatively, the field could prompt against a list of values if one has been defined for the attribute. |
Access the Class Fees Modal page (click the Add Fee button on the Schedule of Classes - Basic Data page).
Image: Class Fees Modal page
This example illustrates the fields and controls on the Class Fees Modal page. You can find definitions for the fields and controls later on this page.
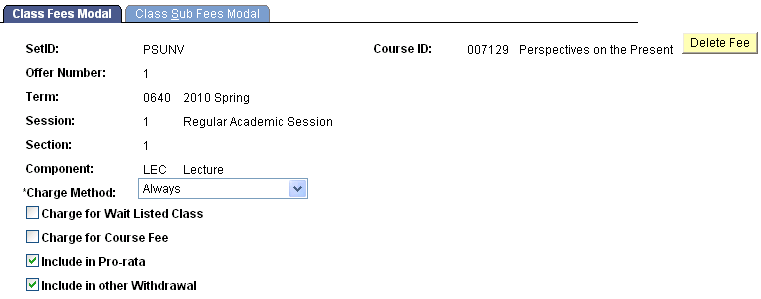
Enter the charge method for the component of the class. These values are set up in PeopleSoft Student Financials tables.
The check box options enable you to specify when the system charges fees.
Class Sub Fees Modal
Access the Class Sub Fees Modal page (click the Add Fee button on the Schedule of Classes - Basic Data page).
Image: Class Sub Fees Modal page
This example illustrates the fields and controls on the Class Sub Fees Modal page. You can find definitions for the fields and controls later on this page.
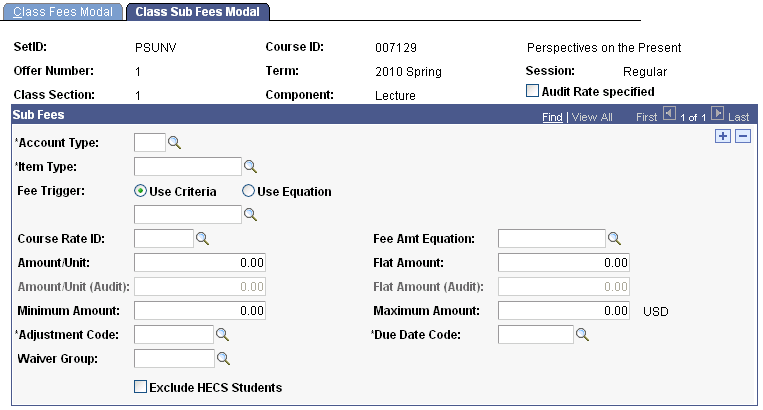
Enter the details of the course fee in this page. You are prompted from tables set up in the Student Financials application.
See Defining Class Fees.
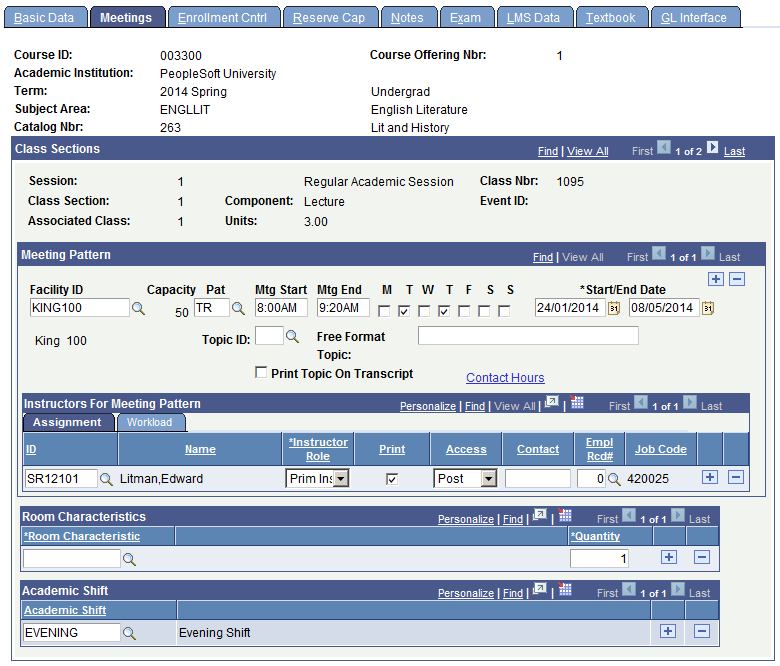
Access the Schedule of Classes - Meetings page ().
Image: Schedule of Classes - Meetings page
This example illustrates the fields and controls on the Schedule of Classes - Meetings page. You can find definitions for the fields and controls later on this page.
Note: For institutions that schedule large numbers of sections of a class and have facility conflict check activated, use the Schedule Class Meetings component to schedule facility and meeting pattern information. Because the system only performs edit checks on an individual class section (rather than for all the sections of the class), you benefit from faster performance. To use the Schedule Class Meetings component to schedule facility and meeting pattern information, enter all information for the class, except facility and meeting pattern in the Schedule of Classes or Schedule New Course components. Then go to the Schedule Class Meetings component, enter the subject and catalog number for the class, select the first section, and then update the facility/meeting pattern information one section at a time, using the Next in List button on the tool bar to scroll through all the sections for the course.
Multiple views of this page are available by clicking the tabs in the scroll area. We document fields common to all views first.
Common Page Information
|
Field or Control |
Definition |
|---|---|
| Event ID |
The system creates a unique event ID record in the Event table when you schedule a class with a meeting pattern and facility ID. The Event table is used to record class and non-class events for room scheduling. |
| Facility ID |
Enter a facility ID for the class. Facility values are defined on the Facility Table page. |
| Capacity |
The system populates this field by default to the setting on the Facility Table page. |
| Pat (pattern) |
Enter the class meeting pattern. Meeting patterns associated with the academic group for the class are available. Meeting pattern values are defined on the Academic Group Table - Standard Meeting Pattern page. Note: It is important that you enter the most important meeting pattern first. In some places in the system when viewing classes you can only see the meeting pattern which was entered first. Also, the system assigns a final exam code based on the first class meeting pattern. |
| Mtg Start (meeting start) and Mtg End (meeting end) |
Enter the class meeting start and end times. The system defaults an end time after you enter a start time, based on the default Normal Class Duration set on the Academic Group table - Standard Meeting Pattern page. |
| M (Monday), T (Tuesday), W (Wednesday), T (Thursday), F (Friday), S (Saturday), and S (Sunday) |
The system populates the meetings days by default based on what you enter in the Pat field. |
| Start/End Date |
For the first meeting, the system populates these fields to the start and end date from the Session table. For all subsequent meetings you add, the system populates this field to the start and end dates on the Basic Data page. The meeting start and end dates must be assigned within the start and end date range assigned to the class on the Basic Data page. |
| Topic ID |
Select a class topic ID for this class meeting pattern. For example, at PSUNV, ENGLLIT 299 meets on MWF and TTH. The MWF class covers "The Mystery Genre," while the TTH class covers "British Influence on US Writers." You can also link class topics to entire classes on the Basic Data page. Topic IDs are defined on the Catalog Data page. |
| Free Format Topic |
Enter a free format topic if a predefined topic ID is not suitable. For example, if a professor wants to teach ENGLLIT 299 as "19th Century Novelists," but the topic had not been set up as a topic ID, you could enter it as a free format topic. You can only link free format topics to class meeting patterns. Note: You cannot assign class meeting pattern topic IDs to combined sections. This would cause data integrity problems. For this reason, after sections are combined, the system makes the Topic ID field unavailable on the Meetings page. Instead, only assign free format topics to combined sections. In addition, if you combine sections that already have class meeting pattern topic IDs assigned to them, the system deletes the topic IDs. |
| Print Topic On Transcript |
Select this check box to allow course topics to appear on the advisement report. Course topics defined at the class meeting pattern must have this check box selected, as well as the Display Topics in AA Reports check box on the Transcript Type - Basic Data page, for the class meeting topic to appear. See Designating Enrollment and Statistics Data. Note: Selecting this check box allows the class meeting pattern topic to be printed on both transcripts and advisement reports. To allow the topic to print on only one of the reports, correctly set the option to print topics on the transcript type for each report type. |
| Contact Hours |
Click to access the Instructor Contact Hours page, where you can review total course contact hours, weeks of instruction, and other contact hours information. |
| Course Contact Hours |
Derived from the course catalog. |
| Weeks of Instruction |
Derived from the Session table. |
| Total |
Equals the course contact hours multiplied by the weeks of instruction. |
| Total Course Contact Hours (Actual) |
Calculated from the class meeting pattern. Equals the sum of the end time minus the start time for every meeting date, excluding holidays. The system only calculates this value for the graded component if a facility is booked for the class. |
| Combined Section |
Click to access the Combined Section Detail page, where you can view all of the classes in the combined section. This link only appears for combined classes. Note: After you combine classes, you must perform updates to meeting pattern and instructor information through the Schedule Class Meetings - Meetings page. Within the Schedule of Classes and Schedule New Course components, the facility/meeting pattern and instructor information is unavailable for entry for combined sections. |
Assignments Tab
See the Meetings page exhibit for a view of this tab.
|
Field or Control |
Definition |
|---|---|
| ID |
Enter the ID of the instructor for the course. The system prompts you from the Personal Data view or one of seven Instructor/Advisor views. The prompt values depend on:
You can associate one or more instructors with each meeting pattern. The system carries forward the instructor ID from the previous meeting pattern when you add a new meeting pattern. Override the instructor ID if necessary. Note: In order to accommodate the Instructor Workload feature, a single instructor may be assigned to more than one row, although this may not be common practice. For example, you may want to assign instructor A to teach 50 percent load factor with an assignment type of Internet, and another 50 percent load factor with an assignment type of In Class Lecture. |
| Instructor Role |
Enter the instructor role for the corresponding ID number. Values for this field are delivered with your system as translate values. You can modify these values. Insert rows to add multiple instructors and their corresponding instructor roles. Note: For independent study courses for which the student can select one of several instructors, assign multiple instructors the Primary instructor role. If you select an Instructor Edit field value of Class Instructor Edit on the Class Associations page, only the primary instructors defined for the class on the Meetings page display on the Enrollment Request page during enrollment. |
|
Select to display the instructor's name on the Schedule of Classes report. The system populates this check box by default to the setting on the Course Catalog - Offerings page. |
|
| Access |
Enter the grade roster access for this instructor. Values for this field are delivered with your system as translate values. Do not modify these values in any way. Any modifications to these values require a substantial programming effort. The values work in hierarchical fashion: Approve: Instructor can enter grades and approve the grade roster. Grade: Instructor can only enter grades for the class. Post: Instructor can enter grades, approve the roster, and post the grades. |
| Contact |
The values you enter in this field have no impact elsewhere in the system. The Contact field on this page has no programming tied to it, and does not relate to the delivered Instructor Workload feature in any way. |
| Empl Rcd# (employee record number) |
Relates job information to instructors for reporting purposes. In addition, the system displays a warning message if the FULL_PART_TIME value on the job does not coincide with the same field value on the instructor assignment class record related to the instructor assignment class on the Term Workload page. |
| Job Code |
Displays the value specified on the Accommodations page for a particular employee record. |
Workload Tab
Select the Workload tab.
Image: Schedule of Classes - Meetings page: Workload tab
This example illustrates the fields and controls on the Schedule of Classes - Meetings page: Workload tab. You can find definitions for the fields and controls later on this page.

|
Field or Control |
Definition |
|---|---|
| Assign Type (assignment type) |
Appears on this page if the Calculate Workload check box is selected on the Academic Institution 4 page. The system populates the field by default from the Academic Institution 4 page and can be overridden. Only those assignment types current as of the term begin date and with the View on Schedule of Classes check box selected are available. |
| App Load (apply load) |
Appears on this page if the Calculate Workload check box is selected on the Academic Institution 4 page. The check box indicates whether the assignment counts toward an individual's total term full time equivalent (FTE). percentage. The field corresponds to the Include Assignment in Workload check box on the Assignment Type page and cannot be overridden. The only way to change the setting of this check box is to select a different assignment type. |
| Load Factor |
If desired, you can use this field to divide one course component into multiple assignments across instructors. Inserting multiple rows per course component and assigning each one a load factor (percent) enables you to divide a component into different assignment types among instructors. For example, you can assign instructor A to teach 30 percent of the lecture component, and instructor B to teach 70 percent of the lecture component. It is your responsibility to set the load factor. The total load factor on one course component should equal 100 percent. The system displays a soft warning message if the total does not equal 100 percent. |
| Work Load |
In order to provide maximum ease in assigning workload hours to individuals, the system auto calculates default workload hours when you schedule classes. The system bases calculations on the academic progress units or course component workload hours for the class (set up on the class association and class component pages), multipliers both per subject/component and per instructor, and load factor. The Work Load field stores the resultant workload hours. Manual modifications to work load hours are enabled and effect the Assigned FTE%. |
| Auto Calc (automatic calculation) |
Appears on this page if the Calculate Workload check box is selected on the Academic Institution 4 page. Select this check box if you want to have the workload value recalculated any time the user manually updates assignment type or load factor. The default is selected. Note: Manually entering a value in the Work Load field clears the Auto Calc check box so that the manual entry is not overridden automatically if you change the assignment type or load factor. You can select the Auto Calc check box again; however, doing so recalculates workload. |
| Assignment FTE% (assignment full time equivalency percentage) |
Appears on this page if the Calculate Workload check box is selected on the Academic Institution 4 page. This value represents the particular assignment's weight based on the 100 percent weekly workload hours or the 100 percent OEE workload hours for the assignment type. For example, if the assignment type Lecture has 100% weekly workload hours set to 15, and you assign an instructor to teach a 3 hour lecture component with an assignment type of Lecture, the assignment FTE % is 20 (because 3 hours out of 15 makes 20%). It is calculated and cannot be modified by the user. |
Room Characteristics
|
Field or Control |
Definition |
|---|---|
| Room Characteristic and Quantity |
Use the Room Characteristic field to link room characteristics to classes. The system populates the Room Characteristic field and the Quantity field from the Course Catalog - Components page. You can override these values. The Room Characteristic field is used for interfacing to the Universal Algorithm's product, Schedule25. The maximum quantity of room characteristics for Schedule25 is 96. Therefore, be sure that you select values between 01 and 96. |
Academic Shift
|
Field or Control |
Definition |
|---|---|
| Academic Shift |
Select an academic shift (for example, Evening Shift) for a class section. See Defining Class Search Result Options |
Access the Schedule of Classes - Enrollment Cntrl page ().
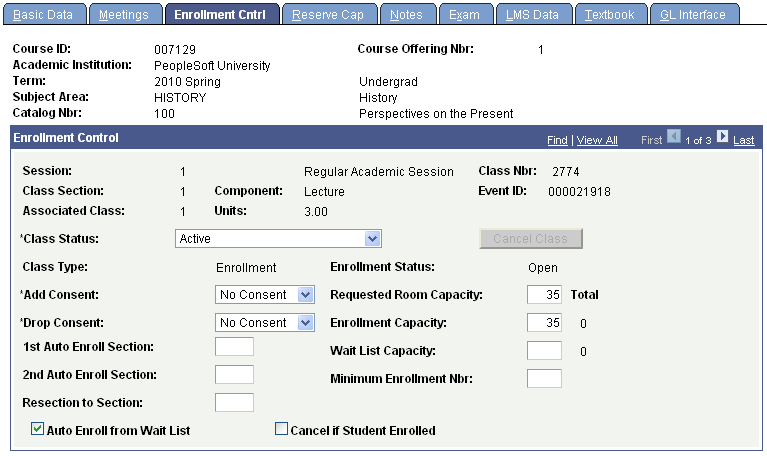
Image: Schedule of Classes - Enrollment Cntrl page
This example illustrates the fields and controls on the Schedule of Classes - Enrollment Cntrl page. You can find definitions for the fields and controls later on this page.
|
Field or Control |
Definition |
|---|---|
| Class Status |
The system populates this field to Active by default. Class status values are delivered with your system as translate values. You can override the status to indicate Stop Further Enrollment, Cancelled Section, or Tentative Section. The Schedule of Classes report enables you to select class status, so that you can print only Active classes, or only Inactive classes, and so on. Note: When you select Stop Further Enrollment, Cancelled Section, or Tentative Section, the system sets enrollment status to closed. Classes with class statuses of Stop Further Enrollment, Cancelled Section, or Tentative Section do not appear in class search. The class status of Active has coding attached to it and should not be deleted from the translate table. You can add as many new class status values to the translate table as you want, but they will not have coding attached to them. |
| Cancel Class |
Click to cancel the class in view. The class status must be Canceled Section. The button processes one section cancellation at a time. If you want to cancel multiple sections, you must post your request for each section that you want to cancel. Warning! If you want to cancel the section regardless of whether students are enrolled, you must select the Cancel if Student Enrolled check box. Doing so, however, drops any students who are enrolled in the section and requires that you recalculate tuition for those students. |
| Add Consent and Drop Consent |
Values default from the Catalog Data page and indicate the type of consent, if any, that is required to enroll in or drop the class. You can override these values. If you select Instructor or Department, consent is granted either by a permission number or a student specific permission. (Drop permissions are always student specific). The consent requirement can also be overridden during the enrollment process, by selecting the permission override. |
| Auto Enroll from Wait List |
This check box is unavailable for open entry - open exit (OEE) classes (classes tied to an OEE session). Select to enable the COBOL/SQL Wait List process (SRCPWAIT) to move students from the wait list to enrolled status when a space opens up in the section. Spaces become available through enrollment drops or an enrollment capacity increase. Generally, when spaces become available in a section, the class status opens, allowing students to enroll. However, selecting this check box keeps the status closed so that you have time to move students from the wait list into the class by running the wait list process (before other students enroll). If you do not select the Auto Enroll from Wait List check box and you have students on the wait list for the class, when the class status changes to open you cannot use the wait list process to move students from the wait list into the class. You have to move wait listed students into the class manually, and students that are not on the wait list can enroll in the class. See Moving Students from Wait Lists to Enrollment. Note: "Enrollment" sections can only auto-enroll "non-enrollment" sections. |
| 1st Auto Enroll Section and 2nd Auto Enroll Section |
Enter a section within the same associated class number in which the system should automatically enroll students into the 1st Auto Enroll Section and 2nd Auto Enroll section. The auto enroll section must have a different component from the parent section. |
| Resection to Section |
Enter the alternative section in which the system automatically enrolls a student if the primary section is full. The component of the primary section and the resection to section class must be the same. For instance, when Section 1 Lecture is filled, the system enrolls students in Section 3 Lecture. |
| Cancel if Student Enrolled |
Select for the system to process a request for a canceled class section regardless of whether students have already enrolled in the section. If you do not select this check box and you attempt to cancel a section in which students have enrolled, the system prevents you from posting the change, keeping the class status active. Thus, by leaving the box cleared you prevent inadvertently canceling a section in which students are enrolled. |
| Requested Room Capacity |
Enter the requested room capacity for the class. Your room capacity can be different than your enrollment capacity. Because the system stores two separate capacity values, this field enables you to manipulate the enrollment capacity without affecting room scheduling. The system populates the Requested Room Capacity field by default from the default section size on the Course Catalog - Components page. This field is useful for you especially if you use Universal Algorithm's Schedule25 software. For more information about the interface between Universal Algorithm's Schedule25 software and PeopleSoft Campus Solutions, see your Schedule25 documentation. |
| Enrollment Capacity |
The system populates the enrollment capacity by default from the default section size on the Course Catalog - Components page. |
| Wait List Capacity |
Enter the wait list capacity for the section to indicate the maximum number of students you want to allow to wait list for the class. |
| Minimum Enrollment Nbr (minimum enrollment number) |
Enter the minimum enrollment number in order for the section to be offered. If the minimum enrollment number is not realized you might decide to cancel the section. This field is for informational purposes only. |
| Total |
The system displays the current total of students enrolled and on the wait list for the section. |
| Combined Section |
Click to access the Combined Section Detail page, where you can view all of the classes in the combined section. This link only appears for combined classes. Note: After you combine classes, you must perform updates to meeting pattern and instructor information through the Schedule Class Meetings - Meetings page. Within the Schedule of Classes and Schedule New Course components, the facility/meeting pattern and instructor information is unavailable for entry for combined sections. |
Access the Reserve Cap page ().
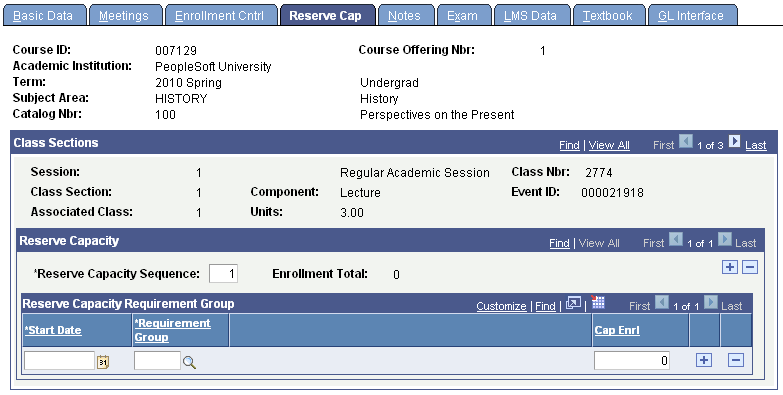
Image: Schedule of Classes – Reserve Cap page
This example illustrates the fields and controls on the Schedule of Classes – Reserve Cap page. You can find definitions for the fields and controls later on this page.
|
Field or Control |
Definition |
|---|---|
| Reserve Capacity Sequence |
The system creates the reserve capacity sequence number indicating the order in which it evaluates the sets of requirement groups during enrollment. You can change this number. If you want to set up more than one requirement group for more than one start date, you must set up each one under its own sequence number. This is important to note because the system does not combine total cap enrollment values within the same reserve capacity sequence. Instead, the system selects and uses only one requirement group per reserve capacity sequence—the one that has the most current effective date. |
| Enrollment Total |
The total number of students enrolled as part of the reserve capacity sequence. |
| Start Date and Requirement Group |
Enter the effective date for your reserve capacity. This date determines when the enrollment capacity requirement group becomes active. If you enter a subsequent row within the same reserve capacity sequence number, the system references the row with the current effective date and this row overrides all others within the sequence. Select the requirement group for the reserve capacity. Values for requirement groups are defined through the Enrollment Requirement Group component. Students who attempt to enroll in the class and who satisfy the reserve capacity requirement group that you specify can enroll in the class up to the Cap Enrl value, (as long as the enrollment does not exceed the total enrollment capacity that you specify on the Enrollment Control page). In order to set various enrollment capacities, or to discontinue the reserve capacity as of a certain date, you can add rows for the same requirement group with a later effective date. For example, if you want to change a reserve capacity for a class on a specific date, you can add a second row to the sequence with a Start Date value equal to the expiration date, and enter a new enrollment capacity for the row. You can also use this method to expire reserve capacities (instead of deleting the reserve capacity sequence and losing your historical data). Under the same reserve capacity sequence, insert a new effective-dated row with the date that you want the reserve capacity to expire, then enter the same requirement group number and set the enrollment capacity to 0. Warning! If you expire (set to O) the Cap Enrl field value for any reserve capacity sequence row within the section, the system inactivates all reserve capacity sequence values for the section. |
| Cap Enrl (capacity enrollment) |
The maximum number of seats that you want to reserve for students who satisfy the requirement group parameters. The system combines the values of the most recent row of each requirement group. The system does not combine this value with other capacity enrollment values within the same sequence number unless the requirement group is different. Otherwise, the system only combines the most current row for each reserve capacity sequence. |
Access the Schedule of Classes - Notes page ().
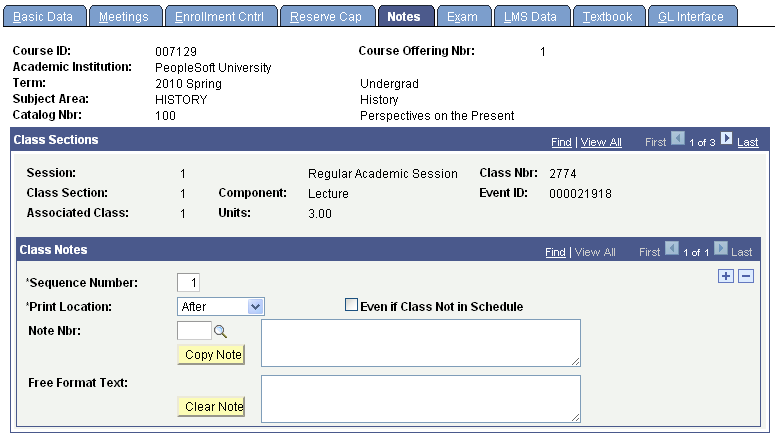
Image: Schedule of Classes - Notes page
This example illustrates the fields and controls on the Schedule of Classes - Notes page. You can find definitions for the fields and controls later on this page.
|
Field or Control |
Definition |
|---|---|
| Sequence Number |
The system creates a class notes sequence number. The number determines the display order of the class notes for a section if multiple notes exist. You can override this number. |
| Print Location |
Enter the print location of the note, either Before the class listing, or After it. |
| Even if Class Not in Schedule |
This check box has no programming tied to it. |
| Note Number |
Enter a note number to reference a preexisting note. The note's description appears adjacent to the note number. Note number values are defined on the Class Notes Table page. |
| Free Format Text |
Enter a free format text note. |
| Copy Note |
Click to copy the note number text to the free format text. The note can then be modified to accommodate the class section. This eliminates the note number and note text. |
| Clear Note |
Click to clear the free format text. |
Access the Exam page ().
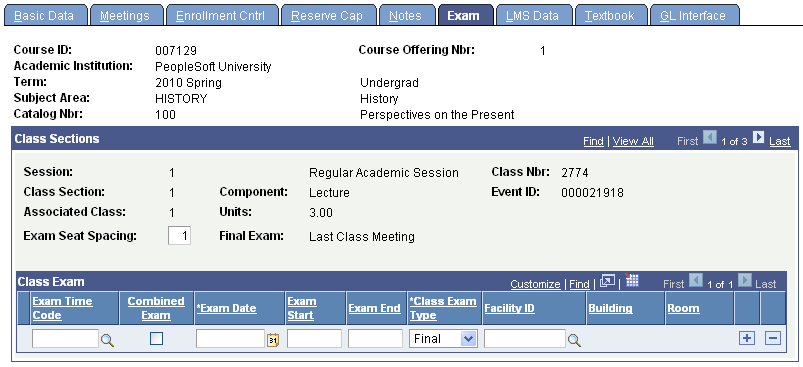
Image: Schedule of Classes – Exam page
This example illustrates the fields and controls on the Schedule of Classes – Exam page. You can find definitions for the fields and controls later on this page.
|
Field or Control |
Definition |
|---|---|
| Exam Seat Spacing |
If you indicate that a final exam will occur on the Course Catalog - Components page, the system populates the Exam Seat Spacing field by default from that page. It indicates the number of seats between students during the final exam and is for informational purposes only. You can override this number. |
| Exam Time Code |
By entering a predefined exam time code, you save yourself some data entry time for the exam date, time, and facility values. Exam time values are defined on the Exam Code Table page. |
| Combined Exam |
Select to indicate that this exam can share a facility with another exam. Note: Time and facility conflicts with other events, such as regular class meetings, are not permitted—the system performs conflict checking for these. If you do not select the Combined Exam check box, the system verifies that no conflicts exist in room and time period scheduling. The stated room and time period is used for only one class exam. |
| Exam Date, Exam Start, Exam End, Class Exam Type, and Facility ID |
If you do not select an exam time code, you can enter values in the Exam Date, Exam Start, Exam End, Class Exam Type, and Facility ID fields. The system performs facility conflict checking when you save the page. |
Access the LMS Data page ().
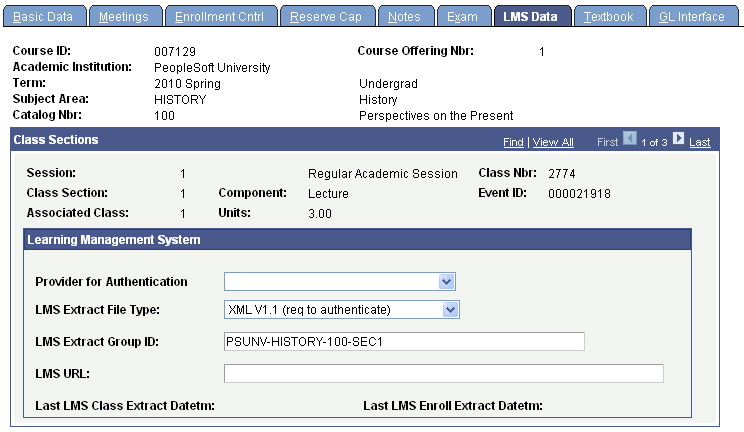
Image: Schedule of Classes – LMS Data page
This example illustrates the fields and controls on the Schedule of Classes – LMS Data page. You can find definitions for the fields and controls later on this page.
|
Field or Control |
Definition |
|---|---|
| Provider for Authentication |
If your institution utilizes the learning management systems feature with self-service user authentication, enter the LMS Authentication Provider. The provider for authentication appears by default according to the provider assigned on the Components page in the Course Catalog component. For instances in which the Components page has no Provider for Authentication, the system uses the setting on the Academic Institution 3 page. The LMS Authentication is designed to be used with the XML V1.1 LMS Extract File Type. Providers are defined on LMS Provider Setup page. PeopleSoft Campus Self Service provides a direct link for enrolled students and the instructor to the third-party web site for classes assigned an LMS Authentication Provider. |
| LMS Extract File Type (learning management system file type) |
If your institution utilizes the learning management systems feature, enter the LMS file type that you use as your interface. The file type defaults according to the LMS file type on the Course Catalog - Components page. In instances where the Course Catalog - Components page has no LMS File Type, the system uses the setting on the Academic Institution 3 page. Values are XML V1.1, Blackboard CourseInfo 4, and API Input Format. WebCT Campus Edition and Vista both support XML V1.1. |
| LMS Extract Group ID (learning management system group ID) |
When you select an LMS file type, the LMS Group ID field populates automatically to academic institution, subject area, catalog number, and section number. For the XML file type, values are separated by dashes, such as TERM-INSTITUTION-SUBJECT-CATALOG NBR-SEC#. For authentication to work as designed, do not edit this entry. For XML extracts, at runtime, the system always appends "term-" to the beginning of the string and -"class number" at the end of the string. |
| LMS URL (learning management system URL) |
If you are using a provider for authentication, do not enter an LMS URL. If you do not want to use LMS authentication, but want to link students enrolled in a class to a designated URL such as an instructor's website, you can specify the website in the LMS URL field. The URL must be preceded by the http:// designation. |
| Last LMS Class Extract Datetm (class extract date/time) |
This field is empty when you first schedule a class, and it automatically populates with a date and time when you extract class data. In addition, the LMS extract process uses this field to distinguish between Snapshot and Update data. Presence of this date means that a class is "ignored" by the extract process if run in update mode and the record is not new or no changes to the class have taken place. No date means that the class is extracted for the LMS update extract and the date is updated to the run date. |
| Last LMS Enrol Extract Datetm (enrollment extract date/time) |
This field is empty when you first schedule a class, and it automatically populates with a date and time value when you extract membership data. In addition, the LMS extract process uses this field to distinguish between Snapshot and Update data. Presence of this date means that enrollment data is "ignored" by the extract process if run in update mode, and the record is not new or no changes have taken place to enrollment status, grading basis, or grade. No date means that enrollment data is extracted for the LMS update extract and the date is updated to the run date. |
Note: Currently, the system passes all classes individually to the LMS at the component level, including those that comprise a combined section. Combined section data is provided within the XML extract.
Access the Schedule of Classes – Textbook page ().
Image: Schedule of Classes – Textbook page
This example illustrates the fields and controls on the Schedule of Classes – Textbook page. You can find definitions for the fields and controls later on this page.
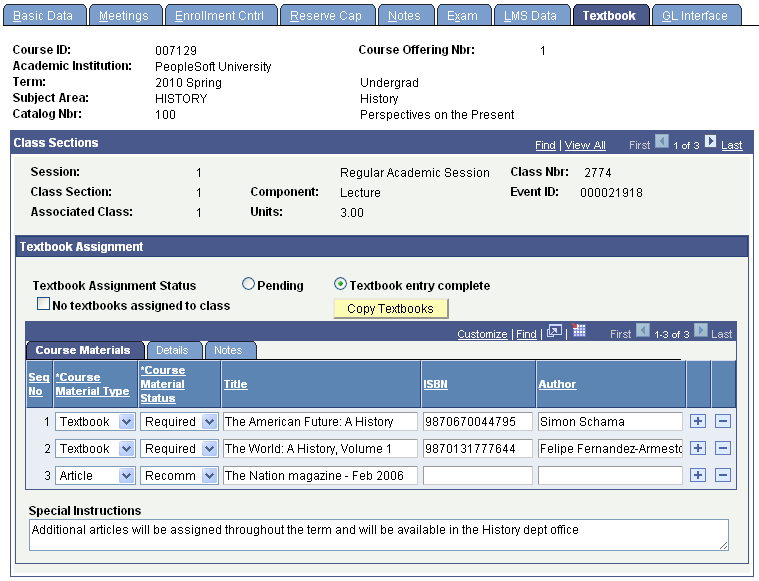
Note: Course materials entered on this page appear on the Class Detail page and on the Faculty and Student Textbook Summary pages. When the Textbook Assignment Status is Pending, the data is available only on administrative, Instructor and Advisor pages. Students and visitors receive a message: Textbooks to be determined. When the Textbook Assignment Status is Textbook entry complete, the data is then available to students and visitors.
|
Field or Control |
Definition |
|---|---|
| Textbook Assignment Status |
Select Pending to indicate that the textbook data that you are entering for the class is not final. The system displays pending textbook information to administrators, instructors and advisors only. Students and visitors cannot view pending textbook information. They receive a message: Textbooks to be determined. Pending is selected by default. Select Textbook entry complete after you complete entering textbook assignments. This option indicates that the textbook data is final. When you select this option, the textbook data is available to all users, including students and visitors. |
| No textbooks assigned to class |
Select this check box if no textbooks are to be assigned to the class section, for example, no textbooks are required for MUSIC 398, Individual Instruction. The Textbook Assignment Status must be set to Textbook entry complete, in order for students to view the message: No textbooks required for this class. |
| Copy Textbooks |
Click this button to copy the textbook and special instructions from another class to the current class. The copied assignments replace any existing assignments and special instructions for the current class. |
Course Materials
Select the Course Materials tab (view this tab in the previous example of the Textbook page.
|
Field or Control |
Definition |
|---|---|
| Course Material Type |
For each course material assignment, enter the course material type. Valid values are defined on the Course Material Type table. Examples include textbook, article, and other course materials. |
| Course Material Status |
Enter the course material status. Values for this field are delivered with your system as translate values. The values are Required and Recommended. You can modify these values. |
| ISBN |
No edits are performed on the ISBN field. |
Details
Select the Details tab.
Image: Schedule of Classes – Textbook page: Details tab
This example illustrates the fields and controls on the Schedule of Classes – Textbook page: Details tab. You can find definitions for the fields and controls later on this page.

The values in the Course Material Type, Course Material Status, and Title fields are carried forward from the Course Materials tab.
|
Field or Control |
Definition |
|---|---|
| Year Published |
Enter the year that the course material edition was published. |
| Price |
Enter the recommended retail price. |
| Currency Code |
Enter the currency code. The base currency code defined on the Installation Table (Set Up HRMS, Install, Installation Table, HRMS) Options tab is selected by default. |
Notes
Select the Notes tab.
Image: Schedule of Classes – Textbook page: Notes tab
This example illustrates the fields and controls on the Schedule of Classes – Textbook page: Notes tab. You can find definitions for the fields and controls later on this page.
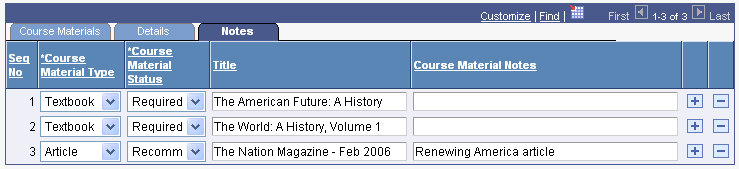
The values in the Course Material Type, Course Material Status, and Title fields are carried forward from the Course Materials tab.
Access the GL Interface page ().
Image: Schedule of Classes - GL Interface page
This example illustrates the fields and controls on the Schedule of Classes - GL Interface page. You can find definitions for the fields and controls later on this page.
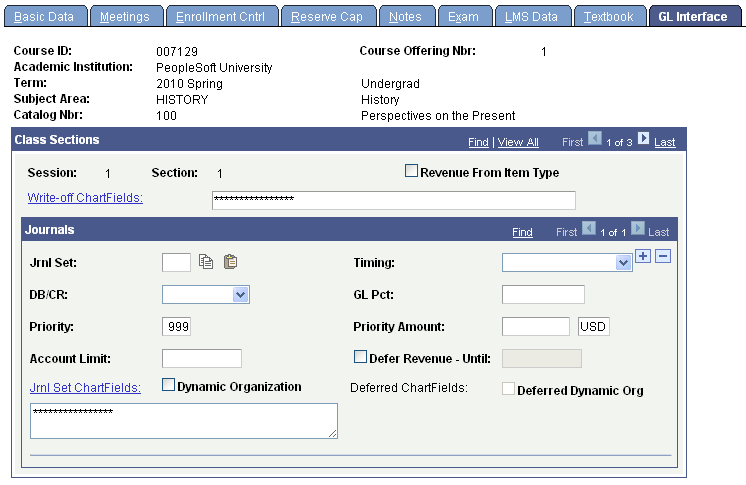
On this page, next to the Jrnl Set field, copy and paste icons are available. Use the copy icon to copy the setup for the row, which can then be pasted to the new, or any proceeding row.
|
Field or Control |
Definition |
|---|---|
| Revenue From Item Type |
Select if you do not want to track revenue by class. The system will allocate revenue based on the credit entry defined for the tuition item type. In this case, you do not populate ChartField information. The system automatically tracks receivables for a class based on the debit entry defined for the tuition item type (on the Item Types - GL Interface page). If you want to track revenue by class, you must select the GL Interface Required check box on Schedule of Classes - Basic Data page and then enter a credit entry for the class by completing the ChartFields on this page. |
| Jrnl Set ChartFields (journal set ChartFields) |
Click the link to enter additional information on the Journal Set ChartFields page. |
To input all areas for the ChartFields, abbreviated display fields have been added. The number of delimiters displayed is based on the number of ChartFields.
The abbreviated display fields are used to view the ChartField set up as a string, add or update the ChartField string. All ChartField edits set up on the SF Installation page are adhered to within the display field.