3.3 Configuring a Connector Instance
To configure the connector, follow these steps:
- As Super Administrator from the Enterprise Manager Setup menu, select Extensibility, and then select Management Connectors. The Management Connectors page appears and lists all created connector instances.
Note:
The status column with a green check mark indicates that the connector is already configured. The pink wrench icon indicates that the connector is not yet configured.
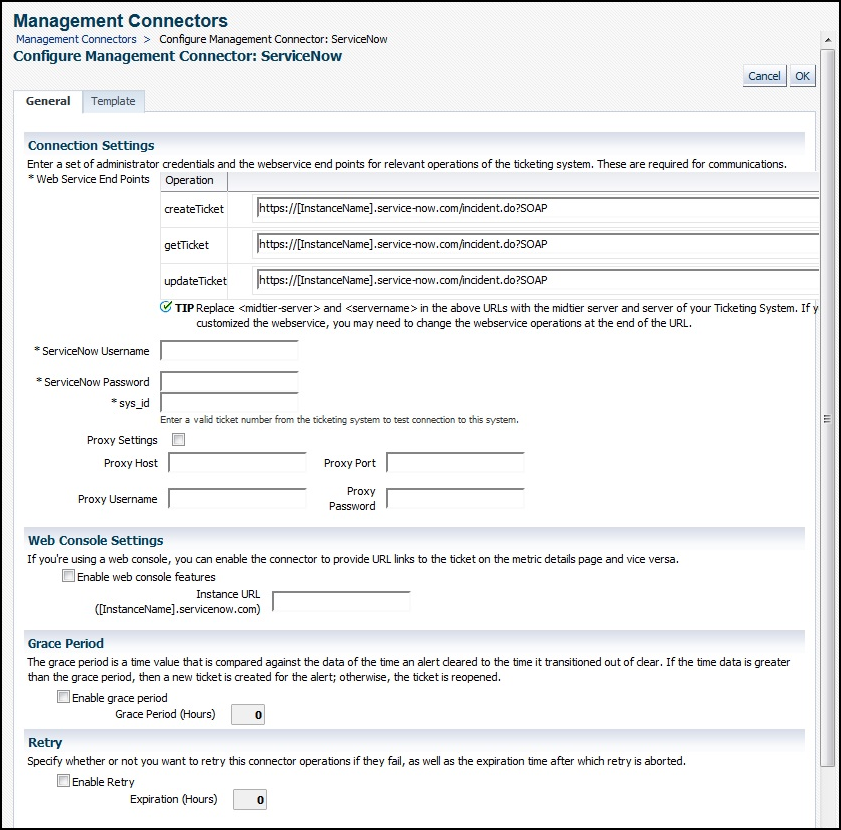
- Click the name of the connector you want to configure. The General tab of the Configure Management Connector page appears as shown in Figure 3-6:
Figure 3-6 Configure ServiceNow Connector

- Provide the required settings as described below, then click OK:
-
Connection Settings
Web Service End Points - URL of the web service end-point to call for the
createTicket,updateTicket, andgetTicketoperations. The ServiceNow web service URL is formatted as shown below:https://[InstanceName].service-now.com
In most cases, you will just need to replace
[InstanceName]with the host name or IP address of the server where the web service is located.ServiceNow Username - Specify the user name supported by the ServiceNow web services. This user name must have the appropriate privileges/roles in ServiceNow (see Table 5-1 for details) to create, update, and query tickets in ServiceNow. All tickets created through the connector are generated with this user account.
Note:
It is recommended to use a service account for the ServiceNow Connector operations.
ServiceNow Password - Specify the password associated with the user specified in the ServiceNow Username field.
sys_id - Enter a
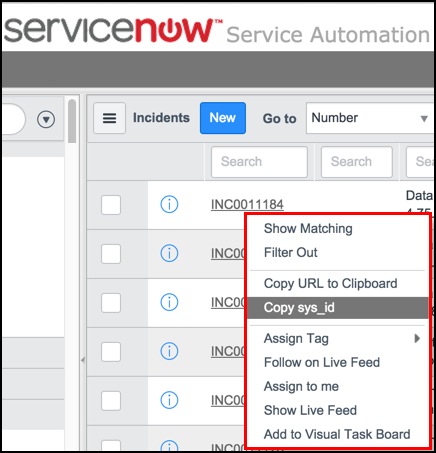
sys_idnumber to test the connection when you save the configuration. A validsys_idcan be obtained by right clicking on any open ServiceNow incident and selecting Copy sys_id, as shown in Figure 3-7:Note:
The
sys_idis the unique record identifier in ServiceNow. More information about thesys_idcan be found at:http://wiki.servicenow.com/index.php?title=Unique_Record_Identifier#gsc.tab=0
Figure 3-7 Select "Copy sys_id"

-
Proxy Settings
If your enterprise requires a proxy server for all communication between Enterprise Manager and ServiceNow, check the Proxy Settings check box to enable the proxy fields and specify the following proxy server settings:
Proxy Host - The host name of the proxy server.
Proxy Port - The port number of the proxy server.
Specify the following proxy credential fields if required by your proxy server.
Proxy Name - The user name to specify when calling the proxy server.
Proxy Password - The password to specify when calling the proxy server.
-
Web Console Settings
Note:
Web Console settings are required if you want the Connector to provide links to ServiceNow tickets created by Enterprise Manager in the context of an incident.
To enable this functionality, provide the following Web console settings:
Enable web console - Check this box to enable launching of the ServiceNow ticket page within context from Enterprise Manager.
Instance URL - Specifies Web server information the connector uses to connect to the ServiceNow web service when accessing incidents in ServiceNow. Use the format shown in the example URL in Web Console Settings and replace
[InstanceName]with the name of your instance. If your ServiceNow instance is configured with a web proxy, then enter the proxy URL. -
Grace Period
You can enable and disable the grace period and configure its value. By default, the grace period is disabled.
This setting applies to all incidents the ServiceNow processes. The grace period interval accepts the number of hours as any integer value. For example, 1 or 2.
For more information on this setting, see Grace Period Setting.
-
Retry
You can enable and disable the Retry option and configure its interval value. By default, the Retry is disabled.
This setting applies to all incidents the ServiceNow Connector processes. The retry period interval accepts the number of hours as any integer value. For example, 1 or 2.
For more information on this setting, see Retry.
After entering the settings and clicking OK, the Management Connectors page reappears. The row for the ServiceNow Connector should have a check mark in the Configured column.
-
If you specify the correct web service end-points and enter a valid
sys_id, the following message appears on the Management Connectors page after you click OK:Connection test succeeded. The configuration was saved.
-
If you have not previously saved the connector configuration and enter incorrect web service endpoints or an invalid
sys_id, the following message appears on the Management Connectors page after you click OK:Connection test failed. The configuration was saved.
-
If you have previously saved the connector configuration and enter incorrect Web service endpoints or an invalid
sys_id, the following message appears on the Management Connectors page after you click OK:Connection test failed. The configuration was not saved.
Note:
Refer to Troubleshooting the ServiceNow Connector for details on troubleshooting connection test failures.
-
- Optionally, to verify that all three ticket templates are present, click the configure icon again to check for the available ticket templates. Click the Ticket Templates tab. All out-of-box ticket templates should appear in the table.