6 Returning Oracle Database Appliance to Operation
This chapter describes how to return Oracle Database Appliance to operation after you have performed service procedures. It includes:
-
Returning Oracle Database Appliance X6-2 Series to Operation
-
Returning Oracle Database Appliance X3-2/X4-2/X5-2 to Operation
-
Powering On an Oracle Database Appliance That Includes a Storage Shelf
-
Returning Oracle Database Appliance (Original Version) to Operation
Returning Oracle Database Appliance X6-2 Series to Operation
This section describes returning Oracle Database Appliance X6-2S/X6-2M to operation after servicing. If you have Oracle Database Appliance X3-2, Oracle Database Appliance X4-2, or Oracle Database Appliance X5-2, go to Returning Oracle Database Appliance X3-2/X4-2/X5-2 to Operation. If you have Oracle Database Appliance (original version), go to Returning Oracle Database Appliance (Original Version) to Operation.
Note:
The links in the following table take you to instructions outside of the Oracle Database Appliance library to the Oracle Server X6-2 documentation library. Use your browser's Back button to return to the Oracle Database Appliance library.| Oracle Database Appliance X6-2S | Oracle Database Appliance X6-2M |
|---|---|
Returning Oracle Database Appliance X3-2/X4-2/X5-2 to Operation
This section describes returning Oracle Database Appliance X3-2, Oracle Database Appliance X4-2, or Oracle Database Appliance X5-2 to operation after servicing. If you have Oracle Database Appliance X6-2 series, go to Returning Oracle Database Appliance X6-2 Series to Operation. If you have Oracle Database Appliance (original version), go to Returning Oracle Database Appliance (Original Version) to Operation.
Note:
The links in the following table take you to instructions outside of the Oracle Database Appliance library to the Sun Server X3-2, Sun Server X4-2 and Oracle Server X5-2 documentation libraries. Use your browser's Back button to return to the Oracle Database Appliance library.| Oracle Database Appliance X3-2 | Oracle Database Appliance X4-2 | Oracle Database Appliance X5-2 |
|---|---|---|
Powering On an Oracle Database Appliance That Includes a Storage Shelf
This section describes how to restore power after servicing an Oracle Database Appliance that includes at least one storage shelf (DE2-24P, DE2-24C). If you have an Oracle Database Appliance X6-2S/X6-2M or Oracle Database Appliance (original version), your system does not support a storage shelf and you should skip this section.
If you haven't already, return the Oracle Database Appliance to operational status. If you have Oracle Database X3-2, Oracle Database Appliance X4-2, or Oracle Database Appliance X5-2, go to Returning Oracle Database Appliance X3-2/X4-2/X5-2 to Operation.
When powering on the system, each server node is powered on separately.
Power On Procedure
Perform the following procedure to power on the Oracle Database Appliance.
- If you powered off and disconnected the power cords from a storage shelf (and storage expansion shelf if one is present), reconnect the power cords now.
- Power on the storage shelf (and storage expansion shelf if one is present) by switching the power supply On/Off button on each power supply to the On position.
The disks begin to initialize and the power supply LEDs light green. This can take several minutes.
Note:
Do not power on the server nodes until the disks on the storage shelf and storage expansion shelf have initialized. - If you powered off a server node, reconnect any unplugged power cords.
- Power on a server node on using one of the following methods:
-
Press the recessed Power button on the server node front panel.
-
Log in to the Oracle ILOM web interface, click Host Management > Power Control, and select Power On from the Select Action list box.
-
Log in to the Oracle ILOM command-line interface (CLI), and type the following command at the Oracle ILOM CLI prompt.
-> start /SYS
When the server is powered on and the power-on self-test (POST) code checkpoint tests have completed, the green Power/OK status indicator on the server node front panel lights and remains lit.
Note:
If you powered off both server nodes prior to servicing, repeat steps 3 and 4 to power on the second server node. -
- Refer to the Getting Started Guide and Administration and Reference Guide for any instructions or commands required to return the appliance to service.
Returning Oracle Database Appliance (Original Version) to Operation
This section describes returning Oracle Database Appliance (original version) to operation after servicing. If you have Oracle Database Appliance X6-2 series, go to Returning Oracle Database Appliance X6-2 Series to Operation. If you have Oracle Database Appliance X3-2, Oracle Database Appliance X4-2, or Oracle Database Appliance X5-2, go to Returning Oracle Database Appliance X3-2/X4-2/X5-2 to Operation.
Installing the Server Node Top Cover
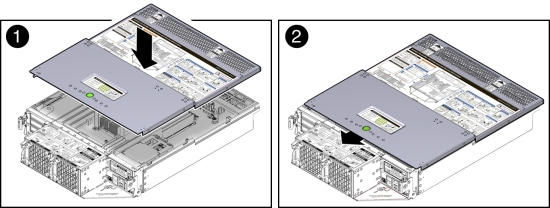
If you removed the top cover from an Oracle Database Appliance (original version) server node, perform the following procedure to replace it.
Caution:
Hazardous voltage present. Do not run the system with the top cover removed.Caution:
Equipment damage. Install the top cover properly before starting the system.Install Server Node Top Cover
- Place the top cover down on the server node so that it hangs over the front of the chassis by 0.5 inches (12.7 mm).
- Ensure that all six of the standoffs on the underside of the cover
(three on each side) fit into the slots on the top of the chassis side walls.
When the top cover is positioned (as described in previous step), the six standoffs on the underside of the cover fit into the slots in the top of the chassis sidewalls.

- Slide the top cover toward the rear of the server node until it seats [2].
Installing a Server Node Into the System Chassis
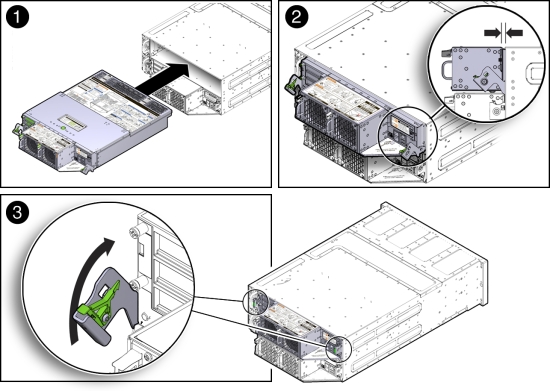
If you removed a Oracle Database Appliance (original version) server node from the chassis, perform the following procedure to reinstall it.
Install Server Node Into System Chassis
Note:
Replacing a server node FRU with a new server node is a service activity that must be performed by an Oracle-qualified service technician. The customer may remove the server node to service other customer serviceable components in the server node.- Before inserting the server node into the system chassis, ensure
that both release latches on the rear of the server node are in the open position.

- Slide the server node into the rear of the system chassis until the bottom lips of the release latches touch the chassis [2].
- To re-seat the server node in the system chassis, grasp both release
latches, one on each side of the server node, and push them upward simultaneously
to the closed position [3].
Caution:
Equipment damage. Always use the release latches to re-seat the server node into the system chassis as described in this procedure. Failure to do so might damage the connectors on the front of the server node and/or the connectors on the disk midplane module. - Reinstall the system chassis into the rack.
Follow the instructions listed in the "Inserting Oracle Database Appliance (Original Version) Into a Rack" section in the Oracle Database Appliance Owner's Guide.
Powering On Oracle Database Appliance (Original Version)
To power on Oracle Database Appliance (original version), follow this procedure.
Each server node is powered on separately.
Note:
To use Oracle ILOM to power on a server node, ensure that you have performed its initial configuration as described in "Connecting and Configuring Oracle ILOM" in the Oracle Database Appliance Getting Started Guide.Power On Oracle Database Appliance (Original Version)
- Ensure that the power cord (or cords) are connected to the power supplies on the rear of the
server node that was serviced.
Once plugged in, the server node goes into the standby power state. The SP status LED on the front panel of the server node lights green and goes from slow blink to steady on. The Power/OK LED on the front panel of the server node lights green and goes to standby blink. It might take about five minutes for the LED to reach standby blink after the power cord is inserted.
For the location of the SP status LED and Power/OK LED, see Server Node Status Indicators.
Standby power state indicates that the server node's service processor is active, but the server node host is powered off.
- Power on a server node by performing one of the following:
If you powered off a single server node without shutting down the appliance, perform this step only for that server node. If you shut down the appliance completely, then perform this step for both server nodes.
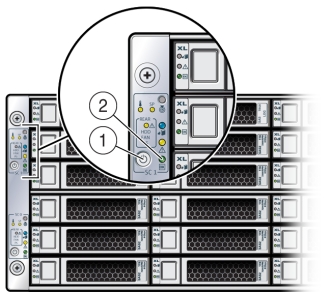
- Using the server node's Power button: Momentarily press and release the recessed Power button on the front panel [1].

On the server node, the green Power/OK LED [2] blinks while the server node is booting, and remains steady on when the server node is operational.
- Using the Oracle ILOM web interface:
- Open a browser and enter the server node's service processor IP address in the browser's address field.
- At the log in page, type a user name (the account must have Reset and Host Control (r) privileges) and password, and click the Log In button.
- Go to Remote Power Control and select Power On from the
Select Action list box and then click Save and OK.
On the server node, the green Power/OK LED [2] blinks while the server node is booting, and remains steady on when the server node is operational.
- Using the Oracle ILOM CLI:
- Log in to Oracle ILOM using an ssh client. Type:
$ssh username@sp_ip_address
Where username is a user account name with Reset and Host Control (r) privileges and sp_ip_address is the IP address of the server node service processor.
- When prompted, enter the user account password.
- Enter the command to power on the server node:
-> start /SYS
On the server node, the green Power/OK LED [2] blinks while the server node is booting, and remains steady on when the server node is operational.
- Log in to Oracle ILOM using an ssh client. Type:
- Using the server node's Power button: Momentarily press and release the recessed Power button on the front panel [1].