Getting Started with JavaFX Scene Builder 1.1
2 Open the Sample FXML File
This chapter shows you how to open the IssueTrackingLite.fxml sample file in a JavaFX Scene Builder window using the NetBeans IDE Open command or using the Scene Builder Open command.
After you have familiarized yourself with the JavaFX concepts and the JavaFX Scene Builder user interface, begin building an FXML layout using JavaFX Scene Builder. Open the completed IssueTrackingLite.fxml file to see what the finished IssueTrackingLite layout looks like. Use one of the following methods:
-
Step through Use NetBeans IDE Projects Window to open the IssueTrackingLite sample NetBeans project and double-click the node for the IssueTrackingLite.fxml file to invoke JavaFX Scene Builder.
-
Follow Use JavaFX Scene Builder Open Command to open the
IssueTrackingLite.fxmlsample file.
The controller source file and the Cascading Style Sheet (CSS) file used in this tutorial are already provided with the IssueTrackingLite sample NetBeans project. These files are in the same project folder that will contain the new FXML file.
Use NetBeans IDE Projects Window
Open the completed IssueTrackingLite.fxml sample layout file using NetBeans IDE's Projects window:
-
Start NetBeans IDE on your Windows platform by double-clicking the NetBeans IDE 7.4 shortcut, or select Start, then All Programs, then NetBeans, and finally, NetBeans IDE 7.4. On a Mac OS X platform, double-click the NetBeans IDE 7.4 application icon.
-
From the Menu bar, choose File and then Open Project.
-
From the Open Project dialog box, go to the directory where you extracted the IssueTrackingLite.zip file and open the IssueTrackingLite project.
-
In the Projects window, expand the IssueTrackingLite, Source Packages, and issuetrackinglite nodes. Double-click the IssueTrackingLite.fxml node to open the file in Scene Builder.
Note:
If the
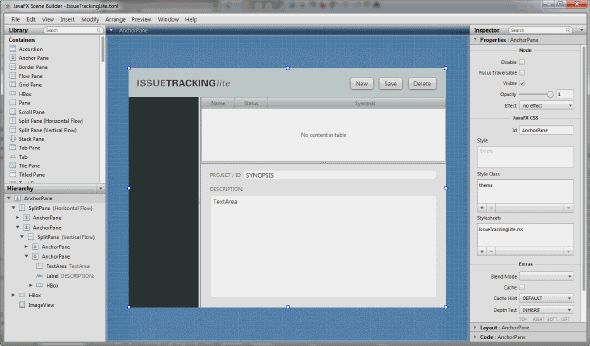
IssueTrackingLite.fxmlfile opens in the IDE source editor instead of in a Scene Builder window, it may mean that the IDE is not aware of your Scene Builder installation. To verify, choose Tools from the NetBeans IDE main menu and then Options. In the Options window, click the Java tab and then the JavaFX tab. The Scene Builder Home directory would be listed if NetBeans is aware of your Scene Builder installation. If it is not listed, see Prepare for This Tutorial chapter for the requirements before continuing with this tutorial.The main window for the JavaFX Scene Builder tool appears with the IssueTrackingLite.fxml file opened in the Content panel, as shown in Figure 2-1.
Figure 2-1 Completed IssueTrackingLite.fxml Opened in JavaFX Scene Builder Window (Click image to enlarge.)

Description of "Figure 2-1 Completed IssueTrackingLite.fxml Opened in JavaFX Scene Builder Window"
-
Save the file with a different name so that you can create your own FXML layout file. From the Menu bar, choose File and then Save As. Enter
IssueTrackingLiteComplete.fxmlin the File Name text field and click Save. Keep the JavaFX Scene Builder window for this file open so that you can use it to compare with the version of the layout you are about to create. -
In the Projects window of the IDE, right-click the node for the IssueTrackingLite.fxml file and select Delete so that you can use the same file name for the FXML layout you will build. On the Confirm Object Deletion dialog box, click Yes.
Use JavaFX Scene Builder Open Command
Open the completed sample FXML file directly from the JavaFX Scene Builder window.
-
Start JavaFX Scene Builder on your Windows platform by double-clicking the JavaFX Scene Builder 1.1 shortcut, or select Start, then All Programs, then JavaFX Scene Builder, and finally, JavaFX Scene Builder 1.1. On a Mac OS X platform, double-click the JavaFX Scene Builder 1.1 application icon.
-
From the Menu bar, choose File and then Open.
-
From the Open FXML dialog box, go to the folder in which you extracted the
IssueTrackingLite.zipfile and open the IssueTrackingLite, src, and issuetrackinglite folders. -
Double-click the IssueTrackingLite.fxml file.
The IssueTrackingLite.fxml file is opened in the Content panel, as shown in Figure 2-1.
-
Save the file with a different name so that you can create your own FXML layout file using the original file name.
-
From the Menu bar, choose File and then Save As.
-
Enter
IssueTrackingLiteComplete.fxmlin the File Name text field and click Save.
-
 Cindy is a technical writer in the JavaFX group.
She has written tutorials, online help, and technical articles for Java and JavaFX technologies.
  Yves is a member of the JavaFX Scene Builder development team. He enjoys creating tutorials to help users quickly learn and adopt developer tools, such as the JavaFX Scene Builder.
