Using JavaFX Scene Builder with Java IDEs
1 Using Scene Builder with NetBeans IDE
This chapter describes how to download and install NetBeans IDE, use it to create a new JavaFX FXML project, start Scene Builder from within the IDE, and run Scene Builder sample applications.
The integration of JavaFX Scene Builder with NetBeans IDE provides optimal development workflow. It is assumed that you have already installed Scene Builder before continuing with the rest of this chapter. Go to the JavaFX Scene Builder Installation Guide for installation information.
Downloading and Installing NetBeans IDE
Go to http://netbeans.org/downloads for the latest NetBeans IDE 7.4 download and installation information.
Creating a New JavaFX FXML Project
In NetBeans IDE, you use the New wizard to create a new JavaFX FXML Application, which is a JavaFX project that is based on an FXML layout. After the project is created, you can edit the FXML file using Scene Builder.
-
From the NetBeans IDE Main menu, select File, and then choose New Project.
-
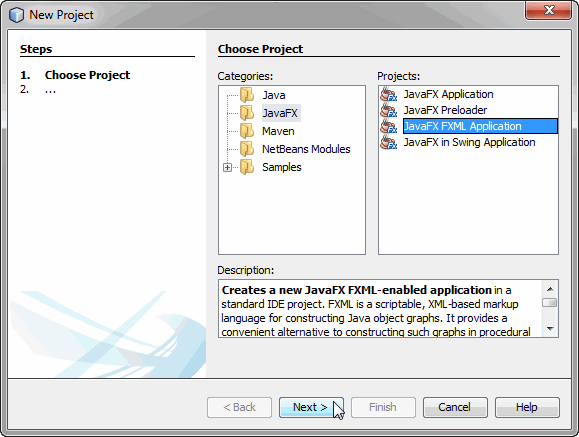
In the New Project dialog box, choose the JavaFX category and JavaFX FXML Application project, as shown in Figure 1-1. Click Next.
Figure 1-1 Create New JavaFX FXML Application Project
Description of "Figure 1-1 Create New JavaFX FXML Application Project"
-
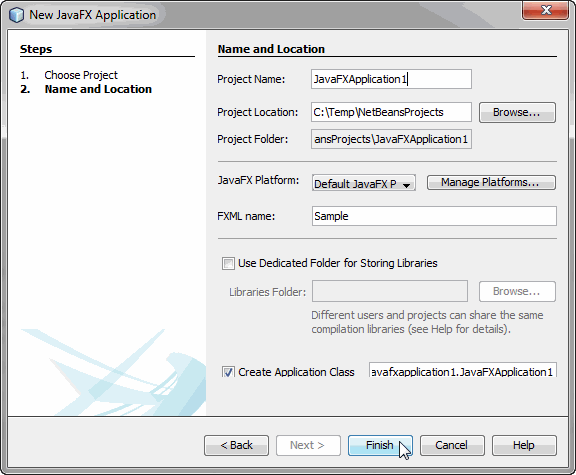
In the New JavaFX Application dialog box, enter the values you would like to use for the project name, project location, and FXML file name. Click Finish to complete the project creation. Figure 1-2 gives an example with sample values.
Figure 1-2 Set the Name and Location of the New JavaFX Application
Description of "Figure 1-2 Set the Name and Location of the New JavaFX Application"
The IDE's Projects window is updated with the new JavaFX application you just created.
Starting Scene Builder from NetBeans IDE
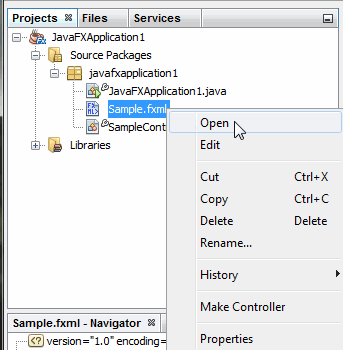
As shown in Figure 1-3, you can either choose Open to edit the FXML file with the Scene Builder tool or choose Edit to edit the FXML file with the Netbeans FXML editor.
Figure 1-3 Open FXML File from NetBeans IDE
Description of "Figure 1-3 Open FXML File from NetBeans IDE"
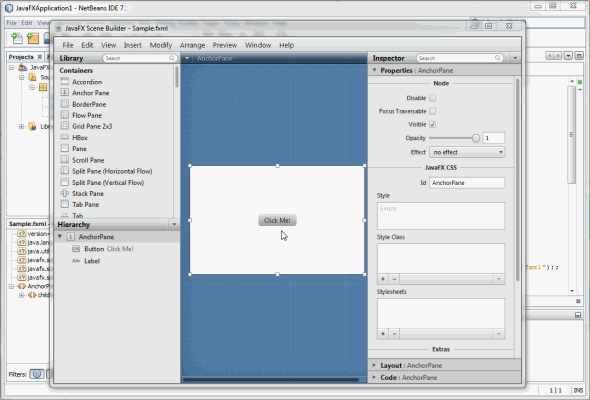
When you right-click the node for the FXML file and choose Open, then NetBeans IDE automatically locates the latest installed Scene Builder on your system and the Scene Builder window appears on top of the Netbeans window, as shown in Figure 1-4.
If you want to use a different installation of Scene Builder or if NetBeans cannot locate the installed Scene Builder, use the following steps to set the location of the Scene Builder installation you would like to use with NetBeans IDE.
-
From the Main menu, select Tools and choose Options.
On the Mac OS platform, select NetBeans and choose Preferences from the Main menu. -
In the Options window, click Java and then the JavaFX tab.
-
Specify the location of the Scene Builder installation folder and then click OK.
Figure 1-4 Open FXML File in Scene Builder (Click image to enlarge.)
Description of "Figure 1-4 Open FXML File in Scene Builder"
To open the FXML file in the NetBeans FXML editor, from the File menu, right-click the file's node and choose Edit. The FXML source file contents are shown in the IDE's source editor window, as shown in Figure 1-5.
Figure 1-5 Open FXML File in NetBeans FXML Editor
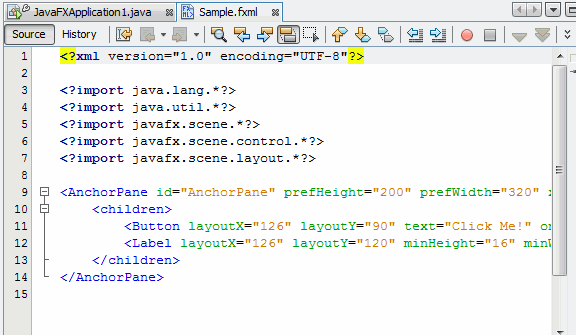
Description of "Figure 1-5 Open FXML File in NetBeans FXML Editor "
Synchronizing With the Controller Source Code
The NetBeans IDE's Make Controller feature allows you to synchronize the modifications you make in the FXML file that is currently opened in Scene Builder and the controller source code opened in NetBeans IDE. To illustrate this feature, do the following:
-
In Scene Builder, drag a Button control from the Library panel to the Control panel.
-
In the Code panel, assign a new value for the new button's
fx:idfield and a new method name for theonActionmethod. -
Select File in the main menu and then Save.
-
In NetBeans IDE 7.4 or later, right click the project node for the FXML file that you just edited and select Edit from the contextual menu.
-
From the main menu, select Source and then Make Controller.
The @FXML private variable and the new onAction method for the button you just added in Scene Builder are created in the controller source file. Use the Make Controller command if you delete an element in the Control panel or update anfx:idvalue or a method name in Scene Builder.
Where to Go From Here
Now that you are familiar with the integration between the Scene Builder tool and NetBeans IDE, look at JavaFX Scene Builder User Guide to learn more about the available Scene Builder features. Use the steps described in Getting Started with JavaFX Scene Builder to create a simple issue tracking application.
You can also try the sample applications provided with the Scene Builder release. These samples are Netbeans projects, which means they can be compiled and ran directly after being opened in the NetBeans IDE. You can download the Scene Builder samples from http://www.oracle.com/technetwork/java/javafx/downloads/index.html. Right-click the project's node in the IDE's Project window and choose Run, as shown in Figure 1-6.
Figure 1-6 Run Scene Builder Sample Application
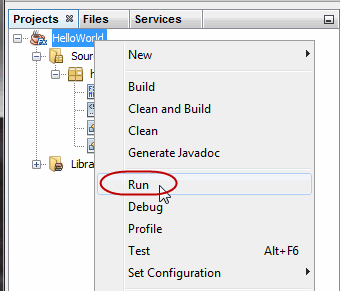
Description of "Figure 1-6 Run Scene Builder Sample Application "
 Jerome is a member of the JavaFX Scene Builder development team.
 Cindy is a technical writer in the JavaFX group.
She has written tutorials, online help, and technical articles for Java and JavaFX technologies.
