| C H A P T E R 5 |
|
Updating a Central Installation |
This chapter describes how to update a Central Installation, including the administrator harness, with new and fixed features and tests. Updating the Central Installation does not affect existing keystores, threshold files, custom test packs, customized MMAPI, AMMS, or MSAPI test packs, or work directories.
After applying an update, you must update templates you have created as described in Synchronizing Templates. Template updates automatically flow to configurations as described in the online help.
For information on updating tester harnesses, see the Java Device Test Suite Tester’s Guide. You must update the Central Installation before you update tester harnesses.
The chapter contains these sections:
Download the Java Device Test Suite updaters from the Java Device Test Suite licensee web site at https://java-partner.sun.com. Download one or both sets of updater files:
The value of version is the version of the Java Device Test Suite that running the updater creates. The value of build and date depend on when the software was built.
The updaters have the same resource requirements as the installers, described in System Requirements.
Read this section if you are updating a version 2.0 installation that has custom AMMS tests. Skip this section if you are updating version 2.0.1 or later.
When applied to Java Device Test Suite version 2.0 (only), the updater does not preserve custom AMMS tests. After running the updater, you must re-create these tests. Before running the updater, you can record the configuration of the custom AMMS tests by choosing Configure > AMMS, selecting a media type, and clicking the Edit button. Write down or take screenshots of the information shown in the tabbed dialog. For more information, see Editing a Media Type in the online help.
You can update a Central Installation interactively with the graphical updater or in batch mode with the command line updater.
|
1. Ensure that the Relay is running.
You can verify this by entering this URL in a web browser: http://appServerHost:appServerPort/appContext
For example: http://localhost:8080/JdtsServer.
The Relay responds displays a page similar to FIGURE 2-4 if it is running.
2. Ensure that no harness, administrator or tester, is running.
You must arrange for all harnesses to be shut down while the administrator updater runs.
3. If you are updating a Windows host, disable anti-virus software and other software that scans files on the host.
File-scanning software can prevent successful test pack installation, which moves and deletes temporary directories. Enable the file scanning software after the installation completes.
4. If you are updating a Windows host, be sure no file in the Central Installation is open for reading or writing.
The Windows operating system might lock such a file, which can make the update fail.
5. Launch the administrator updater:
a. Ensure that you have write permission for the original installation directories.
Using /opt/ and the installer default directory names as examples, be sure you have write permission for these directories:
b. Make the updater file executable.
The updater file is jdts_admin-version-update-build_solaris-date.bin.
c. Run this command:
% sh jdts_admin-version-update-build_solaris-date.bin
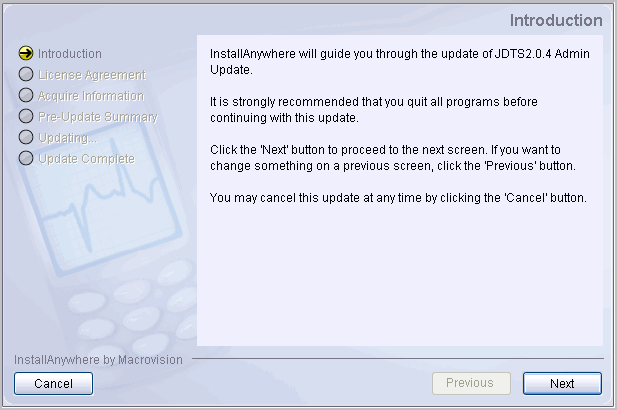
Depending on processor, disk, and network speed, the updater can take a few minutes to initialize before it displays its first screen (FIGURE 5-1).
FIGURE 5-1 Administrator Updater First Screen

Use the guideline in TABLE 5-1 to help you provide the information the updater requires.
|
Select the Central Installation directory, the one that contains admin/, tp_packages/, and other files and directories. |
||
|
Specify a directory containing a Java Runtime Environment or Java Developer’s Kit software version that meets System Requirements. You can specify a newer version than the one you have been using. This item affects only the JDK or JRE version used by the administrator harness. |
||
|
Enter the user name of the Sun Java System Application Server administrator. |
||
|
Enter the Sun Java System Application Server administrator port number. |
||
|
Review the properties gathered from the Central Installation to be sure you are updating the intended installation. |
||
The final installer screen has an option to launch the administrator harness and run the Configure > Manage Templates command. See Synchronizing Templates for details.
If you want the Sun Java System Application Server to use a newer JDK version, follow the instructions at http://docs.sun.com/app/docs/doc/819-4707/6n6re4imh?a=view. Although that page does not mention JDK versions that were released after the application server, Sun’s Java Device Test Suite testing indicates that the application server works well with all versions listed in System Requirements.
|
You can automate the update of a Central Installation by writing a script that invokes the updater. Invocation examples (ignore line breaks):
> jdts_admin-version-update-build_windows-date.exe -f admin.properties
% sh jdts_admin-version-update-build_solaris-date.bin -f admin.properties
The value of version depends on the version of the updater. The values of build and date depend on when the updater was built.
admin.properties is a text file you create. It can be named anything.properties. However, the full path name of the .properties file must not contain a space.
The .properties file must contain the following lines:
INSTALLER_UI=silent
JDTS20_FOLDER=pathToInstallDir
SJSAS_ADMIN=adminUserName
SJSAS_PASSWORD=adminPassword
SJSAS_ADMIN_PORT=adminPort
JAVA_EXEC=pathToJREorJDKSoftware
TABLE 5-2 describes the values to enter.
JDTS20_FOLDER=c\:\\JDTS-CI
SJSAS_ADMIN=LeeAdmin
SJSAS_PASSWORD=j2&xy
SJSAS_ADMIN_PORT=4848
JAVA_EXEC=c\:\\Java\\jdk1.6.0_03\bin\java.exe
Notice that the path characters “:” and “\” must be preceded by “\”.
JDTS20_FOLDER=/home/Lee/JDTS-CI
SJSAS_ADMIN=LeeAdmin
SJSAS_PASSWORD=j2&xy
SJSAS_ADMIN_PORT=4848
JAVA_EXEC=/home/Lee/bin/Java/jdk1.6.0_03/bin/java
Before running the command line updater, follow these steps:
1. Ensure that the Relay is running.
You can verify this by entering this URL in a web browser: http://appServerHost:appServerPort/appContext
For example: http://localhost:8080/JdtsServer.
The Relay displays a page similar to FIGURE 2-4 if it is running.
2. Ensure that no administrator or tester harness is running.
You must arrange for all harnesses to be shut down while the updater runs.
3. If you are updating a Windows host, disable anti-virus software and other software that scans files on the host.
File-scanning software can prevent successful test pack installation, which moves and deletes temporary directories. Enable the file scanning software after the installation completes.
4. If you are updating a Windows host, be sure no file in the Central Installation is open for reading or writing.
The Windows operating system might lock such a file, which can make the update fail.
A command line update does not provide visual feedback, console messages, or an error code. You can monitor its progress with an operating system tool that shows the status of processes.
The update is complete when the file CentralInstallDir/JDTSversion_InstallLog.log has been created. Open this file with a text editor and search for messages containing the string “FATAL”. If there are no such messages, installation was successful. The “FATAL” messages describe the details of the problems encountered, if any.
After running the command line updater, you must synchronize all customer-defined templates so they receive test and property updates. Work directories created with the previous software version cannot be used until their templates have been synchronized with the updated Central Installation. The online help describes how to use the administrator harness’s Configure > Synchronize Templates command.
Unlike the graphical updater, the command line updater does not provide a way to change the Java Runtime Environment or Java Developer’s Kit software version that the Java Device Test Suite or the Sun Java System Application use. If you want to change to a different version (which you have already installed):
If you have not already tuned the Sun Java System Application Server configuration, do so now. Refer to Tuning the Application Server.
You can verify the update by launching the administrator harness and choosing Help > About the Java Device Test Suite. The display should show JDTS Version version RR, where version is equivalent to the version in the updater file name (see Obtaining the Software). For example:
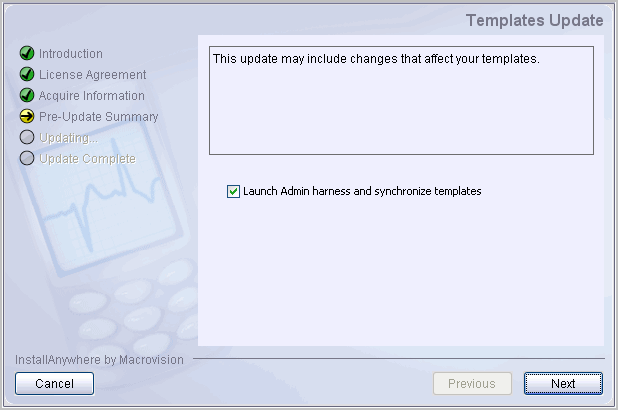
After running the updater, you must synchronize customer-defined templates so they receive test and property updates included in the update. The harnesses do not open a work directory that is associated with a template that has not been synchronized. The graphical updater reminds you to synchronize by displaying the screen shown in FIGURE 5-2.
FIGURE 5-2 Graphical Updater Template Synchronization Reminder

You can respond to this reminder in three ways:
The online help describes how to use the templates manager.
If you have configurations that are used for batch mode test runs, open them in the graphical user interface. Doing so updates the configurations with changes made to their templates as a result of running the updater. Configurations are not automatically updated when they are used in batch mode.
After updating a Central Installation, update custom packages if you have created them. If an update adds properties to such a package, the tests in it cannot be run until they have been updated.
|
If you have one or more custom MMAPI packages, follow these steps (for details, see the online help):
1. In the administrator harness, choose Configure > Custom MMAPI.
The Custom MMAPI Media Types window appears, showing your Custom MMAPI types.
2. If one or more media types is displayed in red, follow these steps:
A red media type has a new property.
a. Select a type and choose Edit.
b. Select the red tab or tabs and supply values for the new property or properties.
c. When you have supplied all values for a type, click OK and proceed to the next type.
|
If you have one or more AMMS packages, follow these steps (for details, see the online help):
1. In the administrator harness, choose Configure > AMMS.
The AMMS Media Types window appears, showing your AMMS types.
2. If one or more media types is displayed in red, follow these steps:
A red media type has a new property.
a. Select a type and choose Edit.
b. Select the red tab or tabs and supply values for the new property or properties.
c. When you have supplied all values for a type, click OK and proceed to the next type.
|
If you have one or more MSAPI packages, follow these steps (for details, see the online help):
1. In the administrator harness, choose Configure > MSAPI.
The MSAPI Types window appears, showing your MSAPI types.
2. If one or more types is displayed in red, follow these steps:
A red type has a new property.
a. Select a type and choose Edit.
b. Select the red tab or tabs and supply values for the new property or properties.
c. When you have supplied all values for a type, click OK and proceed to the next type.
The updater displays alerts if it encounters problems undeploying the old Relay from, or deploying the new one to, the Sun Java System Application Server.
The problem can be one of the following or something else:
When it encounters such a problem, the updater instructs you to undeploy or deploy the Relay manually and then continue updating. The following sections give instructions.
To manually undeploy the old Relay, follow these steps:
1. Log into the Sun Java System Application Server as administrator.
The administrator URL depends on the Sun Java System Application Server’s configuration. An example is http://localhost:4848.
2. In the task tree on the left, click the turner next to Web Applications.
3. In the right pane, check the box next to the Relay’s application context name, by default JdtsServer.
To manually deploy the new Relay, follow these steps:
1. Log into the Sun Java System Application Server as administrator.
The administrator URL depends on the Sun Java System Application Server’s configuration. An example is http://localhost:4848.
2. In the task tree on the left, click Web Applications.
3. In the right pane, click Deploy.
4. Browse to CentralInstallDir/server/ and select JdtsServer.war.