| C H A P T E R 1 |
|
Overview |
This chapter describes the main Java Device Test Suite concepts and components. Additional overview topics can be found in the Java Device Test Suite Administrator’s Guide and the Java Device Test Suite online help.
Readers who do not want to read this background material can skip this chapter. The chapter covers the following subjects:
The Java Device Test Suite helps wireless network operators and device manufacturers maximize product quality and minimize time to market. The Java Device Test Suite is an extensible set of test packs, a shared management facility, and a distributed test execution harness that assess the quality of any device that implements a compatible combination of the following Java Platform, Micro Edition (Java ME platform) technologies:
For a detailed list of supported specifications and versions, see Appendix F.
The Java Device Test Suite also includes tests that do not relate to a particular specification:
The product’s total of about 11,000 tests can be extended with new tests written by Sun or by others, including Java Device Test Suite users.
When considering a device that implements Java technology, it is useful to distinguish between compatibility testing and quality testing. Compatibility testing exercises individual application programming interfaces (APIs) defined by a specification, such as the MIDP 2.0 specification.
When passed valid arguments, a device method call returns a valid result, the invoking test reports that the method implementation conforms to the specification. Compatibility testing is an important first step in testing a product. Sun Technology Compatibility Kits (TCKs) perform compatibility testing, and, ideally, are used in conjunction with the Java Device Test Suite.
A quality product requires additional tests before it can be confidently released to run real applications in real-world conditions. The Java Device Test Suite complements Sun TCKs by performing quality testing, which can be divided into three main areas:
The Java Device Test Suite software consists of the components shown in FIGURE 1-1.
FIGURE 1-1 Java Device Test Suite Architecture: Tester’s View
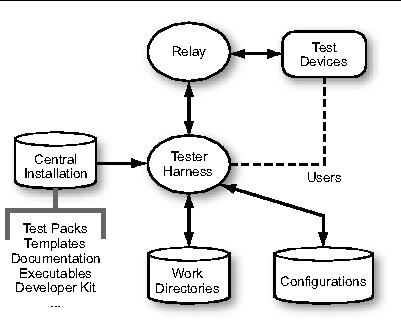
Testers interact with the Central Installation indirectly. When you launch a harness, the executable comes from the Central Installation. When you direct a harness to run tests, use a keystore, or other shared resources, the harness obtains them from the Central Installation.
A test pack is a collection of tests that are functionally related and have common setup requirements. Functionally related means that the tests exercise a cluster of test device functions, for example, the MIDP 2.0 runtime APIs. Common setup requirements means that all the tests in the pack either require the same setup (such as starting a partner device that cooperates with the test device) or the same user interaction (such as inspecting test device behavior), or both. Developers create test packs as described in the Java Device Test Suite Developer’s Guide.
A test pack has the hierarchical structure shown in FIGURE 1-2:
FIGURE 1-2 Test Pack Hierarchy
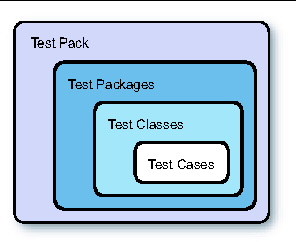
A test pack contains at least one test package. A test package can contain a nested test package or a test class. A test class contains at least one test case.
FIGURE 1-3 shows how the harness displays an example test pack in which the test cases in one test class are expanded (exposed to view). The harness does not visually distinguish packs, packages, classes, and cases, except by their position in the hierarchy. Test packs have no ancestors. Test cases have no descendents. The parents of test cases are test classes. Everything else is a test package.
FIGURE 1-3 Sample Test Pack Hierarchy
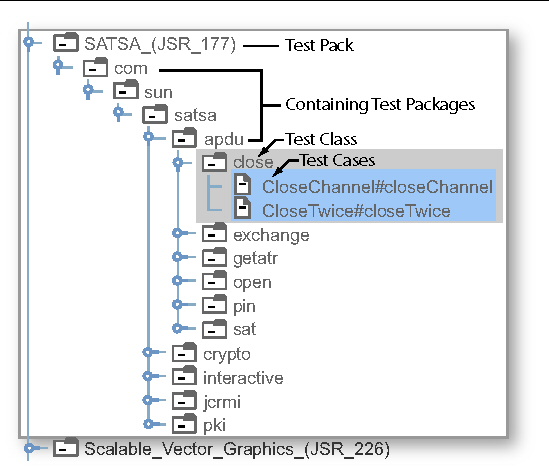
FIGURE 1-3 shows the SATSA_(JSR_177) test pack. The test pack contains the apdu test package, which contains the close test class, which contains the test cases CloseChannel#closeChannel and CloseTwice#closeTwice.
Test packages subdivide a test packs name space. Test packages can be nested, and they often are. For example, there are six packages visibly nested in the com.sun.satsa package in FIGURE 1-3.
A test class is the unit of code that test developers create. A test class contains one or more test cases.
A test case, informally called a test, is the code in a test class that exercises one or more test device functions and passes, fails, or returns benchmark metrics. The Java Device Test Suite Developer’s Guide describes test classes and test cases in detail.
Your interaction with the Java Device Test Suite software, and the interaction of the software components themselves, varies according to the kinds of tests that you run.
FIGURE 1-4 shows some of the same SATSA tests shown in FIGURE 1-3. Instead of a test pack hierarchy, the tests are arranged in a device feature hierarchy. This hierarchy emphasizes capabilities that might be supported by a given test device. For some users, particularly those who work for mobile network operators, this hierarchy is easier to use because it maps better to the description of a device provided by a manufacturer. Java Device Test Suite testers and administrators can use either hierarchy to select tests to run and to view results in a report. The main harness test tree (shown on the left in FIGURE 1-8) always displays the package hierarchy. In either view, the test cases that run are the same. The two hierarchies organize the tests differently.
FIGURE 1-4 Sample Feature Hierarchy
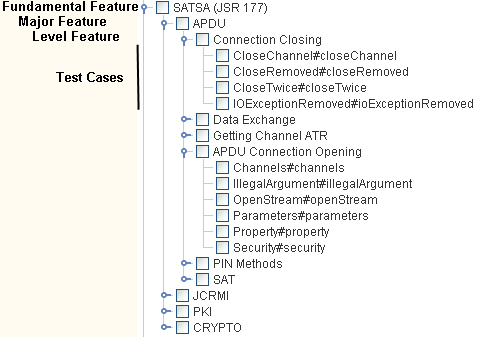
The tutorial in Chapter 5 covers both methods of test selection.
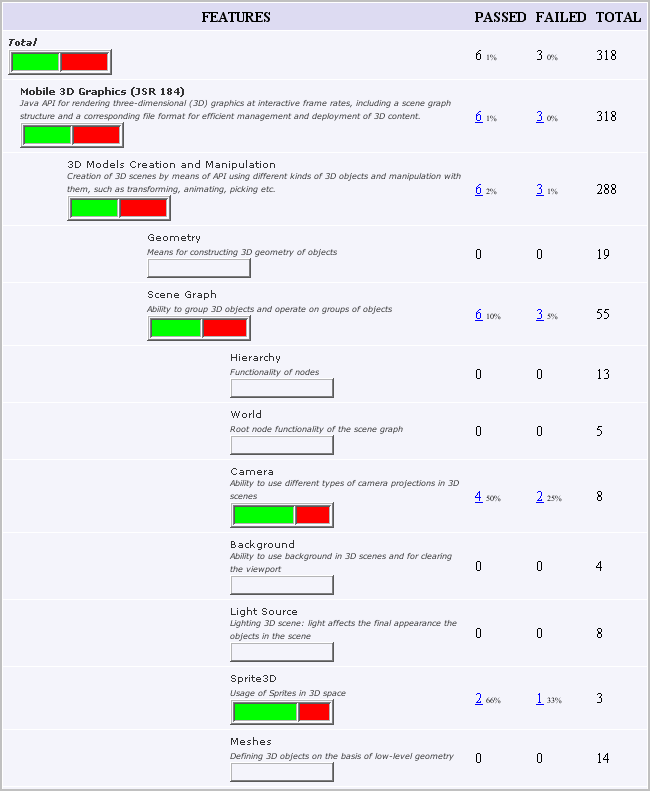
In addition to optionally selecting tests by device feature, after a test run, you can create a report that is organized by device feature. FIGURE 1-5 is an example. The online help describes how to create a feature-based report.
FIGURE 1-5 Feature Report Example
Runtime tests execute on the test device under the control of a Java Device Test Suite component called an agent. The agent is usually included in the test bundles that users download and install in devices being tested. It is also possible to install an agent in some test devices’ read-only memory. A test bundle is a collection of tests packaged as a MIDlet suite, a unit that a test device’s application management system (AMS) must be able to download, install, and execute. Specifications, such as MIDP and MMAPI, define the device-resident APIs that runtime tests test.
FIGURE 1-6 summarizes the user and component interactions for runtime tests, and Tester Harness provides details. Runtime tests that involve networking use additional Java Device Test Suite components to send and receive test messages. These are not shown in FIGURE 1-6:
FIGURE 1-6 Java Device Test Suite Runtime Architecture
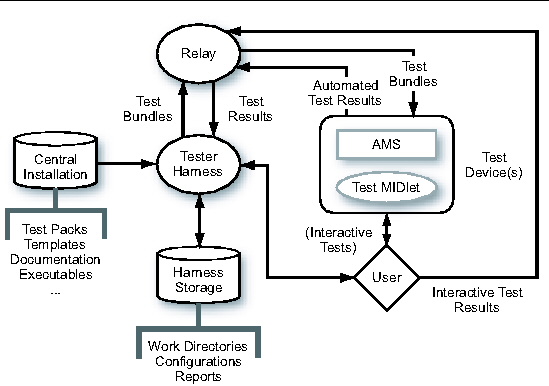
From the user’s point of view, there are two kinds of runtime tests, automated and interactive. An automated runtime test determines its result (passed or failed) and returns the result to the agent, which returns it to the harness via the Relay. An interactive runtime test relies on you to determine if the test passed or failed. When an interactive test begins to run, the harness displays instructions for you to operate the device and inspect the device’s response (for example, what it displays). The instruction window includes Passed and Failed buttons. If the device behaves as the test instructions say it should, you click the Passed button. Otherwise, you click the Failed button.
Because interactive tests require your presence and automated tests do not, it is often convenient to run these tests separately. The tester harness has a selector that lets you do just that. You can choose to run only automated, only interactive, or both kinds of tests in a given test run. You can merge the results produced in multiple runs into a single report. You can view a report in a web browser or export its data to a spreadsheet or database application for analysis and presentation.
To reduce the time required to execute large numbers of tests, the architecture supports two styles of parallel testing, which are not shown in FIGURE 1-6.
The Java Device Test Suite offers a variant of the architecture shown in FIGURE 1-6, called offline mode. The intent of offline mode is to allow some testing to be done on devices that are not developed enough to support full testing. For most devices, the agent uses HTTP to return automated test results to the harness. In offline mode, the agent writes test results to the device display when the last test in a bundle has been completed. Tests that rely on the presence of Java methods that implement HTTP cannot be run in offline mode.
From a tester’s perspective, benchmark tests are nearly identical to runtime tests. Benchmark tests return performance measurements called metrics, that the tests compute and the harness displays. Benchmark tests can also pass or fail. The pass or fail decision is made by comparing the test device’s performance with the performance of a reference device on the same test. The reference device’s performance constitutes a threshold that the test device must meet or exceed for the test to pass.
OTA provisioning tests verify the quality of a device’s over-the-air application provisioning implementation. This includes obtaining, installing, and removing applications (MIDlet suites), and enforcing security requirements.
Unlike runtime and benchmark tests, OTA provisioning tests do not run on the test device. They run on an emulated provisioning server that is implemented as a servlet. Each OTA test has an associated application (a MIDlet suite) that you download from the provisioning server and install and launch on the test device. FIGURE 1-7 summarizes the roles of the user and the provisioning server in OTA provisioning testing. For simplicity, FIGURE 1-7 shows a single test device and a single harness. In reality, multiple instances of each can run in parallel, sharing one provisioning server.
FIGURE 1-7 Java Device Test Suite Architecture: OTA Provisioning Tests
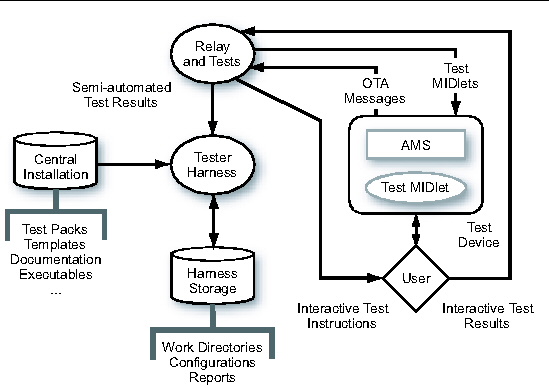
There are two kinds of OTA provisioning tests: semi-automated and interactive. For both kinds of tests, the harness displays instructions for you to download the associated application to the test device. A semi-automated OTA provisioning test decides if it passes or fails based on the content of status information returned to it by the test device. An interactive OTA provisioning test’s instructions have Passed and Failed buttons and instructions for determining if the downloaded application has performed correctly. You compare the device’s behavior to the expected outcome described in the instructions and click the Passed or Failed button as appropriate.
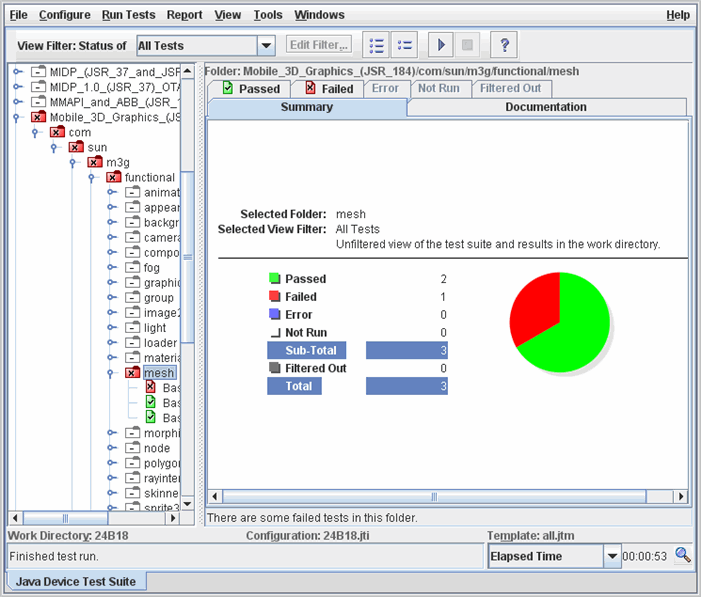
Testers primarily interact with the Java Device Test Suite harness. FIGURE 1-8 shows the harness’s graphical interface, the Test Manager. The harness can also be run in batch (command line) mode.
FIGURE 1-8 Test Manager User Interface
In a typical testing session, the first step is to open or create a work directory. A work directory is associated with a specific template. It contains a configuration file that is based on the template. When a test is run, the harness creates test result files that store information about the test run. The harness then stores these files in the work directory.
When you create a work directory, you select a template. Administrators create templates with the Java Device Test Suite Administrator harness. A template is the archetype of a configuration. Both specify tests to be run and configuration values. A template typically corresponds to a test device. A configuration typically corresponds to a subset of tests for a device. For example, two testers might divide the testing of a device by creating two configurations from the same template, each configuration specifying half of the tests to be run on the device. However, there are no limitations on how you use templates and configurations. The more that an administrator preconfigures a template, the less information that you need to supply in a configuration that is based on that template. A work directory’s template is permanent, but you can switch a work directory’s current configuration as you wish, for example, to run a different subset of tests. When you open a work directory, its configuration, if it has one, is loaded at the same time.
When you have a work directory and a configuration that represents the tests you want to run, you can start the test device and click the Start button on the harness to begin testing.
As a test run proceeds, the harness updates its summary results, which show the numbers of passed and failed tests. While a run is in progress or after it ends, you can inspect individual test results and diagnostic logs. The harness records each test’s most recent pass or fail status. You can elect to rerun only the tests that failed in the previous run.
Testing a device might require multiple runs, for example, if there are configuration problems or the test device software is updated. These runs might be separated by several days. With a work directory, you can load the same configuration file and run the tests again if needed or edit the configuration to change certain test values or to run only those tests that previously failed.
You can save information about a test run by creating a report. Also, because running all of the tests for a device can be quite time consuming, it is common practice to divide the tests among multiple users, who run their tests in separate sessions. You can merge reports produced in multiple testing sessions run by a single tester or by multiple testers into a single report that gives an integrated view of the device’s test status.
The tester and administrator harnesses have extensive online help, which you should consult first when you have a question about using the tester harness. The Central Installation holds the following additional documentation, accessible from InstallDir/index.html:
The Central Installation holds the Java Device Test Suite executables, which the administrator and tester launch scripts share. The Relay executable is normally installed on a host located in the demilitarized zone between the organization’s inner and outer firewalls.