16 Extending the Domain with Business Activity Monitoring
This chapter describes the procedures for extending the domain to include Oracle Business Activity Monitoring.
This chapter contains the following sections:
-
Special Instructions When Configuring Oracle BAM on Separate Hosts
-
Extending the SOA Domain to Include Oracle Business Activity Monitoring
-
Configuring a Default Persistence Store for Transaction Recovery
-
Propagating the Extended Domain to the Domain Directories and Machines
-
Configuring Automatic Service Migration for the Oracle BAM Servers
-
Adding the Enterprise Deployment Administration User to the Oracle BAM Administration Group
-
Configuring Oracle HTTP Server for the WLS_BAM Managed Servers
-
Validating Access to Oracle BAM Through the Hardware Load Balancer
16.1 Variables Used in This Chapter
As you perform the tasks in this chapter, you will be asked to enter the following values for several directory variables defined in Section 7.4, "File System and Directory Variables Used in This Guide".
-
ORACLE_HOME
-
ASERVER_HOME
-
MSERVER_HOME
In addition, you'll be referencing the following virtual IP (VIP) address defined in Section 5.2.3, "Physical and Virtual IP Addresses Required by the Enterprise Topology":
-
ADMINVHN
Actions in this chapter will be performed on the following host computers:
-
SOAHOST1
-
SOAHOST2
-
WEBHOST1
-
WEBHOST2
16.2 Prerequisites When Adding Oracle BAM to the Domain
Before you add Oracle BAM to your existing Oracle SOA Suite domain, consider the following information and prerequisites:
Note:
If you choose to install Oracle BAM on a separate set of host computers, then in addition to the prerequisites listed here, see Section 16.3, "Special Instructions When Configuring Oracle BAM on Separate Hosts".-
Section 16.2.1, "Understanding the Installation Requirements Adding Oracle BAM to the Domain"
-
Section 16.2.2, "Understanding the Database Schema Requirements for Oracle BAM"
16.2.1 Understanding the Installation Requirements Adding Oracle BAM to the Domain
This chapter assumes you are configuring Oracle Business Activity Monitoring on the same host computers as Oracle SOA Suite, as shown in Figure 3-2, "Oracle SOA Suite and Oracle Business Activity Monitoring Enterprise Topology Diagram".
In the default Oracle SOA Suite and Oracle Business Activity Monitoring topology, you target Oracle BAM to its own Managed Servers and its own cluster, but it shares system resources with the other Oracle SOA Suite products on SOAHOST1 and SOAHOST2. Those system resources include a shared storage device where the Oracle SOA Suite software has been installed in an existing Oracle home directory.
In the default topology, there is no need to install Oracle BAM, because Oracle BAM is included in the Oracle SOA Suite and Oracle Business Process Management distribution and is installed into the Oracle home directories when you install Oracle SOA Suite in Chapter 3, "Understanding the SOA Enterprise Deployment Topology".
16.2.2 Understanding the Database Schema Requirements for Oracle BAM
The schemas required for Oracle BAM are created in the database when you run the Repository Creation Utility (RCU) to create the required Oracle SOA Suite schemas.
As a result, there is no need to run RCU specifically for Oracle BAM.
If the BAM system is being created without the other Oracle SOA Suite products and the SOA schemas creation has not been performed yet, you must use the RCU installation steps provided in Chapter 12, "Extending the Domain with Oracle SOA Suite".
16.2.3 Backing Up the Existing Installation
If you have not yet backed up the existing Fusion Middleware Home and domain, back it up now.
To back up the existing Fusion Middleware Home and domain, see Section 18.2.6, "Performing Backups and Recoveries in the SOA Enterprise Deployments."
16.3 Special Instructions When Configuring Oracle BAM on Separate Hosts
For some organizations, it might make sense to install and configure Oracle BAM on separate host computers so the Oracle BAM software can use dedicated hardware resources and can be further isolated from the other Oracle SOA Suite products.
If you choose to configure Oracle BAM on its own hardware, then you can use the instructions in this chapter, as long as you also consider the information in the following sections:
-
Section 16.3.1, "Procuring Additional Host Computers for Oracle BAM"
-
Section 16.3.2, "Installation Requirements When Configuring Oracle BAM on Separate Hosts"
-
Section 16.3.3, "Configuration Wizard Instructions When Configuring Oracle BAM on Separate Hosts"
-
Section 16.3.4, "Propagating the Domain Configuration When Configuring Oracle BAM on Separate Hosts"
16.3.1 Procuring Additional Host Computers for Oracle BAM
If you are configuring Oracle BAM on its own set of host computers, you must procure the additional hardware and be sure it meets the system requirements described in Section 5.1.2, "Host Computer Hardware Requirements" and Section 5.1.3, "Operating System Requirements for the Enterprise Deployment Topology".
You should also add the required entries to the Enterprise Deployment Workbook, as described in Chapter 4, "Using the Enterprise Deployment Workbook". For the purposes of this guide, you can refer to these host computers as BAMHOST1 and BAMHOST2.
16.3.2 Installation Requirements When Configuring Oracle BAM on Separate Hosts
If you are configuring Oracle BAM on its own set of host computers, then you should follow the same shared storage strategy you are following for the host computers where the other Oracle SOA Suite products are installed.
Note:
The Oracle home used by BAMHOST1 and BAMHOST2 must contain the exact set of software binaries used by the SOAHOST1 and SOAHOST2 hosts in the domain; otherwise, unpredictable behavior in the execution of the binaries may occur.Depending on your shared storage strategy, one of the following sections apply if you are using separate host hardware for the Oracle BAM software:
-
Section 16.3.2.1, "Installation Requirements When Using a Separate Volume or Partition"
-
Section 16.3.2.2, "Installation Requirements When Using a Shared Oracle Home"
16.3.2.1 Installation Requirements When Using a Separate Volume or Partition
If BAMHOST1 and BAMHOST2 are using separate shared storage volumes or partitions, then you must install the Infrastructure and optionally Oracle SOA Suite on those hosts. For more information, see Section 7.2, "Shared Storage Recommendations When Installing and Configuring an Enterprise Deployment".
Note that the location where you install the Oracle home (which contains the software binaries) will vary, depending upon the host. To identify the proper location for you Oracle home directories, refer to the guidelines in Section 7.4, "File System and Directory Variables Used in This Guide".
To install the software on BAMHOST1 and BAMHOST2, log in to each host, and perform the following tasks:
-
Use the instructions in Section 10.3 to create the Oracle home on the appropriate storage device and install Oracle Fusion Middleware Infrastructure.
-
Optionally use the instructions in Section 12.3 to install the Oracle SOA Suite software.
16.3.2.2 Installation Requirements When Using a Shared Oracle Home
If BAMHOST1 and BAMHOST2 are using an existing volume or partition where the Oracle Fusion Middleware Infrastructure or Oracle SOA Suite are already installed, then you must mount the volumes appropriately to BAMHOST1 and BAMHOST2. For more information, see Section 8.5, "Mounting the Required Shared File Systems on Each Host". Ensure that BAMHOST1 and BAMHOST2 have access to this Oracle home, just like the rest of the hosts in the domain.
This is the preferred method of using shared storage for the enterprise deployment. For more information, see Section 7.2, "Shared Storage Recommendations When Installing and Configuring an Enterprise Deployment".
After you have mounted an existing volume or partition that contains an existing Oracle home, then you should attach the Oracle home to the local Oracle Inventory on BAMHOST1 or BAMHOST2.
To attach an Oracle home in shared storage to the local Oracle Inventory, use the following command on the BAMHOSTs:
cd ORACLE_HOME/oui/bin/attachHome.sh
./attachHome.sh -jreLoc JAVA_HOME
The pack and unpack utilities is used to bootstrap the domain configuration for the WLS_BAM1 and WLS_BAM2 servers. As a result, if you have mounted an existing Oracle home with the required software already installed, then you do not need to install any software in these two hosts.
16.3.3 Configuration Wizard Instructions When Configuring Oracle BAM on Separate Hosts
If you are configuring Oracle BAM on separate host computers, then the instructions in this chapter for configuring the domain with the Configuration Wizard are slightly different.
Specifically, be sure to create additional Oracle WebLogic Server machines for BAMHOST1 and BAMHOST2, and then target the WLS_BAM1 and WLS_BAM2 Managed Servers to those machines, rather than to SOAHOST1 and SOAHOST2.
For more information, see Task 12, "Verifying the Existing Machines" and Task 13, "Assigning Servers to Machines".
16.3.4 Propagating the Domain Configuration When Configuring Oracle BAM on Separate Hosts
If you are configuring Oracle BAM on separate host computers, then the instructions in this chapter for propagating the domain to the other domain directories must be modified.
Specifically, in addition to propagating the domain to the Managed Server domain directories on SOAHOST1 and SOAHOST2, you must also unpack the domain in the local Managed Server directories for BAMHOST1 and BAMHOST2.
Note that this means you must start the Node Manager software on each BAMHOST computer before you can remotely start the WLS_BAM Managed Servers on these hosts.
16.4 Roadmap for Adding Oracle BAM to the Domain
Table 16-1 lists the high-level steps for extending a SOA domain for Oracle Business Activity Monitoring.
Table 16-1 Steps for Extending a SOA Domain to Include Oracle BAM
| Step | Description | More Information |
|---|---|---|
|
Run the Configuration Wizard to Extend the Domain in the Administration Server domain home |
Extend the SOA domain to contain Oracle BAM components |
Section 16.5, "Extending the SOA Domain to Include Oracle Business Activity Monitoring" |
|
Configure a Default Persistence Store for Transaction Recovery |
To leverage the migration capability of the Transaction Recovery Service for the servers within a cluster, store the transaction log in a location accessible to a server and its backup servers. |
Section 16.6, "Configuring a Default Persistence Store for Transaction Recovery" |
|
Propagate the Domain Configuration to the Managed Server domain directories |
Oracle BAM requires some updates to the WebLogic Server start scripts. Propagate these changes using the pack and unpack commands. |
Section 16.7, "Propagating the Extended Domain to the Domain Directories and Machines" |
|
Configure Automatic Service Migration for the Oracle BAM Servers |
Service migration ensures that key pinned services can be migrated automatically to another Managed Server in the cluster if one of the Managed Servers or host computers fails. For more information about service migration, see Chapter 19. |
Section 16.8, "Configuring Automatic Service Migration for the Oracle BAM Servers" |
|
Add the SOA Administrator role to the Oracle BAM Administration Group |
This step allows you to use one set of credentials to access the various product-specific management utlities. |
|
|
Start the Oracle BAM Servers |
Oracle BAM servers extend an already existing domain. As a result, the Administration Server and respective Node Managers are already running in SOAHOST1 and SOAHOST2. |
|
|
Validate the WLS_BAM Managed Servers |
Verify that the server status is reported as Running in the Admin Console and access URLs to verify status of servers. |
Section 16.11, "Starting and Validating the WLS_BAM2 Managed Server" |
|
Configuring Oracle HTTP Server for the WLS_BAMn Managed Servers |
To enable Oracle HTTP Server to route to Oracle BAM, add the required directives to the Oracle HTTP Server configuration files, and set the WebLogicCluster parameter to the list of nodes in the cluster. |
Section 16.12, "Configuring Oracle HTTP Server for the WLS_BAM Managed Servers" |
|
Configure the WebLogic Server Proxy Plugin |
Enable the WebLogic Server Proxy Plugin for Oracle BAM. |
|
|
Validating Access Through Oracle HTTP Server |
Verify that the server status is reported as Running. |
Section 16.14, "Validating Access to Oracle BAM Through the Hardware Load Balancer" |
|
Backing up the Oracle BAM Configuration |
To back up the domain configuration for immediate restoration in case of failures in future procedures. |
16.5 Extending the SOA Domain to Include Oracle Business Activity Monitoring
This section provides instructions for extending the existing enterprise deployment SOA domain with the Oracle Business Activity Monitoring.
Extending the domain involves the following:
16.5.1 Starting the Configuration Wizard
Note:
If you added any customizations directly to the start scripts in the domain, those will be overwritten by the configuration wizard. To customize server startup parameters that apply to all servers in a domain, you can create a file calledsetUserOverrides.sh and configure it, for example, add custom libraries to the WebLogic Server classpath, specify additional java command line options for running the servers, or specify additional environment variables. Any customizations you add to this file are preserved during domain upgrade operations, and are carried over to remote servers when using the pack and unpack commands.To begin domain configuration:
-
Shut down the Administration Server to prevent any configuration locks, saves, or activations from occurring during the configuration of the domain.
For more information, see the instructions for shutting down the Administration Server with Node Manager in Section 11.3.1.
-
Navigate to the following directory and start the WebLogic Server Configuration Wizard.
ORACLE_HOME/oracle_common/common/bin
./config.sh
16.5.2 Navigating the Configuration Wizard Screens to Create the Domain
In this step, you extend the domain created in Chapter 12, "Extending the Domain with Oracle SOA Suite," to contain Oracle Business Activity Monitoring components.
The steps reflected in this section would be very similar if Oracle Business Activity Monitoring was extending a domain containing only an Administration Server and a WSM-PM Cluster, but some of the options, libraries and components shown in the screens could vary.
Domain creation and configuration includes the following tasks:
-
Task 1, "Selecting the Domain Type and Domain Home Location"
-
Task 5, "Providing the GridLink Oracle RAC Database Connection Details"
-
Task 15, "Reviewing Your Configuration Specifications and Configuring the Domain"
- Task 1 Selecting the Domain Type and Domain Home Location
-
On the Configuration Type screen, select Update an existing domain.
In the Domain Location field, select the value of the ASERVER_HOME variable, which represents the complete path to the Administration Server domain home you created in Chapter 10.
For more information about the directory location variables, see Section 7.4, "File System and Directory Variables Used in This Guide"
Tip:
More information about the other options on this screen can be found in Configuration Type in Creating WebLogic Domains Using the Configuration Wizard. - Task 2 Selecting the Configuration Template
-
On the Templates screen, make sure Update Domain Using Product Templates is selected, then select the following template:
Oracle Business Activity Monitoring- 12.1.3.0 [soa]
Click Next.
- Task 3 Specifying the Datasource Configuration Type
-
Note:
Any custom data sources that were created before the extension (like LEASING datasources) will show up before this screen. Check the Datasources row and click Next. The test data source screen will verify its validity. Click Next.All fields are pre-populated, because you already configured the domain to reference the Fusion Middleware schemas that are required for the Infrastructure domain. Verify and ensure that credentials in all the fields are the same that you have provided while configuring Oracle Fusion Middleware Infrastructure.
Click Get RCU Configuration after you finish verifying the database connection information. The following output in the Connection Result Log indicates that the operation succeeded:
Connecting to the database server...OK
Retrieving schema data from database server...OK
Binding local schema components with retrieved data...OK
Successfully Done.
- Task 4 Specifying JDBC Component Schema Information
-
On the JDBC Component Schema page, select the BAM Schema, BAM Job Sched Schema and BAM MDS Schema.
Select Convert to Gridlink, and then click Next.
- Task 5 Providing the GridLink Oracle RAC Database Connection Details
-
On the GridLink Oracle RAC Component Schema screen, provide the information required to connect to the RAC database and component schemas, as shown in Table 10-3 and in Figure 10-2.
Remember to use the SCAN address for the database for the Service Listener and ONS Host fields.
- Task 6 Testing the JDBC Connections
-
On the Test JDBC Data Sources screen, confirm that all connections were successful.
The connections are tested automatically. The Status column displays the results. If all connections are not successful, click Previous to return to the previous screen and correct your entries.
Click Next when all the connections are successful.
- Task 7 Selecting Advanced Configuration
-
On the Select Advanced Configuration screen, select the following:
-
Managed Servers, Clusters, and Coherence
-
JMS File Store
Click Next.
-
- Task 8 Configuring Managed Servers
-
On the Managed Servers screen, add the required managed servers for Oracle BAM:
-
Select the automatically created server and rename it to WLS_BAM1.
-
Click Add to add another new server and enter WLS_BAM2 as the server name.
-
Give servers WLS_BAM1 and WLS_BAM2 the attributes listed in Table 16-2.
-
Select BAM12-MGD-SVRS-ONLY as the server group for the BAM Servers. Deselect BAM12-MGD-SVRS from the list.
In the end, the configuration for the added servers should match Table 16-2.
Click Next.
Table 16-2 Items on the Managed Servers Screen When Extending the Domain for Oracle BAM
Name Listen Address Listen Port SSL Listen Port SSL Enabled Server Groups WLS_SOA1Foot 1
SOAHOST1VHN1
8001
n/a
No
SOA-MGD-SVRS-ONLY
WLS_SOA2
SOAHOST2VHN1
8001
n/a
No
SOA-MGD-SVRS-ONLY
WLS_WSM1
SOAHOST1
7010
n/a
No
JRF-MAN-SVR
WSMPM-MAN-SVR
WSM-CACHE-SVR
WLS_WSM2
SOAHOST2
7010
n/a
No
JRF-MAN-SVR
WSMPM-MAN-SVR
WSM-CACHE-SVR
WLS_BAM1
SOAHOST1Foot 2
9001
n/a
No
BAM12-MGD-SVRS-ONLY
WLS_BAM2
SOAHOST2
9001
n/a
No
BAM12-MGD-SVRS-ONLY
Footnote 1 The WLS_SOA1 and WLS_SOA2 Managed Servers are shown if you are extending a domain where Oracle SOA Suite has already been configured.
Footnote 2 When specifying the listen address for WLS_BAM1 and WLS_BAM2, enter the IP address for SOAHOST1 and SOAHOST2, respectively, unless you are configuring Oracle BAM on separate host computers (BAMHOST1 and BAMHOST2). If you are configuring Oracle BAM on separate hosts enter the listen addresses for BAMHOST1 and BAMHOST2.
-
- Task 9 Configuring a Cluster
-
On the Configure Clusters screen, click Add to add the BAM_Cluster (leave the present cluster as they are):
Table 16-3 List of Clusters When Extending the Domain for Oracle BAM
Name Cluster Adress SOA_ClusterFoot 1
Leave it empty
WSM-PM_Cluster
Leave it empty
BAM_Cluster
Leave it empty
Footnote 1 The SOA cluster appears only if you have already configured Oracle SOA Suite in the domain.
Click Next.
- Task 10 Assigning Managed Servers to the Cluster
-
On the Assign Servers to Clusters screen, assign servers to clusters as follows:
-
BAM_Cluster:
-
WLS_BAM1
-
WLS_BAM2
-
Click Next.
-
- Task 11 Configuring Coherence Clusters
-
Use the Coherence Clusters screen to configure the Coherence cluster that is automatically added to the domain. Leave the port number value at 9991, as it was defined during the initial Infrastructure domain creation.
- Task 12 Verifying the Existing Machines
-
Verify the machines that have already been created in the domain. By default, you will be targeting the new Oracle BAM Managed Servers to the SOAHOST1 and SOAHOST2 machines, respectively.
However, if you are configuring Oracle BAM on separate host computers, then you must create two new machines for the corresponding BAMHOST1 and BAMHOST2 host computers:
-
Select the Unix Machine tab.
-
Use the Add button to create two new Unix machines for BAMHOST1 and BAMHOST2.
Node Manager Listen Address to the physical IP address for BAMHOST1 and BAMHOST2.
-
Verify the port in the Node Manager Listen Port field.
The port number 5556, shown in this example, may be referenced by other examples in the documentation. Replace this port number with your own port number as needed.
Leave all other fields to their default values.
Click Next.
-
- Task 13 Assigning Servers to Machines
-
On the Assign Servers to Machines screen, assign the new WLS_BAM1 and WLS_BAM2 servers to the SOAHOST1 and SOAHOST2 machines, respectively.
However, if you are configuring Oracle BAM on separate host computers, assign the new Oracle BAM servers to the newly created BAMHOST1 and BAMHOST2 machines, respectively.
Click Next.
- Task 14 Configuring the JMS File Store
-
On the JMS File Stores screen, assign the following directory for each of the Oracle BAM persistent stores, including the 2 UMS JMS file stores created in this session:
ASERVER_HOME/BAM_Cluster/jmsDo not change the values assigned to the existing JMS file stores, which correspond to the clusters you created for previously configured products.
- Task 15 Reviewing Your Configuration Specifications and Configuring the Domain
-
The Configuration Summary screen contains the detailed configuration information for the domain you are about to create. Review the details of each item on the screen and verify that the information is correct.
Click Update.
In the Extending Domain screen, click Done.
- Task 16 Start the Administration Server
-
Start the Administration Server to ensure the changes you have made to the domain have been applied.
16.6 Configuring a Default Persistence Store for Transaction Recovery
Each server has a transaction log that stores information about committed transactions that are coordinated by the server that may not have been completed. The WebLogic Server uses this transaction log for recovery from system crashes or network failures. To leverage the migration capability of the Transaction Recovery Service for the servers within a cluster, store the transaction log in a location accessible to a server and its backup servers.
Note:
The recommended location is a dual-ported SCSI disk or on a Storage Area Network (SAN).To set the location for the default persistence stores:
-
Log in to the Oracle WebLogic Server Administration Console.
-
In the Domain Structure window, expand the Environment node and then click the Servers node.
The Summary of Servers page appears.
-
Click the name of the server, for example WLS_BAM1 (represented as a hyperlink) in Name column of the table.
The settings page for the selected server appears and defaults to the Configuration tab.
-
Click the Services tab.
-
Click Lock and Edit to start making modifications
-
In the Default Store section of the page, enter the path to the folder where the default persistent stores will store its data files and click Save.
The directory structure of the path is as follows:
ASERVER_HOME/BAM_Cluster/tlogs -
Repeat steps 2 - 6 for WLS_BAM2 server.
-
Shut down the servers running SOA, OSB, ESS, and WSM.
-
Click Activate Changes.
-
Start the Managed Servers that you shut down, starting with the WLS_WSM servers.
Note:
To enable migration of the Transaction Recovery Service, specify a location on a persistent storage solution that is available to other servers in the cluster. Both WLS_BAM1 and WLS_BAM2 must be able to access this directory. This directory must also exist before you restart the servers.16.7 Propagating the Extended Domain to the Domain Directories and Machines
After you have extended the domain with the BAM instances, and you have restarted the Administration Server on SOAHOST1, you must then propagate the domain changes to the domain directories and machines.
Table 16-4 summarizes the steps required to propagate the changes to all the domain directories and machines.
Note that there is no need to propagate the updated domain to the WEBHOST1 and WEBHOST2 machines, because there are no changes to the Oracle HTTP Server instances on those host computers.
Table 16-4 Summary of Tasks Required to Propagate the Domain Changes to Domain Directories and Machines
| Task | Description | More Information |
|---|---|---|
|
Pack up the Extended Domain on SOAHOST1 |
Use the Pack command to create a new template jar file that contains the new BAM Servers configuration. When you pack up the domain, create a template jar file called soadomaintemplateExtBAM.jar. |
Section 11.4.1, "Packing Up the Extended Domain on SOAHOST1" |
|
Unpack the Domain in the Managed Servers Directory on SOAHOST1Foot 1 |
Unpack the template jar file in the Managed Servers directory on SOAHOST1 local storage. |
Section 12.7.1, "Unpacking the Domain in the Managed Servers Domain Directory on SOAHOST1" |
|
Unpack the Domain on SOAHOST2 |
Unpack the template jar file in the Managed Servers directory on the SOAHOST2 local storage. |
Footnote 1 If you are configuring Oracle BAM on separate hosts, then you would unpack the domain on BAMHOST1 and BAMHOST2, rather than on SOAHOST1 and SOAHOST2.
16.8 Configuring Automatic Service Migration for the Oracle BAM Servers
Oracle BAM Managed Servers use per-server JMS services. These per-server queues are also referred to as "pinned" services, because they are pinned to a specific Managed Server, rather than to the cluster. To ensure that these server-specific queues are highly available and can fail over to another Managed Server, you must configure the servers for automatic service migration.
For more information about Automatic Server Migration, see "Service Migration" in Administering Clusters for Oracle WebLogic Server.
A data source and a leasing configuration is created during the configuration of the Oracle BAM servers, but you must manually enable automated migration for the specific Oracle BAM services, as follows:
- Task 1 Log in to the Oracle WebLogic Server Administration Console
-
For example:
ADMVHN:7001/console - Task 2 Select the Managed Servers to configure for service migration
-
-
In the Domain Structure pane, expand the Environment node and then click the Servers node.
The Summary of Servers page appears.
-
Click the name of the server WLS_BAM1 (represented as a hyperlink) in Name column of the table.
The settings page for the selected server appears and defaults to the Configuration tab.
-
Click the Migration tab.
-
Click Lock and Edit to start making modifications.
-
In the JMS Service Migration Configuration section of the page, select the WLS_BAM1 and WLS_BAM2 Managed Servers in the Available list box, and then click the move button
 to move them into the Chosen list box.
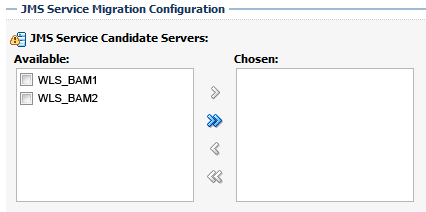
Description of the illustration ''console_migr_services.gif''
-
Click Save.
-
- Task 3 Set the service migration policy for each Managed Servers
-
-
In the Domain Structure pane, select Environment, then Clusters, then Migratable Targets.
-
Click WLS_BAM1 (Migratable).
-
Click the Migration tab.
-
In the Service Migration Policy drop-down list, select Auto-Migrate Exactly-Once Services.
-
Click Save.
-
- Task 4 Manually Target the UMS JMS Server and Persistent Stores to non-migratable targets
-
Oracle User Messaging Service (UMS) 12c (12.1.3) does not support service migration. As a result, you must manually retarget the UMS JMS server and persistent stores to a non-migratable target; otherwise, service migration for Oracle BAM will fail.
To target the UMS services to non-migratable targets:
-
In the Domain Structure window, expand Environment, expand Services, and click Persistent Stores.
The console displays a list of persistent stores. In the list you will see a set of UMS persistent stores names called
UMSJMSFileStore_auto_, followed by a number, one for each Managed Server.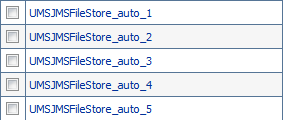
Description of the illustration ''ums_persistent_stores.gif''
-
Click the first UMS file store that is targeted to WLS_BAM1 (migratable).
-
On the settings page for the selected persistent store, change the value selected in the Target drop-down menu from WLS_BAM1 (migratable) to WLS_BAM1.
-
Click Save.
If an error occurs, explaining that the JMS server is not targeted to the same target as its persistent store, then you can ignore the error.
-
Repeat steps 2 through 4 for the remaining UMS file store entries that are targeted to WLS_BAM2 (migratable).
-
In the Domain Structure window, expand Environment, expand Services, expand Messaging, and then click JMS Servers.
The console displays a list of JMS Servers. In the list you will see a set of UMS persistent stores names called
UMSJMSServer_auto_, followed by a number, one for each Managed Server.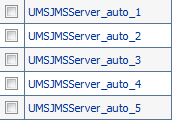
Description of the illustration ''ums_jms_servers.gif''
-
Click on the first JMS store that is currently targeted to WLS_BAM1 (migratable).
-
On the settings page for the selected JMS server, click the Targets tab.
-
Change value in the Target drop-down menu from to WLS_BAM1 (migratable) to WLS_BAM1.
-
Click Save.
-
Repeat steps 7 through 10 for the remaining UMS JMS Servers that are targted to WLS_BAM2 (migratable).
-
Click Activate Changes.
-
- Task 5 Testing Service Migration for Oracle BAM
-
Use the following procedure to verify that service migration is configured properly for Oracle BAM:
-
Verifying the current hosting server:
-
Log in to the Oracle WebLogic Server Administration Console.
-
In the Domain Structure pane, expand Environment, and then expand Clusters.
-
Click Migratable Targets.
-
Click the Control tab.
-
In the Migratable Targets table, locate the row for the WLS_BAM1 (migratable) target.
-
Note the value in the Current Hosting Server column; verify that the WLS_BAM1 Managed Server is the Current Hosting Server for the WLS_BAM1(migratable) target.
-
-
Stop the WLS_BAM1 managed server.
Use the following command:
kill -9 pidIn this example, replace pid with the process ID (PID) of the WLS_BAM1 Managed Server. You can identify the PID by running the following UNIX command:
ps -ef | grep WLS_BAM1
-
Watch the terminal window (or console) where the Node Manager is running.
You should see a message indicating that the WLS_BAM1 Managed Server has failed. The message will be similar to the following:
<INFO> <soaedg_domain> <WLS_BAM1>
<The server 'WLS_BAM1' with process id 4668 is no longer alive; waiting for the process to die.>
<INFO> <soaedg_domain> <WLS_BAM1>
<Server failed so attempting to restart (restart count = 1)>.
-
Return to the Oracle WebLogic Server Administration Console and verify that the Current Hosting Server for the WLS_BAM1 (migratable) target is now WLS_BAM2:
-
Log in to the Oracle WebLogic Server Administration Console.
-
In the Domain Structure pane, expand Environment, and then expand Clusters.
-
Click Migratable Targets.
-
Click the Control tab.
-
In the Migratable Targets table, locate the row for the WLS_BAM1 (migratable) target.
-
Note the value in the Current Hosting Server column; verify that the WLS_BAM2 Managed Server is now the Current Hosting Server for the WLS_BAM1(migratable) target.
-
-
Note:
If automatic service migration occurs, and the required Oracle BAM services are automatically migrated to another Managed Server, note that those services will remain targeted to the failover server, even after the original Managed Server is back online and has rejoined the cluster.Oracle recommends that you manually fail the services back to the original server. For more information, see Section 18.2.3, "Failing Back Oracle BAM Services After Automatic Service Migration Occurs".
16.9 Adding the Enterprise Deployment Administration User to the Oracle BAM Administration Group
Before you validate the Oracle BAM configuration on the Managed Server, add the enterprise deployment administration user (weblogic_soa) to the BAMAdministrators group.
To perform this task, refer to Section 18.2.1, "Configuring Roles for Administration of Oracle SOA Suite Products".
16.10 Starting WLS_BAM1 Managed Server
After extending the domain, restarting the Administration Server, and propagating the domain to the other hosts, start the newly configured BAM servers:
-
Enter the following URL into a browser to display the Fusion Middleware Control login screen:
http://ADMINVHN:7001/em -
Log in to Fusion Middleware Control using the Administration Server credentials.
-
In the Target Navigation pane, expand the domain to view the Managed Servers in the domain.
-
Select only the WLS_BAM1 Managed Server and click Start Up on the Oracle WebLogic Server toolbar.
Note:
BAM Servers depend on the policy access service to be functional, so the WSM-PM Managed Servers in the domain need to be up and running and reachable before the BAM servers are started. -
When the startup operation is complete, navigate to the Domain home page and verify that the WLS_BAM1 Managed Server is up and running.
-
To verify that the BAM software is configured properly:
-
Enter the following URL in the browser:
http://SOAHOST1:9001/bam/composer
The login screen for BAM's composer appears.
If you configured Oracle BAM on separate host computers, enter BAMHOST1 in the URL, rather than SOAHOST1.
-
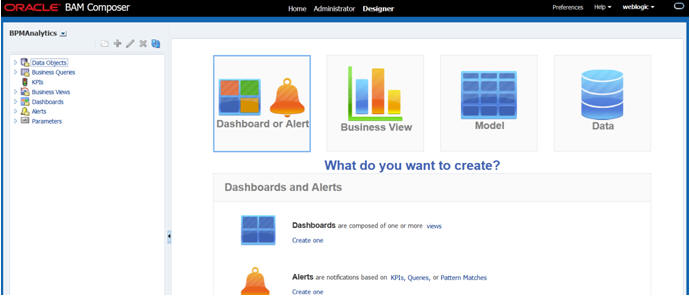
Enter the
weblogic_soalogin credentials.The BAM Composer screen appears, as shown in Figure 16-1.
-
-
Enter the following URL:
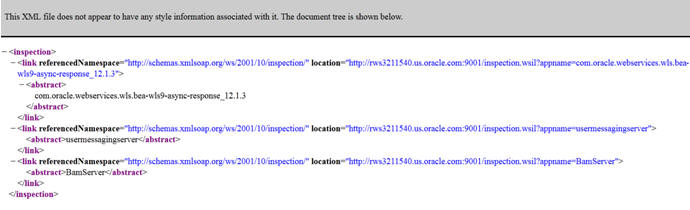
http://SOAHOST1:9001/inspection.wsil/
You should see a response with a the following list of links.
If you configured Oracle BAM on separate host computers, enter BAMHOST1 in the URL, rather than SOAHOST1.
-
Enter the following URL in the browser:
http://SOAHOST1:9001/bam/cqservice/
If you configured Oracle BAM on separate host computers, enter BAMHOST1 in the URL, rather than SOAHOST1.
You should get a message in the browser indicating " BAM CQService is running."
16.11 Starting and Validating the WLS_BAM2 Managed Server
Follow similar steps as in the previous section for WLS_BAM2:
-
Log in to Fusion Middleware Control using the Administration Server credentials.
-
In the Target Navigation pane, expand the domain to view the Managed Servers in the domain.
-
Select only the WLS_BAM2 Managed Server and click Start Up on the Oracle WebLogic Server tool bar.
-
When the startup operation is complete, navigate to the Domain home page and verify that the WLS_BAM2 Managed Server is up and runningAccess the equivalent URLs for the WLS_BAM2:
http://SOAHOST2:9001/bam/composer
The login screen for BAM's composer appears. Enter the login credentials. The BAM composer's menu is displayed.
-
Enter the following URL:
http://SOAHOST2:9001/inspection.wsil/You should see a response with a list of links.
-
Enter the following URL in the browser:
http://SOAHOST2:9001/bam/cqservice/You should get a message in the browser indicating "BAM Service is running."
16.12 Configuring Oracle HTTP Server for the WLS_BAM Managed Servers
Make the following modifications to the Oracle HTTP Server instance configuration files to ensure that the Oracle HTTP Server instances in the Web tier can route Oracle B2B requests correctly to the Oracle B2B software on the Oracle SOA Suite cluster.
Note that these instructions assume you configuring Oracle BAM on the same host as Oracle SOA Suite. If you are using separate hosts for Oracle BAM, you must modify the WebLogicCluster parameter in the Oracle HTTP Server configuration files to reference the BAMHOST computers, rather than the SOAHOST computers.
To enable Oracle HTTP Server to route requests to Oracle B2B Console and to Oracle B2B services:
-
Log in to SOAHOST1 and change directory to the configuration directory for the first Oracle HTTP Server instance (OHS_1):
cd ASERVER_HOME/config/fmwconfig/components/OHS/OHS_1/
-
Add the following directives inside the
<VirtualHost>tag in thesoa_vh.conffile:<Location /bam/composer > SetHandler weblogic-handler WebLogicCluster SOAHOST1:9001,SOAHOST2:9001 </Location> <Location /OracleBAMWS> SetHandler weblogic-handler WebLogicCluster SOAHOST1:9001,SOAHOST2:9001 </Location>
-
Change directory to the following location so you can update the configuration file for the second Oracle HTTP Server instance (OHS_2):
cd ASERVER_HOME/config/fmwconfig/components/OHS/OHS_2/
-
Open the
soa_vh.conffile and add the B2B directives to the<VirualHost>tag. -
Restart the Administration Server.
-
After the Administration Server is running, review the files in the following directories on both WEBHOST1 and WEBHOST2 to be sure they contain the modifications made in the Administration Server domain directory:
MSERVER_HOME/config/fmwconfig/components/OHS/instances/OHS_1/MSERVER_HOME/config/fmwconfig/components/OHS/instances/OHS_2/ -
Restart the Oracle HTTP Server instances on WEBHOST1 and WEBHOST2.
16.13 Configuring the WebLogic Proxy Plug-In
Set the WebLogic Plug-In Enabled parameter for the BAM cluster.
-
Log in to the Oracle WebLogic Server Administration Console.
-
In the Domain Structure pane, expand the Environment node.
-
Click on Clusters.
-
Select the BAM_Cluster cluster to which you want to proxy requests from Oracle HTTP Server.
The Configuration: General tab is displayed.
-
Scroll down to the Advanced section and expand it.
-
Click Lock and Edit.
-
Set the WebLogic Plug-In Enabled to yes.
-
Click Save and Activate the changes.Restart the BAM servers for the changes to be effective.
16.14 Validating Access to Oracle BAM Through the Hardware Load Balancer
Verify that Oracle BAM URLs are successfully routing requests from the hardware load balancer to the Oracle HTTP Server instances to the Oracle BAM software in the middle tier.
You can also use this procedure test the failover of the Managed Servers where Oracle BAM is configured.
To verify the URLs:
-
While the WLS_BAM1 Managed Server is running, stop the WLS_BAM2 Managed Server, using the Oracle WebLogic Server Administration Console.
-
Access the following URL and verify the HTTP response as indicated in Section 16.10, "Starting WLS_BAM1 Managed Server":
http://soa.example.com/bam/composer
-
Start WLS_BAM2 from the Oracle WebLogic Server Administration Console.
-
Stop WLS_BAM1 from the Oracle WebLogic Server Administration Console.
-
Access the URL again, and verify the HTTP response is still valid, as indicated in section ,Section 16.11, "Starting and Validating the WLS_BAM2 Managed Server."
16.15 Backing Up the Oracle BAM Configuration
It is an Oracle best practices recommendation to create a backup after successfully extending a domain or at another logical point. Create a backup after verifying that the installation so far is successful. This is a quick backup for the express purpose of immediate restoration in case of problems in later steps.
The backup destination is the local disk. You can discard this backup when the enterprise deployment setup is complete. After the enterprise deployment setup is complete, you can initiate the regular deployment-specific Backup and Recovery process.
For information about backing up your configuration, see Section 18.2.6, "Performing Backups and Recoveries in the SOA Enterprise Deployments."