3 Configuring the Content of a MAF Application
maf-application.xml and maf-features.xml files to define information such as the application name and application features to include for your MAF application.
This chapter includes the following sections:
3.1 Introduction to Configuring MAF Application Display Information
You can configure the display information that appears to the end users of your MAF application by setting values in the overview editor of the maf-application.xml file. Examples of the type of information you enter for the application include the display name, a description of your application, and the application's version number. You can enter similar information for individual application features that you include in your MAF application or distribute for use in other MAF applications. Additionally, you can specify icons that an application feature displays when it renders in a MAF application's navigation bar or springboard.
3.2 Setting Display Properties for a MAF Application
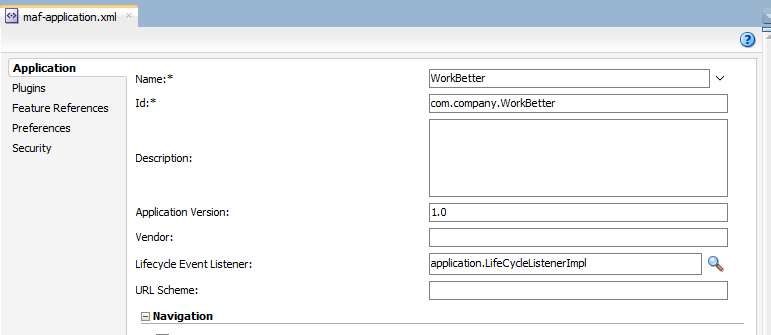
Figure 3-1 shows the Application page of the maf-application.xml file's overview editor where you set the display name and application ID of your MAF application.
Figure 3-1 Setting the Basic Information for the MAF Application

To set the basic information for a MAF application:
3.3 Changing the Launch Screen for Your MAF Application on iOS
MAF provides a HTML page to display the launch screen that appears to end users when your MAF application starts up on an iOS device.
This HTML page is designed to render responsively on the iOS device where the MAF application runs. That is, the page uses the available screen and displays the copyright information and logo in a size appropriate to the device.
You can create a custom HTML page where you define an alternative launch screen. You do this from the Launch Screen section of the Application page of the maf-application.xml file’s overview editor. The HTML page you create is saved in the ApplicationController/public_html directory of your MAF application. The following XML entries appear in the maf-application.xml file’s source if you create a HTML page to use as a launch screen:
...
  <adfmf:configuration>
    <adfmf:launchScreen url="custom-launch-screen.html"/>
  </adfmf:configuration>
...
The URL attribute defines the path, relative to the ApplicationController/public_html directory, that the application uses to find the HTML page you create as the launch screen.
View the HTML page that MAF renders as the default launch screen for iOS devices for ideas on how to create a custom HTML page to render as the launch screen. The default launch screen (maf-launch-screen.html) can be found in the following sub-directory of the deployment profile that you use to first deploy the MAF application:
.../FARs/OracleStandardADFmfUiComponents/public_html/
For MAF applications that you deploy to Android devices, MAF uses a fixed size image as the launch screen. MAF provides a number of these images to provide launch screens for the Android devices that MAF supports. For more information about these images, see How to Add a Custom Image to an Android Application.
3.4 Setting Display Properties for an Application Feature
Each MAF application must have at least one application feature. Application features can be developed independently of each other (and also from the MAF application itself). The overview editor for the maf-feature.xml file enables you to define the child elements of <adfmf:features> to differentiate the application features by assigning each application feature a name, an ID, and setting how their content can be implemented. Using the overview editor for application features, you can also control the runtime display of the application feature within MAF application and designate when an application feature requires user authentication.
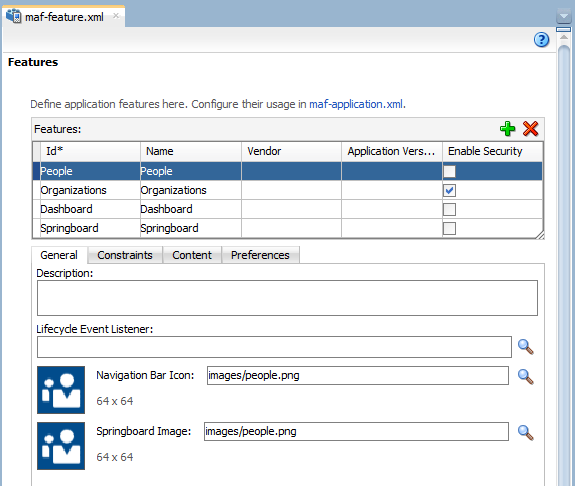
Figure 3-2 shows the General tab of the overview editor for the People application feature in the WorkBetter sample application. Use this tab to specify information such as the name of the application feature and the icons that display in the springboard and navigation bar.
Figure 3-2 General Tab for Application Feature in maf-feature.xml File

Before you begin:
If an application feature uses custom images for the navigation bar and springboard rather than the default ones provided by MAF, you must create these images to the specifications described by the Android Developers website (http://developer.android.com/design/style/iconography.html) and in the "Custom Icon and Image Creation Guidelines" chapter in iOS Human Interface Guidelines, which is available from the iOS Developer Library (http://developer.apple.com/library/ios/navigation/).
You place these images in the view controller project's public_html directory. See also What You May Need to Know About Selecting External Resources .
In addition, you must open the maf-feature.xml file and select the General tab.
To set the basic information for the application feature: