6 Creating the Client Data Model in a MAF Application
This chapter describes how to create data and service objects in the client data model of your MAF application by retrieving resources from REST services.
This chapter includes the following sections:
-
Overview of Creating a Client Data Model in a MAF Application
-
Connecting to a REST Service to Create the Client Data Model
-
Discovering Candidate Data Objects for the Client Data Model
-
Selecting and Persisting Data Objects for the Client Data Model
-
Accessing the SQLite Database Using the MAF Client Data Model DBPersistenceManager
-
Understanding the Client Data Model’s Support for Data Change Events
6.1 Introduction to the Client Data Model in a MAF Application
MAF provides design-time support to connect your MAF application to REST services from where you can expose data objects. You can then create a client data model based upon these data objects. MAF also helps you determine what data to persist on the application in offline mode.
The client data model MAF application contains Java classes and associated files to represent the data model of a MAF application. MAF uses a SQLite database to store data for offline usage, and two types of Java class: data objects (also known as entity objects) and service objects (also known as entity CRUD service objects) to interact with the data. Data objects hold the data that you retrieve from the REST service(s) that your MAF application connects to. The MAF application stores and retrieves data objects in a SQLite database on the device. Service objects perform create, read, update, and delete (CRUD) actions plus other custom actions that operate on the data objects. You typically use service objects to create data controls from where you can drag and drop the associated methods and entity collections onto AMX pages to build the UI layer. The MAF client data model uses the persistence-mapping.xml file to store the object-relation mapping information that identifies how database tables and columns map to data objects and attributes of data objects plus how data objects and attributes of data objects map to attributes in the REST response payloads.
Figure 6-1 illustrates the runtime architecture of the MAF client data model by reference to a specific implementation in a MAF application that reads and writes department information from a REST service.
Figure 6-1 MAF Client Data Model Runtime Architecture
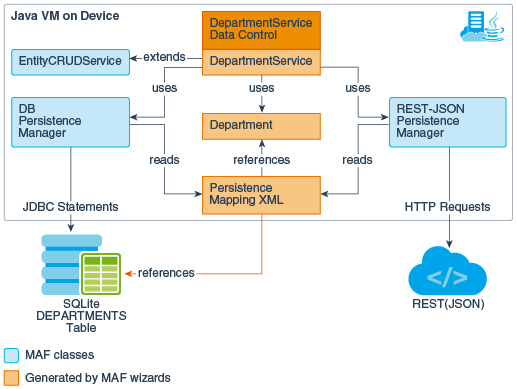
In Figure 6-1, the service object (DepartmentService) provides the CRUD actions plus other custom actions that operate on the Department data object.
The Department data object has getter and setter methods for the department attributes (name, ID, and so on) that map to the corresponding attributes in the REST service request and response payloads. The DEPARTMENTS table in the SQLite database has columns that map to the same data object attributes. The persistence-mapping.xml file stores the information that maps the relationship between the attributes in the various locations (database table columns, Java class attributes and REST payload).
MAF provides a number of wizards in JDeveloper that you use to create the client data model in your MAF application. See Overview of Creating a Client Data Model in a MAF Application. Once you have created the client data model, you can generate data controls from the service objects in the client data model. MAF provides a further wizard (the MAF User Interface Generator) that generates a user interface in your MAF application based on the data controls and data model that the MAF client data model generates. See Creating a User Interface from a MAF Client Data Model.
Tip:
See Consuming and persisting REST/JSON services with Oracle MAF and the Client Data Model (CDM) for a tutorial that guides you step-by-step through the creation of a MAF application that uses the client data model to access a REST service.6.2 Overview of Creating a Client Data Model in a MAF Application
Create a client data model from REST services by discovering data objects, configuring their attributes, mapping relationships for them, identifying the REST resources to use for CRUD actions, and generating the artefacts to include in the model.
Using this wizard, you can connect to a generic REST service or to REST services hosted on Oracle Mobile Cloud Service (MCS). Once you connect, MAF displays additional dialogs where you perform tasks to identify and retrieve the data you want to use in your application. These tasks are:
-
Discover the data objects that are candidates for use in your MAF application. MAF supports the discovery of data objects from the following data object resources:
-
Sample REST resource URLs
-
Sample resource payloads
-
RAML files
-
ADF Business Components REST services
-
-
Having discovered the candidate data objects for use in your MAF application, MAF presents you with a dialog where you select the data objects that you want to use. MAF also provides an option to create new data objects.
-
Additional dialogs let you inspect and modify data object attributes. Tasks you can perform include edit the attribute name, the name that appears in the REST service payload, the Java type and the database column type for each attribute in addition to choosing not to persist sensitive data on the device. You also select a key attribute. It is important that the key attribute you select be unique.
-
Specifying parent-child relationships for data objects.
-
Define the REST resources and associated HTTP methods to use for CRUD actions plus specify resource details such as the query and path parameters.
-
Once you have identified the REST resources to use for CRUD actions, MAF presents you with dialog where you set the runtime behavior of your MAF application by, for example, enabling offline transactions, enabling remote read and write in the background, or showing web service errors.
-
MAF finally presents a dialog where you specify the location in your application of the artefacts that MAF generates for the client data model. Use this dialog to determine the project location and package name(s) of Java classes that MAF generates.
Once you complete the MAF Client Data Model From REST Web Service wizard, MAF generates a client data model for your MAF application. You can invoke the wizard again to edit the generated client data model by, for example, identifying additional data objects in the REST service that you want to include in the data model. If you want to edit a client data model without connecting to the REST service to retrieve additional data objects, invoke the Edit Persistence Mapping wizard. This latter wizard shares dialogs with the MAF Client Data Model From REST Web Service wizard, but does not require a connection to REST services.
You can also generate data controls from the service objects in the client data model. Once you generate data controls, you can drag and drop data and operations from the Data Controls panel to AMX pages to create the UI of your MAF application. Creating data controls is a prerequisite if you want to use the MAF UI Generator to generate a prototype UI for your MAF application. See Creating a User Interface from a MAF Client Data Model.
Note:
If you connect to REST services hosted on MCS, you should not use the MCS Data Offline & Synchronization API. The MAF client data model enables your MAF application to work offline and synchronize data when the MAF application returns online.6.3 Connecting to a REST Service to Create the Client Data Model
Connect to a REST service to identify the data object resources that you want to retrieve for use in the client data model of a MAF application.
You connect to the REST service (whether a generic service, or a service hosted on MCS) by invoking MAF Client Data Model From REST Web Service wizard. See:
-
If connecting to MCS, see What You May Need to Know About the MCS Anonymous Access Key
This task is one in a series of tasks to generate a client data model in your MAF application. See Overview of Creating a Client Data Model in a MAF Application.
6.3.1 How to Connect to the REST Service to Retrieve Data Objects
Use the MAF Client Data Model From REST Web Service wizard to connect to the REST resources and identify candidate data objects that you select for inclusion in the client data model.
6.3.2 What You May Need to Know About the MCS Anonymous Access Key
MAF uses the MCS anonymous access key value to create the authorization header when the MAF application accesses MCS before the application has been authenticated with MCS. This is useful if, for example, you want to send a startSession MCS analytics event to MCS before your user logs in.
The access key value that you use does not have to be the anonymous key. You can use the authorization key of an MCS user defined in the user realm of your MCS mobile backend. Do this if you want to, for example, access MCS storage collections or other resources that are not accessible to anonymous users.
You do not need to prefix the access key with Basic. MAF adds or removes the Basic prefix as needed. If your MAF application needs to support dynamic MCS connections, you can specify an EL expression in the MCS Mobile Backend ID and MCS Anonymous Access Key fields. After you authenticate against MCS, MAF automatically injects the authorization header into every REST call based on the user’s login credentials. That is, MAF ignores the MCS anonymous access key value in the input field once the MAF application has been authenticated.
6.4 Discovering Candidate Data Objects for the Client Data Model
After a MAF application is connected to the REST service, you can select the data objects to be used in the client data model of the application.
The MAF Client Data Model From REST Web Service wizard provides the following options to discover data objects to use in your MAF application:
-
REST resource URLs: Use this option to invoke the REST service to return candidate data.
-
Sample resource payloads: Use this option to enter a sample JSON or XML payload. This option is useful if the first item returned by invoking a live REST service has missing attributes or child data. It is also useful if you do not currently have access to the REST service or if your application will not retrieve data, but will post data.
-
RAML file: A RAML file describes the REST service your application is going to access. MCS automatically creates a RAML file when you define the endpoints for an API in MCS.
-
ADF BC REST Describe: Use this option to access REST services published by ADF Business Components.
See How to Discover Data Objects Using ADF BC REST Describe.
This task is one in a series of tasks to generate a client data model in your MAF application. See Overview of Creating a Client Data Model in a MAF Application.
6.4.1 How to Discover Data Objects Using a REST Resource URL
Specify one or more REST resources including the HTTP method (typically GET) to invoke the REST service and return candidate data objects based on the structure of the response payload.
Figure 6-3 shows the Data Object Resources dialog in the wizard where you specify the REST resources to query.
Figure 6-3 Querying a REST Resource for Data Object Resources
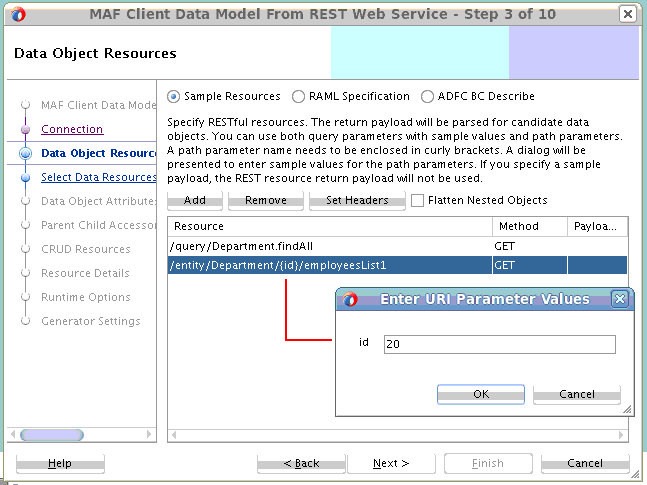
Use the Add and Remove buttons to manage the list of REST resources that you enter in the Resource list, as shown in Figure 6-3. Use the Set Headers button to invoke a dialog where you enter header key-value pairs if specific HTTP headers are required to invoke the REST resource. For example, if you want to make sure that the payload returned by the REST service is in JSON format rather than XML, click Set Headers and enter Content-Type as the key and application/json as the value in the dialog that appears.
For information about the usage of the Flatten Nested Objects checkbox, see What You May Need to Know About the Flatten Nested Data Objects Option.
Note the following before you click Next to query the REST service and return candidate data objects based on the structure of the response payload:
-
MAF inspects the first item in the collection of data that returns from the REST service. If, for example, the first employee in a collection of employees is not a salesperson and, as a result, does not have an associated commission attribute, then the candidate data object for employee will not include a commission attribute. Likewise, if the response payload returned from the REST service is a master-detail structure of departments and employees, make sure that the first department returned contains employees. If it does not, employee will not be identified as a child data object. You can add data objects and attributes on later pages in the wizard. However, it is best to avoid this work if possible.
-
When you enter path parameters enclosed in curly brackets, the wizard presents a dialog (Enter URI Parameter Values) to enter sample values for the path parameter(s) when you click Next. In Figure 6-3, we specified {
id} as the path parameter in theemployeesListresource to reference the current department ID so the dialog appears. Make sure to enter a sample value that returns data. If, for example, the department with the ID value of20does not contain employees, no employee data object will be identified. -
The resources you specify in this page only identify candidate data objects to create and use in your application. You use later pages to specify the exact resources to use for the CRUD actions. The values you enter here will only be used as the default value for the Find All Resource input field for each data object in the CRUD Resources page later in the wizard. A situation where you use different resources to discover data objects and the Find All Resource is where the Find All Resource value returns a subset of the available attributes. For example, a Find All Resource for employees that returns the attributes you show in a list view (employeeId, firstName and lastName). When an end user clicks an employee in the list view to navigate to a detail screen, the MAF application loads the additional employee attributes by invoking a canonical employee REST resource that returns all attributes for the selected employee. This optimizes performance when you have large data sets where each data object has a lot of attributes. In such a scenario, specify the canonical REST resource in the Data Object Resources wizard page to identify all employee attributes.
6.4.2 How to Discover Data Objects Using a Sample Payload
Specify a sample payload to create candidate data objects and attributes.
This option is useful when the:
-
First item of the data collection returned by invoking a REST service misses some attributes and/or child data
-
REST resource is not available yet because the back-end development team is still working on it
-
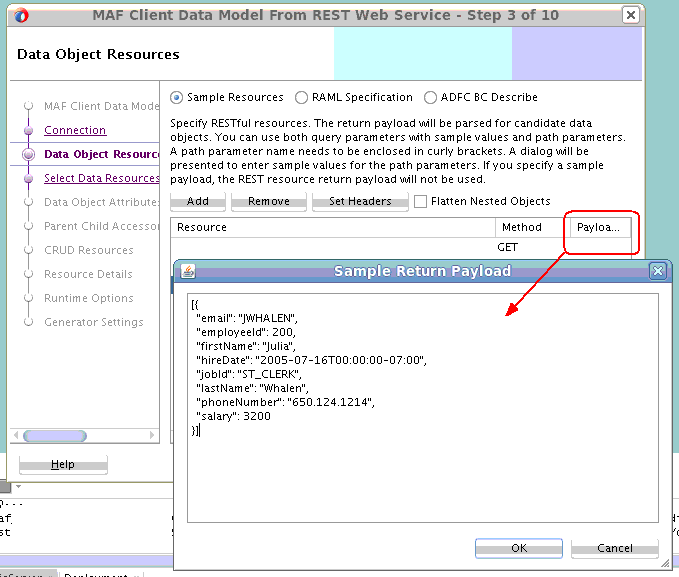
Your application is not retrieving data but only creating (posting) new data. In other words, you do not have a GET resource that returns a response payload to parse. In this case, you specify a sample payload that contains all the attributes that you want to send in your REST call when creating new data. The full signature of the REST call to create new data can be specified later on in the wizard.
When you specify a sample payload, any REST Resource you enter is not invoked. Instead, it derives a default name for your data object and the default value for Find All Resource value in the CRUD Resources page later in the wizard.
Figure 6-4 shows the Sample Return Payload dialog where you enter the sample payload. Invoke this dialog by clicking in the Payload column.
Figure 6-4 Discovering Candidate Data Objects Using a Sample Payload
Click OK to return to the Data Object Resources dialog and Next to proceed to the next page in the wizard.
6.4.3 How to Discover Data Objects Using a RAML File
Specify a RESTful API Modeling Language (RAML) file to create candidate data objects and attributes based on the description in the RAML file.
MAF suggests data objects, parent-child relationships and CRUD resources based on the content in the RAML file. That is, subsequent pages in the wizard present default values based on the content of the RAML file.
Figure 6-5 Discovering Candidate Data Objects Using a RAML File
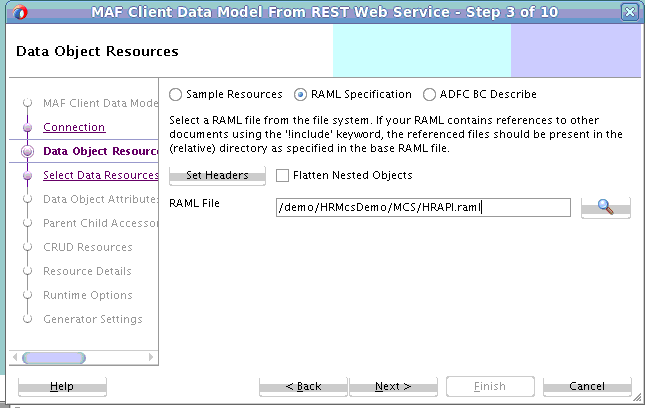
Use the Set Headers button to invoke a dialog where you enter header key-value pairs if specific HTTP headers are required to invoke the REST resource. For example, if you want to make sure that the payload returned by the REST service is in JSON format rather than XML, click Set Headers and enter Content-Type as the key and application/json as the value in the dialog that appears.
For information about the usage of the Flatten Nested Objects checkbox, see What You May Need to Know About the Flatten Nested Data Objects Option.
6.4.4 What You May Need to Know About the Flatten Nested Data Objects Option
Select the Flatten Nested Data Objects checkbox when you have a JSON payload like the following where, by default, manager will be created as its own data object. Selecting the Flatten Nested Data Objects checkbox includes the two manager attributes (name and email) within the department data object.
[
{
"departmentId" : 10,
"departmentName" :"Administration",
"locationId" : 1700,
"manager": {"name" :"Steven"
            "email"  : "steven@oracle.com"
           }
}
, ...
]
6.4.5 How to Discover Data Objects Using ADF BC REST Describe
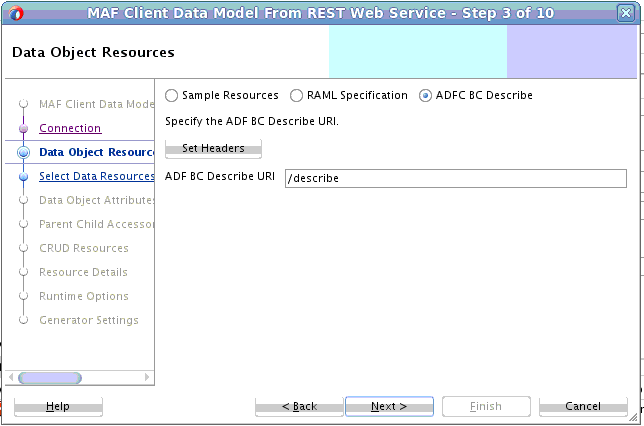
Specify a URI to invoke REST services that are published by ADF Business Components.
Oracle ADF Business Components support publication of REST APIs that work on top of the application module that exposes a set of view objects. A /describe resource is automatically included when you create this type of REST API. See Creating RESTful Web Services with Application Modules in Developing Fusion Web Applications with Oracle Application Development Framework.
A MAF application request to the URI that includes the /describe resource returns metadata describing the REST resources. The wizard inspects the metadata and populates the data objects and REST resources pages later in this wizard based on this inspection.
Figure 6-6 Discovering Candidate Data Objects Using ADF Business Components Describe
6.5 Selecting and Persisting Data Objects for the Client Data Model
Select the data objects that you want to use in the client data model of your MAF application from the list of candidate data objects that MAF identifies. Also select those data objects that you want to persist so that the MAF application can access instances of the data objects when offline.
The Select Data Objects and Data Object Attributes pages in the MAF Client Data Model From REST Web Service wizard help you to perform the following tasks:
-
Select and persist data objects. See How to Select and Persist Data Objects.
-
Create new data objects. See How to Create New Data Objects.
-
Modify data object attributes. See How to Modify Data Object Attributes.
This task is one in a series of tasks to generate a client data model in your MAF application. See Overview of Creating a Client Data Model in a MAF Application.
6.5.1 How to Select and Persist Data Objects
Select the data objects that you want to include and clear the checkboxes for unwanted data objects. Modify the values for the data objects in the Class Name column so that MAF generates valid Java class names when it creates the client data model.
Select the Persist checkbox for each data object that you want to persist the data for so that the MAF application can access it in offline mode. This instructs MAF to create a SQLite database table for the data object that is populated at runtime based on the REST resources you specify later to retrieve the data.
Note:
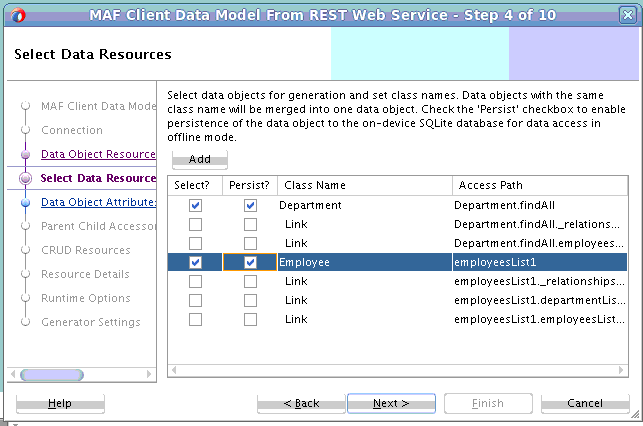
If you do not want to persist data objects for offline access because, for example, the data is volatile, you can still use the MAF client data model for offline transactions. The transactions are stored in a separateDATA_SYNCH_ACTIONS table and synchronization is independent of the data object tables.The accuracy of the list of candidate data objects that the Select Data Objects page, shown in Figure 6-7, presents to you depends on the method used to discover the candidate data objects. A list of suggested data objects from a RAML file is, for example, typically more accurate than the list returned by a sample REST resource like the following:
[
  {
    "departmentId": 10,
    "departmentName": "Administration",
    "locationId": 1700,
    "_relationships": [
      {
        "_link": {
          "href": "http://localhost:7101/HRRest/persistence/v1.0/Model-1/entity/Department/10/employees1",
          "rel": "employees1"
        }
      },
      {
        "_link": {
          "href": "http://localhost:7101/HRRest/persistence/v1.0/Model-1/entity/Department/10/employeesList1",
          "rel": "employeesList1"
        }
      }
    ],
    "employeesList1": [
      {
        "_link": {
          "href": "http://localhost:7101/HRRest/persistence/v1.0/Model-1/entity/Employee/200",
          "method": "GET",
          "rel": "self"
        }
      }
    ]
  },
The sample REST resource displayed above shows candidate data objects for link information that is included in the payload, as shown in Figure 6-7. As it is unlikely that you want to include information about links in the data model, clear the checkbox in the Select column for these candidate data objects. Also edit the value for Class Name so that a valid Java class name appears.
Figure 6-7 Candidate Data Objects Retrieved from REST Resource
6.5.2 How to Create New Data Objects
Create data objects that only live on the mobile device and are not populated through the REST web services that your MAF application connects to.
Click the Add button in the Select Data Objects page to add a new data object to the data model. Edit the default generated name (NewDataObject) to a unique valid Java class.
MAF creates a database table in the SQLite database for each data object that you add. You can populate these database tables with data using the CRUD operations from the service object that MAF generates for the data object when you complete the wizard.
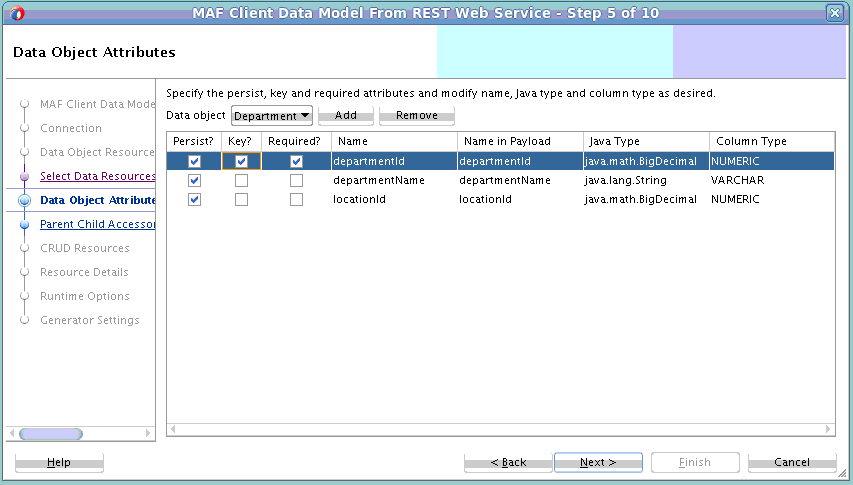
6.5.3 How to Modify Data Object Attributes
Select or modify attributes of the data objects that you have selected for inclusion in the client data model of the MAF application.
You can set or change the key, required, attribute name, name in payload, Java type and database column type of each attribute as desired. For an attribute carrying sensitive data you can choose to not persist it, which causes the attribute value to be null when the application runs in offline mode.
It is important that the key attribute(s) be unique. The persistence runtime uses a data object cache based on the selected key attribute. If you have multiple data object instances with the same key, they will all be written to the same database table row. Because of this, only one instance (with the attributes of the last instance processed) appear in the UI of the MAF application. In other words, all instances are merged into one because MAF thinks it is the same instance. For a child data object, the reference attribute(s) to the parent might be part of the key. If your payload does not contain such reference attribute(s) you can create them in the Parent Child Accessors page of the wizard. Then return to this page (Data Object Attributes) to select the parent-populated attributes as the key attribute.
When using sample resources to identify the candidate data objects, you usually need to modify the Java type for the attributes as they typically show up as java.lang.String. Some attributes may show up as java.math.BigDecimal when the payload value is not enclosed in double quotes. You can change the Java types using the class picker, and the database column type automatically updates based on the Java type you select. Typical type changes include changing numeric attributes from String or BigDecimal to Long or Integer. Date attributes should be set to java.util.Date and a date format should be specified for use in the JSON payload (for example, yyyy-MM-dd'T'HH:mm:ssZ). You specify the date format in the Payload Date Format field of the CRUD Resources page that you access later in the wizard.
If you used a RAML file or ADF BC REST Describe to discover the data objects, the default attribute type is usually correct and does not need modification.
Note:
Select each data object from the Data object drop-down list to make the necessary modifications to the object’s attributes.Figure 6-8 Modify Data Object Attributes
6.6 Specifying Parent-Child Relationships for Data Objects
Specify parent-child relationships for data objects where you want the UI of your MAF application to render master-detail screens.
Figure 6-9 shows the Parent Child Accessors page where you define such a relationship. Use this dialog when you want to set up a relationship such as that which exists between a department and a department’s employees.
Figure 6-9 Parent-Child Accessors Page
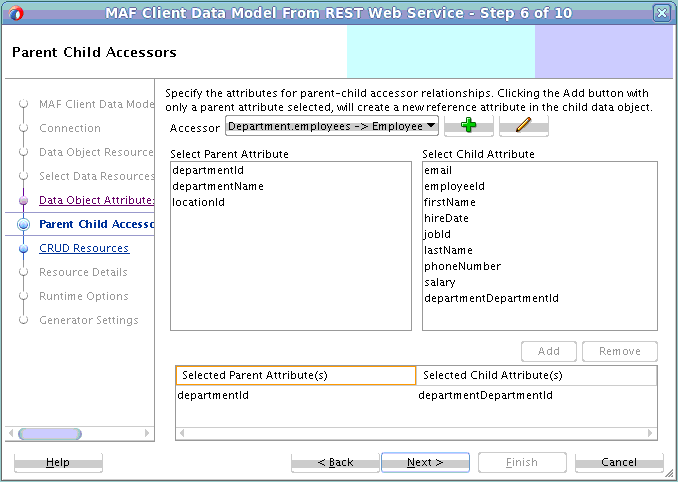
When you specify REST resources that return parent and child data objects in the same payload, and you selected both data objects, the Accessor drop-down list is populated with the parent-child relationship. This also happens if you use a RAML file or ADF BC REST Describe to access REST resources. However, if you retrieve the child data object in a separate REST call and the child object is not included in the payload of the parent data object, the Accessor drop-down list will be empty. If this scenario occurs, you define the parent-child relationship manually in the Parent-Child Accessors page, as described in How to Specify a Parent-Child Relationship for Data Objects.
You need to specify attribute mappings for each parent-child relationship regardless of whether MAF automatically completed the values in the Parent Child Accessors page for you or you manually defined the parent-child relationship. You do this so that MAF restores the one-to-many or one-to-one relationship when the application runs in offline mode. In database terms, you set up a foreign key relationship between the underlying parent and child data object tables. Figure 6-9 shows an example where departmentID and departmentDepartmentId have been specified by adding both attributes to the list in the lower part of the Parent Child Accessors page using the Add button.
If the child data object contains a foreign key attribute that is in the response payload, you select the parent key attribute in the Select Parent Attribute list and the child data object foreign key attribute in the Select Child Attribute list, then click Add to add the attribute mapping. However, this foreign key attribute might not be present in the child data object because the payload did not include it. This typically happens because the child data object is nested within the parent data object payload. In this scenario, there is no need to include the foreign key attribute as the value is inferred by the hierarchical nature of the payload. MAF still needs an attribute mapping for offline mode, so you can select the parent attribute and click Add button without selecting a matching child attribute. Figure 6-9 above shows such a use case where departmentID has been selected in the Select Parent Attribute list and the Add button was clicked. This added the departmentDepartmentId attribute to the employee data object (and a column in the underlying database table. Although this attribute is not included in the REST payload when querying the employee details for a department, the runtime code populates this attribute (and underlying column value) based on the department instance for which the employee details are retrieved.
Tip:
The name of this parent-populated attribute is the name of the data object suffixed with the selected parent attribute name. You can change these attribute names to get clean attribute names. In the example above, do this by clicking the Back button, select the department data object and rename thedepartmentDepartmentId attribute to departmentId.This task is one in a series of tasks to generate a client data model in your MAF application. For more information, see Overview of Creating a Client Data Model in a MAF Application.
6.6.1 How to Specify a Parent-Child Relationship for Data Objects
Access the Parent Child Accessors page from the MAF Client Data Model from REST Web Service wizard.
To specify a parent-child relationship for data objects:
-
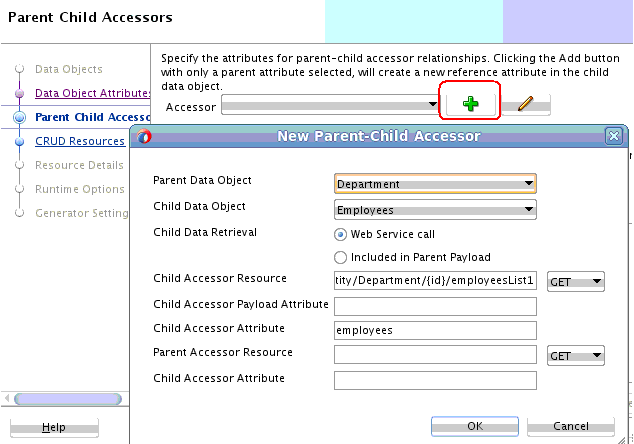
In the Parent-Child Accessor page, click the Plus icon shown in Figure 6-10, and complete the fields in the dialog that appears.
Figure 6-10, for example, shows a dialog where a parent-child accessor to retrieve all employees in a department has been defined.
Figure 6-10 Parent-Child Accessor Page
Note:
MAF populates the Child Accessor Resource field with the resource you used to identify a candidate data object in the Data Object Resources page. In our example, this was/entity/Department/{id}/employeesList1.The value in the Child Accessor Attribute field has been set toemployees. On completion of the wizard, agetEmployeesmethod is generated in thedepartmentdata object, and an employees collection appears under the department node in the data control that you create later.
6.7 Defining CRUD REST Resources
Define CRUD actions to enable the MAF application end user to edit the data objects that the MAF application retrieves from the REST services it connects to.
This task is one in a series of tasks to generate a client data model in your MAF application. For more information, see Overview of Creating a Client Data Model in a MAF Application.
MAF provides the CRUD Resources page where you determine what actions to perform on the data objects that you retrieve to use in the client data model of the MAF application. Figure 6-11 shows the page where a number of operations, such as create, update and delete have been specified for a Departments data object.
Figure 6-11 Defining the CRUD REST Resources for the Client Data Model
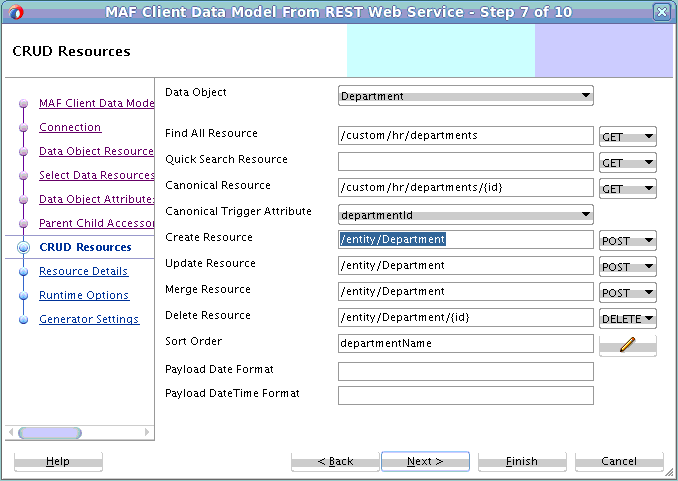
MAF populates values in the CRUD Resources page depending on values that you entered previously plus the method that you used to discover the candidate data objects. If, for example, you used a RAML file or ADF BC REST Describe, MAF populates the page based on best-practice conventions for REST as follows:
-
A POST resource creates a resource
-
A PUT or PATCH resource updates or merge a resource
-
A DELETE resource to delete a resource
If you used sample resource URLs to discover your data objects, the Find All Resource defaults to the sample resource. While the defaults are usually accurate you might need to change the values of the resource and/or HTTP method if your REST services do not follow best practice.
Select each data object from the Data Object drop-down list and enter values in the input fields as follows:
-
Quick Search Resource: Useful for large data sets. For a large data set you typically do not want to execute a Find All Resource that returns all instances as this may cause your application to run out of memory. In such a situation, define a quick search facility in the user interface that returns only the instances that match the search criterion. With a smaller data set, use the Find All Resource to return all instances at once. Execute a quick search filter directly against the on-device SQLite database. Performance is faster as no web service is invoked.
-
Canonical Resource: Specify a value for Canonical Resource when you have a data object with many attributes, and you only want to bring in all the attributes once a specific data object instance has been selected from a list.
-
Canonical Trigger Attribute: If you specify the Canonical Trigger Attribute, MAF generates code in the data object class that automatically invokes the canonical REST resource when the value of the attribute is retrieved through the getter method.
For example, if a
Departmentdata object’s Find All Resource returns a list of department IDs and names to display on a list page and you select adepartmentto go to the detail page which shows all department attributes, then we can set the Canonical Trigger Attribute tolocationId, thegetLocationIdmethod invokes when you navigate to the detail page. MAF has generated code inside thegetLocationIdmethod to automatically invoke the canonical REST resource. -
CRUD resources (Create Resource, Update Resource, and so on): The service object, generated for each data object that has at least one REST resource specified on this page, includes a
save[DataObjectName]method. When you invoke thesave[DataObjectName]method by, for example, dragging and dropping it from the Data Controls panel, MAF decides based on the data object state which resource to call:Create,Update, orMerge. MAF makes its decision as follows:-
If the data object state is new, MAF calls
Createresource. If theCreateresource is not specified, MAF calls theMergeresource. If neither resource is specified, the MAF application will not make a REST call. -
If the data object state is not new, MAF calls the
Mergeresource. IfMergeresource is not specified, MAF calls theUpdateresource. If neither resource is specified, the MAF application will not make a REST call. The data object state is automatically set toNewwhen you create a new data object through the data controlCreateoperation. If you programmatically create a new data object instance using a subclass oforacle.maf.api.cdm.persistence.model.Entity, callsetIsNewEntity(true).
-
-
Sort Order: Define a comma-separated list of attribute names. You can suffix the attribute name with
descto get a descending sort for the attribute. Note that the sort order specified here is the default order in the user interface. The persistence runtime code makes it easy to add UI controls to change the sort order at runtime. -
Payload Date Format: Specify the Java date pattern to convert date attribute string values in the payload to a
java.util.Dateinstance.
6.8 Specifying CRUD REST Resource Details
Specify resource details, including query and path parameters and their values for the various REST resources that you defined in your MAF application.
MAF provides the CRUD Resources Details page where you specify resource details. The wizard page populates the fields with default values. It is good practice to check whether these defaults make sense in your specific application. Figure 6-12 shows the page. You select additional resources from the Resource drop-down to review or customize. You can also add a custom resource by clicking the Plus icon beside the Resource drop-down menu. For more information, see Defining a Custom Resource.
Figure 6-12 Specifying CRUD REST Resource Details
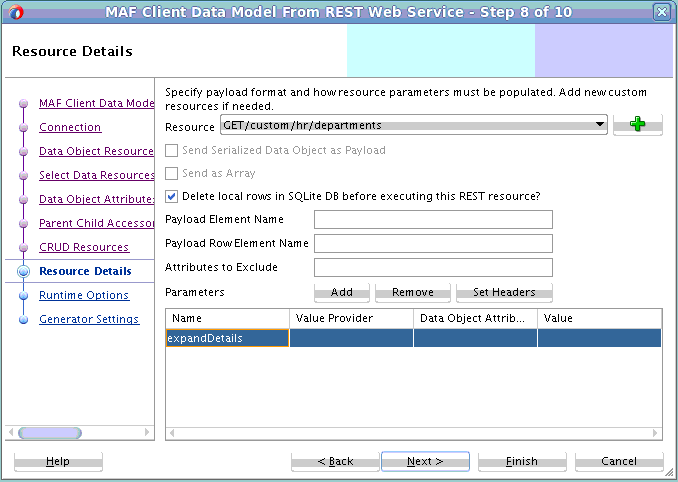
To understand the options on this page, distinguish between GET (read) and non-GET (write) resources. Some fields only apply to one type of resource, or have a different meaning depending on the type of resource.
The Resource Details page helps you to perform the following tasks:
-
Specify GET (Read) Resource Details
For more information, see How to Specify GET (Read) Resource Details.
-
Specify non-GET (Write) Resource Details
For more information, see How to Specify Non-GET (Write) Resource Details.
-
Add Custom Resources
For more information, see How to Add Custom Resources.
-
Specify Query and Path Parameters
For more information, see How to Specify Query and Path Parameters.
-
Add HTTP Header Parameters
For more information, see How to Add HTTP Header Parameters.
This task is one in a series of tasks to generate a client data model in your MAF application. For more information, see Overview of Creating a Client Data Model in a MAF Application.
6.8.1 How to Specify GET (Read) Resource Details
Configure the following menu options to specify GET resource details.
-
Delete Local Rows in SQLite DB before executing this REST resource
If you select the Delete Local Rows checkbox and the GET resource is used as Find All Resource, then all rows in the table created for the corresponding data object are deleted after the REST call is made and before the REST response is processed. This is useful to ensure that any obsolete rows that are no longer included in the GET response payload do not remain visible in the application just because that data was downloaded before. If you select the Delete Local Rows checkbox and the GET resource was defined in Parent-Child Accessor dialog to retrieve child data objects, then all those child rows will be removed just before the REST call is executed.
-
Payload List Element Name
The Payload List Element Name instructs MAF how to find the actual array of JSON objects representing the resource data object in the response payload. For example, if the response payload looks like the following:
{"departmentList":[{"departmentId":10, "departmentName": "Accounting", "locationId": 1400, "managerId": 103}, {"departmentId":20, "departmentName":
                                                                                                  "Marketing", "locationId": 1400, "managerId": 102} ]}
Then you should set the Payload List Element Name to
departmentList. Note thatdepartmentListdoes not have to be an attribute of the top-level JSON object, MAF recursively traverses the response object tree until it finds an object with this attribute name. You can leave this field blank if the response payload directly starts with the array you need. -
Payload Row Element Name
You can use the Payload Row Element Name field to instruct MAF how to find the correct JSON object within a specific array instance. For example, with the following response payload:
{"departmentList":["department":{"departmentId":10, "departmentName": "Accounting", "locationId": 1400, "managerId": 103}}, "department":{"departmentId":20,
                                                                                         "departmentName": "Marketing", "locationId": 1400, "managerId": 102}) ]}
Set the Payload Row Element Name to
department. If you have to traverse a deeper nested object tree to get to the actual JSON object that MAF should parse, use the dot notation in this field. For example,departmentTopObject.department
6.8.2 How to Specify Non-GET (Write) Resource Details
Configure the following menu options to specify non-GET resource details.
-
Send Serialized Data Object as Payload
The Send Serialized Data Object as Payload checkbox should usually be selected when making a PUT, POST or PATCH request. It might be checked with DELETE request as well, depending on how the delete is implemented at the server side. By selecting this checkbox, MAF creates a request payload with key value pairs for each data object attribute that has the Name in Payload property set in the Data Objects Attributes page, described in How to Modify Data Object Attributes:
{"departmentId":10, "departmentName": "Accounting", "locationId": 1400, "managerId": 103} -
Send as Array
Select the Send as Array checkbox to enclose the JSON object that holds the key-value pairs with brackets, as shown in the following example. This checkbox is disabled until you select the Send Serialized Data Object as Payload checkbox.
[{"departmentId":10, "departmentName": "Accounting", "locationId": 1400, "managerId": 103}] -
Payload Row Element Name
Use to instruct MAF to nest the actual JSON object with key-value pairs inside another object. For example, if the request payload should look like this:
{"department":{"departmentId":10, "departmentName": "Accounting", "locationId": 1400, "managerId": 103}}Then you should set the Payload Row Element Name to
department.If your request payload requires payload attribute names different from the GET resource, you cannot specify these write-specific payload attribute names here. You need to create your own remote persistence manager that subclasses the
RestJSONPersistenceManagerand overrides thegetPayloadKeyValuePairsmethod. You can register your custom remote persistence manager on the next page of the wizard, or register it later, see Editing the Client Data Model in a MAF Application. -
Attributes to Exclude
Specify a comma-delimited list of attribute names that should not be serialized into the JSON object used as request payload. For example, if you specify
departmentId, the following payload exclude it from serialization into the JSON object:{"departmentName": "Accounting", "locationId": 1400, "managerId": 103}You could achieve the same by nullifying the value for Name in Payload field in the Data Object Attributes page, but then
departmentIdwould also be ignored in GET requests which is typically not what you want. Note that you should use the data object attribute names in this field, not the payload names of these attributes.
6.8.3 How to Add Custom Resources
A custom resource is a REST call you make that does not map to a find, create, update or delete action that you specified on the CRUD Resources page.
You can add a custom resource in the Resource Details page. Click the green plus icon, as shown in Figure 6-13, to invoke the New Custom Resource dialog where you can define the custom resource:
Figure 6-13 Adding a Custom Resource
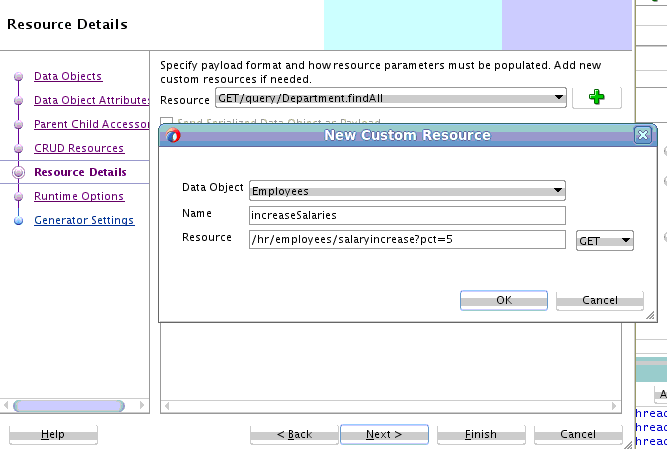
In the service class that MAF generates for the data object, a method will be added with the name you specified in the Name field. Calling this method invokes the REST resource. Custom methods are also included in the data synchronization mechanism of the MAF client data model, so, if you call the custom method in offline mode, it will be registered as a pending synchronization action and the REST call will be executed when the MAF application is online again.
6.8.4 How to Specify Query and Path Parameters
Path parameters enclosed in curly brackets that you specified in the REST resources of the CRUD Resources page or the Parent-Child Accessors dialog appear by default in the Parameters list.
Use the Add button to add additional query parameters.
Figure 6-14 Specifying Query and Path Parameters
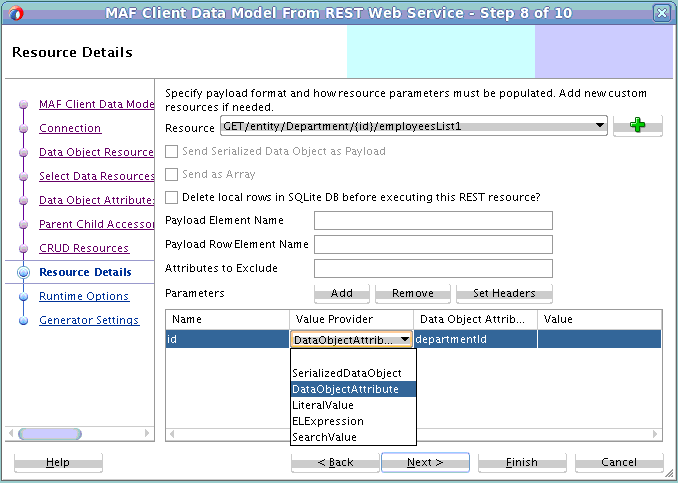
When a MAF application executes the REST resource, it automatically populates the resource query and path parameter values based on the Value Provider you choose:
-
DataObjectAttribute: Populates the parameter with the value of a data object attribute. When using this value provider, you need to choose a value from the Data Object Attribute drop-down list. The data object whose attributes are displayed in the drop-down list are determined by the usage of the resource. For example, the above resource returns the employees within a department, so it is assumed you want to select an attribute from the department data object to set the context for the employees list.
-
SerializedDataObject: If the data that must be persisted should be sent through a query parameter rather than in the request body, you choose this setting. With this value provider, the other columns should remain empty.
-
LiteralValue: Populates the parameter with a literal value specified in the Value column.
-
ELExpression: Populates the parameter with a value obtained by evaluating an EL Expression. You specify the EL Expression in the Value column. You can use EL Expressions with any scope (applicationScope, pageFlowScope, viewScope, deviceScope, preferenceScope) but it is your own responsibility that the expression is valid in the execution context of the REST service call. Remember that when making transactions in offline mode, the REST service will be invoked later and the EL expression context will then be determined by the task flow and page that triggers the data synchronization.
-
SearchValue: Populates the parameter with the value of the quick search value entered in the user interface. You will typically use this value provider only with the Quick Search Resource that you define in the CRUD Resources page described in Defining CRUD REST Resources.
6.8.5 How to Add HTTP Header Parameters
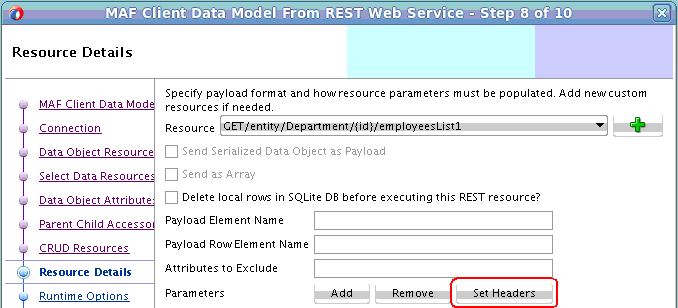
The HTTP headers that you specified in Discover Objects Resources page are applied by default to all resources that you have specified.
If you want to remove a header and/or add another header specific for one resource, click the Set Headers button to invoke a dialog where you enter or modify header key-value pairs if HTTP header parameter changes are required.
Figure 6-15 Setting HTTP Header Parameters
6.9 Setting Runtime Options for the Client Data Model
Set runtime options for the MAF application that you generate on completing this wizard.
This task is one in a series of tasks to generate a client data model in your MAF application. For more information, see Overview of Creating a Client Data Model in a MAF Application.
Figure 6-16 shows the Runtime Options page where you determine how the generated MAF application behaves at runtime.
Figure 6-16 Setting Runtime Options for a MAF Application
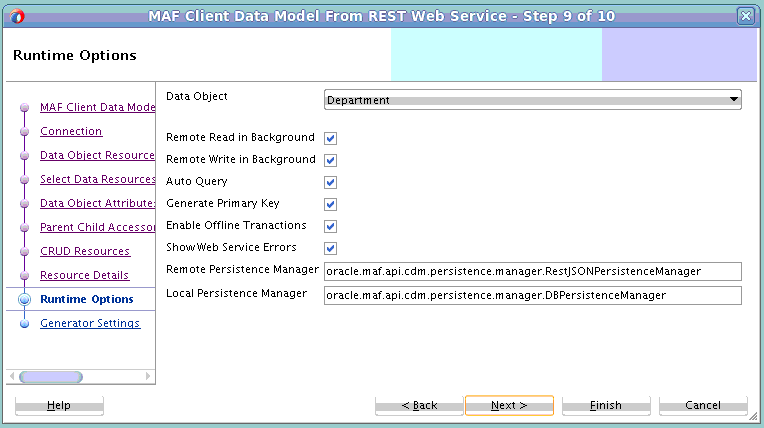
Configure the fields shown in Figure 6-16 as follows:
-
Remote Read in Background: If selected, the GET requests (typically the Find All, Find and Canonical resources) specified for the data object execute in a background thread. It is a good idea to select this checkbox as it enhances the end user's perception of the MAF application’s performance. MAF first queries the SQLite database and show these results immediately on the screen (assuming you persisted the data object, as described in How to Select and Persist Data Objects). REST calls will be made in the background without blocking the user interface. Once the MAF application receives the REST response, it automatically updates the user interface.
-
Remote Write in Background: If selected, non-GET requests (typically the Create, Update, and Merge resources) specified for this data object execute in a background thread. You will usually leave this checkbox selected as it enhances the end user's perception of the MAF application’s performance. After triggering a REST call through, for example, a Save button, the end user can continue to use the application. The user interface is not blocked for the duration of the REST call. Again, if the REST response includes some attributes with server-updated values, the MAF application automatically refreshes the user interface.
-
Auto Query: If selected, MAF automatically queries the on-device database for all rows and/or call resource specified by Find All Resource when the service object class for the data object is initialized. This is convenient when building your AMX pages using the bean data control that you create for the service object class. The bean data control exposes a collection element that you can drag and drop onto an AMX page to, for example, create a list view or form view. When auto-query is selected, this collection element returns all data objects. It initially returns what is present in the SQLite database and refreshes with the remote collection once execution of the Find All Resource completes. If you clear this checkbox, you will need to execute a finder method in your task flow before navigating to the AMX page. Otherwise the AMX page will show no data.
-
Generate Primary Key: If selected, the MAF application automatically generates a primary key when a new data object is inserted into SQLite database when the primary key attribute value is still null. This feature only works when the primary key attribute is a numeric attribute. MAF queries the SQLite database for the current maximum value and increments this value with 1.
-
Enable Offline Transactions: If selected, write REST calls can be invoked while the MAF application is offline. MAF registers the transaction (create, update, remove or a custom action) as a pending data synchronization action. Once the MAF application comes online, MAF synchronizes these actions and executes the associated REST calls. Note that when the MAF application is online, and the REST call fails because the server is not available or the server throws some error when invoking the REST resource, the transaction is also registered as a pending synchronization action. MAF retries execution the next time the MAF application makes a REST call. If this checkbox is cleared, an error message appears to the end user when the MAF application is offline or when the REST call fails.
-
Show Web Service Errors: If selected, any REST Call failure shows an error message popup in the user interface. This is a useful setting during development so you can see errors. We recommend you clear this checkbox when publishing your MAF application in production. You typically do not want to show technical details about REST call failures to end users.
-
Remote Persistence Manager: Register your own remote persistence manager. This is useful if you want to extend the default behavior of the MAF remote persistence manager.
-
Local Persistence Manager: Register your own local persistence manager. This is useful if you want to extend the default behavior of the MAF local persistence manager.
6.10 Generating the Client Data Model
Specify the project and package names for the data objects that MAF generates for the client data model.
This task is one in a series of tasks to generate a client data model in your MAF application. For more information, see Overview of Creating a Client Data Model in a MAF Application.
Figure 6-17 shows the Generator Settings page where you determine the location and package names for the objects in the client data model.
Configure the fields in this page as follows:
-
Add Classes to Project: Select the project within your application where you generate the Java classes. MAF recommends using the default ApplicationController project. This allows you to use the classes in application-scoped managed beans as well as in the application lifecycle methods. It is also avoids class loader issues when using the same data objects in multiple application features. Each MAF application feature has its own class loader, but all share the parent class loader of the ApplicationController project.
-
Data Objects Package: Specify the Java package name used by the Java classes that are generated for each data object.
-
Service Objects Package: The Java package used by the Java classes that are generated for each service object. Such a class is generated when a data object has at least one REST resource associated.
-
Overwrite Data Object Classes: If selected, MAF overwrites existing data object classes. If you added custom code to these classes after a previous generation, you will lose this code.
-
Overwrite Service Object Classes: If selected, MAF overwrites existing service object classes. If you added custom code to these classes after the previous generation, you will lose this code. This checkbox is clear by default because the service object class typically does not need to change when payload structures change. Also, this class is the most likely to contain custom code that you added after generation.
Figure 6-17 Generating the Client Data Model

6.11 Editing the Client Data Model in a MAF Application
Describes how to invoke wizard(s) where you can modify a previously-generated client data model in a MAF application.
MAF supports iterative development of the client data model in a MAF application. You can extend and refine the client data model after its initial creation. Use one of the following two options:
-
Re-run the Client Data Model from REST Service wizard to discover new data objects or edit existing data objects. You can re-enter this wizard to discover new data objects. If you do not want to modify existing data objects, clear the associated Select checkboxes so the existing data objects do not show up in subsequent wizard pages and no Java classes will be regenerated for these data objects, regardless of the settings on the last generator settings wizard page.
-
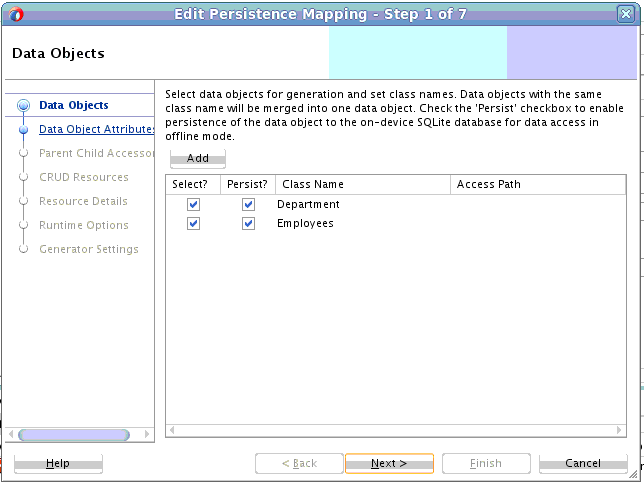
Run the Edit Persistence Mappings wizard shown in Figure 6-18. Invoke this wizard from the Edit Persistence Mappings context menu entry that appears when you right-click the project that contains the client data model.
The Edit Persistence Mappings wizard displays the same pages as the Client Data Model from REST Service wizard except that it does display pages to connect to REST services or discover new data objects. As a result, you typically use this wizard to edit existing data objects although you can use it create data objects that you store in the SQLite database which do not require REST calls to read or write data from a REST service.
Figure 6-18 Editing the Client Data Model
6.12 Accessing the SQLite Database Using the MAF Client Data Model DBPersistenceManager
The MAF client data model provides an API (oracle.maf.api.cdm.persistence.manager.DBPersistenceManager) to access the on-device SQLite database within your MAF application.
The MAF client data model delegates all interaction with the SQLite database to DBPersistenceManager. Use DBPersistenceManager as an alternative to writing the low-level JDBC statements described in How to Connect to the Database. For more information about the role of DBPersistenceManager in the client data model, see Introduction to the Client Data Model in a MAF Application. For information about the DBPersistenceManager and the methods it exposes, see the Java API Reference for Oracle Mobile Application Framework.
The following examples demonstrate how you get an instance of DBPersistenceManager, perform some search operations and other operation on data objects (insert, update, and remove). Apart from using the constructor as shown in the following example, you can also get an instance of the DBPersistenceManager by calling getLocalPersistenceManager() from an instance of a service object. This returns an instance of DBPersistenceManager or a subclass if you registered a custom local persistence manager in the Runtime Options page of the client data model wizard, described in Setting Runtime Options for the Client Data Model.
/* Use the default constructor to get an instance of DBPersistenceManager.*/
DBPersistenceManager pm = new DBPersistenceManager();

/* findAll takes a class or class name as an argument and returns a list of all data objects.*/
List<Department> departments = pm.findAll(Department.class);


/* The overloaded find method returns a filtered list of data objects.
 *
 * There are various ways to specify your filter conditions, as demonstrated by the following examples.
 *
 * A quick search method that returns all employees where at least one of the String
 * attributes (firstName, lastName, emailAddress, and so on) starts with "king" (case insensitive).
 * This translates to use of the SQL LIKE operator where the search value is suffixed with %. */
List<Employee> emps = pm.find(Employee.class, "king");


/* A search method which allows you to specify the search attributes. It returns all employees where at least
 * one of the attributes passed in as list in the third argument starts with "king" (case insensitive). */
List<String> searchAttrs = new ArrayList<String>();
searchAttrs.add("firstName");
searchAttrs.add("lastName");
List<Employee> emps = pm.find(Employee.class, "king", searchAttrs);


/* This is a search method which allows you to specify separate values for each
 * attribute you want to search on, it will return all employees where the firstName
 * equals "Steven" and the lastName equals "King". The query is case sensitive.
 */
Map<String, String> searchAttrs = new HashMap<String, String>();
searchAttrs.put("firstName", "Steven");
searchAttrs.put("lastName", "King");
List<Employee> emps = pm.find(Employee.class, searchAttrs);


/* The findByKey method returns one data object based on its primary key.
 * It first checks the data object cache. If the department with id 10 does not exist in the cache, it queries
 * the database. If you do not want to check the cache, add a third boolean argument checkEntityCache, as demonstrated
 * by the second example
 */
Department dep = (Department) pm.findByKey(Department.class, new Object[] { 10 });
Department dep = (Department) pm.findByKey(Department.class, new Object[] { 10 }, false);


/* Insert, updates and remove a row for a data object instance.
 * MAF automatically commits the change if the second argument is true. If false, you
 * need to call pm.commit() later.
 * MAF generates the primary key attribute for you when calling insertEntity if you selected
 * the Generate Primary Key checkbox in the Runtime Options page of the MAF client data model wizard.
 */
pm.insertEntity(department, true);
pm.updateEntity(department, true);
pm.removeEntity(department, true);
Using Custom SQL Statements
You can specify custom SQL statements if the above data object-based APIs do not provide an option to execute the SQL statement you need. We distinguish between SQL SELECT and SQL DML statements.
Use code as demonstrated in the following example if the result of your SELECT statement needs to be converted to a data object or a data object list.
DBPersistenceManager pm = new DBPersistenceManager();
ClassMappingDescriptor descriptor = ClassMappingDescriptor.getInstance(Dealer.class);
StringBuffer sql = pm.getSqlSelectFromPart(descriptor);
sql.append(" WHERE SALES_ACCOUNT_ID not in (SELECT DEALER_ID FROM PRIORITY_ASSIGNMENT WHERE PRIORITY_ID=" +
         priority.getId() + ")");
sql = pm.constructOrderByClause(sql, descriptor);
ResultSet set = pm.executeSqlSelect(sql.toString(), null);
List<Dealer> dealerList = pm.createEntitiesFromResultSet(set, descriptor.getAttributeMappingsDirect());
Since the result must be converted to data object list, the SELECT clause should include all the columns, and the FROM clause should use the table name that corresponds to the data object. By using the getSqlSelectFromPart convenience method, the SELECT and FROM clause will be automatically created for you using the data object class descriptor from the persistence-mapping.xml file. You can then append your custom WHERE clause to the SQL statement. You can also append your custom ORDER BY clause, or, if you just want to use the default order by as registered with the data object class descriptor you can use the convenience method constructOrderByClause as in the example above. Once you have constructed your SQL SELECT statement, you can execute it using the executeSqlSelect method which returns a JDBC RowSet object. You then convert the JDBC RowSet to a data object list using the createEntitiesFromResultSet method.
For all SQL SELECT results that cannot be converted to a data object list, you can define the whole SQL statement, and also process the JDBC RowSet. The following is an example of an aggregate query:
DBPersistenceManager pm = new DBPersistenceManager();
String sql = "SELECT AVG(SALARY) FROM EMPLOYEE";
ResultSet set = pm.executeSqlSelect(sql, null);
try {
  set.first();
  int averageSalary = set.getInt(1);
}
catch (SQLException e) {
  sLog.severe("Error executing SQL statement: "+e.getLocalizedMessage());
}
For single-row insert, update or delete you will typically use the data object-based API described above. However, if you want to insert, update or delete multiple rows at once, you can use the executeSqlDml method. Here is an example where we increase the salary of all clerks by 10%.
DBPersistenceManager pm = new DBPersistenceManager();
String sql = "UPDATE EMPLOYEE SET SALARY = SALARY * 1.1 WHERE JOB_ID='CLERK'";
pm.executeSqlDml(sql, null, true);
If the third doCommit argument is true, the batch update will be automatically committed. If you set it to false, you need to call pm.commit() later.
6.13 Defining a Custom Resource
Describes how to add custom REST resources in your MAF application’s client data model that do not map directly to the standard CRUD resources supported by the MAF client data model.
The Resource Details wizard page, described in Specifying CRUD REST Resource Details, allows you to add custom resources. When you do this, MAF generates an additional method with the same name as your custom resource into your service object with the following signature:
public void doSomething(Department department) {
  invokeCustomMethod(department, "doSomething");
}
The advantage of this approach is that it is fast and easy to implement. If your MAF application is offline or the REST call fails due to a server error, the custom resource action will be registered as a pending data synchronization action. MAF makes the call later on when the MAF application returns to online mode. In other words, it is handled in the same ways as standard CRUD transactions in offline mode, as described in Synchronizing Offline Transactions from a MAF Application.
The disadvantage of this approach is that it limits you in how you supply query and path parameters, and how you provide the request payload (this can only be the serialized data object). The value of query and path parameters can be defined declaratively using the options described in Specifying CRUD REST Resource Details. If you need complete flexibility in how you construct your URI path with query and path parameters, it is better to go for the programmatic approach and code your REST call in Java.
You can invoke any REST resource using the invokeRestService method on the remote persistence manager, which is either the RestJSONPersistenceManager, or if you connect to Oracle Mobile Cloud Service (MCS), the MCSPersistenceManager. For more information about these classes and methods, see Java API Reference for Oracle Mobile Application Framework.
You could also use the RESTServiceAdapter, described in Creating a Rest Service Adapter to Access Web Services. However, the invokeRestService method has the following advantages:
-
One line of code makes the REST call
-
It handles all responses with HTML status code in
200-299range successfully. No exception is thrown for status codes201-299, as is the case with theRESTServiceAdapter. -
If you have enabled web service logging, you can easily view the REST call details.
-
If connecting to MCS, you do not need to specify the
Oracle-Mobile-Backend-Idand (anonymous)Authorizationheader parameters.
The invokeRestService method has the following signature:
public String invokeRestService(String connectionName, String requestType, String requestUri,
                                              String payload, Map<String, String> headerParamMap, int retryLimit, boolean secured)
Note:
The last argument (secured) is not used. It included for backward compatibility.You typically add a method to your service object in which you invoke the invokeRestService method. You can then make the REST call from the user interface by dragging and dropping the method onto your AMX page. Here is a sample method that makes such a REST call:
public void invokeSomeRestResource(String pathParamValue,String queryParamValue) {

  if (isOnline()) {
      RestJSONPersistenceManager rpm = new RestJSONPersistenceManager();
      String uri = "/someResourcePath/"+pathParamValue+"?someQueryParam="+queryParamValue;
      String result = rpm.invokeRestService("MyRESTConn", "GET", uri, null, null, 0, false);
    // do something with the result
  }
}
If you want to execute the REST call in the background, the code looks as follows:
public void invokeSomeRestResource(String pathParamValue,String queryParamValue) {
  TaskExecutor.getInstance().execute(true, () -> {
    if (isOnline())
    {
      RestJSONPersistenceManager rpm = new RestJSONPersistenceManager();
      String uri = "/someResourcePath/"+pathParamValue+"?someQueryParam="+queryParamValue;
      String result = rpm.invokeRestService("MyRESTConn", "GET", uri, null, null, 0, false);
      // do something with the result
    }
  });
}
If the response should be converted to a list of entities and stored in SQLite database, like the standard Find All resource, use the handleReadResponse method on the remote persistence manager do all this for you. This is the signature of this method:
public <E extends Entity> List<E> handleReadResponse(String jsonResponse, Class entityClass,
                                                     String collectionElementName, String rowElementName,
                                                     List<BindParamInfo> parentBindParamInfos, boolean deleteAllRows)
The collectionElementName and rowElementName arguments map to the Payload List Element Name and Payload Row Element Name that we specify for standard GET resources. See Specifying CRUD REST Resource Details for an explanation on how to set the values of these arguments based on the structure of the response payload. If the response returns an array as top-level object, you need to specify root as the value for collectionElementName.
You can leave the parentBindParamInfos argument null, and the deleteAllRows argument is obsolete (It is included for backwards compatibility). If you want to delete all local rows prior to processing the response payload, then you need to add the code to do so yourself.
The following code sample illustrates how the above example can be extended to process the response payload into a list of entities:
public void invokeSomeRestResource(String pathParamValue,String queryParamValue) {
  if (isOnline()) {
      RestJSONPersistenceManager rpm = new RestJSONPersistenceManager();
      String uri = "/someResourcePath/"+pathParamValue+"?someQueryParam="+queryParamValue;
      String result = rpm.invokeRestService("MyRESTConn", "GET", uri, null, null, 0, false);
      List<Employee> emps = rpm.handleReadResponse(result, Employee.class, "root", null, null, false);
      setEntityList(emps);
  }
}
6.14 Executing Custom Logic After CRUD REST Calls
Describes the methods that MAF generates in service classes to execute CRUD operations against the local and/or remote persistence manager(s). MAF generates these methods from the MAF Client Data Model From REST Web Service wizard.
A department service class, for example, will have methods like findAllDepartment, saveDepartment and removeDepartment. These methods indirectly make the corresponding REST calls if you configured these calls in the MAF Client Data Model From REST Web Service wizard. So, if you want to execute custom logic based on a REST response, you might be inclined to add your logic at the end of these methods. However, this will not work if you execute these REST calls in the background, which might be the case when you select the Remote Read in Background and/or Remote Write in Background checkboxes in the Runtime Options page. In this scenario, your custom logic would already be executed while the REST call is still in progress in a separate background thread.
You need to follow a different approach to make sure your custom logic executes after the REST call completes in the background. If you need to add custom logic after a read REST call (GET), you can override one of the following methods in your service class:
-
executeRemoteFindAll -
executeRemoteFindAllInParent -
executeGetCanonical
Add your custom logic after the call to super, as demonstrated in the following example that overrides executeRemoteFindAll:
@Override
protected List<Department> executeRemoteFindAll()
{
  // call super to get the new list of departments from REST call
  List<Department> result =  super.executeRemoteFindAll();
  // do some custom logic here
  ...

  // return department list
  return result;
}
If you need to execute custom logic after a write REST call (POST, PUT, PATCH, DELETE), create a subclass of the remote persistence manager, and override one of the following methods:
-
insertEntity -
updateEntity -
mergeEntity -
removeEntity
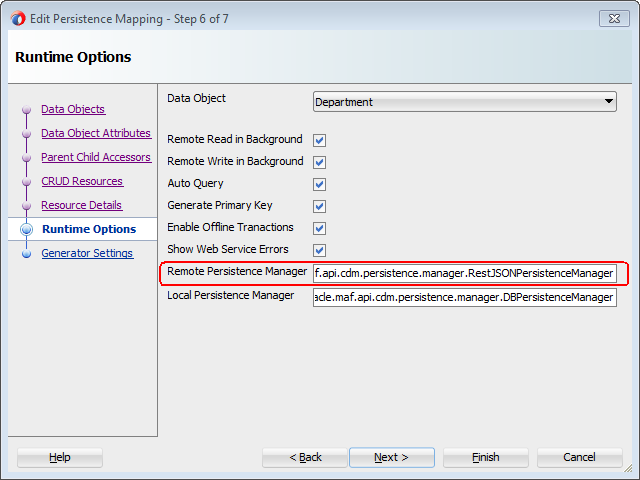
Find the remote persistence manager class that you need to subclass by using the Edit Persistence Mapping wizard. Navigate to the Runtime Options page shown in Figure 6-19, select the correct data object, and copy the class name from the Remote Persistence Manager field. Create a new Java class that subclasses from this class and override one or more of the methods listed above. To ensure that the MAF application runtime uses your custom remote persistence manager, enter the fully qualified class name of your subclass in the Remote Persistence Manager field shown in Figure 6-19. For information about invoking the Edit Persistence Mapping dialog to access the Runtime Options page, see Editing the Client Data Model in a MAF Application.
Figure 6-19 Remote Persistence Manager
You need to subclass the remote persistence manager for write methods because of the offline transactions supported by MAF. In offline mode, REST calls will not be executed but will instead be registered as pending synchronization action(s). When online again, the MAF application executes the REST call directly using your remote persistence manager subclass, bypassing the service class.
If you need to execute custom logic based on the raw response from the REST call, before MAF has done any processing, override the following method in the remote persistence manager:
public String invokeRestService(String connectionName, String requestType, String requestUri,
                                String payload, Map111String,String222 headerParamMap, int retryLimit, boolean secured)
This method handles all REST calls in MAF and returns the response of the REST call. After calling super, you can also call getLastResponseStatus() and getLastResponseHeaders() to get more information about the response.
6.15 Getting Programmatic Access to Service Objects
Describes how to get programmatic access to an instance of a service object.
You typically create a data control for your service objects to create the user interface of your MAF application using drag and drop from the Data Controls panel. If you want to access a service object from a managed bean or a lifecycle listener method, create an instance of your service object as follows:
DepartmentService service = new DepartmentService();
Where DepartmentService extends from oracle.maf.impl.cdm.persistence.service.EntityCRUDService.
This triggers a REST call if you have selected Auto Query in the Runtime Options page, as described in Setting Runtime Options for the Client Data Model, and you specified a value for Find All Resource , as described in Defining CRUD REST Resources. If you do not want to perform this automatic query for the instance you create programmatically, use the following constructor that takes autoQuery as a boolean argument:
DepartmentService service = new DepartmentService(false);
If you do want to perform an automatic query, write code as follows:
DepartmentService service = new DepartmentService();
List<Department> deps = service.getDepartment();
// do something with the departments
This will not work reliably if the REST call executes in the background which happens when the Remote Read in Background checkbox is selected in the Runtime Options page. In that case, the getDepartment() method call only returns the departments stored in the local database (if any), as the REST call executes in a background thread. So, the safest way is to use the following constructor:
public DepartmentService(boolean doRemoteReadInBackground, boolean doRemoteWriteInBackground)
{
  super(false);
  setDoRemoteReadInBackground(doRemoteReadInBackground);
  setDoRemoteWriteInBackground(doRemoteWriteInBackground);
}
This constructor calls super with the autoQuery argument set to false, and will set the remoteReadInBackground and remoteWriteInBackground properties as specified in your constructor call. In other words, using this constructor you can get an instance that ignores the selections made in the Runtime Options page (and stored in the persistence-mapping.xml file).
DepartmentService service = new DepartmentService(false,false);
// get latest department list from server by making synchronous REST call
service.findAllDepartmentRemote;
// get a handle in the department list
List<Department> deps = service.getDepartment();
// do something with the department list
In managed bean code, you might need access to the service object instance used by the data control. Do this using the following convenience method:
DepartmentService service = (DepartmentService) EntityUtils.getEntityCRUDService(Department.class);
This method looks up a data control instance by the name of your service object class. Be aware though that if you use this method without the data control being instantiated yet (that is, used on an AMX page), it creates a new instance using the default constructor which might trigger an unwanted REST call as explained previously. A data control instance lives in the context of an application feature. If you have used the same data control in the AMX pages of two different application features, you will have two instances of the underlying service object. The application feature context in which you execute the getEntityCRUDService method determines which instance returns.
Move as much logic as possible into your service class to reduce the need to get a handle on the data control instance in your managed bean code. If you evaluate lots of value binding and method binding expressions, and subsequently execute lots of these method bindings, you might want to rethink your coding strategy.
Finally, if you only need access to the local SQLite database in your custom Java code and do not require any REST calls to be made, you do not have to create a service object instance. Instead, use an instance of oracle.maf.api.cdm.persistence.manager.DBPersistenceManager to query or manipulate data objects. For more information, see the Java API Reference for Oracle Mobile Application Framework.
6.16 Understanding Usage of the Primary Key
Every data object must have a primary key to ensure that rows in the SQLite database can be uniquely identified. MAF also uses the primary key to minimize data object creation in the data object cache and to prevent the creation of multiple instances of the data object.
Use the following method to retrieve a specific data object instance from the cache:
EntityCache.getInstance().findByUID(Class entityClass, Object[] key)
Use the following method from the DBPersistenceManager class to retrieve a data object from the cache or from the database if the data object has not been cached:
findByKey(Class entityClass, Object[] key)
The primary key can be a composite key consisting of multiple attributes/columns. This is why the key argument in the above methods takes an object array. If the primary key is a single numeric attribute, MAF automatically generates a primary key if you select the Generate Primary Key checkbox in the Runtime Options page described in Setting Runtime Options for the Client Data Model. MAF queries the SQLite database for the current maximum value and increments this value by 1 when the DBPersistenceManager’s insertEntity method is called, either by the framework, or by your custom code.
You can also generate a primary key yourself, by using the following method:
EntityUtils.generatePrimaryKey(Entity entity, int increment)
Note:
The latter method only works if you selected the Generate Primary Key checkbox for the data object as it checks this flag in thepersistence-mapping.xml file.Understanding MAF Management of Server-Derived Primary Key Values
The primary key value that you create or generate for new data object instances can be regarded as a temporary primary key. Obviously, this primary key is not guaranteed to be unique at the server side. Typically, when you invoke a REST service that inserts the data object to the remote server (the Create Resource you specified in the wizard), the remote server generates a truly unique primary key.
If the REST call that inserts the data object returns the data object with the new server-derived values in the response, then the MAF client data model automatically updates the temporary primary key with the server-derived primary key. The MAF client data model deletes the database row with the temporary primary key and inserts a new row with the server-derived key. It also updates the database object cache.
Make sure that the Create Resource endpoint returns the full data object in the response to benefit from this MAF client data model feature.
SQLite Auto-Increment Functionality
Avoid using SQLite’s auto-increment functionality because MAF uses the primary key to identify instances in the data object cache and to update existing rows in the SQLite database when the MAF application fetches the up-to-date data from the server. For this reason, it is better to specify the primary key using one or more data object attributes that are included in the payload coming from the remote server rather than SQLite’s auto-increment functionality.
It is fine to use SQLite’s auto-increment functionality for data objects where no existing data objects instances are retrieved from the server. That is, where no GET resource called to load data into the SQLite database.
For more information about SQLite’s auto-increment functionality, see SQLite’s documentation.
6.17 Using Filtered Entity Lists
Describes the methods that the MAF client data model generates to facilitate the creation of filtered lists in the UI of your MAF application.
MAF generates a getter method in the data object’s CRUD service class that returns a collection of the data object instances. An employee data object’s service class (EmployeeService) has, for example, the following method:
public List<Employee> getEmployee() {
  return getEntityList();
}
The EntityCRUDService superclass stores the returned list in a private member variable (private EntityList<E> entityList). This list contains all data object instances retrieved from the local SQLite database and/or from a call to the Find All REST resource if you selected the Auto Query checkbox in the Runtime Options page, as described in Setting Runtime Options for the Client Data Model.
To filter this list based on a quick search field in the user interface, use the find[entityName] method that the data object CRUD service class also generates. For example, the following method is generated for an employee data object.
public void findEmployee(String searchValue) {
  super.find(searchValue);
}
Drag and drop the method from the Data Controls panel onto your AMX page to render a search field and a command button to invoke the find[entityName] method. When the end user taps the command button to invoke the find[entityName] method, the find[entityName] method delegates to the find method in the DBPersistenceManager class. For more information about the DBPersistenceManager class, see Accessing the SQLite Database Using the MAF Client Data Model DBPersistenceManager and Java API Reference for Oracle Mobile Application Framework. The result returned by the find method is stored as the new content of the entityList variable. A data change event is send to the user interface to refresh the list correctly after the end user clicks the command button.
You can also write a custom method to filter entity lists. The following example filters a list of employees to only clerks.
public void filterClerks()
{
  DBPersistenceManager pm = new DBPersistenceManager();
  Map<String,String> searchAttrs = new HashMap<String,String>();
  searchAttrs.put("jobId","CLERK");
  List<Employee> clerks = pm.find(Employee.class,searchAttrs);
  setEntityList(clerks);
}
The call to setEntityList updates the entityList variable and sends the required data change events to the user interface once setEntityList is invoked.
Note:
It does not matter whether this method is invoked through some UI action or through Java code in a background thread.Assume, for example, that the user interface of your application needs to show multiple filtered lists at the same time. You want to show, for example, a list of employees and a list of clerks. In this scenario, the filterClerks method cannot update the entityList member variable because entityList already shows all employees in the user interface. The solution is to add a getter method to return the list of clerks. This adds a clerks collection attribute to the EmployeeService data control that you can drag and drop onto AMX pages to show the list of clerks. The following code example illustrates such a getter method:
public List<Employee> getClerks()
{
  DBPersistenceManager pm = new DBPersistenceManager();
  Map<String,String> searchAttrs = new HashMap<String,String>();
  searchAttrs.put("jobId","CLERK");
  List<Employee> clerks = pm.find(Employee.class,searchAttrs);
  return clerks;
}

@Override
protected void setEntityList(List<Employee> entityList)
{
  super.setEntityList(entityList);
  // we also need to refresh the clerks list
  getPropertyChangeSupport().firePropertyChange("clerks", null, getClerks());
  getProviderChangeSupport().fireProviderRefresh("clerks");
}
The previous example overrides the setEntityList method to handle the situation where we retrieve the latest list of employees in the background by calling the Find All REST resource. When a MAF application executes a Find All REST call in the background, it calls setEntityList when the response is returned and the database has been updated with the latest set of data object instances included in the response payload. In our example, the user interface shows both a list of all employees and a list of clerks. We want both lists updated when the REST call completes. Overriding the setEntityList method ensures that the getClerks method is executed again once the latest set of employees has been retrieved from the REST service and ensures that data change events are sent to refresh the clerks list.
6.18 Creating a User Interface from a MAF Client Data Model
MAF applications where you have generated a client data model can avail of a number of features provided by MAF that facilitate your development work.
Once you create the client data model, you typically create a data control for each entity service class that the client data model generated. These data controls include a large number of methods that allow you to build your MAF AMX pages by dragging and dropping operations and collections from the Data Control palette in JDeveloper. For more information, see How to Create Data Controls from the Client Data Model.
If you created your client data model as described in Overview of Creating a Client Data Model in a MAF Application, you can make use of the following features that MAF provides to make you productive as you build and test the user interface layer of your MAF application:
-
Use the MAF User Interface Generator wizard to test your client data model and prototype the user interface of your MAF application. This wizard generates a complete MAF application feature that includes a task flow, AMX pages, and data bindings. To use this wizard, you create a data control and then generate the application feature from the data control. For more information, see How to Use the MAF User Interface Generator.
-
View pending data synchronization actions using reusable data synchronization application feature included with MAF. Alternatively, create your own AMX pages using the data synchronization service data control.
-
Force your MAF application to behave as if it is offline while it is actually connected to the internet.
-
Add a visual indicator to show end users that the MAF application is performing work the background. You typically use this visual indicator to inform end users that the MAF application is reading or writing data to or from a remote server.
-
Inspect the REST calls your MAF application makes by using the web service calls application feature included with MAF
6.18.1 How to Create Data Controls from the Client Data Model
Describes how to create data controls from the service objects created during the generation of the MAF application’s client data model.
Once you complete the creation of the client data model, as described in Overview of Creating a Client Data Model in a MAF Application, you typically create data controls from the service objects generated during the latter task. These data controls facilitate the creation of the user interface of your application. You can drag the collections, attributes, or operations from the Data Controls panel in JDeveloper and drop them on the AMX page where MAF prompts you to choose the appropriate AMX components to render data or UI controls in the AMX page. Alternatively, you can generate an application feature from the data control using the MAF User Interface Generator wizard, as described in How to Use the MAF User Interface Generator.
To create data controls from the client data model:
-
In the Applications window, navigate to the service object that the client data model wizard generated.
The location of the service objects depends on the options you chose in the client data model wizard. Figure 6-20, for example, shows the DepartmentService and EmployeeService service objects in the ApplicationController project of a MAF application.
Figure 6-20 Client Data Model Service Object
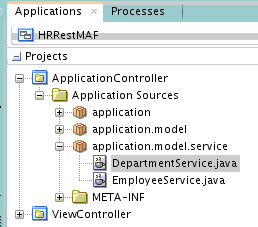
-
In the Applications window, right-click the service object (for example,
DepartmentService.java) and choose Create Data Control from the context menu that appears. -
Complete the fields in the Create Bean Data Control wizard that appears and click Finish.
6.18.2 What Happens When You Create a Data Control from the Client Data Model
MAF generates a data control from the service object with a range of elements and operations that you can drag and drop to AMX pages.
This data control can also be used by the MAF User Interface Generator wizard to create an application feature, as described in How to Use the MAF User Interface Generator.
Figure 6-21 Data Control Created from a Client Data Model Service Object
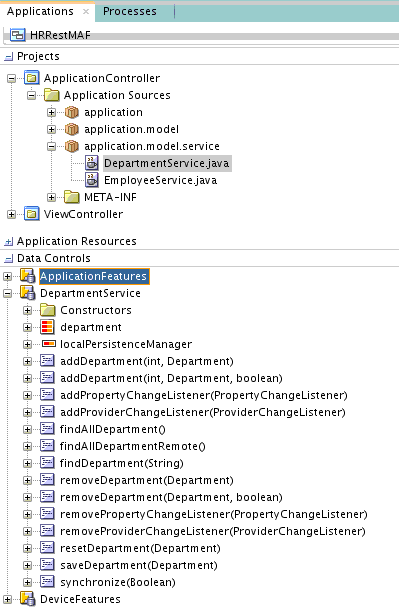
6.18.3 How to Use the MAF User Interface Generator
Use the MAF User Interface Generator wizard to create a MAF application feature with a task flow, AMX pages and data bindings if you generated a client data model in your MAF application.
This wizard helps test your client data model and creates a prototype user interface for your MAF application. Before you use the wizard, create a client data model as described in Overview of Creating a Client Data Model in a MAF Application. Generate data controls from the service objects that are created when you create a client data model. Make sure that the data control for which you want to generate a MAF application feature appears in the Data Control window of JDeveloper. You may need to click the refresh icon.
The wizard generates a list view page and a form page for every data object that the data control exposes. You can choose the data object attributes to expose in the list view page. The form page displays all data object attributes.
To use the MAF User Interface Generator wizard:
-
In the main menu, choose File and then From Gallery.
-
In the New Gallery, in the Mobile Application Framework node of the Client Tier category, double-click MAF User Interface Generator.
-
Click Next in the welcome page and in the Select Data Control page, select the data control for which you want to generate a MAF application feature.
-
You can select the Enable Feature Security? checkbox in the Select Data Control page if you have already configured security for your MAF application, as described in Securing MAF Applications. You can perform this task at a later time.
-
Click Next to navigate to the Data Object UI Settings page, shown in Figure 6-22, and configure values as follows:
-
Data Object: Choose the data object from the drop-down list and configure the display title of this object plus the operations that the user interface exposes for end users to perform (create, update, or delete the object, and so on). Select the checkboxes for Create Allowed, Update Allowed and Deleted Allowed if you have defined CRUD REST resources as described in Defining CRUD REST Resources.
-
Show on Parent Page: Select for child data objects where you want to include the list view of the child data object inside the form page of the parent data object. Clear the checkbox to display on a separate page. Use of this checkbox assumes that you have configured a parent-child relationship, as described in Specifying Parent-Child Relationships for Data Objects.
-
List Attributes: Specify the data object attributes to display in the list view page. You can also choose a list divider.
Figure 6-22 Configuring the User Interface for Pages Generated by MAF User Interface Generator
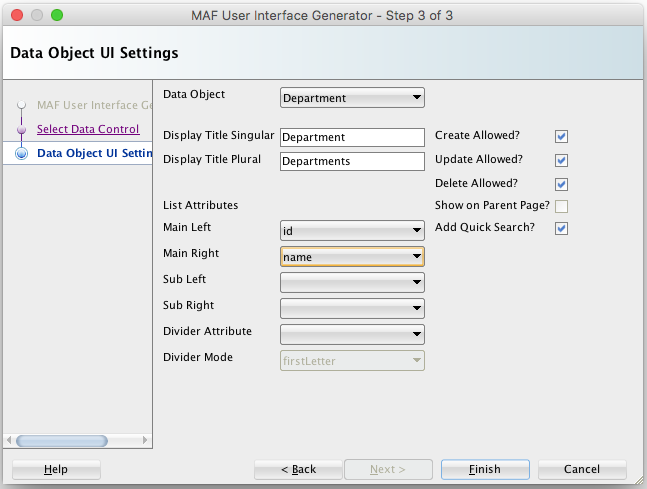
-
-
Click Finish to generate the MAF application feature includes the user interface.
6.18.4 What Happens When You Generate a User Interface
MAF makes the following changes to your MAF application when you complete the MAF User Interface Generator wizard:
-
Adds the newly-created MAF application feature to the
maf-feature.xmlfile. -
Generates a task flow in a sub-directory of the
Web Contentdirectory. The name of the sub-directory derives from the name of the data object (for example,Department). -
Generates AMX pages for every view activity in the generated task flow and generates AMX page definitions for the generated AMX pages.
-
Adds
GoToFeatureandConnectivitymanaged beans to theadfc-mobile-config.xmlfile. The generated AMX pages use these managed beans. -
Adds references to the newly-created MAF application feature plus two other application features that MAF includes when you generate the client data model. These are the data synchronization application feature and the web services call application feature. For more information about using these application features, see Synchronizing Offline Transactions from a MAF Application and Inspecting Web Service Calls in a MAF Application.
6.19 Synchronizing Offline Transactions from a MAF Application
MAF applications allow end users to perform transactions when the application is in offline mode. MAF performs a data synchronization action for each transaction when the application is next in online mode.
A transaction in this context is a method invocation on a service object that results in a REST call to create, modify or delete data. If you invoke a service object’s method, such as, saveDepartment(Department), MAF checks if there is a corresponding REST resource to call. If there is no corresponding REST resource, MAF invokes the method against the on-device SQLite database if applicable. If there is a corresponding REST resource to call, MAF creates a data synchronization action. The data synchronization action holds the type of resource to execute (Insert, Update, Remove, or a custom action) and all data of the data object instance which the transaction requires.
If the MAF application is in online mode, MAF starts the synchronization action and invokes the corresponding REST resource. If the MAF application is in offline mode and you enabled offline transactions for the data object, MAF registers the data synchronization action and stores it as a pending synchronization action. MAF synchronizes the action when the MAF application is next in online mode. MAF preserves the exact sequence in which transactions are committed when synchronizing.
You enable offline transactions for a data object by selecting the Enable Offline Transactions checkbox, as described in Setting Runtime Options for the Client Data Model. If you disable offline transactions for a data object, MAF throws a “Device is offline” exception if an end user attempts to perform an offline transaction on the data object. Prevent this exception by disabling the UI controls when the MAF application is in offline mode so that end users cannot create a transaction that throws the exception.
MAF stores data synchronization actions in the PENDING_SYNCH_ACTIONS table of the SQLite database. The data object’s SQLite database table does not store information related to data synchronization actions. Assume, for example, an end user deletes a department when the MAF application is in offline mode. This action removes the corresponding row from the DEPARTMENTS table in the SQLite database and a corresponding data synchronization action is added to the PENDING_SYNCH_ACTIONS table. When the MAF application is next in online mode, the REST action associated with the data synchronization action of deleting the department is performed. This ensures that the local SQLite database tables reflect the latest transactions performed by end users regardless of whether the associated REST calls have been performed or not.
When a MAF application returns to online mode from offline mode, MAF waits for the application to invoke a REST call. When this event occurs, MAF synchronizes the pending data synchronization actions before processing the REST call. This synchronization makes sure that the subsequent REST call(s) and responses to the MAF application do not use obsolete data. You can explicitly invoke this automatic synchronization when the MAF application returns to online mode, even if there are no REST calls to trigger the automatic synchronization by invoking the synchronize(boolean) method from any service object in your MAF application. The oracle.maf.impl.cdm.persistence.service.EntityCRUDService class, from which all service object classes extend provides the synchronize(boolean) method. Invoking this method once from any service object class performs an automatic synchronization for all pending data synchronization actions in the MAF application. The boolean argument for synchronize determines whether synchronization happens in the background (true) or in the foreground (false). Although not recommended, you can disable the default behavior of MAF applications to synchronize pending synchronization actions before invoking a REST call. For more information, see What You May Need to Know About Disabling Automatic Synchronization.
MAF applications cannot detect if data synchronization conflicts occur when a MAF application returns to online mode and synchronizes data. Assume, for example, that an end user of your MAF application updates a department when the MAF application is in offline mode. Elsewhere, another user of a web application that accesses the same data set modifies the same department information. MAF cannot detect this latter change. When the MAF application returns online, MAF attempts to synchronize the changes in the PENDING_SYNCH_ACTIONS table. To resolve and work around the issue just described, you need to identify and resolve data synchronization conflicts at the location where all applications (mobile, web, and so on) access the data set that your MAF application accesses.
When MAF tries to synchronize pending synchronization actions by calling the corresponding REST resource, the REST call may return an error response for an action because, for example, the server is down. If this happens, MAF keeps the data synchronization action in the PENDING_SYNCH_ACTIONS table. It also updates the action with the timestamp of the synchronization attempt and the synchronization error. MAF continues processing the remaining data synchronization actions in the table despite the failure of one or more actions. MAF retries these pending data synchronization actions the next time it performs synchronization. You can expose these pending synchronization actions to end users so they can view and make a decision on what do with actions that remain to be synchronized. For more information, see How to View Pending Synchronization Actions. You can also write custom logic to execute in your MAF application on completion of a synchronization action. You can, for example, write code that executes in response to failure to synchronize. For more information, see How to Add Custom Logic to Handle Failed Synchronization Actions.
6.19.1 How to View Pending Synchronization Actions
Add the DataSyncFeature.jar feature archive to your MAF application to display an application feature where end users can view and remove pending synchronization actions.
Once added, your MAF application includes an application feature that includes a menu to view pending synchronization actions. End users can tap each pending synchronization action to view more detail and make a decision to remove the action or leave it for MAF to re-attempt to synchronize it. Figure 6-23 shows a composite image of the menu entry and the Pending Sync Actions screen in a MAF application where this feature archive has been added.
Figure 6-23 Viewing Pending Sync Actions
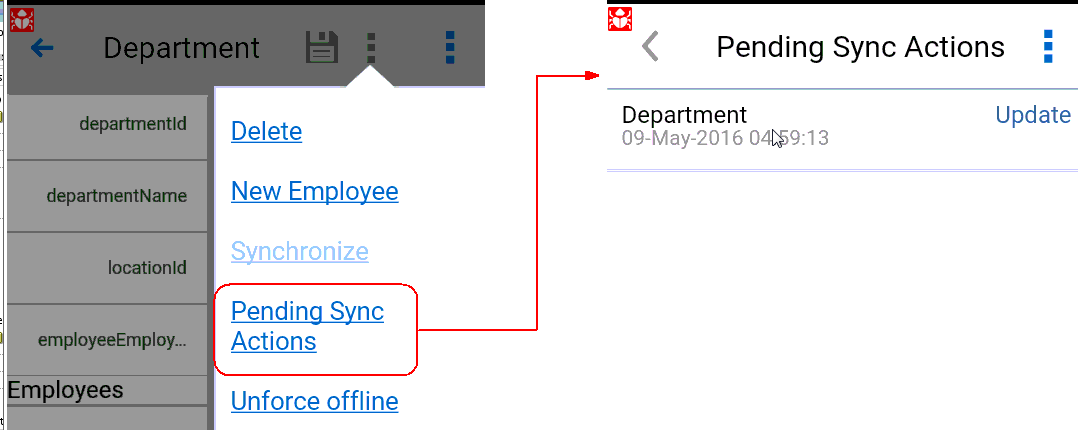
Note:
The MAF User Interface Generator wizard automatically adds this FAR to the MAF application on completion. For more information, see Creating a User Interface from a MAF Client Data Model.To add the DataSyncFeature.jar FAR:
-
In the main menu, choose Application and then Application Properties.
-
In the Application Properties dialog, navigate to the Libraries and Classpath page and click Add JAR/Directory.
-
In the Add Archive or Directory dialog that appears, navigate to the
jdeveloper/jdev/extensions/oracle.maf/FARs/CDMdirectory in your JDeveloper installation and select theDataSynchFeature.jarfile so that it appears under the Classpath entries for your MAF application. -
Click OK to close the dialogs.
-
In the Feature References page of the
maf-application.xmlfile’s overview editor, add the data synchronization feature to your application by selecting it from the Insert Feature Reference dialog, as shown in Figure 6-24.Figure 6-24 Adding FAR to View Pending Synchronization Actions
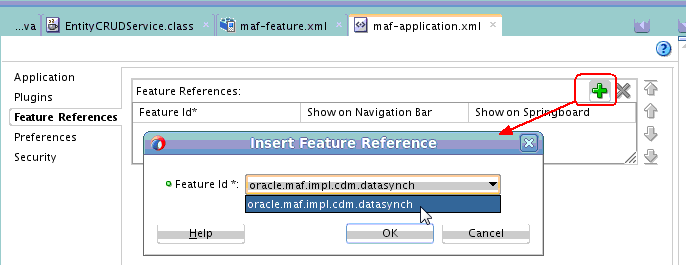
6.19.2 How to Add Custom Logic to Handle Failed Synchronization Actions
Write custom code that executes in your MAF application once data synchronization completes if you want to handle failed synchronization actions programmatically.
Perform the following steps to write Java code in and register it in your MAF application:
-
Create a Java class that extends from
oracle.maf.impl.cdm.persistence.service.DataSynchManager. -
Override the
dataSynchFinishedmethod to add custom logic after the data synchronization action(s) complete.protected void dataSynchFinished(java.util.List<DataSynchAction> succeededDataSynchActions, java.util.List<DataSynchAction> failedDataSynchActions)The
dataSynchFinishedmethod has two arguments: a list of successful synchronization actions and a list of failed synchronization actions. You can use this method to, for example, warn end users that one or more transactions failed and will be re-tried later, or you can inform them that all pending data synchronization actions have been processed successfully.Add the Java code to implement your synchronization policy to this method. The following simple example informs the user about the number of successful and failed synchronization actions:
package application.model.service; import java.util.List; import oracle.adfmf.framework.exception.AdfException; import oracle.maf.impl.cdm.util.MessageUtils; import oracle.maf.api.cdm.persistence.service.DataSynchAction; import oracle.maf.impl.cdm.persistence.service.DataSynchManager; public class MyDataSynchManager extends DataSynchManager { public DataSynchManager() { super(); } @Override protected void dataSynchFinished(List<DataSynchAction> succeededDataSynchActions, List<DataSynchAction> failedDataSynchActions) { int ok = succeededDataSynchActions.size(); int fails = failedDataSynchActions.size(); int total = ok + fails; MessageUtils.handleMessage(AdfException.INFO, total + " data synch actions completed. Successful: " + ok + ", Failed: " + fails); } } -
Register your class in your application’s
mobile-persistence-config.propertiesfile, as demonstrated by the following example:datasync.manager.class=application.model.service.MyDataSynchManagerThe
mobile-persistence-config.propertiesfile is inApplicationRootDirectory/ApplicationController/src/META-INF/folder.
6.19.3 What You May Need to Know About Disabling Automatic Synchronization
Automatic synchronization of transactions from a MAF application can be disabled.
To disable automatic synchronization of transactions from a MAF application:
-
Create a new abstract Java class that extends the
oracle.maf.impl.cdm.persistence.service.EntityCRUDService -
Override the
synchronizemethod and comment out the call tosuper.synchronizeso the method performs no execution -
Modify your service object classes to extend from the just-created subclass instead of extending from
EntityCRUDService
If you disable automatic synchronization, configure your MAF application so that end users can explicitly start a synchronization action. Use the following statement to explicitly trigger data synchronization:
new DataSynchService().synchronize(true);
The boolean argument determines whether the synchronization happens in the background (true) or in the foreground (false). The DataSynchService class is located in the following package: oracle.maf.api.cdm.persistence.service. For more information, see Java API Reference for Oracle Mobile Application Framework.
We do not recommend disabling automatic synchronization of transactions as it can lead to out-of-date data in your application and a confusing user experience. The following example use case for a user (John) illustrates this point. John performs the following actions in his application:
-
Gets the latest list of departments when starting the application in online mode
-
Modifies the name of department 10 in offline mode
-
Removes department
20in offline mode -
Creates a new department
280in offline mode -
Leaves the application
-
John starts the application again in online mode and the latest list of departments is retrieved from the server while the 3 pending sync actions are not yet processed
-
John will now see the old department name of department
10 -
John will now see department
20again although he already removed it -
If you (the MAF application developer) selected the Delete Local Rows checkbox for the Find All Resource for department data object, the new department (
280) that John created disappears again.
Only when John manually starts a synchronization action, will he see the latest data again including the changes he made in offline mode once he refreshes the department list again with the latest data from the server (through a user interface control or by restarting the application).
6.20 Understanding the Client Data Model’s Support for Data Change Events
Describes the APIs that the MAF client data model uses to refresh the user interface of MAF applications in response to data change events in the underlying data collection.
The data and service classes that the MAF client data model generates provide ready-to-use support for both types of change events (property and provider) that MAF supports. This is because the Entity and EntityCRUDService classes that these types of classes extend from both extend from the ChangeEventSupportable class. For more information about the data change events that MAF supports, see Working with Data Change Events.
If you want to send a data change event from your data or service class, call the corresponding getter method to get an instance to send your change event:
-
getPropertyChangeSupport() -
getProviderChangeSupport()
Always use the above getter methods rather than including your own instance of propertyChangeSupport or providerChangeSupport in a data or service class. This avoids breaking the built-in runtime code that the MAF client data model uses to refresh the user interface of your MAF application.
By default, each service class has a getter method that returns a list of data objects. A DepartmentService class, for example, includes the following generated method:
public List<Department> getDepartment() {
  return getEntityList();
}
When your MAF application makes a REST call to get the up-to-date list of departments, MAF automatically refreshes the user interface by invoking the setEntityList method from the EntityCRUDService superclass of the service class. This method calls another generated method in the service class (getEntityListName) to find out which property name to use in the fireProviderRefresh method call. The following example shows the generated getEntityListName method for a DepartmentService class:
protected String getEntityListName() {
  return "department";
}
The above implementation means that:
-
If you write custom logic to change the content of a department list, you can call
setEntityListto refresh the user interface with content changes. -
If you rename the generated method
getDepartmentto the more appropriate plural namegetDepartments, you also need to change the methodgetEntityListNameto return "departments" instead of "department". If you do not, the standard MAF client data model refresh code will no longer work. -
If you have added your own getter list methods to the service class to provide multiple filtered views on your set of data object instances, you can override the
setEntityListmethod to make sure your filtered lists also refresh in the user interface when a REST call completes. For more information, see Using Filtered Entity Lists.
Refresh Forms in Response to Data Change Events
To refresh the user interface in a form layout where only one data object instance displays, you need to use property change events because provider change events only refresh list views. While each data class includes the PropertyChangeSupport instance to send a property change event as explained above, the generated setter methods in your data object instances do not send change events by default. You are free to add this code yourself, as long as you use the getPropertyChangeSupport() method:
public void setName(String name)
{
  String oldValue = this.name;
  this.name = name;
  getPropertyChangeSupport().firePropertyChange("name", oldValue, name);;
}
If you want to refresh all properties (attributes) of a data object instance, you can also use the MAF convenience method EntityUtils.refreshEntity. This takes a data object instance as its only argument.
Send Data Changes in a Background Thread
When sending data change events in a background thread, you need to flush these data change events to the user interface layer by calling AdfmfJavaUtilities.flushDataChangeEvent. Furthermore, MAF requires you to use the MafExecutorService to prevent deadlocks when sending data change events in a background thread. The following example demonstrates how you use the execute method from the MafExecutorService to send data change events and flush the events once complete. The following example uses a Java 8 Lambda expression to pass in the code.
public void setName(String name) {
  String oldValue = this.name;
  this.name = name;
  if (AdfmfJavaUtilities.isBackgroundThread()) {
    MafExecutorService.execute(() ->
       {
         getPropertyChangeSupport().firePropertyChange("name", oldValue, name);
         AdfmfJavaUtilities.flushDataChangeEvent();

       });
  }
  else {
    getPropertyChangeSupport().firePropertyChange("name", oldValue, name);
  }
}
As an alternative to writing the above code for each attribute you want to refresh, you can instead use the refreshUI method provided by the MAF client data model’s Entity class to send property change events. This method takes a list of attributes for which you want to send data change events, as the following example demonstrates:
      List<String> attrs = new ArrayList<String>();
      attrs.add("name");
      attrs.add("managerId");
      refreshUI(attrs);
The refreshUI method uses the previously-described MafExecutorService and flushes the data change events when running in a background thread.
Refresh the User Interface with Data Changes from a Child Data Collection
By default, the MAF client data model does not refresh a user interface with data changes to a child data collection when a MAF application makes a REST call that returns the parent data collection. This default behavior optimizes the performance of your application as it prevents a child data object being read from the database and loaded into memory when the page that triggers the REST call might only display the parent data object. You can extend a refresh to include a child data collection by overriding the refreshUI method from the Entity class in your data object’s class. The following example demonstrates how you might do this in a Department class where you want to refresh a child data collection of employees:
  @Override
  public void refreshUI(List attrsToRefresh)
  {
    getProviderChangeSupport().fireProviderRefresh("employees");
    super.refreshUI(attrsToRefresh);
  }
6.21 Forcing Offline Mode in a MAF Application
MAF allows you to configure a MAF application as if the device it runs on is offline when it is connected to the Internet.
This can be helpful to prevent REST calls over slow network connections. For example, you might use it to prevent REST calls over 3G connections but allow them over Wi-Fi connections.
Use the following method to force offline mode:
new ConnectivityBean().setForceOffline(true);
Note:
While you create a new instance ofConnectivityBean, the value of forceOffline flag is saved in a static variable that is shared across all instances.This allows you to use the ConnectivityBean class as a managed bean and force/unforce offline mode from the user interface. This might be helpful for demos where you want to show data synchronization capabilities of MAF. To do this, define the managed bean in the adfc-mobile-config.xml file as follows:
<managed-bean id="__3">
  <managed-bean-name>Connectivity</managed-bean-name>
  <managed-bean-class>oracle.maf.api.cdm.controller.bean.ConnectivityBean</managed-bean-class>
  <managed-bean-scope>application</managed-bean-scope>
</managed-bean>
You can then add a "force offline" toggle option in your AMX pages as follows:
<amx:commandLink id="menFo" text="#{Connectivity.forceOffline ? 'Unforce offline' : 'Force offline'}">
    <amx:setPropertyListener id="menfospl" from="#{!Connectivity.forceOffline}" to="#{Connectivity.forceOffline}"/>
</amx:commandLink>
The MAF User Interface Generator wizard, described in How to Use the MAF User Interface Generator, generates a menu entry that displays this option, as shown in Figure 6-25.
Figure 6-25 Force Offline Menu Entry from MAF User Interface Generator
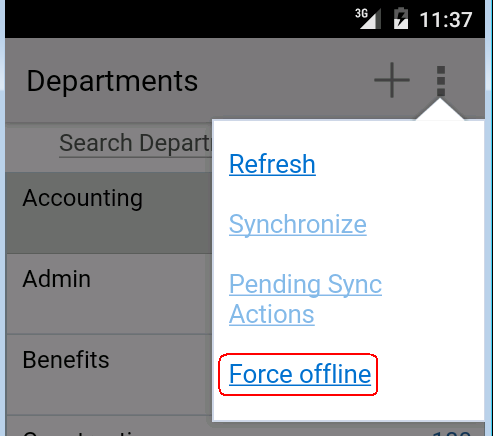
If you want to force offline mode based on the strength of the network connection, use the Cordova network plugin which is pre-installed with MAF to set up a JavaScript callback handler that calls the ConnectivityBean.forceOffline method.
6.22 Using a Visual Indicator for Running Background Tasks
Describes how to render a visual indicator to end users to let them known that their MAF application is performing background tasks.
MAF makes all background REST calls through a thread pool that maintains a Boolean flag to return True if the MAF application is executing at least one task in the thread pool. Use the following EL expression to access the value of this Boolean flag:
#{applicationScope.maf_bgtask_running}
The MAF User Interface Generator wizard, described in How to Use the MAF User Interface Generator, generates the following entry in the AMX pages it creates to display the visual indicator, shown in Figure 6-26, when the MAF application processes tasks in the background.
  <amx:image id="bgRunImg" source="/images/reloading.gif" inlineStyle="margin-right:5px;"
            rendered="#{applicationScope.maf_bgtask_running}"/>
Figure 6-26 Visual Indicator for Background Tasks from MAF User Interface Generator
