4 Prepare for Upgrade
Oracle Virtual Directory (OVD) is not a supported component in Fusion Applications (FA) Release 11.12.x.0.0. Therefore, if you are using OVD in your FA setup, you must remove it before starting your FA upgrade from Release 8 or 9 to Release 12.
This chapter provides the steps to remove OVD including the scenarios where you have OVD backed by an Oracle Internet Directory (OID), or where OVD is used in split profiles to talk to Microsoft Active Directory (AD) and OID. For more information about split profiles, see Split Profiles with AD and OID for Fusion Apps IDM in the Oracle A-Team Chronicles.
4.1 OVD Removal Roadmap
Review the following flowchart for an overview of the typical Oracle Virtual Directory (OVD) removal process including the scenario where OVD is used to proxy Active Directory (AD) in split-profile.
Figure 4-1 OVD Removal Process Flowchart
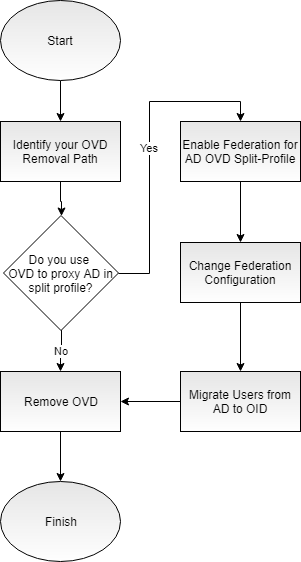
Table 4-1 Tasks for Removing OVD from your Environment
| Task | Required | Description |
|---|---|---|
|
Identify your OVD Removal Path |
Required |
Identify your removal path to choose the right procedure for your system. See Identify your OVD Removal Path. |
|
Enable Federation for AD OVD Split-Profile |
Required only if you use OVD to proxy AD in split profile |
Configure your OIF with an Identity Provider on the IDM environment. See Enable Federation for AD OVD Split-Profile. |
|
Change Federation Configuration |
Required only if you use OVD to proxy AD in split profile |
Configure your OIF bundled with IDM to talk to AD. See Change Federation Configuration. |
|
Migrate Users from AD to OID |
Required only if you use OVD to proxy AD in split profile |
Copy users from AD to OID by running the migration tool. See Migrate Users from AD to OID. |
|
Remove OVD |
Required |
Remove the OVD authenticator and replace it with the OID authenticator. Update the respective product configurations with OID details and bring down OVD. See Remove OVD. |
4.2 Identify your OVD Removal Path
The path that you must take to remove your OVD component depends on how you are using OVD. Use the following table to identify the path you need to follow when removing OVD from your environment.
Table 4-2 OVD Removal Paths
| If your current use of OVD is: | Then you need to: |
|---|---|
|
To proxy OID |
Update your domain and dependent product configurations to use authenticators that talk to OID instead of OVD. |
|
To proxy AD in split profile |
Enable federation, then remove the OVD authenticator, and run the AD to OID user migration tool. Once the AD to OID migration is complete, Weblogic domains are updated to use OID. |
4.3 Enable Federation for AD OVD Split-Profile
Note:
The steps in this section are only applicable if you use OVD to proxy AD in split profile. If you use OVD to proxy OID, skip to Remove OVD.4.3.1 Configure OIF with an Identity Provider
The steps in this section are applicable to either Release 8 or 9. To enable federation and to configure Oracle Identity Federation (OIF) Service Provider (SP) with an Identity Provider (IdP) (or OIF as IdP /ADFS) on and IDM environment prior to upgrade, perform the following steps:
-
Verify if OIF is enabled by checking if the
oif_startup.conffile exists in the setup’s binary orconfiglocation. If yes, then check if the following properties are set to true in that file. If true, then OIF is enable, otherwise it is not:'OIF_ENABLED=true' & ' OPMN_EMAGENT_MANAGED_BY_OIF_SCRIPT=true'
-
Enable OIF if it is not already enabled:
-
Find the
oifAutomation.propertiesfile at the following location, where relX refers to rel8, rel9:OIF_HOME/scripts/fa/relX/oifAutomation.properties
WhereOIF_HOME: location of OIF installation. -
Back up the
oifAutomation.propertiesfile. -
Update the
oifAutomation.propertiesfile with the appropriate environment information. -
Ensure all servers are up.
-
Ensure your Perl version is v5.8.8 or above.
-
Download the
jce_policy-6.zipfile from Java Cryptography Extension (JCE) Unlimited Strength Jurisdiction Policy Files 6. -
Go to the location of the
oifAutomation.plscript and run the following:cd OIF_HOME/scripts/fa/relX perl oifAutomation.pl oifAutomation.properties enableOIF -enableOIF true -enableOPMN true -initializeOIF -updateJCECrypto <download location of jce_policy-6.zip> perl oifAutomation.pl oifAutomation.properties enableOIFTest true
-
-
Configure Single Sign-on (SSO) with federation as follows:
perl oifAutomation.pl oifAutomation.properties configureSSO -sso federation chooser nofedmobile
-
Create a user through OIM with an email address. For example, username and username@example.com.
-
Enable the Identity Provider (IdP) as follows:
-
Log in to Enterprise Manager Fusion Middleware Control Console.
-
Expand Identity and Access folder, and choose OIF(11.1.1.2.0).
-
Expand the Oracle Identity Federation menu, and go to Administration.
-
Click Identity Provider.
-
Ensure that the Enable Identity Provider check box is checked.
-
4.3.2 Import ADFS-IdP Metadata to OIF-SP
If you have linked to OIF-IdP already, skip to Import OIF-SP to ADFS IdP. If OIF is IdP, then you can skip all AD related steps and go directly to Protect a Resource.
-
Ensure all servers are up.
-
Ensure your Perl version v5.8.8 or above.
-
Run the following command:
perl oifAutomation.pl oifAutomation.properties configureIdPPartner -metadata FederationMetadata.xml -nameid email -ssoprofile post (-nameid unspecified if you want to use uid)
4.3.3 Import OIF-SP to ADFS IdP
-
Connect to the remote desktop
myhost.example.comand log in with your username and password. -
Save the
https://sso_lbr server: PORT URL fed/sp/metadatato asp_metadata.xmlfile on the desktop. -
Launch the AD FS 2.0 Management by going to Start, then Programs, then Administrative Tools, and AD FS 2.0 Management.
Note:
Note that the steps provided are for AD FS 2.0. If you are running a later version, then consult the latest Microsoft documentation. -
Expand the Trust Relationships folder and right-click Relying Party Trusts, then choose Add Relying Party Trust.
-
Click Start, then go to Select Data Source.
-
Choose Select Import data about the relying party from file, and then browse the
metadata.xmlfile, and then click Next. -
Enter the Display name of
myhost, and then click Next. -
Select Default Permit for all users to access this relying party, and then click Next.
-
Click Next, then mark the check box Open the Edit Claim Rules...when wizard closes, and then click Close.
The Edit Claim Rules wizard appears and shows the message “EmailID and Email Transform claim rules are needed”.
-
Click Add Rule, then choose Send LDAP Attributes as Claims, and then click Next.
-
Provide the following details:
-
For Claim rule Name, enter
EmailID -
For Attribute store, enter
Active Directory -
For LDAP Attribute, enter
E-Mail Addresses -
For Outgoing Claim Type, enter
E-Mail Addresses
-
-
Click Finish.
-
Click Add Rule, then choose Transform an Incoming Claim, and then click Next.
-
Provide the following details:
-
For Claim rule Name, enter
EmailID Transform -
For Incoming claim type, enter
E-Mail Address -
For Outgoing claim type, enter
Name ID -
For Outgoing name ID format, enter
Unspecified
-
-
Click Finish.
-
Change to SHA–1 for Secure hash algorithm as follows:
-
Right-click the newly created Relying Party.
-
Choose Properties and click the Advanced tab.
-
On the Secure hash algorithm, choose SHA-1.
-
Click Apply.
-
-
Create an user with the same email address on AD users as follows:
-
Launch the AD Users and Computers by clicking Start, then Programs, Administrative Tools, and Active Directory Users and Computers.
-
Click to expand the domain name
adfs.fed.example.com, then Users, and right-click New User. -
Enter the following values on the create user wizard, and then click Next.
-
First name: username
-
Full name: username
-
User logon name: oifusername
-
-
Deselect User must change password at next logon, and then check Password never expires.
-
In Enter Password/Confirm Password, enter password, and then click Finish.
-
Right-click the new example user and choose Properties.
-
Update the E-mail address with
username@example.com, and then click Apply.
-
4.3.4 Protect a Resource
IAMSuiteAgent:/welcome_webcenter.html resource with FAAuthScheme using Oracle Access Manager (OAM) as follows:
-
Log in to the OAM Console and navigate to Application Domains.
-
Go to IAM Suite, and then click OIFAuthnPolicy.
-
Click the add + sign to add the resource.
-
Choose
IAMSuiteAgent:/welcome_webcenter.htmlfrom the drop down list. -
Click Apply.
4.4 Change Federation Configuration
Note:
The steps in this section are only applicable if you use OVD to proxy AD in split profile. If you use OVD to proxy OID, skip to Remove OVD.4.4.1 Configure Identity Providers - Common Properties
-
Log in to Enterprise Manager Fusion Middleware Control Console.
-
Expand Identity and Access folder, and choose OIF(11.1.1.2.0).
-
Expand the Oracle Identity Federation menu, and go to Administration.
-
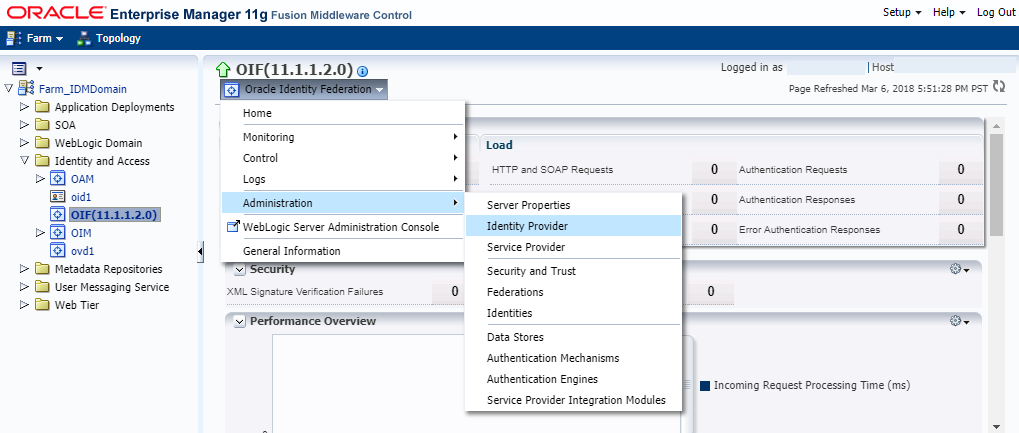
Click Identity Provider as shown in the following figure:
-
Click the Common tab.
-
Ensure that the Enable Identity Provider box is checked.
-
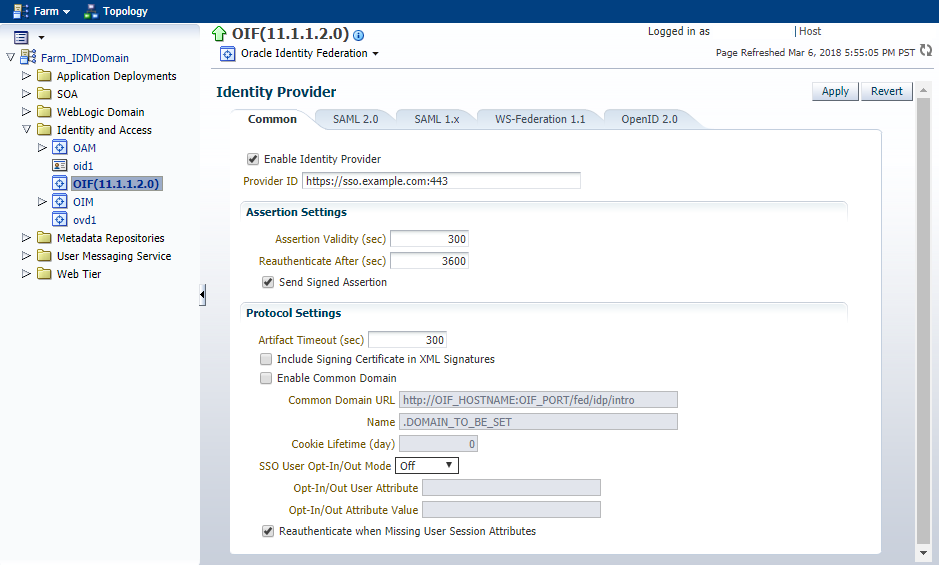
Specify the Provider ID as
SSO_URL/fed/idp. For example,https://sso.example.com:443:
-
Click Apply.
4.4.2 Configure Identity Providers - SAML 2.0 IdP Properties
This section describes how to configure the SAML 2.0 Identity Provider (IdP) properties.
-
Log in to Enterprise Manager Fusion Middleware Control Console.
-
Expand Identity and Access folder, and choose OIF(11.1.1.2.0).
-
Expand the Oracle Identity Federation menu, and go to Administration.
-
Click Identity Provider.
-
Click the SAML 2.0 tab.
-
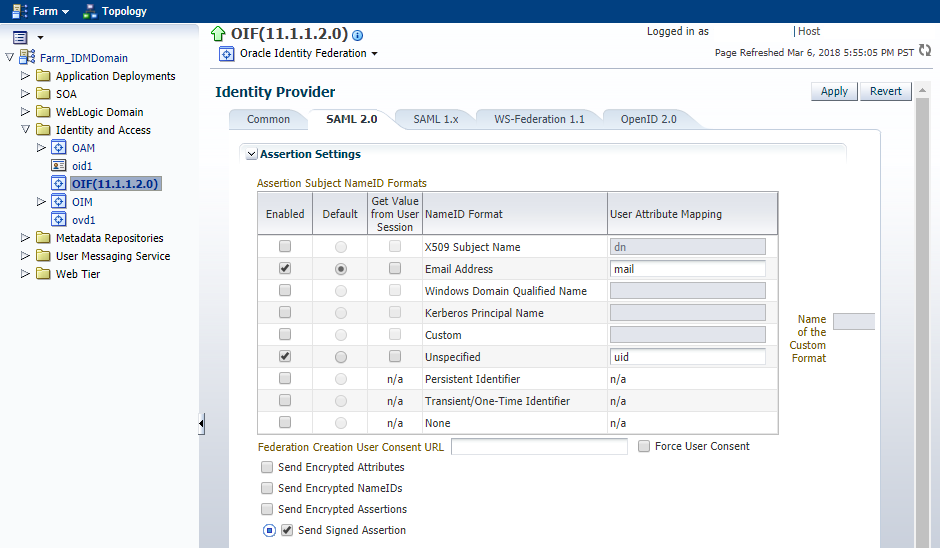
In the Assertion Subject NameID Formats table, ensure that the following formats are enabled:
-
Email Address and enter the attribute
mail. -
Unspecified and enter the attribute
uid.
-
-
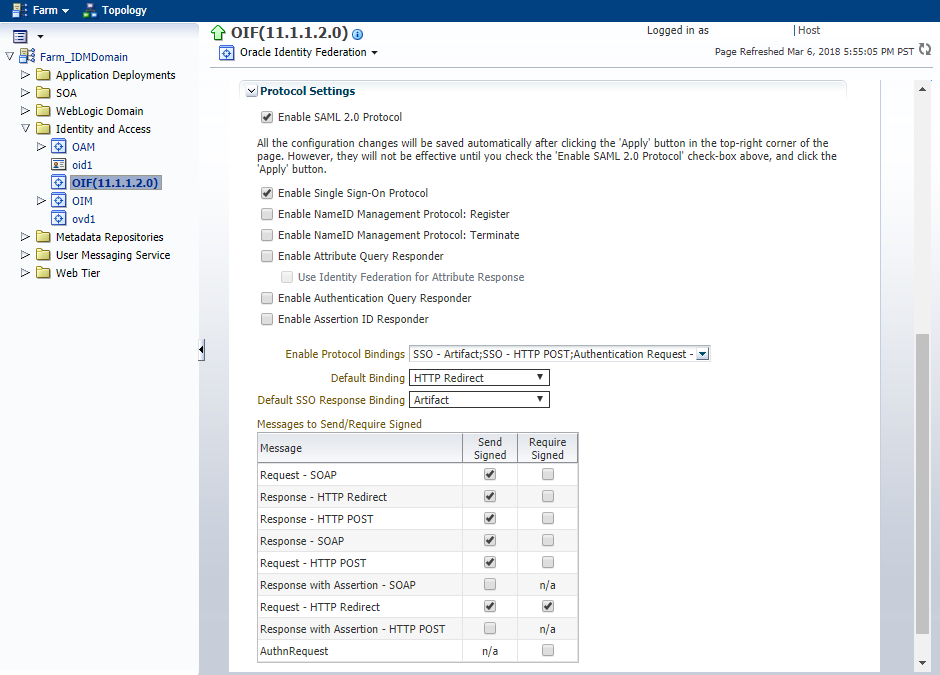
In the Protocol Settings, ensure that the following boxes are checked:
-
Enable SAML 2.0 Protocol
-
Enable Single Sign-On Protocol
-
-
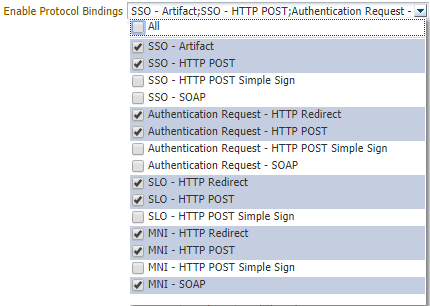
Ensure that the following protocol bindings are selected from the Enable Protocol Bindings drop down list as shown in the figure:
-
SSO - Artifact
-
SSO - HTTP POST
-
Authentication Request - HTTP Redirect
-
Authentication Request - HTTP Post
-
SLO - HTTP Redirect
-
SLO - HTTP Post
-
MNI - HTTP Redirect
-
MNI - HTTP Post
-
MNI - SOAP
-
-
Ensure that
HTTP Redirectis selected from the Default Binding drop down list. -
Ensure that
Artifactis selected from the Default SSO Response Binding drop down list. -
In the Messages to Send/Require Signed table, ensure that the Send Signed box is checked for the following messages:
-
Request - SOAP
-
Response - HTTP Redirect
-
Response - HTTP Post
-
Response - SOAP
-
Request - HTTP POST
-
Request - HTTP Redirect
-
-
In the Messages to Send/Require Signed table, ensure that the Require Signed box is checked for the Request - HTTP Redirect message.
-
Click Apply.
4.4.3 Configure Data Stores
-
Log in to Enterprise Manager Fusion Middleware Control Console.
-
Expand Identity and Access folder, and choose OIF(11.1.1.2.0).
-
Expand the Oracle Identity Federation menu, and go to Administration.
-
Click Data Stores.
-
In the Federation Data Store section, click Edit.
-
Select Database from the Repository Type drop down list.
-
Ensure that the JNDI Name is
oracle/security/fed/feddatastoreas shown in the following figure:

-
Click OK.
-
In the User Session Data Store and Message Data Store section, click Edit and perform Steps 6 through 8.
-
In the Configuration Data Store section, click Edit and perform Steps 6 through 8.
4.4.4 Configure Service Provider
-
Log in to Enterprise Manager Fusion Middleware Control Console.
-
Expand Identity and Access folder, and choose OIF(11.1.1.2.0).
-
Expand the Oracle Identity Federation menu, and go to Administration.
-
Click Service Provider.
-
Click the SAML 2.0 tab.
-
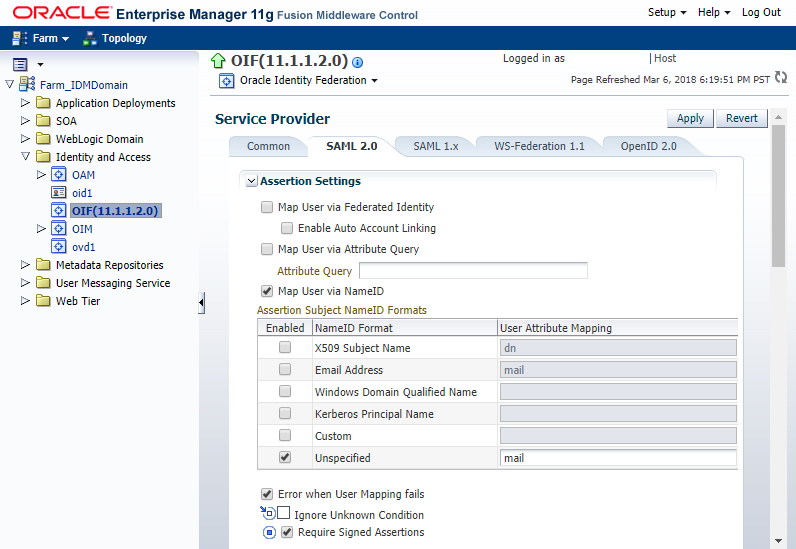
Ensure the Map User via NameID box is checked.
-
In the Assertion Subject NameID Formats table, ensure the Unspecified NameID Format is enabled, and then give it the value
mailas shown in the following figure:
-
Ensure that the following boxes are checked:
-
Error when User Mapping fails
-
Require Signed Assertions
-
Enable SAML 2.0 Protocol.
-
Enable Single Sign-On Protocol
-
Allow Federation Creation
-
-
Ensure that the following options are selected from the Enable Protocol Bindings drop down list:
-
SSO - Artifact -
SSO - HTTP POST -
SLO - HTTP Redirect
-
-
Ensure that
HTTP Redirectis selected from the Default Binding drop down list. -
Ensure that
HTTP POSTis selected from the Default SSO Request Binding drop down list. -
Ensure that
HTTP POSTis selected from the Default SSO Response Binding drop down list. -
Ensure that
Unspecifiedis selected from the Default Authentication Request NameID Format drop down list. -
Ensure that
Noneis selected from the Request Authentication Context Mechanism drop down list. -
Ensure that
Noneis selected from the Request Authentication Context Comparison drop down list. -
Click Apply.
4.4.5 Configure Service Provider Integration Modules
To configure your service provider integration module, perform the following steps:
-
Log in to Enterprise Manager Fusion Middleware Control Console.
-
Expand Identity and Access folder, and choose OIF(11.1.1.2.0).
-
Expand the Oracle Identity Federation menu, and go to Administration.
-
Click Service Provider Integration Modules.
-
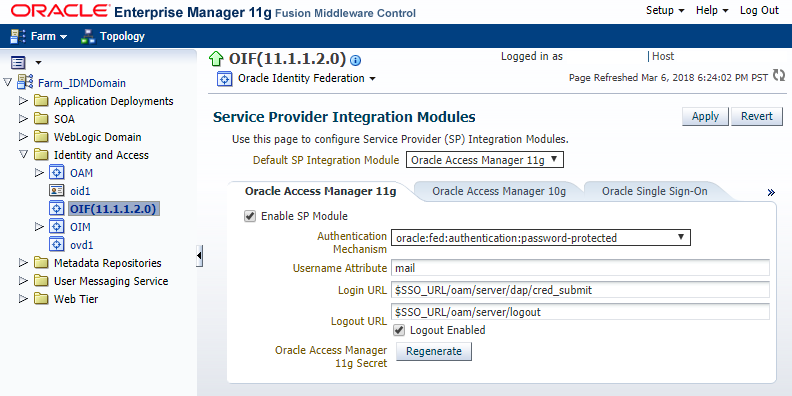
In the Oracle Access Manager 11g tab, ensure that the Enable SP Module box is checked.
-
Select
oracle:fed:authentication:password-protectedfrom the Authentication Mechanism drop down list. -
Provide the following details:
-
For Username Attribute, enter
mail. -
For Login URL, enter
$SSO_URL/oam/server/dap/cred_submit. -
For Logout URL, enter
$SSO_URL/oam/server/logout.
-
-
Ensure that the Logout Enabled box is checked.
-
Click Apply.
4.4.6 Configure OAM
-
Log in to the OAM console.
-
Click the System Configuration tab, and expand Access Manager Settings.
-
Expand the Authentication Module and the Custom Authentication Module.
-
Double click SaaS Module.
-
Click the Steps tab.
-
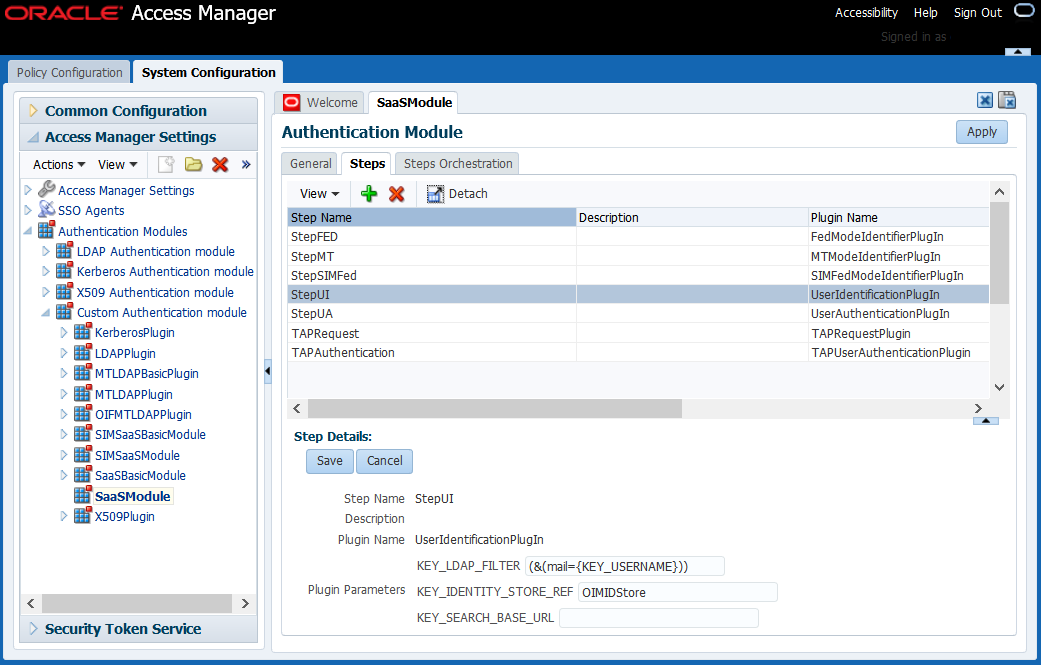
Choose StepUI from the Step Name column.
-
Update the value of the
KEY_LDAP_FILTERparameter fromuidtomailas shown in the following figure:
-
Click Save.
-
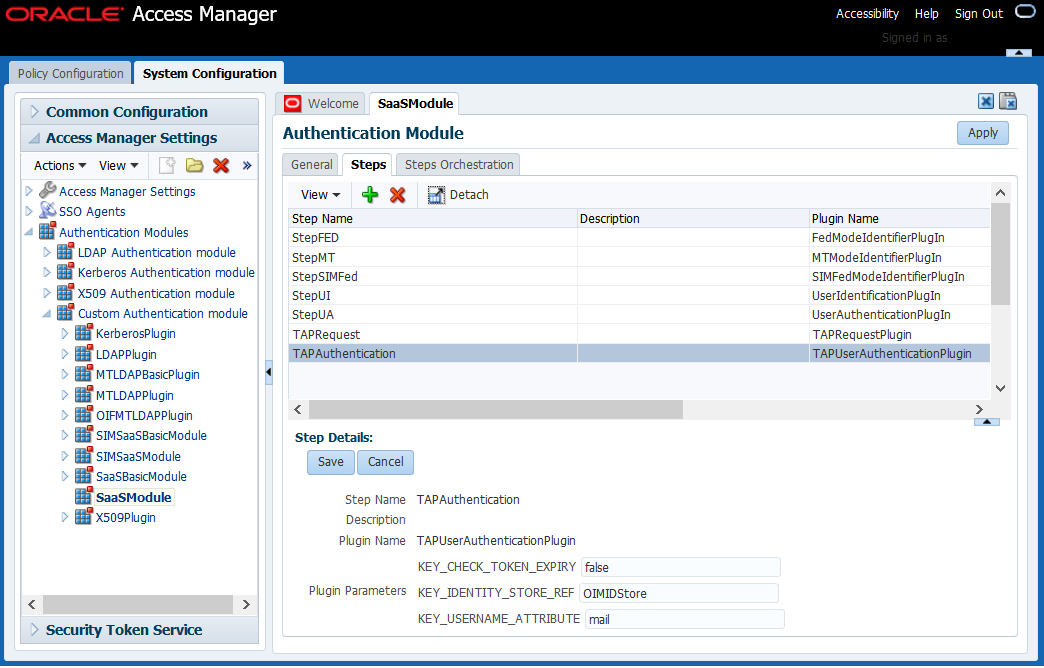
Choose TAPAuthentication from the Step Name column.
-
Update the value of the
KEY_USERNAME_ATTRIBUTEparameter fromuidtomailas shown in the following figure:
-
Click Save.
-
Click Apply.
4.4.7 Verify If Resource Is Protected
IAMSuiteAgent:/welcome_webcenter.html resource is protected, perform the following steps:
-
Go to
https://sso_lbr server: PORT URL/welcome_webcenter.html.-
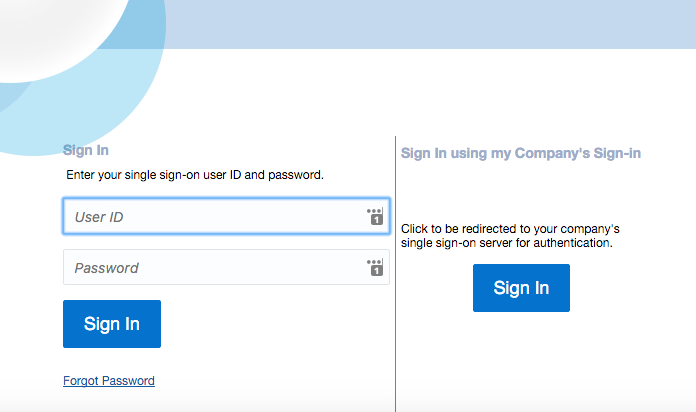
If you configured your Single Sign-On (SSO) with federation as described in Configure OIF with an Identity Provider, Step 4, then the login page shows two login options as shown in the following figure. One login option is a local FA and the other one is an IdP login.
-
Click Sign In in the "Sing In using my Company’s Sign-in" section.
You are redirected to the IdP login page.
-
Log in using the Domain\Username and your password.
-
-
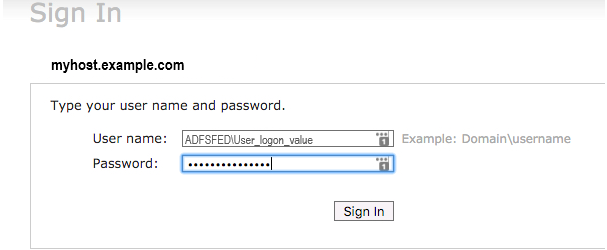
If you did not configure your SSO with federation, then the login page shows only the IdP login option.
-
Log in using your Domain/username and your password.
-
-
-
Perform SSO and Single Logout (SLO).
4.5 Migrate Users from AD to OID
Note:
The steps in this section are only applicable if you use OVD to proxy AD in split profile. If you use OVD to proxy OID, skip to Remove OVD.When OVD is set up in split profile, most of your data comes from Active Directoy (AD), and some FA specific attributes get stored in OID under a different branch. This branch is referred to as Remote Base in Adapter configuration cn=shadowentries. To remove the AD dependency, you must copy the user attributes needed by FA and make them available in the bundled OID. Note that AD still remains the source of truth and FA specific attributes will be saved in OID.
4.5.1 Run the ldifde Tool
To export users from AD to a ldif file, perform the following steps:
-
Run the
ldifdetool on the AD machine as follows:ldifde -s <AD Host machine name> -t <AD port> -a <AD Domain name>\<user> <password> -d "<AD user base DN>" -p subtree -f c:\<path to a ldif file> -l "dn,sn,uid,mail,objectclass" -c "<AD user base DN>" "<oid user base DN>"
For example:ldifde -s myhost.example.com -t 389 -a ADFSFED\windows <password> -d "CN=Users,DC=adfs,DC=fed,DC=example,DC=com" -p subtree -f c:\ad_users.ldif -l "dn,sn,uid,mail,objectclass" -c "CN=Users,DC=adfs,DC=fed,DC=example,DC=com" "cn=Users, dc=example,dc=com"You can obtain the values for the user base DN from the OVD adapter configuration.
-
Copy the generated
ldiffile from the AD Windows machine to the*nixbox that is hosting IDM for FA.
4.5.2 Run IDM Migrate Utility
The steps in this section take the ldif file generated in Run the ldifde Tool and loads the AD users data in a bundled OID.
-
Set the following environment variables:
-
MW_HOMEto the directory middleware home -
ORACLE_HOMEto the OID oracle home -
JDK_HOMEto the jdk6 path
-
-
Run the following command:
cd <idm patch unzip location>/idmUpgrade/IDMFAOnPremiseUpgrade/bin
bash LoadADusers2OID.sh -H <OID Host> -D <OID Bind DN> -f <path to AD users ldif file> -G "cn=groups,dc=example,dc=com" -O "cn=shadowentries" -N "cn=users,dc=example,dc=com"
Command usage:bash LoadADusers2OID.sh <options> [-p|--port <port>]
Where <options>-
-H|--HOST: [Required] OID host name -
-p|--port: [Optional] OID Server port. Default port3060 -
-D|--bindDN: [Required] OID Server bind DN -
-f|--ad_users_ldif_file: [Required] path of exported AD usersldiffile to be imported in OID -
-G|--oid_group_base: [Required] OID group search base -
-O|--old_ad_container_dn: [Required] Shadow entries container (For example,cn=shadowentries) of AD users in OID -
-N|--new_ad_container_dn: [Required] New user container DN to be used for AD users
bash LoadADusers2OID.sh -H <OID host> -p|--port <OID server port> -D <OID Bind DN> -f|--ad__users_ldif_file <path to AD users ldif file-G <OID group search base> -O <Old AD container DN> -N <new AD container DN in OID>
bash LoadADusers2OID.sh --HOST <OID Host> --bindDN <OID Bind DN> --ad_users_ldif_file ./AD_users.ldif --oid_group_base "cn=groups,dc=example,dc=com" --old_ad_container_dn "cn=shadowentries" --new_ad_container_dn "cn=users,dc=example,dc=com"
Note that this scripts prompts you for the
bindDNpassword.This command takes backup of users and groups in OID, and then loads the AD users into OID. After the command is run users from AD appears in the OID under user search base DN.
-
4.6 Remove OVD
4.6.1 Update WLS Authenticator Configuration
-
Log in to the WebLogic Server Administration Console.
-
Click Lock & Edit.
-
Navigate to Security Realm under IDMDomain.
-
Go to myrealm, then click the Providers tab.
-
Click New and add a new
OracleInternetDirectoryAuthenticatorauthenticator and name itOIDAuthenticator.Note:
Ensure there are no spaces in the authenticator name. -
Set the OPTIONAL control flag to SUFFICIENT.
-
Update the configuration of that OVD, except for the port’s SUFFICIENT flag.
-
Enter the OID port in the Port field, and click Save.
-
Reorder the authenticator and place it below the OVD authenticator.
4.6.2 Update OAM Configuration
-
Log in to the OAM console.
-
Click the System Configuration tab, and expand Common Configuration.
-
Expand Data Sources and User Identity Store.
-
Click OIMIDStore.
-
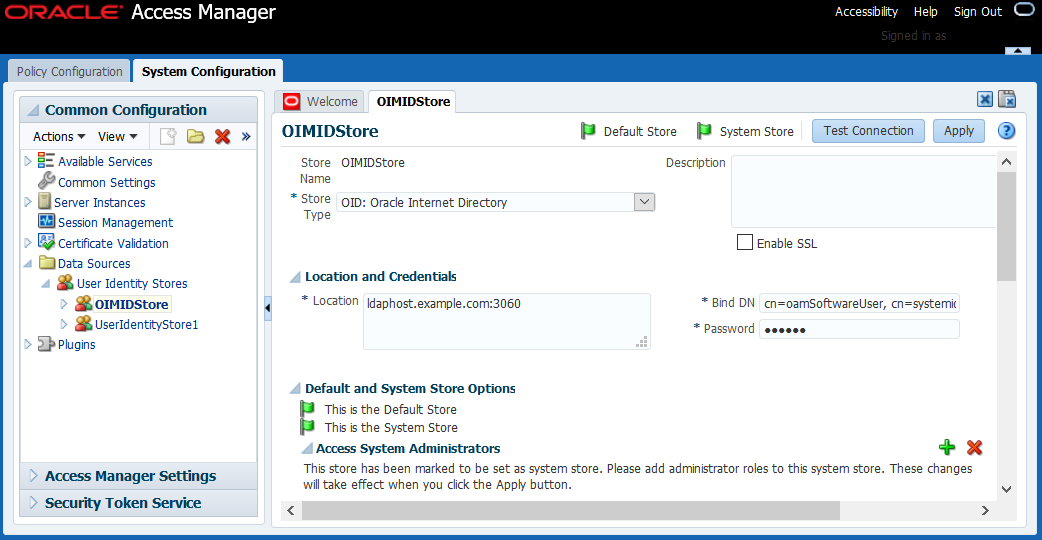
Update the value of Store Type to OID: Oracle Internet Directory as shown in the following figure:
-
Click Apply.
If you have any issues updating the values, see OAM Configuration Update Fails for OVD Removal.
4.6.3 Update OIM Configuration
-
Log in to the OIM console.
-
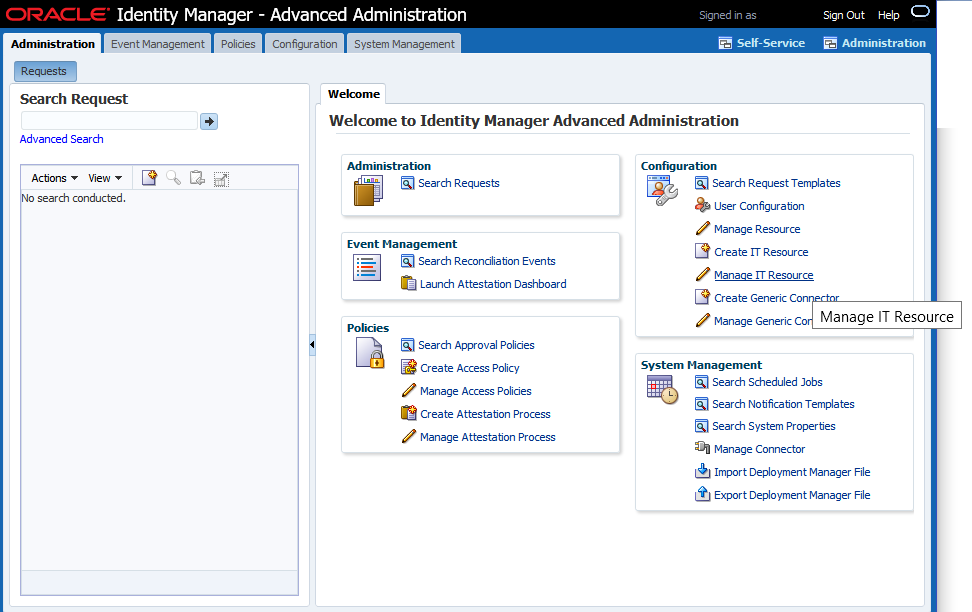
Navigate to Advanced, then go to Manage IT Resource under Configuration as shown in the following figure:
-
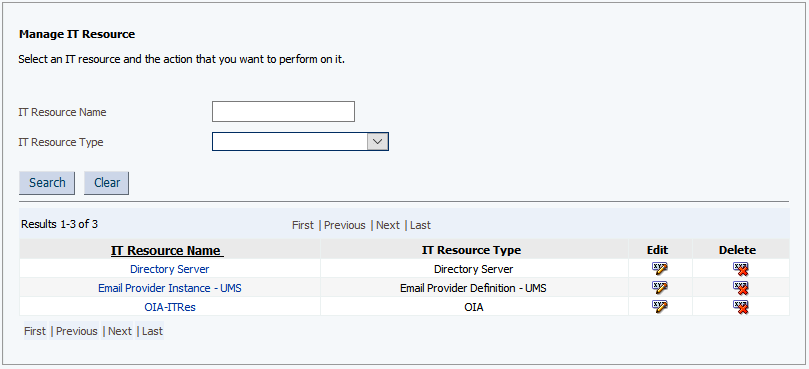
Click Search and choose Directory Server as shown in the following figure:
-
Click Edit.
-
Update the values for the following parameters:
-
Server SSL URL to
ldaps://ldaphost.example.com:3131 -
Server URL to
ldap://ldaphost.example.com:3060
-
-
Click Update.
4.6.4 Update Federation Configuration
Note:
This step is only applicable if you use OVD to proxy AD in split profile. If you use OVD to proxy OID, skip to Remove OVD Authenticator.-
Log in to Enterprise Manager Fusion Middleware Control Console.
-
Expand Identity and Access folder, and choose OIF(11.1.1.2.0).
-
Expand the Oracle Identity Federation menu, and go to Administration.
-
Click Data Stores.
-
In the User Data Store section, click Edit.
-
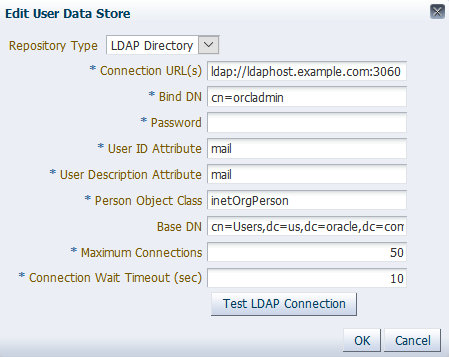
Update the Connection URL(s) to
ldap://ldaphost.example.com:3060as shown in the following figure:
-
Click OK.
-
Navigate to the Oracle Identity Federation menu, and go to Administration.
-
Click Authentication Engines.
-
Click the LDAP Directory tab.
-
Update the Connection URL(s) to
ldap://ldaphost.example.com:3060as shown in the following figure:
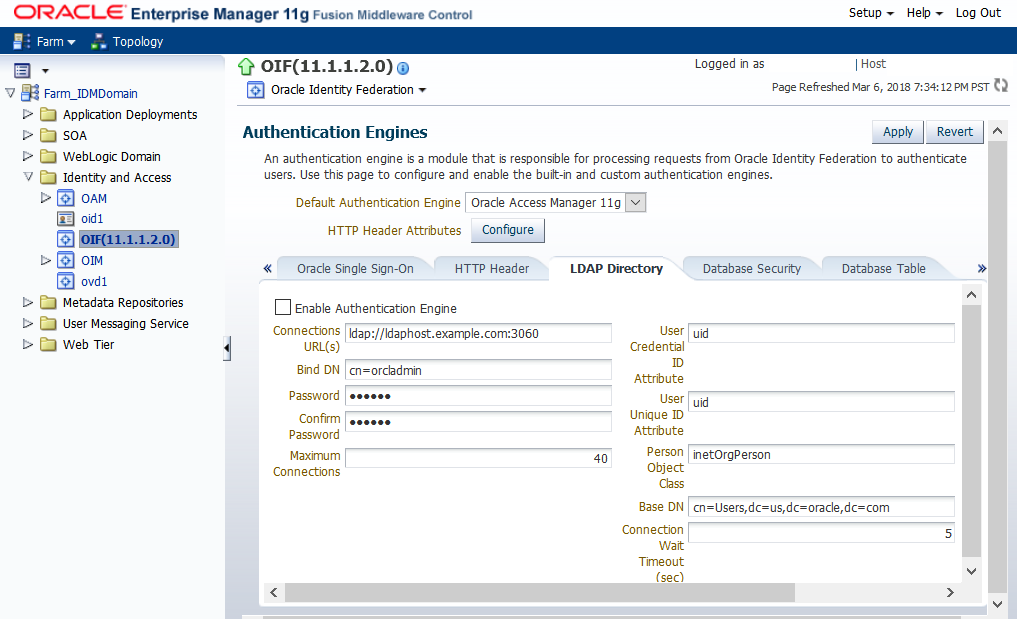
-
Click Apply.
4.6.5 Remove OVD Authenticator
-
Log in to the WebLogic Server Administration Console.
-
Click Lock & Edit.
-
Navigate to Security Realm under IDMDomain.
-
Go to myrealm, then click the Providers tab.
-
Click OVDAuthenticator.
-
Delete the OVD authenticator in the Provider Configuration page.
-
Restart the Admin server and all of the other servers.
4.6.6 Remove OVD Component
This step is only applicable to scenarios where OVD is part of the OID instance. Skip this step if OID and OVD are separate in your environment.
-
Shut down OID.
-
Back up the
opmn.xmlfile under the OID instance. -
Remove the OVD
ias-componenttag. -
Restart OID.
4.6.7 Update OID Authenticator
This step is only applicable if you use OVD to proxy AD in split profile. Skip this step if you use OVD to proxy OID.
-
Log in to the WebLogic Server Administration Console.
-
Click Lock & Edit.
-
Navigate to Security Realm under IDMDomain.
-
Go to myrealm, then click the Providers tab.
-
Click OIDAuthenticator, and then update its Users and Groups as follows:
-
Users:
“cn=users,dc=example,dc=com” -
Groups:
“cn=groups,dc=example,dc=com”
-
-
Click Save and apply the changes.
4.6.8 Verify OID Authenticator Configuration
-
Ensure the WebLogic Server (WLS) is in
RUNNINGmode again. -
Log in to the WebLogic Server Administration Console.
-
Click Lock & Edit.
-
Navigate to Security Realm under IDMDomain.
-
Go to myrealm, then click the Users and Groups tab.
If the configuration is correct, the Users sub-tab is selected by default and you can see the browsed users. Also, note that each user has the Provider listed as
OIDAuthenticator.
4.6.9 Update JPS Configuration
-
Run the following command:
cd $DOMAIN_HOME/config/fmwconfig
-
Update the following values under
idstore.ldapserviceInstancein thejps-config.xmlfile:-
Update the value of the
idstore.typeproperty toOID. -
Point the
ldap.urlto the OID server and port:<serviceInstance name="idstore.ldap" provider="idstore.ldap.provider"> <property name="idstore.type" value="OID"/> <property name="ldap.url" value="ldap://myhost.example.com:3060"/> </serviceInstance>
Note:
Ifidstore.typeandldap.urlare not already present in the file, add them. Then, change the ldap host and port appropriately. -
-
Bounce the environment.