Oracle Security Server Guide
Release 2.0.3

A54088-01

Library

Product

Contents

Index

Prev Next

3
Installing and Configuring the Oracle Security Server

This chapter details how database administrators (DBAs) and a security administrator perform the tasks involved in initializing the Oracle Security Server, including:

Oracle Security Server Repository Dependencies

In order for you to use a given database as an Oracle Security Server Repository, that database must be running Oracle7 Server release 7.3.2 or higher, or Oracle8 Server, on any platform that Oracle supports.

Before proceeding with this installation, you must also make sure that SQL*Net release 7.3.2 or higher, or Net8 release 8.0.2 or higher, is running on the given database.

Defining Global Users and Global Roles to Oracle8 Servers

It is recommended that global users and global roles be defined to Oracle8 Servers before those users and roles are identified to the Oracle Security Server. The DBA associated with each relevant server should follow these steps, using the Security Manager feature of Oracle Enterprise Manager:

  1. Define each global user using the following syntax:

    CREATE USER user IDENTIFIED GLOBALLY AS `C=country, O=organization, OU=organization_unit, ST=state, L=locality, CN=user'

    Of the items that appear between the single quotes, only CN is mandatory.

    See the Oracle8 Server SQL Reference for more information about the CREATE USER command.

  2. Define each global role using the following syntax:

    CREATE ROLE role IDENTIFIED GLOBALLY

    See the Oracle8 Server SQL Reference for more information about the CREATE ROLE command.

Installing the Oracle Security Server Repository

A DBA should perform the following steps to configure an Oracle database to contain the Oracle Security Server Repository:

  1. Launch Oracle Enterprise Manager.
  2. Install Oracle Security Server Manager 2.0.3.

A new program group named Oracle Security Server appears on your desktop in response.

  1. Launch the Create Security Server program from that program group.

The Database Login Information Window appears in response.

  1. Use the Database Login Information window to define the database that will contain the Oracle Security Server Repository.
    1. Type system in the Username field.
    2. Type the password that you wish to define for use by the Oracle Security Server administrator, in the Password field. This password should contain at least eight characters; at least one of these characters should not be alphanumeric.
    3. Type the name of the database on which the Oracle Security Server Repository will reside, in the Service field.
    4. Click the OK button.

A confirmation window appears in response. This window will ask you to confirm that you want the Oracle Security Server Repository to reside on the specified database.

  1. Click the OK button on the confirmation window.

Installing the Oracle Security Server Repository creates a new username called "oracle_security_service_admin." The oracle_security_service_admin user has read/write access to data in the Oracle Security Server Repository. You defined the password for this username within Step 4 of the procedure described above.


Note: Only one oracle_security_service_admin user can connect to the Oracle Security Server Repository at a time.


  1. Launch the Oracle Security Server Manager program from the Oracle Security Server program group.

The Login Information window appears in response.

  1. Log in to the Oracle Security Server Manager, using the Login Information window.
    1. Type oracle_security_service_admin in the Username field.
    2. Type the password you defined in Step 4, in the Password field.
    3. Type the service name you defined in Step 4, in the Service field.
    4. Click the OK button.

A confirmation window appears in response. This window will ask you to confirm that you want to establish a certificate authority (CA) in connection with the new Oracle Security Server Repository.

  1. Click the OK button on the confirmation window.

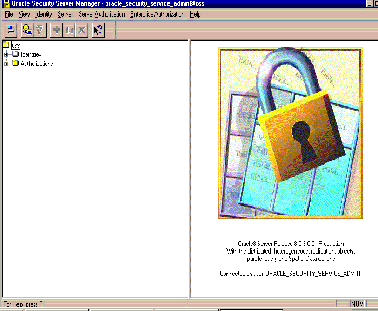
The Oracle Security Server Manager window (Figure 3-1) appears in response.

Figure 3-1 Oracle Security Server Manager Window

Constructing the Oracle Security Server Repository

In order to construct your Oracle Security Server Repository, you need to become familiar with the Oracle Security Server Manager. Chapter 4, Using the Oracle Security Server Manager, describes all the tasks that appear within the procedure that follows, and also other tasks that you can perform.

Please note the following in connection with this procedure:

Follow these steps to construct your Oracle Security Server Repository:

  1. To establish your certification authority:
    1. Select Create from the Identity pulldown on the Oracle Security Server Manager window.
      The Create Identity window appears in response. The Certificate Authority radio button at the top of the window is filled in.
    2. Fill out the fields within the Distinguished Name area of the Create Identity window as appropriate. (Click the Help button at the bottom of the window if you need more information about any of these fields.)
    3. Click the OK button at the bottom of the window.
      The Create New Credentials window appears in response.
    4. Enter and/or change the values of the fields on the Create New Credentials window as appropriate. (Click the Help button at the bottom of the window if you need more information about any of these fields.)
    5. Click the Create button at the bottom of the window.
      The CA will appear in the tree structure on the Oracle Security Server Manager window within the oss/Identities/Approved folder.

Figure 3-2 shows the Identity and credentials information for a typical CA.

Figure 3-2 Identity Window for Root User

  • To define a Server:
    1. Select Create from the Server pulldown on the Oracle Security Server Manager window.
      The Create Server window appears in response.
    2. Type the name of the new Server, in the Server Name field.


      Note:

      This name must match the global name of the associated database.


    3. Click the OK button at the bottom of the window.
      The new Server will appear in the tree structure on the Oracle Security Server Manager window within the oss/Authorizations/Server Authorizations folder.

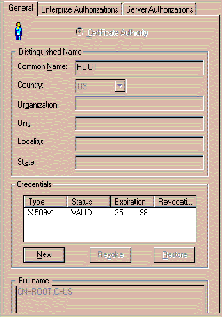
    Figure 3-3 shows the information for a typical Server.

    Figure 3-3 Create Server Window for Sample Server

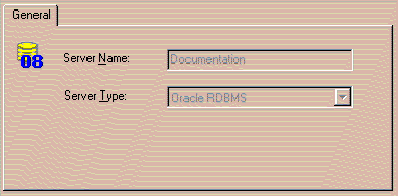
    You can define as many Servers as you wish during this step.

    1. To define a Server Authorization:
      1. Select Create from the Server Authorization pulldown on the Oracle Security Server Manager window.
        The Create Server Authorization window appears in response.
      2. Type the name of the new Server Authorization, in the Role Name field.
      3. If you wish to define the new Server Authorization for only one Server, select the name of that Server from the Server Name pulldown menu. If you wish to define the new Server Authorization for all of the Servers you have defined to the Oracle Security Server, click on the radio button next to Create for All Servers.
      4. Click the OK button at the bottom of the window.
        The new Server Authorization will appear in the tree structure on the Oracle Security Server Manager window within the Roles folder under the entry for each Server with which the new Server Authorization is associated. Each of these Server entities resides under the oss/Authorizations/Server Authorizations folder.

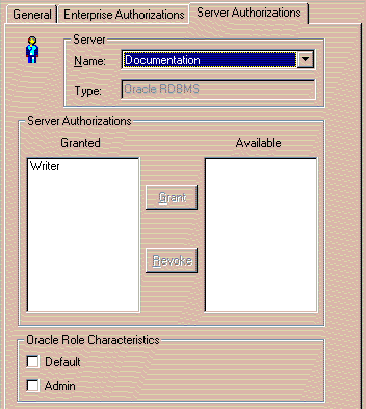
    Figure 3-4 shows the information for a typical Server Authorization.

    Figure 3-4 Server Authorization Window for Sample Server Authorization

    You can define as many Server Authorizations as you wish during this step.

    1. To define an Enterprise Authorization:
      1. Select Create from the Enterprise Authorization pulldown on the Oracle Security Server Manager window.
        The Create Enterprise Authorization window appears in response.
      2. Type the name of the new Enterprise Authorization, in the Enterprise Authorization field.
      3. Click the OK button at the bottom of the window.
        The new Enterprise Authorization will appear in the tree structure on the Oracle Security Server Manager window within the oss/Authorizations/Enterprise Authorizations folder.

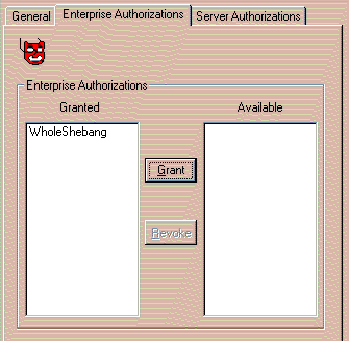
    Figure 3-5 shows the basic information for a typical Enterprise Authorization.

    Figure 3-5 Enterprise Authorization Window for Sample Enterprise Authorization

  • In the tree structure, click the symbol for the new Enterprise Authorization.
    The Enterprise Authorization window appears in response.
  • Click the Server Authorizations tab on the Enterprise Authorization window.
    The window associated with that tab appears in response.
  • The Server Authorizations that you defined at Step 3 of this procedure are available for you to roll up into Enterprise Authorizations. To assign a Server Authorization to the Enterprise Authorization you are defining:
    • Select a Server from the Name pulldown menu.
    • Click the name of a Server Authorization that appears in the Available column.
    • Click the Grant button.
    The Server Authorization has been moved from the Available column to the Granted column.

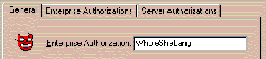
    Figure 3-6 shows the Server Authorizations, associated with a particular Server, that have been assigned to a typical Enterprise Authorization.

    Figure 3-6 Server Authorizations for Typical Enterprise Authorization

    You can define as many Enterprise Authorizations as you wish during this step.

    Taken together, Server Authorizations and Enterprise Authorizations are the Oracle Security Server's implementation of the global role concept introduced in Chapter 1, "Oracle Security Server Concepts." Specifically, if an Identity defined within the Oracle Security Server is authorized to perform a particular role on a particular server, then a user who has been "identified globally" on that server can acquire a role, of the same name, that has been "identified globally" on that server.

    1. Define Identities for each of the users that have been defined as "identified globally" to one or more Oracle8 Servers. (See the section "Defining Global Users and Global Roles to Oracle8 Servers," which appears earlier in this chapter.)
      Oracle recommends that you, in your role as security administrator, validate each user's identity, using some form of strong identification (such as a driver's license or passport), before defining that user to the Oracle Security Server.
      To define an Identity for a user:
      1. Select Create from the Identity pulldown on the Oracle Security Server Manager window.
        The Create Identity window appears in response.
      2. Fill out the fields within the Distinguished Name area of the Create Identity window as appropriate. (Click the Help button at the bottom of the window if you need more information about any of these fields.)
      3. Click the OK button at the bottom of the window.
        The Create New Credentials window appears in response.
      4. Enter and/or change the values of the fields on the Create New Credentials window as appropriate. (Click the Help button at the bottom of the window if you need more information about any of these fields.)
      5. Click the Create button at the bottom of the window.
        The new Identity will appear in the tree structure on the Oracle Security Server Manager window within the oss/Identities/Approved folder.

    Figure 3-7 shows the Identity and credentials information for a typical user Identity.

    Figure 3-7 Identity Window for Sample User

  • Click the Server Authorizations tab.
    The window associated with that tab appears in response.
  • The Server Authorizations that you defined at Step 3 of this procedure are available for you to assign to the new Identity. To assign a Server Authorization to the Identity you are defining:
    • Select a Server from the Name pulldown menu.
    • Click the name of a Server Authorization that appears in the Available column.
    • Click the Grant button.
    The Server Authorization has been moved from the Available column to the Granted column.

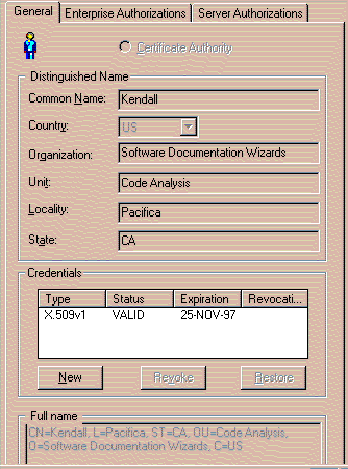
    Figure 3-8 shows the Server Authorizations, associated with a particular Server, that have been assigned to a typical Identity.

    Figure 3-8 Server Authorizations for Typical Identity

  • Click the Enterprise Authorizations tab.
    The window associated with that tab appears in response.
  • The Enterprise Authorizations that you defined at Step 4 of this procedure are available for you to assign to the new Identity. To assign an Enterprise Authorization to the Identity you are defining:
    • Click the name of an Enterprise Authorization that appears in the Available column.
    • Click the Grant button.
    The Enterprise Authorization has been moved from the Available column to the Granted column.

    Figure 3-9 shows the Enterprise Authorizations that have been assigned to a typical Identity.

    Figure 3-9 Enterprise Authorizations for Typical Identity

    You can define as many Identities as you wish during this step.

    1. To approve, if applicable and desirable, credentials for an Identity generated a by a WebServer, which appear initially in the tree structure under the oss/Identities/Requested folder:
      1. Click the symbol for that Identity.
        The Approve Credentials window appears in response.
      2. Type the password for the CA, which you defined in Step 1 of this procedure, in the Enter CA Password field on the Approve Credentials window.
      3. Click the Generate Identity button near the bottom of the window.
        Once you have approved credentials for an externally defined Identity, that Identity should have moved, within the tree structure, from a folder under oss/Identities/Requested to one under oss/Identifies/Approved.
        You can approve credentials for as many of these Identities as you wish during this step.
    2. Define Identities for the other principals, such as Oracle8 Servers and applications, that will be doing business with the Oracle Security Server.

    Configuring Oracle Security Adapters on Clients and Servers

    If you wish to enable the Oracle Security Adapter on a particular client or server, use Oracle Net8 Assistant or your command line to perform one or more of the following steps, as necessary, to modify the SQLNET.ORA file:

    1. In order to be authenticated, each principal must possess a wallet. A wallet is a file that contains an X.509 certificate (see "Oracle Security Server Certificates" in Chapter 1) and a public/private key pair (see "Public/Private Key Pairs," also in Chapter 1). The private key is encrypted.
      The SQLNET.ORA file, at a given Net8 client or Oracle8 Server, contains the location of that entity's wallet. A given client or server downloads its wallet from the Oracle Security Server Repository. The wallet is stored local to the client or server, which is responsible for protecting the wallet's contents from unauthorized access. The client or server will use its password to decrypt the encrypted private key that is contained in the wallet.
      Define the location of the directory containing the given principal's wallet, using the following template:
      oss.source.my_wallet=
      
      
      (SOURCE =
      (METHOD=FILE)
      (METHOD_DATA=
      (DIRECTORY= directory_path)
      )
      )
      
      
      where directory_path is the full name of the appropriate directory (for example, /oracle_home/network/admin on UNIX).
      If you do not specify a value for oss.source.my_wallet, the Oracle Security Server uses the default value, which is a "well-known" directory under the principal's home directory. On UNIX, for example, this directory is $HOME/oracle/oss.
    2. Define a name for the Oracle Security Server Repository, the database that holds the wallets for all principals. Define a name that points to the entry, in the TNSNAMES.ORA file, that contains the TNS address for this server, using the following template:
      oss.source.location =
      
      
      (SOURCE=
      (METHOD=ORACLE)
      (METHOD=DATA=
      (SQLNET_ADDRESS=<service_name>)
      )
      )
      
      
      where service_name is the name defined within the TNSNAMES.ORA file (oracle_repository, for instance) for the Oracle Security Server Repository.
      If you do not specify a value for oss.source.location, the Oracle Security Server uses the default value, OSS, which refers to the Oracle Security Server Repository.


      Note: There must be a pointer to the Oracle Security Server Repository from either the TNSNAMES.ORA file or a Names Server.


    Installing Wallets at Clients and Servers

    You use the osslogin tool to download a wallet, or to generate a clear private key by decrypting an encrypted private key contained within a wallet.

    The syntax of the osslogin command is as follows:

    osslogin [-d] [`<X.509 Name>']


    The X.509 name for a client or server contains all of the standard and optional values that form the name within that entity's Identity: C=country, O=organization, OU=organization_unit, ST=state, L=locality, CN=user. For a global user, these values must appear in exactly the same order as they did when that user was "identified globally" to the database. (See the section "Defining Global Users and Global Roles to Oracle8 Servers," which appears earlier in this chapter.) The single quotes are required; osslogin will generate an error message if you do not provide them.

    What the tool does depends on what form of the command you issue and what information exists in what location(s).

    Downloading a Wallet

    If you issue the command

    osslogin -d `<X.509 Name>'


    the tool will retrieve the given client or server wallet from the Oracle Security Server Repository, using the specified X.509 name, and then download the wallet to the location specified by the value of the oss.source.my_wallet parameter within the SQLNET.ORA file (see the section "Configuring Oracle Security Adapters on Clients and Servers," which appears earlier in this chapter).


    Note: The certificate and encrypted private key contained within the wallet are protected only by the access control mechanisms provided by the client or server operating system. (The clear private key will not be generated in association with this form of the osslogin command.)


    CAUTION:

    You should delete your wallet when you are finished using it for a particular communications session. This will help protect its contents from unauthorized access.


    Generating a Decrypted (Clear) Private Key (Name Specified)

    If you issue the command

    osslogin `<X.509 Name>'


    the tool will look for the given client or server wallet at the location specified by the value of oss.source.my_wallet.

    If the wallet is not at that location, the tool will retrieve it from the Oracle Security Server Repository, using the specified X.509 name, and then download the wallet to the specified location.


    Note: The certificate and encrypted private key contained within the wallet are protected only by the access control mechanisms provided by the client or server operating system.


    Once it has been established that the wallet is stored locally at the client or server, the tool will prompt you to enter the client or server password. The tool will generate the clear private key by using the password to decrypt the encrypted private key, and will then store the clear private key local to the client or server, at the location specified within the oss.source.my_wallet parameter.


    WARNING: You must protect the clear private key carefully. The clear private key authenticates the client or server on the network. If unauthorized users were allowed to access the clear key file, they could masquerade as the client or server on the network and obtain the entity's privileged information.


    Note that you can add -f to this form of the command:

    osslogin -f `<X.509 Name>'


    to force the tool to go directly to the Oracle Security Server Repository in search of the client or server wallet. If you choose this option, the tool will prompt you for the X.509 name.


    CAUTION:

    You should delete your wallet when you are finished using it for a particular communications session. This will help protect its contents from unauthorized access.


    Generating a Decrypted (Clear) Private Key (Name Not Specified)

    If you issue the command

    osslogin


    the tool will look for the given client or server wallet at the location specified by the value of oss.source.my_wallet.

    If the wallet is not at that location, the tool will prompt you to enter the elements of the X.509 name of the client or server. The tool will then use that name to retrieve the client or server wallet from the Oracle Security Server Repository, and then download the wallet to the specified location.


    Note: The certificate and encrypted private key contained within the wallet are protected only by the access control mechanisms provided by the client or server operating system.


    Once the wallet is stored locally at the client or server, the tool will prompt you to enter the client or server password. The tool will generate the clear private key by using the password to decrypt the encrypted private key, and will then store the clear private key local to the client or server, at the location specified within the oss.source.my_wallet parameter.


    WARNING: You must protect the clear private key carefully. The clear private key authenticates the client or server on the network. If unauthorized users were allowed to access the clear key file, they could masquerade as the client or server on the network and obtain the entity's privileged information.


    CAUTION:

    You should delete your wallet when you are finished using it for a particular communications session. This will help protect its contents from unauthorized access.


    Removing the Oracle Security Server Repository


    WARNING: You should consider deleting the Oracle Security Server Repository only if you have migrated the data from the repository to another database or if you intend to discontinue use of the Oracle Security Server.


    A DBA should perform the following steps to remove the Oracle Security Server Repository from its Oracle database:

    1. Launch the Remove Security Server program from the Oracle Security Server program group on the desktop.

    The Database Login Information Window appears in response.

    1. Use the Database Login Information window to log into the database that contains the Oracle Security Server Repository.
      1. Type system in the Username field.
      2. Type the password for the Oracle Security Server administrator, in the Password field.
      3. Type the name of the database on which the Oracle Security Server Repository resides, in the Service field.
      4. Click the OK button.

    A confirmation window appears in response. This window will ask you to confirm that you want to remove the Oracle Security Server Repository from the specified database.

    1. Click the OK button on the confirmation window.


  • Prev

    Next
    Oracle
    Copyright © 1997 Oracle Corporation.

    All Rights Reserved.

    Library

    Product

    Contents

    Index