A
Manually Creating Oracle Service for MTS Users
This appendix describes how to manually create the MTSSYS
user, a custom user, or an operating system authenticated Oracle Service
for MTS user on Windows NT.
Specific topics discussed are:
Manually
Creating the MTSSYS User
This section describes how to manually create the MTSSYS
user (if it is not included in your Oracle8i database) and execute
the scripts that enable you to run the sample application demo described
in section "Using OCI with the Microsoft Application
Demo". See section "Verifying Oracle Service
for MTS User Name" to determine if your Oracle8i database includes
this user.
To manually create an MTSSYS user:
-
Log on to the computer where your Oracle8i
database is installed.
-
Start SQL*Plus:
C:\> SQLPLUS
-
Connect with the INTERNAL user name:
ENTER USER-NAME: INTERNAL
-
If you want to use the Microsoft application demo
described in section "Using OCI with the Microsoft
Application Demo", go to step 4a.
Otherwise, go to step 5.
-
Verify that you can connect with the SCOTT user name.
SQL> CONNECT SCOTT/PASSWORD
-
where PASSWORD is TIGER after installation, unless
you changed it.
-
Follow the steps below based on whether or not you
connected to the Oracle8i database:
-
Run the following script:
SQL> @ORACLE_BASE\ORACLE_HOME\RDBMS\ADMIN\SCOTT.SQL;
-
This creates the user SCOTT, which is used by the sample
application demo.
-
Go to step 5.
-
Run the ORAMTS.SQL script:
SQL> @ORACLE_BASE\ORACLE_HOME\RDBMS\ADMIN\ORAMTS.SQL;
-
This creates the user MTSSYS and two tables (ACCOUNT and
RECEIPT) under user SCOTT that are used by the Microsoft application demo.
Note:
If your Oracle8i database did not include user SCOTT
and you did not run SCOTT.SQL, error messages appear when running ORAMTS.SQL.
Ignore these messages. The product functions properly, but the sample application
demo will not work.
|
-
Connect with the MTSSYS user name and MTSSYS password:
SQL> CONNECT MTSSYS/MTSSYS
-
Change the password for the MTSSYS user:
SQL> ALTER USER MTSSYS IDENTIFIED BY NEW_PASSWORD
-
This changes your MTSSYS user password.
-
Exit SQL*Plus:
SQL> EXIT
-
Follow the procedures in section "Creating
a New Oracle Service for MTS" to create an Oracle Service for MTS user.
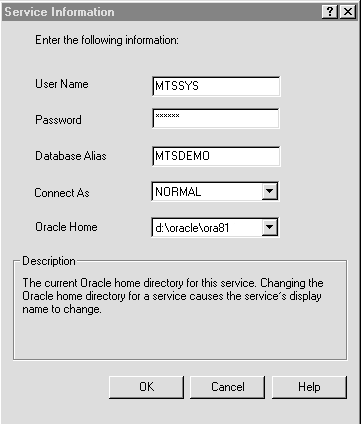
When you get to step 10, enter the MTSSYS
user name and password in the Service Information dialog box:
-
Complete the remaining procedures (steps 11
through 13) in section "Creating
a New Oracle Service for MTS".
-
When complete, this creates an MTSSYS user for the Oracle
Service for MTS.
Manually
Creating a Custom Oracle Service for MTS User
This section describes how to manually create a custom Oracle
Service for MTS user (if you do not want to use the user MTSSYS) and execute
the scripts that enable you to run the Microsoft application demo described
in section "Using OCI with the Microsoft Application
Demo".
To manually create a custom user:
-
Go to the computer where your Oracle8i database
is installed.
-
Start SQL*Plus:
C:\> SQLPLUS
-
Connect with the INTERNAL user name:
ENTER USER-NAME: INTERNAL
-
If you want to use the Microsoft application demo
described in section "Using OCI with the Microsoft
Application Demo", go to step 4a.
Otherwise, go to step 5.
-
Verify that you can connect with the SCOTT user name.
SQL> CONNECT SCOTT/PASSWORD
-
where PASSWORD is TIGER after installation, unless
you changed it.
-
Follow the steps below based on whether or not you
connected to the Oracle8i database:
-
Run the following script:
SQL> @ORACLE_BASE\ORACLE_HOME\RDBMS\ADMIN\SCOTT.SQL;
-
This creates the user SCOTT, which is used by the sample
application demo.
-
Go to step 5.
-
Verify that you can connect with the MTSSYS user name:
SQL> CONNECT MTSSYS/PASSWORD
-
where PASSWORD is MTSSYS after installation, unless
you changed it. The MTSSYS user name is required to run the script that
enables you to create a custom Oracle Service for MTS user.
-
Follow the steps below based on whether or not you
connected to the Oracle8i database:
-
Run the ORAMTS.SQL script:
SQL> @ORACLE_BASE\ORACLE_HOME\RDBMS\ADMIN\ORAMTS.SQL;
-
This creates the user MTSSYS and two tables (ACCOUNT and
RECEIPT) under user SCOTT that are used by the Microsoft application demo.
Note:
If your Oracle8i database did not include user SCOTT
and you did not run SCOTT.SQL, error messages appear when running ORAMTS.SQL.
Ignore these messages. The product functions properly, but the Microsoft
application demo will not work.
|
-
Go to step 7.
-
Go to the computer where your Oracle Services for
Microsoft Transaction Server is installed.
-
Go to the ORACLE_BASE\ORACLE_HOME\ORAMTS\ADMIN
directory.
-
Use an ASCII editor to open the file MTSUSER.SQL.
-
Replace all occurrences of MTS_USER with a custom
user name (in this example, the user name entered is FRANK).
-
Replace all occurrences of MTS_PASSWORD with a custom
password.
-
Save your changes and close the file.
-
Start SQL*Plus:
C:\> SQLPLUS
-
Connect with the INTERNAL user name:
ENTER USER-NAME: INTERNAL
-
Run the MTSUSER.SQL script:
SQL> @ORACLE_BASE\ORACLE_HOME\ORAMTS\ADMIN\MTSUSER.SQL;
-
This creates a custom Oracle Service for MTS user.
-
Exit SQL*Plus:
SQL> EXIT
-
Follow the procedures in section "Creating
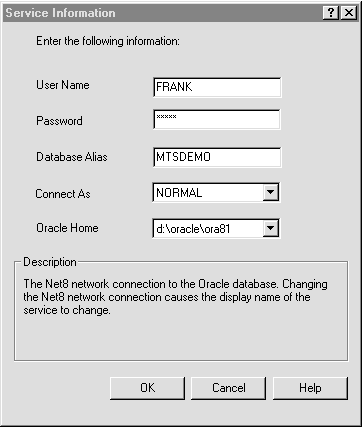
a New Oracle Service for MTS". When you get to step 10,
enter the custom user name and password in the Service Information
dialog box:
-
Complete the remaining procedures (steps 11
through 13) in section "Creating
a New Oracle Service for MTS".
-
When complete, this creates a custom user for the Oracle
Service for MTS.
Creating
a New Operating System Authenticated Oracle Service for MTS
Your Oracle Service for MTS user name can be authenticated
by the Windows NT operating system. This provides you with the advantage
of not having to enter a user name and password when creating your Oracle
Service for MTS.
Note:
These instructions assume you are familiar with enabling
Oracle8i database users to be authenticated by Windows NT. See the
Getting Started guide that was included with your Oracle8i
database for Windows NT.
|
To create an operating system-authenticated Oracle Service
for MTS user:
-
Authenticate a Windows NT user name by following the
instructions in your Getting Started guide. Ensure that you grant
the following roles and privileges to the user:
-
CONNECT, RESOURCE, and SELECT_CATALOG_ROLE roles
-
FORCE ANY TRANSACTION, CREATE PUBLIC SYNONYM, and
DROP PUBLIC SYNONYM privileges
-
Log onto Windows NT with the authenticated user name.
-
Follow the procedures in section "Creating
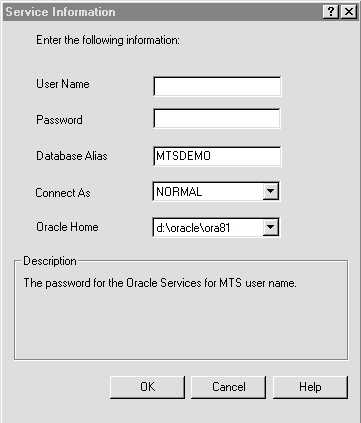
a New Oracle Service for MTS". When you get to step 10,
leave the User Name and Password fields blank in the Service Information
dialog box.
-
Complete the remaining procedures (steps 11
through 13) in section "Creating
a New Oracle Service for MTS".
-
Choose Start > Settings > Control Panel.
-
The Control Panel window appears.
-
Double-click Services.
-
The Services dialog box appears.
-
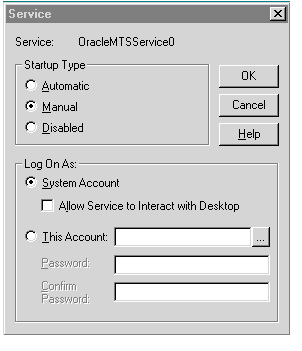
Select OracleMTSServicen and click Startup.
-
where n is the Oracle Service for MTS number you
want to modify.
The Service dialog box appears:
-
Select This Account.
-
Specify the operating system authenticated user name
with which you logged onto the computer in step 2.
-
Enter the password in the Password field.
-
Enter the password a second time in the Confirm Password
field.
-
Click OK to exit the Service dialog box.
-
Click Close to exit the Services dialog box.
-
Exit the Control Panel window.
-
Choose Start > Programs > Oracle - HOME_NAME
> Application Development > Oracle Manager for Microsoft Transaction Server.
-
The Microsoft Management Console appears.
-
Find the Oracle Service for MTS to modify in the Explorer
window.
-
Right-click the new Oracle Service for MTS icon.
-
A menu appears with several options.
-
Choose Stop Service.
-
The service stops.
-
Right-click the same Oracle Service for MTS icon again.
-
A menu appears with several options.
-
Choose Start Service.
-
The service starts.
Enabling
an Existing Oracle Service for MTS to be Operating System Authenticated
You can modify an existing Oracle Service for MTS to be associated
with an operating system-authenticated user on Windows NT.
Note:
These instructions assume you are familiar with enabling
Oracle8i database users to be authenticated by Windows NT. See the
Getting Started guide that was included with your Oracle8i
database for Windows NT.
|
To modify an existing user to be operating system authenticated:
-
Authenticate a Windows NT user name by following the
instructions in your Getting Started guide. Ensure that you grant
the following roles and privileges to the user:
-
CONNECT, RESOURCE, and SELECT_CATALOG_ROLE roles
-
FORCE ANY TRANSACTION, CREATE PUBLIC SYNONYM, and
DROP PUBLIC SYNONYM privileges
-
Log onto Windows NT with the authenticated user name.
-
Choose Start > Settings > Control Panel.
-
The Control Panel window appears.
-
Double-click Services.
-
The Services dialog box appears.
-
Select OracleMTSServicen and click Startup.
-
where n is the Oracle Service for MTS number you
want to modify.
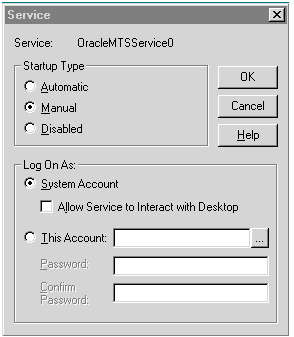
The Service dialog box appears:
-
Select This Account.
-
Specify the operating system authenticated user name
with which you logged onto the computer in step 2.
-
Enter the password in the Password field.
-
Enter the password a second time in the Confirm Password
field.
-
Click OK to exit the Service dialog box.
-
Click Close to exit the Services dialog box.
-
Exit the Control Panel window.
-
Go to the computer from which to modify the Oracle
Service for MTS. The Oracle Service for MTS can be running on this computer
or on a remote computer that you can access from this computer.
-
Choose Start > Programs > Oracle - HOME_NAME
> Application Development > Oracle Manager for Microsoft Transaction Server.
-
The Microsoft Management Console appears.
-
Find the Oracle Service for MTS to modify in the Explorer
window.
-
Right-click the Oracle Service for MTS icon to modify.
-
A menu appears with several options.
-
Choose Properties.
-
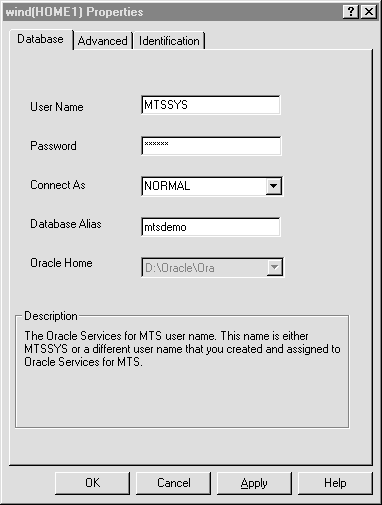
The Properties dialog box contains a Database tab
that displays the following information:
-
Remove all information from the User Name and Password
fields.
-
Click OK.
-
Right-click the same Oracle Service for MTS icon again.
-
A menu appears with several options.
-
Choose Stop Service.
-
The service stops.
-
Right-click the same Oracle Service for MTS icon again.
-
A menu appears with several options.
-
Choose Start Service.
-
The service starts.
-