Release 8.1.5 for Windows NT and Windows 95/98
A68801-01
Library |
Product |
Contents |
Index |
| Pro*C/C++
Precompiler Getting Started
Release 8.1.5 for Windows NT and Windows 95/98 A68801-01 |
|
![]()
![]()
This chapter provides an overview of how to use Pro*C/C++
release 8.1.5 for Windows NT and Windows 95/98.
Specific topics discussed are:
When you install Pro*C/C++ release 8.1.5, Oracle Universal
Installer creates a directory called \PRECOMP in your ORACLE_BASE\ORACLE_HOME
directory.
|
Note: The \PRECOMP directory can contain files for other products, such as Pro*COBOL. |
The \PRECOMP directory contains the following directories:
This section describes how to use the Pro*C/C++ graphical
user interface.
Specific topics discussed are:
To start the graphical user interface:
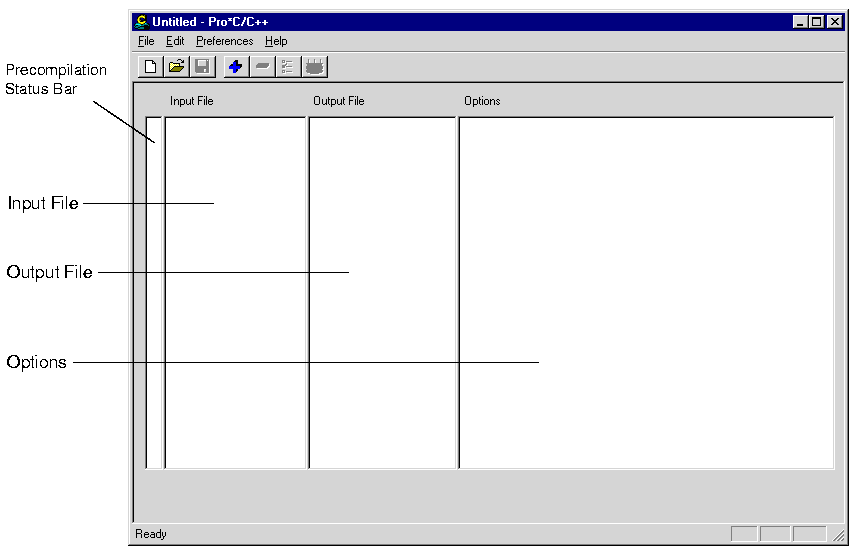
The Pro*C/C++ graphical user interface contains five elements:

Displays the name of the Pro*C/C++ project. If you have not
assigned a name to the current project, the word "Untitled" appears instead.
Enables you to execute commands by clicking a button:

Displays information about the progress of a precompilation.
The status bar also identifies the purpose of a toolbar button or menu
command when you place the mouse pointer over the toolbar button or menu
command.
A Pro*C/C++ project consists of one or more precompilable files. Project files have an extension of .PRE. You can have only one project open at a time.
|
Note: To open an existing project, choose Open Project from the File menu. |
Use the Preferences menu to set the default file extension
of output files:

|
Note: Changing the default file extension does not change the file extension of existing output files. |
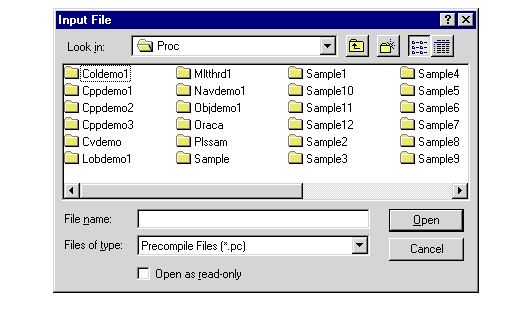
To add files to a Pro*C/C++ project:
If you need to, you can easily delete one or more files from
a Pro*C/C++ project.
To delete files from a Pro*C/C++ project:
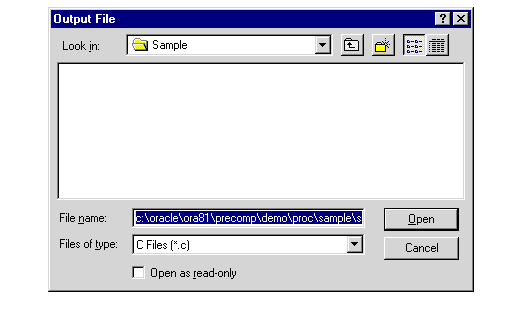
To change the name of an existing input file or output file:
Precompiler options enable you to control such things as
how resources are used, how errors are reported, how input and output are
formatted, and how cursors are managed.
If you change the default value of a precompiler option,
a description of the change appears in the Option String edit field (at
the bottom of the Options dialog box) and in the Options area of
the information pane.
To change the value of precompiler options:

|
Additional Information: See Chapter 11 in the Pro*C/C++ Precompiler Programmer's Guide for descriptions of the precompiler options. In addition, click Help in the Options dialog box for a condensed version of the descriptions in Chapter 9. See "Precompiler Options", later in this chapter, for issues related to Pro*C/C++ for Windows NT and Windows 95/98. |
If you selected semantics or full from the SQL Check drop-down
list box in the Options dialog box, you may need to specify database
connection information for the Oracle database. You do not need to connect
to the Oracle database if every table referenced in a data manipulation
statement or PL/SQL block is defined in a DECLARE TABLE statement.
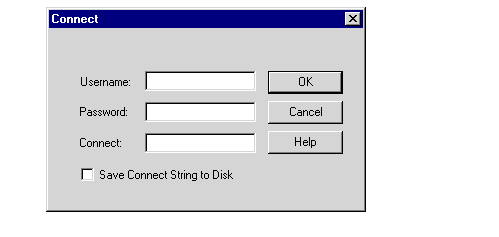
To specify database connection information:
You can precompile any number of files in the Input File
area of the information pane.
To precompile a Pro*C/C++ project:
|
Note: Cancel does not interrupt the precompile for a file already in process, but it does halt the precompile for any remaining files. |
When precompiling is completed, the message box indicates "Precompiling Finished!".
Look for one of the following icons in the Precompilation
Status Bar once the precompile process is complete:
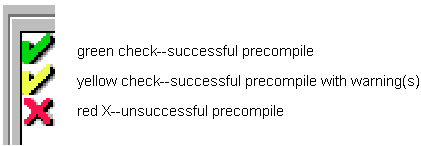
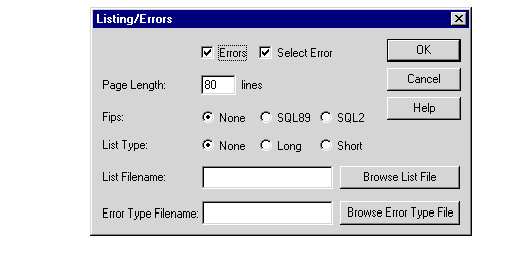
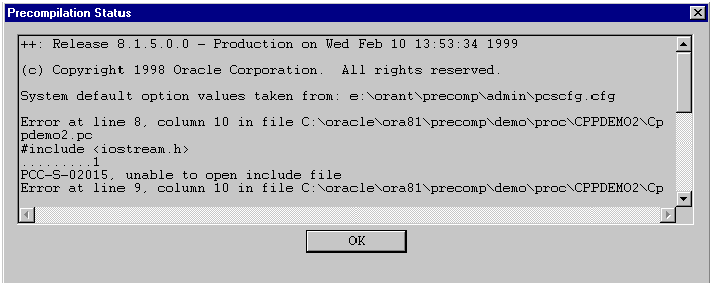
If you see a yellow check or a red X, double-click the icon.
The Precompilation Status dialog box appears. This dialog box provides
detailed information on the reason for a yellow check or a red X. For example:
Switch to your development environment to fix any problems.
Then, precompile again.
To precompile a file at the command line, enter the following command:
C:\> PROC INAME=FILENAME.PC
where FILENAME.PC is the name of the file.
Pro*C/C++ generates FILENAME.C, which can be compiled
by your C compiler.
If the file is not in your current working directory, include
the file's full path after the INAME argument.
The ORACLE_BASE\ORACLE_HOME\PRECOMP\PUBLIC
directory contains the Pro*C/C++ header files.
| Additional
Information:
See the Pro*C/C++ Precompiler Programmer's Guide for more information about ORACA.H, SQLCA.H, and SQLDA.H. |
The ORACLE_BASE\ORACLE_HOME\PRECOMP\LIB\MSVC
directory contains the library file that you use when linking Pro*C/C++
applications.
The library file is called ORASQL8.LIB.
Pro*C/C++ application program interface (API) calls are implemented
in DLL files provided with your Pro*C/C++ software. To use the DLLs, you
must link your application with the import libraries (.LIB files) that
correspond to the Pro*C/C++ DLLs. Also, you must ensure that the DLL files
are installed on the computer that is running your Pro*C/C++ application.
Microsoft provides you with three libraries: LIBC.LIB, LIBCMT.LIB,
and MSVCRT.LIB. The Oracle DLLs use the MSVCRT.LIB runtime library. You
must link with MSVCRT.LIB rather than the other two Microsoft libraries.
Chapter 11 of the Pro*C/C++
Precompiler Programmer's Guide describes the precompiler options.
This section highlights issues related to Pro*C/C++ for Windows NT and
Windows 95/98.
A configuration file is a text file that contains precompiler
options.
For release 8.1.5, the system configuration file is called
PCSCFG.CFG. This file is located in the ORACLE_BASE\ORACLE_HOME\PRECOMP\ADMIN
directory.
The CODE option has a default setting of ANSI_C. Pro*C/C++
for other operating systems may have a default setting of KR_C.
DBMS=V6_CHAR is not supported when using CHAR_MAP=VARCHAR2.
Instead, use DBMS=V7.
For the Pro*C/C++ graphical user interface, use the Include
Directories field of the Options dialog box to enter INCLUDE path
directories. If you want to enter more than one path, separate each path
with a semicolon, but do not insert a space after the semicolon. This causes
a separate "INCLUDE=" string to appear in front of each directory.
For sample programs that precompile with PARSE=PARTIAL or
PARSE=FULL, an include path of C:\PROGRAM FILES\DEVSTUDIO\VC\INCLUDE has
been added. If Microsoft Visual C++ has been installed in a different location,
modify the Include Directories field accordingly for the sample programs
to precompile correctly.
The PARSE option has a default setting of NONE. Pro*C/C++
for other operating systems may have a default setting of FULL.
The XA Application Program Interface (API) is typically used to enable an Oracle8 database to interact with a transaction processing (TP) monitor, such as:
The Oracle XA Library is automatically installed as part
of Oracle8 Enterprise Edition. The following components are created in
your Oracle home directory:
| Component | Location |
|---|---|
|
ORAXA8.DLL |
ORACLE_BASE\ORACLE_HOME\BIN |
|
ORAXA8.LIB |
ORACLE_BASE\ORACLE_HOME\RDBMS\XA |
|
XA.H |
ORACLE_BASE\ORACLE_HOME\RDBMS\XA |
You can also use TP monitor statements in your client programs.
The use of the XA API is also supported from both Pro*C/C++ and OCI. In
either case, ORAXA8.DLL must be contained in the execution path of the
calling program.
To compile and link a Pro*C/C++ program with XA:
| Library | Location |
|---|---|
|
ORAXA8.LIB |
ORACLE_BASE\ORACLE_HOME\RDBMS\XA |
|
OCI.LIB |
ORACLE_BASE\ORACLE_HOME\OCI\LIB\MSVC |
|
ORASQL8.LIB |
ORACLE_BASE\ORACLE_HOME\PRECOMP\LIB\MSVC |
The Oracle8 database supports the use of XA dynamic registration.
XA dynamic registration improves the performance of applications that interface
with XA-compliant TP monitors.
For TP monitors to use XA dynamic registration with an Oracle8 database on Windows NT, you must add either an environmental variable or a registry variable to the Windows NT computer on which your TP monitor is running. See either of the following sections for instructions:
After adding this variable, see Oracle8
Application Developer's Guide - Fundamentals for information on
using XA dynamic registration.
Adding an environmental variable at the MS-DOS command prompt
affects only the current MS-DOS session.
To add an environmental variable for the current session:
C:\> SET ORA_XA_REG_DLL = VENDOR.DLLwhere VENDOR.DLL is the TP monitor DLL provided by your vendor.
Adding a registry variable affects all sessions on your Windows
NT computer. This is useful for computers where only one TP monitor is
running.
To add a registry variable for all sessions:
|
|
Copyright © 1999 Oracle Corporation. All Rights Reserved. |
|