Release 8.1.6
A76932-01
Library |
Product |
Contents |
Index |
| Oracle Advanced Security Administrator's Guide Release 8.1.6 A76932-01 |
|
Enterprise user security provides single sign-on functionality in a client-server environment.
This chapter covers topics in the following sections:
Administrators today must manage complex user information, keeping it current and secure. These tasks become all the more challenging with increased use of technology and a high user turnover in enterprises. For example, in a typical enterprise, each user can have multiple accounts on different databases. This means too many passwords for users to remember, and too many accounts for administrators to manage.
There are security problems as well. For example, any time a user leaves a company or changes jobs, that user's privileges should change the same day in order to guard against misuse of that user's old or unused accounts and privileges. However, in a large enterprise, with user accounts and passwords distributed over multiple databases, an administrator may not be able make all the changes as expeditiously as good security requires.
Enterprise user security management, introduced in Oracle8i Release 8.1.6, addresses these user, administration, and security challenges by centralizing storage and management of user-related information in an LDAP-compliant directory service. Now, when an employee changes jobs, the administrator needs to modify information in only one location, namely, the directory. This centralization lowers the cost of administration and makes the enterprise more secure.
Oracle8i enterprise user security provides single sign-on to Oracle8i using interoperable X.509 v3 certificates over Secure Sockets Layer (SSL) v3. It supports the following LDAP-compliant directory services:
It also provides a tool, Oracle Enterprise Security Manager, to create user entries in the directory.
This chapter discusses important concepts related to enterprise user security management in the following sections:
A directory is a way of organizing information so that you can find it easily. It lists objects--for example, people, books in a library, merchandise in a department store--and gives details about each one. A telephone book is a familiar enter of directory, a card catalog in a library is another, and a department store catalog still another.
In a computerized environment, a directory is a specialized database that stores collections of information about objects. The information in such a directory might represent any resources that require management--for example, employee names, titles, and security credentials, information about e-commerce partners, or about shared network resources such as conference rooms and printers.
Some of the key concepts for understanding directories are discussed in the following sections:
In a directory, each collection of information about an object is called an entry. Just as a typical telephone directory includes entries for people, an online directory might include entries for employees, conference rooms, e-commerce partners, or shared network resources such as printers.
Each entry in a directory is uniquely identified by a distinguished name (DN). The distinguished name tells you exactly where the entry resides in the directory's hierarchy, called a Directory Information Tree (DIT).
To understand the relation between a distinguished name and a Directory Information Tree look at Figure 17-1.
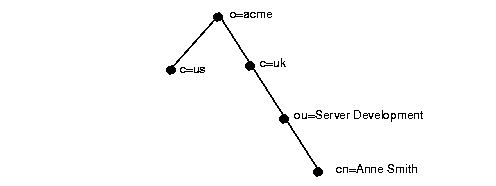
The DIT in Figure 17-1 is structured along geographical and organizational lines. The branch on the right represents the entry for Anne Smith who works in the organization (o) Acme, in an organizational unit (ou) named Server Development, in the country (c) of Great Britain (uk).
The DN for this "Anne Smith" entry is:
cn=Anne Smith,ou=Server Development,c=uk,o=acme.
Note that the conventional format of a distinguished name places the lowest DIT component at the left, then follows it with the next highest component, thus moving progressively up to the root.
A directory divides its information into units called directory naming contexts. A directory naming context is a subtree that resides entirely on one server. It must be contiguous, that is, it must begin at an entry that serves as the top of the subtree, and extend downward to either leaf entries or references to subordinate naming contexts. It can range in size from a single entry to the entire DIT.
With Oracle8i Release 8.1.6, as we will see later in this chapter, you choose one or more naming contexts to contain Oracle enterprise information. We call these administrative contexts, and in each one, a container may be created to hold Oracle enterprise information. This container is called an Oracle Context.
Authorization is the process of ensuring that a user reads or updates only the information for which that user has privileges. When directory operations are attempted within a directory session, the directory server ensures that the user has the required permissions to perform those operations. Otherwise, the operation is disallowed. Through this mechanism, the directory server protects directory data from unauthorized operations by directory users. This mechanism is called access control.
Access control policies are captured in Access Control Lists (ACLs). Typically, a given ACL is associated with each directory object and governs the access policies for that object.
ACLs specify the following:
There are a few main types of directory entries that relate to enterprise user security management, and these are discussed in the following sections:
An enterprise user one that is defined and managed in a directory. Each enterprise user has a unique identity across an enterprise.
Enterprise users can be assigned enterprise roles, which determine their access privileges on databases. These enterprise roles are also stored and managed in a directory.
An enterprise role consists of one or more global roles. A global role is managed in a directory, but its privileges are contained within a single database. An enterprise role is thus a container of global roles. For example, the enterprise role CLERK could contain the global role HRCLERK with its unique privileges on the Human Resources database, and the ANALYST role with its unique privileges on the Payroll database.
An enterprise role can be granted to or revoked from one or more enterprise users. For example, you could grant the enterprise role CLERK to a number of enterprise users who hold the same job. This information is protected in the directory, and only you, as the administrator, can manage users and grant and revoke their roles.
A user can be granted local roles and privileges in a database in addition to enterprise roles.
An enterprise domain is a group of databases and enterprise roles. An example of a domain could be the engineering division in an enterprise or a small enterprise itself. It is here, at the enterprise domain level, that the domain administrator, using Oracle Enterprise Security Manager, allocates enterprise roles to users and manages enterprise security.
An Oracle Context (cn=OracleContext) is a special entry in the directory that contains various Oracle entries to support directory naming and enterprise user security. An Oracle Context contains three administrative groups, a products subtree, and, possibly, server and Net8 objects.
The administrative context is the location for an Oracle Context. It can be any directory entry. During directory access configuration, which is completed with the Net8 Configuration Assistant during or after installation, you select an administrative context.
An administrative context, an Oracle Context, and its subtrees are shown in Figure 17-2.
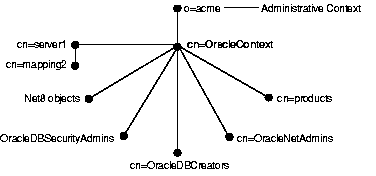
Each of the three administrative groups is created with its associated ACL. The user who creates the Oracle Context with the Net8 Configuration Assistant automatically becomes the first member of these groups. The three administrative groups in an Oracle Context are:
|
See Also:
Net8 Administrator's Guide for instructions on adding members to the OracleNetAdmins group |
In addition to the three administrative groups, an Oracle Context may also include other types of objects, for example:
| Object | Description |
|---|---|
|
Database server object |
A database server object (represented as |
|
Net service name object |
Net service name objects can be created during the database installation by using the Net8 Assistant. The can be created later by members of the OracleNetAdmins group. |
The Oracle Context also contains the database security subtree under the cn=products and cn=OracleDBSecurity container objects. This subtree contains enterprise domains, which are the groups of database servers and enterprise roles.
During database installation, a default enterprise domain (cn=OracleDefaultDomain) is established. The domain administrator can later add additional enterprise domains (represented in Figure 17-3 as cn=Domain1) by using Oracle Enterprise Security Manager.
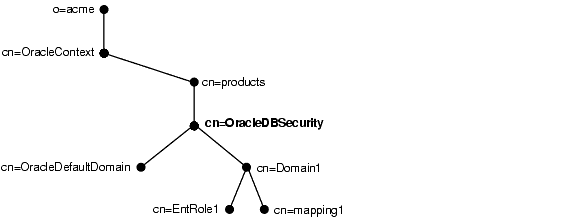
An enterprise domain subtree includes the following objects:
|
Enterprise role object |
Contains information about global roles for each server and enterprise roles for the domain. These are created and managed by the domain administrator by using Oracle Enterprise Security Manager. See Also: Creating an Enterprise Role within an Enterprise Domain. |
|
Mapping objects |
Each mapping object contains mapping information between a full or partial DN and an Oracle database user name. Mapping objects are created by the domain administrator for a particular domain. Mapping objects, as we saw earlier, also reside under server objects and are created by the database administrator for a particular database. |
Refer to Figure 17-4 to see the relationships among the various components of this product.
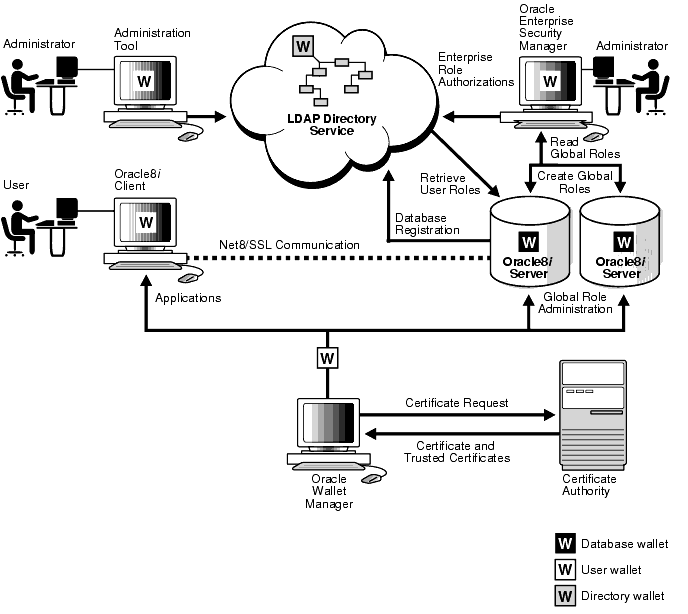
This section summarizes the interactions between the various components in enterprise user security management. In this summary, we are assuming that the user already has a wallet and that the user's authentication to the database takes place by using SSL.
The enterprise user security management process looks like this:
In most cases, users do not need their own accounts or schemas in a database. Rather, they typically need to access only application schemas. For example, suppose that users John, Firuzeh, and Jane need to access the Payroll schema on the Finance database. They do not need to create objects in the database, and therefore do not need their own schemas. They merely need access to the Payroll application.
Oracle8i Release 8.1.6 supports mapping many enterprise users stored in a directory to shared schema on an individual database. This separation of users from schemas reduces the cost of user administration by reducing the number of user accounts. It means that you do not need to create an account for a user--that is, a user schema--in multiple databases, in addition to creating the user in the directory. Instead, you can create a user in one location, namely, the directory, and "point" the user to a shared schema that other enterprise users can also access. For example, if John, Firuzeh and Jane all access both the Sales and the Finance databases, you do not need to create an account for each user on each of these databases. Instead, you need to create only a single schema on each database--let's call them SALES_APPLICATION and FINANCE_APPLICATION respectively--that all three users can access.
To configure User/Schema Separation, the local administrator or privileged user of a database needs to create at least one database schema in the database. Enterprise users can then be mapped to this schema.
Consider the process in the following example in which an enterprise security administrator creates a shared schema, then maps users to it.
Now, when Jane connects to the database, she is automatically connected to the EMPLOYEE schema and is given the global role HRMANAGER. Multiple enterprise users can be mapped to the same shared schema. For example, the enterprise security administrator can create another enterprise user Scott and map Scott to the EMPLOYEE schema. From that point on, both Jane and Scott automatically use the EMPLOYEE schema when connecting to the HR database, but each may get a different role.
User/Schema Separation functionality relies on SSL for authentication to the database. SSL authentication occurs as follows:
If the database does not find the DN locally, it looks up the appropriate DN mapping in the directory. This DN mapping object in the directory associates a user to a database schema. The database may find:
This method associates the DN of a single directory user with a particular schema on a database. It results in one mapping entry per user.
When using full DN mapping, each enterprise user can be mapped either to a unique schema, or to a shared schema.
This method allows multiple enterprise users sharing part of their DN to access the same shared schema. This method is useful if multiple enterprise users are already grouped under some common root in the directory tree. The subtree that these users share can be mapped to a shared schema on a database. For example, you can map all enterprise users in the subtree for the engineering division to one shared schema, BUG_APPLICATION, on the bug database.
If the database does find either the DN locally or the appropriate DN mapping object in the directory, the database allows the user to log on.
For example, suppose that Jane is trying to connect to the HR database. Suppose, further, that the HR database does not find Jane's DN. The HR database then looks up the Jane's DN in the directory. The directory has a mapping of Jane to the shared schema EMPLOYEE and returns this schema. The database now logs Jane in and points her to the EMPLOYEE schema.
The database also retrieves from its own tables any local roles and privileges associated with the database schema to which the user was mapped.
The database uses both the global and the local roles to determine the information that the user can access.
|
See Also:
|
Continuing our example, suppose that the enterprise role MANAGER contains the global roles CLERK on the Payroll database and ANALYST on the HR database. When Jane, who has the enterprise role MANAGER, connects to the HR database, she uses the schema EMPLOYEE on that database. Her privileges on that database are determined by:
When she connects to the Payroll database, her privileges are determined by:
The syntax for creating a shared schema is:
CREATE USER application_user IDENTIFIED GLOBALLY AS ''
For example, the administrator for the HR database creates a shared schema for the user SALES_APPLICATION as follows:
CREATE USER sales_application IDENTIFIED GLOBALLY AS ''
To load entries one at a time, you can use Oracle Enterprise Security Manager. To load large numbers of entries, use other LDAP processes such as the Oracle Internet Directory bulkload tool.
The mapping between enterprise users and a schema can be done in either the database or the directory.
The mapping is done in the directory by means of one or more mapping objects. A mapping object is used to map the Distinguished Name (DN) of a user, contained in a user's X.509 certificate, to a database schema that the user will access. You create a mapping object by using Oracle Enterprise Security Manager. This mapping can be either:
When determining the schema to which it should connect the user, the database uses the following precedence rules:
If there are some privileges that need to be granted to a certain group of users, you can do this by granting roles and privileges to a database schema. Everyone sharing such schema gets these local roles and local privileges in addition to their personal enterprise roles. However, you must exercise caution when doing this, because everyone who points to this shared schema can exercise the privileges assigned to this schema.
Current user database links are an Oracle Advanced Security feature.
Oracle8i supports a particular type of database link, called a current user database link. This link allows you to connect to a second database as another user, with that user's privileges. At the same time, it does not require that user's credentials be stored in the database link definition.
For example, a current user database link allows Jane, a user of the Accounts Payable database, to access the Human Resources database by connecting as Scott, and using Scott's credentials.
For Jane to access a current user database link to connect to the schema Scott, Scott must be a schema created as IDENTIFIED GLOBALLY in both databases. Jane, however, can be a user identified in one of three ways:
To create Scott as a global user in both the Accounts Payable and Human Resources databases, you would use the following command in each database:
CREATE USER Scott IDENTIFIED GLOBALLY AS 'CN=Scott,OU=Sales,C=US,O=Acme'
Note that the syntax for creating this kind of schema is slightly different from the syntax for creating a shared schema presented in "Creating a Shared Schema". In this case, the schema is Scott's alone. In order for the current user database link to work, the schema created for Scott is not shared with other users.
Current user database links operate only between databases within a single enterprise domain, and only if that domain is trusted. You specify a domain as trusted by using Oracle Enterprise Security Manager. If you want to specify as untrusted a database that is part of a trusted enterprise domain, you use the PL/SQL package DBMS_DISTRIBUTED_TRUST_ADMIN. To obtain a list of trusted servers, you use the TRUSTED_SERVERS view.
|
See Also:
|
Oracle enterprise user security incorporates administration tools discussed in the following sections:
Oracle Wallet Manager is a stand alone Java application that wallet owners and security administrators use to manage and edit the security credentials in their Oracle wallets. These tasks include:
Use Oracle Enterprise Login Assistant to open and close a user wallet in order to enable or disable secure SSL based communications for an application. This tool provides a subset of the functionality provided by Oracle Wallet Manager.
Use Oracle Enterprise Security Manager to:
Oracle Internet Directory is a Lightweight Directory Access Protocol (LDAP) v3 directory service implemented as an application on the Oracle8i database. It enables the retrieval of information about dispersed users and network resources.
This section gives you an overview of how to set up enterprise user security. The required steps are as follows:
Oracle Wallet Manager requires you to have a certificate authority in your environment. The CA must be able to process PKCS#10 certificate requests in Base 64 format, and return X509v3 certificates, also in Base 64 format.
If you are using Oracle Internet Directory, use Oracle Wallet Manager and Oracle Directory Manager to create a wallet for the directory and to configure SSL. If you are using Microsoft Active Directory or Novell Directory Service, see the product-specific documentation for instructions for enabling two-way SSL authentication.
For example, if your naming context is dc=my_company,dc=com, you may choose as an administrative context dc=us,dc=my_company,dc=com.
If you are not using Oracle Internet Directory, you can use the Net8 Configuration Assistant later to install the Oracle schema and desired Oracle Contexts.
|
See Also:
|
This involves performing the tasks described in the following subsections:
Use the Oracle Universal Installer to install Oracle8i Release 8.1.6 databases.
Before installation, obtain from the directory administrator:
During installation, select Oracle8i Enterprise Edition and the Custom installation type with Oracle Advanced Security.
You may complete this during or after the installation of Oracle8i Release 8.1.6. If so then you do not need to do it again.
To configure directory service access configuration by using the Net8 Configuration Assistant:
If your directory does not yet have the required Oracle schema, you are prompted to install it in the directory. If there is no Oracle Context set up under an administrative context, you are prompted to create the Oracle Context.
Oracle Database Configuration Assistant asks if you want to register the database in the directory. Choose Yes. This creates a database service object underneath your chosen Oracle Context in the directory.
Net8 needs to be configured for SSL on both the Listener and the Database. The Listener must have a listening endpoint which is configured for the TCP/IP with SSL protocol, and the location of the Database's wallet must be specified. You do this using the Net8 Configuration Assistant as described in "Enabling SSL". The suggested wallet locations for a database are:
/etc/ORACLE/WALLETS/DATABASES/database_name
C:\WINNT\Profiles\DATABASES\database_name
This involves performing the tasks described in the following subsections:
To do this:
owm
cn=database_name,cn=OracleContext,cn=administrative_context and is found in the initialization parameter file in the parameter RDBMS_SERVER_DN.
Be sure to match the case of the characters exactly. For example, if the global database name chosen during installation is sales.us.acme.com, and the administrative context selected within Net8 Configuration Assistant is ou=division1,c=us,o=acme, then the DIT for this DN would look like this:
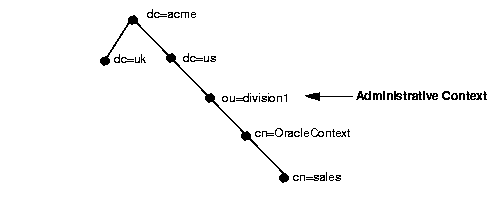
The full DN of the database that you would type into Oracle Wallet Manager would be:
cn=sales,cn=OracleContext,ou=division1,c=us,o=acme
The certificate text includes the lines BEGIN CERTIFICATE and END CERTIFICATE and the text within these two lines.
In order for users to access the database using two-way SSL authentication, the database wallet must be open, and the listener must be running. To open the wallet and run the listener:
lsnrctl stop
lsnrctl start
To log out of the database:
lsnrctl stop
owm
lsnrctl start
Follow the steps listed below to verify that the database was successfully installed.
cwallet.sso file located in the database wallet directory. If there is no cwallet.sso file in the directory, Autologin was not successfully enabled. If this happens, go back to the Oracle Wallet Manager, open the wallet, select the Autologin check box, and save the wallet.
listener.ora file. Enter:
lsnrctl status
ldap.ora file located in $ORACLE_HOME/network/admin.
If there is no ldap.ora file, then the Net8 Configuration Assistant failed. Verify that the ORACLE_HOME is set and TNS_ADMIN is not set. Rerun Net8 Configuration Assistant.
ldap.ora file exists and is correct. Then try to register the database again. Enter:
dbassist
Once you have installed Oracle8i clients, configure Net8 on the client. Do this by using the Net8 Configuration Assistant.You may complete this during or after installation of the Oracle8i Release 8.1.6.
Because you will be using an LDAP directory service for enterprise security, you may also want to use Net8 directory naming. Net8 directory naming allows the client to connect to the database using the database entry registered with the directory by Oracle Database Configuration Assistant. Or you can use one of the other Net8 naming methods, such as Local naming (tnsnames.ora file), to configure a net service name for the database.
Enable clients to connect and authenticate to a database by using SSL. Use the Net8 Assistant to configure SSL. Do not enter a wallet location.
|
Note: Wallets for specific users are set up when you create enterprise users. See Chapter 20 for instructions on creating enterprise users. |
Once you have installed and configured Oracle Enterprise Security Manager, set up an enterprise domain. The following table lists the tasks you perform when you set up an enterprise domain, and points you to the corresponding instructions:
The following procedures assume that you have successfully installed all of the enterprise user security components. You should also have started the directory and the Oracle Enterprise Security Manager.
Create a new enterprise user by performing tasks described in the following subsections:
Any directory user can be an enterprise user. You can add users to the directory by using one of the following tools:
You may want to populate the directory with users before using Oracle Enterprise Security Manager.
|
See Also:
|
Use Oracle Enterprise Manager or SQL*Plus to add a user to the desired database. For example:
CREATE USER fred IDENTIFIED GLOBALLY AS
'cn=frederick,ou=division1,c=us,o=oracle'
The user name must match the DN that is found in the user's wallet and in the directory.
Alternatively, to create a shared schema to which multiple enterprise users may be mapped, you could enter:
CREATE USER guest IDENTIFIED GLOBALLY AS '';
You can do either or both of the following:
Use Oracle Enterprise Manager or SQL*Plus to grant local roles and privileges to the database user, or schema, created in "Create the User on the Databases". This step is optional.
Use Oracle Enterprise Security Manager to create and grant enterprise roles to the enterprise user in the directory. In order to do this, you must first set up an enterprise domain.
|
See Also:
|
This involves two tasks:
In "Task 6: Create and Configure Enterprise Users", you created a wallet for the enterprise user. The enterprise user must now open this wallet in order to log in to the database. Use Oracle Enterprise Login Assistant to open or close the wallet.
Opening a user wallet generates a single sign-on file and allows authentication to the SSL adapter.
To open a user wallet:
elogin
Your wallet will now remain open, and you will have authenticated communications using the SSL adapter.
sqlnet.ora file that you created in "Task 4: Configure Database Clients".
If you have a separate client ORACLE_HOME, then you do not need to set the TNS_ADMIN environment variable.
To close a user wallet:
In the Oracle Enterprise Login Assistant, click Autologin > Logout to disable authentication with the SSL adapter.
You have the option of doing this by using SQL*Plus. To do this, launch SQL*Plus and enter:
CONNECT /@connect_identifier
where connect_identifier is the net service name you set up in "Task 4: Configure Database Clients". If you are using Net8 directory naming, the connect identifier is the simple database name.
This section contains a list of potential problem areas and ways to alleviate them.
The following tips help you verify that the user has been allocated the correct global roles upon database login and, if necessary, determine the cause of failure.
SELECT * FROM session_roles;
This error may indicate that you attempted to configure a domestic cipher suite. Run the Net8 Assistant again, and be sure that you select the "Show domestic cipher suites" radio button.
This error indicates that the connection was not over SSL. Look at the tnsnames.ora file to verify the protocol value of the net service name that you are using. The value must be TCPS and not TCP.
The distinguished name in the wallet that is used to connect does not match the DN in the CREATE USER statement for any schema in the database, nor does it match the DN in any relevant mapping.
Check the case, spaces, and spelling of the distinguished name of the user that was created in the database. Enter:
SELECT external_name FROM user_users;
This error usually means that something is wrong with the wallet. Look in the sqlnet.log file in the current operating system directory for more information.
|
|
 Copyright © 1999 Oracle Corporation. All Rights Reserved. |
|