Release 8.1.6
A73028-01
Library |
Product |
Contents |
Index |
| Oracle AppWizard for Microsoft Visual C++ User's Guide Release 8.1.6 A73028-01 |
|
This chapter guides you through the creation and customization of an application generated by Oracle AppWizard for Microsoft Visual C++. All of the customization lessons presented in this tutorial are based on information described in Chapter 3, "Understanding Your Application's Code" This tutorial introduces each lesson with an explanation of what you will learn upon completion.
By working through all the lessons of this tutorial, you will learn how to create and customize an Oracle AppWizard for Microsoft Visual C++ starter application.
Specific topics discussed are:
A store owner must keep accurate records of all customers and their purchases. A database application is perfect for performing this job.
In this tutorial, you develop a custom purchase order application for Nicole's Sporting Goods called "Order." This business must track information about sales orders, the items sold, and to which of the store's customers. You create and examine the structure of the database tables, then create and customize the application to manage that information. The application you develop allows Nicole and her employees to create, update, and view purchase orders for her sporting goods store.
Each main section of the tutorial corresponds to a version number for Order, with each successive lesson building on what was learned in the last one. When you finish working through the final lesson, you will have programmed a completely customized purchase order system for Nichole's Sporting Goods.
You can access the files for the tutorial in the following directory:
ORACLE_BASE\ORACLE_HOME\APPWIZARD\VC++\TUTORIAL\ORDER[1-5]
These files show you what you should have built by the end of each lesson. The Order1 file corresponds to Lesson 1, Order2 corresponds to Lesson 2, and so on. Therefore, to see the set of completed files for Lesson 1, access:
ORACLE_BASE\ORACLE_HOME\APPWIZARD\VC++\TUTORIAL\ORDER1
Before you can create any application, you must set up your database tables, so that the application has information to process. Because Nicole needs to keep track of information about sales orders, the items sold, the store's customers, and the products sold, you must structure the tables to reflect those needs.
To create this purchase order system, you must set up the following database tables to interact with each other:
If you need to create the user DEMO and the above tables, search for DEMO.SQL in the ORACLE_BASE\ORACLE_HOME\RDBMS\ADMIN directory and execute it within Server Manager or SQL*Plus. The DEMO.SQL file creates user DEMO and calls the SQL script BDEMOBLD.SQL to create the above tables for you.
The following illustrates the data models for the tables you will construct:
Sales_Order table:Name Null? Type ------------------------------- -------- ---- ORDER_ID NOT NULL NUMBER(4) ORDER_DATE DATE CUSTOMER_ID NUMBER(6) SHIP_DATE DATE
TOTAL NUMBER(8,2)
Item table:Name Null? Type ------------------------------- -------- ---- ORDER_ID NOT NULL NUMBER(4) ITEM_ID NOT NULL NUMBER(4) PRODUCT_ID NUMBER(6) ACTUAL_PRICE NUMBER(8,2) QUANTITY NUMBER(8) TOTAL NUMBER(8,2)Customer table:
Name                            Null?    Type
------------------------------- -------- ----
CUSTOMER_ID                     NOT NULL NUMBER(6)
NAME                                     VARCHAR2(45)
ADDRESS                                  VARCHAR2(40)
CITY                                     VARCHAR2(30)
STATE                                    VARCHAR2(2)
ZIP_CODE                                 VARCHAR2(9)
AREA_CODE                                NUMBER(3)
PHONE_NUMBER                             NUMBER(7)
SALESPERSON_ID                           NUMBER(4)
CREDIT_LIMIT                             NUMBER(9,2)
COMMENTS                                 LONG
Product table:
Name                            Null?    Type
------------------------------- -------- ----
PRODUCT_ID                      NOT NULL NUMBER(6)
DESCRIPTION                              VARCHAR2(30)
In Lesson 1, you form the basis of the purchase order application for Nicole's Sporting Goods. In this lesson, you learn how to quickly complete a starter application as explained in Chapter 2, "Creating a Starter Application" The application you create using Oracle AppWizard for Microsoft Visual C++ is then ready for customization.
When you are finished with this section, you will understand how to use Oracle AppWizard for Microsoft Visual C++ to create a starter application.
Lesson 1 consists of the following parts:
The New dialog box appears.
Oracle AppWizard for Microsoft Visual C++ starts.
The Welcome window appears.
By default, all columns under SALES_ORDER are selected.
By default, all columns under ITEM are selected.
The next window displays the columns from the master and the detail tables you have selected and the default join clause that Oracle AppWizard has created. Oracle AppWizard creates the default join it bases on the primary and foreign keys of the master and detail tables.
In our example, Oracle AppWizard has created a default join, based on the primary and foreign keys:
Sales.Order.Order_ID joined with Item.Order_ID
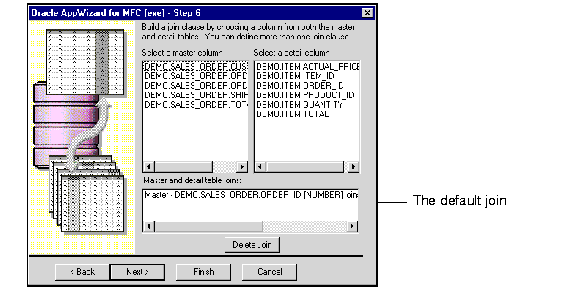
Oracle AppWizard prompts you:
Would you like to create another form?
In the last window, the Next button is disabled, as shown in the following diagram.
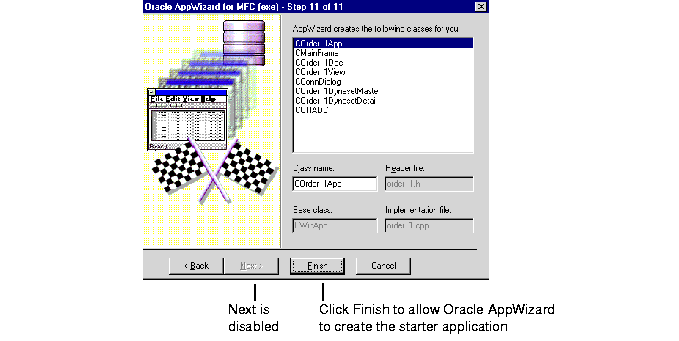
In this window, Oracle AppWizard for Microsoft Visual C++ displays the classes it creates for your application.
The New Project Information window appears. This window shows you the specifications that Oracle AppWizard used to create the Order application.
Oracle AppWizard for Microsoft Visual C++ creates the source, header, and resource files for your Order application and takes you automatically to the Microsoft Developer Studio with Workspace "Order" open.
Now that you have created the Order application using Oracle AppWizard for Microsoft Visual C++, you can customize it to better suit your needs. To customize this application you need to know about the classes and files created for this purpose, as shown in the following table:
Oracle AppWizard for Microsoft Visual C++ creates a ReadMe.txt file for the generated Order project. This ReadMe.txt file describes the source, header, and resource files that Oracle AppWizard has created.
To view the contents of the ReadMe.txt file:
The following diagram shows what the ReadMe.txt file for Order should look like:

In this section you use Microsoft Developer Studio to build and run the executable files created by Oracle AppWizard for Microsoft Visual C++.
The Connect to Oracle dialog box appears.

The Order application appears.
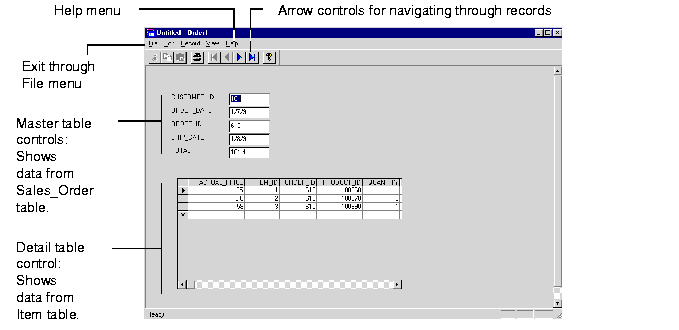
Notice and try using the following features:
These controls on the toolbar let you easily navigate through the records.
Another method for navigating through the records.
Shows or hides the toolbar or status bar.
This displays the About Order window. (Clicking OK closes the window.)
In this first customization task, you learn how to add specific, detailed information about customers that should appear on any purchase order for the Order application. To accomplish this task, complete the following parts of this lesson:
To see the set of completed files for Lesson 2, access:
ORACLE_BASE\ORACLE_HOME\APPWIZARD\VC++\TUTORIAL\ORDER2.
To display customer information on your purchase order form for an active order, you must first create an ODynaset class to represent the CUSTOMER table. To do this, create a new generic class called COrderCustomerDynaset, which is derived from the ODynaset class.
The ODynaset class is a class in the Oracle Objects for OLE C++ class library. It creates, manages, and accesses data records from the database.
To create a dynaset for the CUSTOMER table:
The New Class dialog box appears.
COrderDynasetCustomer
ODynaset
This is how the New Class dialog box appears before you click OK.

Microsoft Developer Studio displays the following message:
The New Class Wizard could not find the appropriate header file(s) to include for the base class(es) ODynaset...
This message occurs because the definition of the ODynaset class is not included in the generated file. Therefore, you must manually include the header file that defines the ODynaset class, ORACL.H, in the OrderDynaSetCustomer.h file. You can locate the header file in:
ORACLE_BASE\ORACLE_HOME\0040\cpp\include
a ORACLE_HOME\0040\cpp\include
Oracle AppWizard for Microsoft Visual C++ generates both an OrderDynasetCustomer.cpp file and OrderDynasetCustomer.h file for the COrderDynasetCustomer class with the following contents:
The OrderDynasetCustomer.cpp file contains:
//OrderDynasetCustomer.cpp: implmentation of the COrderDynasetCustomer
class.
//
//////////////////////////////////////////////////////////
#include "stdafcx.h"
#include "Order.h"
#include "OrderDynasetCustomer.h"
COrderDynasetCustomer:COrderDynasetCustomer()
{

}
COrderDynasetCustomer:~COrderDynasetCustomer()
{

}
//OrderDynasetCustomer.h: interface for the COrderDynasetCustomer Class//
//////////////////////////////////////////////////////////
class COrderDynasetCustomer : public ODynaset
{
public:
COrderDynasetCustomer();
};
COrderDynasetCustomer class is derived from the ODynaset class. This class contains member variables that store information about a SQL statement to query the database. This class also stores information to represent columns in the USER.DEMO.CUSTOMER table. These are shown below:
To add member variables for the COrderDynasetCustomer class:
class COrderDynasetCustomer : public ODynaset
{
...
public:
    COrderDynasetCustomer();
    virtual ~COrderDynasetCustomer();
public: // strings needed for creating the queries CString m_strSQLQuery; // the query to be sent to the database CString m_strSQLSelect; // the select portion CString m_strSQLFilter; // the where portion CString m_strSQLSort; // the order by portion // Field/Param DataOField m_CUSTOMER_ID; OField m_NAME; OField m_ADDRESS; OField m_CITY; OField m_STATE; OField m_ZIP_CODE; OField m_AREA_CODE; OField m_PHONE_NUMBER; OField m_SALESPERSON_ID; OField m_CREDIT_LIMIT; OField m_COMMENTS;... };
Adding the member functions shown below to the COrderDynaset customer class enables you to create a query statement, have the database process it, then retrieve and store information.
To declare member functions for the COrderDynasetCustomer class:
class COrderDynasetCustomer : public ODynaset
{
...

    public:
            COrderDynasetCustomer();
            virtual ~COrderDynasetCustomer();
// Operations public: void OpenQuery(ODatabase theDB); void CreateSQLSelect(); void AddFilter(CString strFilter); void ResetToDefaultFilter(); void RefreshQuery(); ...};
COrderDynasetCustomer::COrderDynasetCustomer()
{
m_strSQLQuery.Empty();
m_strSQLSelect.Empty();
m_strSQLFilter.Empty();
m_strSQLSort.Empty();
// Create the default select clause of the
statement m_strSQLSelect
CreateSQLSelect();
}
// Creates the default select
void COrderDynasetCustomer::CreateSQLSelect()
{
m_strSQLSelect = "select CUSTOMER_ID, NAME,
    ADDRESS, CITY, STATE, \
    ZIP_CODE, AREA_CODE, PHONE_NUMBER, \
    SALESPERSON_ID, CREDIT_LIMIT, COMMENTS \
    from DEMO.CUSTOMER";
}
// opens the query
void COrderDynasetCustomer::OpenQuery(ODatabase theDB)
{
oresult dbresult;
// create a query statement
m_strSQLQuery = m_strSQLSelect;
if (m_strSQLFilter)
      m_strSQLQuery += m_strSQLFilter;
if (m_strSQLSort)
      m_strSQLQuery += m_strSQLSort;
// query the database
dbresult = Open(theDB, m_strSQLQuery);
// retreive/store information from the database
m_CUSTOMER_ID = GetField("CUSTOMER_ID");
m_NAME = GetField("NAME");
m_ADDRESS = GetField("ADDRESS");
m_CITY = GetField("CITY");
m_STATE = GetField("STATE");
m_ZIP_CODE = GetField("ZIP_CODE");
m_AREA_CODE = GetField("AREA_CODE");
m_PHONE_NUMBER = GetField("PHONE_NUMBER");
m_SALESPERSON_ID = GetField("SALESPERSON_ID");
m_CREDIT_LIMIT = GetField("CREDIT_LIMIT");
m_COMMENTS = GetField("COMMENTS");
// display the first record from the Customer table
dbresult = MoveFirst();
}
// adds a condition to the where clause
void COrderDynasetCustomer::AddFilter(CString strFilter)
{
m_strSQLFilter += m_strSQLFilter.IsEmpty() ? "
    WHERE " : " AND ";
m_strSQLFilter += strFilter;
}
// resets the filter to the default value
void COrderDynasetCustomer::ResetToDefaultFilter()
{
m_strSQLFilter.Empty();
}
void COrderDynasetCustomer::RefreshQuery()
{
oresult dbresult;
// create a query statement
m_strSQLQuery = m_strSQLSelect;
if (m_strSQLFilter)
    m_strSQLQuery += m_strSQLFilter;
if (m_strSQLSort)
    m_strSQLQuery += m_strSQLSort;
// set the query statement to be used
dbresult = SetSQL(m_strSQLQuery);
dbresult = Refresh();
}
To display customer information for a purchase order, add the customer dynaset to the COrderView class and COrderDoc class.
To add customer information to a purchase order:
class COrderView : public CFormView
{
...
COrderDynasetMaster *m_pDynasetMaster;
COrderDynasetDetail *m_pDynasetDetail;
COrderDynasetCustomer *m_pDynasetCustomer;
...
}
COrderView::COrderView()
: CFormView(COrderView::IDD)
{
...
m_pDynasetMaster = NULL;
m_pDynasetDetail = NULL;
m_pDynasetCustomer = NULL;
...
}
class COrderDoc : public CDocument
{
...
COrderDynasetMaster m_OrderDynasetMaster;
COrderDynasetDetail m_OrderDynasetDetail;
COrderDynasetCustomer m_OrderDynasetCustomer;
...
}
This section demonstrates how to display customer information for each purchase order.
After you add these edit controls, the IDD_ORDER_FORM dialog box appears similar to the one shown below. This illustration serves only as a sample. Yours may look slightly different.
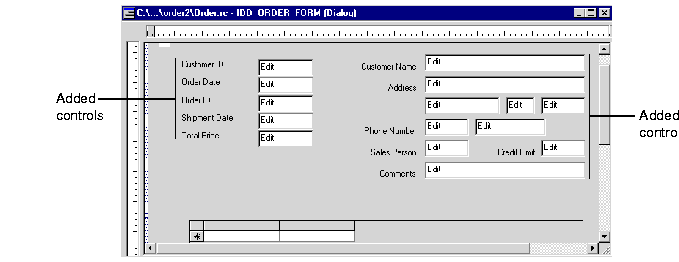
To bind these edit controls with the OField members in the COrderDynasetCustomer class, call the DDX_FieldText() method for each customer edit control in the COrderView class::DoDataExchange() method, as described in the next step.
The OField members represent the columns in the Customer table. Bind these with a corresponding OField member variable of the COrderDynasetCustomer class shown in Table 4-1.
void COrderView::DoDataExchange(CDataExchange* pDX)
{
...
CFormView::DoDataExchange(pDX);
...
// for customer dynaset
DDX_FieldText(pDX, IDC_CUST_NAME,
m_pDynasetCustomer->m_NAME, m_pDynasetCustomer);
DDX_FieldText(pDX, IDC_CUST_ADDRESS,
m_pDynasetCustomer->m_ADDRESS, m_pDynasetCustomer);
DDX_FieldText(pDX, IDC_CUST_CITY, m_pDynasetCustomer->m_CITY,
m_pDynasetCustomer);
DDX_FieldText(pDX, IDC_CUST_STATE,
m_pDynasetCustomer->m_STATE, m_pDynasetCustomer);
DDX_FieldText(pDX, IDC_CUST_ZIP_CODE,
m_pDynasetCustomer->m_ZIP_CODE, m_pDynasetCustomer);
DDX_FieldText(pDX, IDC_CUST_AREA_CODE,
m_pDynasetCustomer->m_AREA_CODE, m_pDynasetCustomer);
DDX_FieldText(pDX, IDC_CUST_PHONE_NUMBER,
m_pDynasetCustomer->m_PHONE_NUMBER, m_pDynasetCustomer);
DDX_FieldText(pDX, IDC_CUST_CREDIT_LIMIT,
m_pDynasetCustomer->m_CREDIT_LIMIT, m_pDynasetCustomer);
DDX_FieldText(pDX, IDC_CUST_SALESPERSON_ID,
m_pDynasetCustomer->m_SALESPERSON_ID, m_pDynasetCustomer);
DDX_FieldText(pDX, IDC_CUST_COMMENTS,
m_pDynasetCustomer->m_COMMENTS, m_pDynasetCustomer);
...
}
void COrderView::OnInitialUpdate()
{
CString strJoin;
...
m_pDynasetMaster = &GetDocument()->m_OrderDynasetMaster;
m_pDynasetDetail = &GetDocument()->m_OrderDynasetDetail;
m_pDynasetCustomer = &GetDocument()->m_OrderDynasetCustomer;

m_pDynasetMaster->OpenQuery(GetDocument()->m_database);
}
...
m_pDynasetMaster->OpenQuery(GetDocument()->m_database);

// create a join based on CUSTOMER_ID
// between the Customer table and
// the Sales.Order table.
m_pDynasetCustomer->ResetToDefaultFilter();
strJoin = "CUSTOMER_ID = " +
(CString)m_pDynasetMaster->m_Column1;
m_pDynasetCustomer->AddFilter(strJoin);
// create, process the query
m_pDynasetCustomer->OpenQuery(GetDocument()->m_database);
...
CFormView::OnInitialUpdate();
m_dataControl.SetRecordset((LPDISPATCH)(m_pDynasetDetail->Internal()));
...
}
void COrderView::PerformMove(int nCommand)
{
...
// Update Customer information
m_pDynasetCustomer->ResetToDefaultFilter();
strJoin = "CUSTOMER_ID = " +
(CString)m_pDynasetMaster->m_Column1;
m_pDynasetCustomer->AddFilter(strJoin);
m_pDynasetCustomer->RefreshQuery();
UpdateData(FALSE);
}
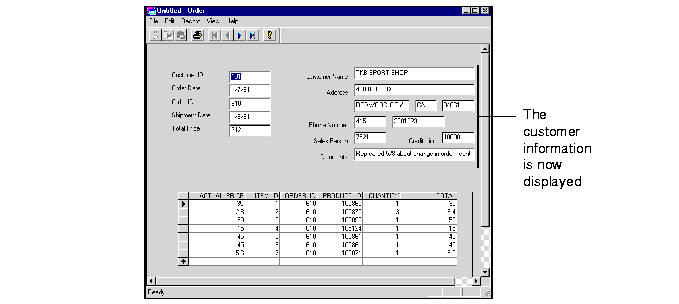
This is how the application should look when you are done:
Nicole's employees must add products to a purchase order. This lesson demonstrates how to customize your application to:
Lesson 3 contains the following parts:
To see the set of completed files for Lesson 3, access:
ORACLE_HOME\APPWIZARD\VC++\TUTORIAL\ORDER3.
Nicole's Sporting Goods carries a wide variety of products. Many of them have similar names and descriptions. To insure data integrity, display a list of the product items in the purchase order application window. This enables Nicole's employees to select the items that customers have purchased from the list.
In this part, you will add a list box that displays the available products in the
IDD_ORDER_FORM dialog box.
To add a list box:
void COrderView::OnInitialUpdate()
{
...
CFormView::OnInitialUpdate()
...

// Put list of sales items into the listbox
ODynaset oProdList;
oProdList.Open(GetDocument()->m_database,
     "SELECT PRODUCT_ID,DESCRIPTION
     FROM DEMO.PRODUCT ORDER BY PRODUCT_ID");
int index = 0;
while (!oProdList.IsEOF())
{
   m_prodList.InsertString(index,
       (CString)oProdList.GetField(0) + " - " +
        oProdList.GetField(1));
m_prodList.SetItemData(index,
       (long)oProdList.GetField(0));
oProdList.MoveNext();
index++;
}
}
When Nicole's employees add a purchased item from the product list box to a purchase order, a new record for the purchased item is inserted into the ITEM table. Nicole wants the TOTAL column in the SALES_ORDER table to be re-calculated to reflect the amount added from the purchased item to the purchase order. Content in the detail table control and the master table control should also be updated accordingly.
Change:
dbresult = Open(theDB, m_strSQLQuery, ODYNASET_READONLY);
To:
dbresult = Open(theDB, m_strSQLQuery);
| Button Control ID | Button Caption | Event | Event Handler Function |
|---|---|---|---|
|
IDC_ADDITEMS |
Add to Order |
BN_Clicked |
OnAdditems |
void COrderView::OnAdditems()
{
int *pAddIndices;
int nSelCount;
oresult r;
nSelCount = m_prodList.GetSelCount();
pAddIndices = new int[nSelCount];
m_prodList.GetSelItems(nSelCount, pAddIndices);
for (int i = 0; i < nSelCount; i++)
{
char szProdID[8];
char szItemID[8];
itoa(m_prodList.GetItemData(pAddIndices[i]), szProdID,
     10);
itoa(m_pDynasetDetail->GetRecordCount() + 1, szItemID,
     10);
(CString strInsert = "INSERT INTO DEMO.ITEM (ORDER_ID,
     PRODUCT_ID, ITEM_ID, QUANTITY,
     ACTUAL_PRICE, TOTAL) SELECT " +
       CString)m_pDynasetMaster->m_Column3 + ", "
     + szProdID +", " + szItemID +
       ", 1, LIST_PRICE, LIST_PRICE FROM
     DEMO.PRICE WHERE PRODUCT_ID = " +
     szProdID + " AND ((SYSDATE BETWEEN
     START_DATE AND END_DATE) OR " +
   "(SYSDATE > START_DATE AND END_DATE IS NULL))";
r = GetDocument()->m_database.ExecuteSQL(strInsert);
if (r == OFAILURE)
ProcessOO4OError(&GetDocument()->m_database);
m_pDynasetDetail->Refresh();
}
TotalOrder();
m_prodList.SelItemRange(FALSE, 0, m_prodList.GetCount());
delete pAddIndices;
}
The function TotalOrder() is being called in the COrderView::OnAdditems() method. It is a member function for COrderView class. It re-calculates the total amount for a purchase order and updates the TOTAL column in the SALES_ORDER table.
public:
void TotalOrder();
void COrderView::TotalOrder()
{
ODynaset oTotal;
oTotal.Open(GetDocument()->m_database, "SELECT SUM(TOTAL) FROM
DEMO.ITEM WHERE ORDER_ID = " +
(CString)m_pDynasetMaster->m_Column3);
m_pDynasetMaster->StartEdit();
m_pDynasetMaster->
m_Column5.SetValue((double)oTotal.GetField(0));
m_pDynasetMaster->Update();
UpdateData(FALSE);
}
The application will look similar to the following screen:

This section allows you to make changes in the detail table control for the Order application. When the value in the QUANTITY column or the ACTUAL_PRICE column in the detail table changes, the application should update the appropriate changes to the ITEM table, the SALES_ORDER table, the content in the master detail controls, and the detail table control accordingly.
This section consists of the following parts:
To see the set of completed files for Lesson 4, access:
ORACLE_HOME\APPWIZARD\VC++\TUTORIAL\ORDER4.
| Event Type | Event Handler |
|---|---|
|
AfterColUpdate |
OnAfterColUpdateDatagrid |
|
AfterUpdate |
OnAfterUpdateDatagrid |
|
AfterDelete |
OnAfterDeleteDatagrid |
When the Actual Price or the Quantity sold for a purchased item has been changed, the total price for this item should change. To have the application do this, additions must be made to the code.
void COrderView::OnAfterColUpdateDatagrid(short ColIndex)

// recalcuates the TOTAL column in the detail table when the
value
// in the ACTUAL_PRICE or QUANTITY column changes

{
	if (ColIndex == 4 || ColIndex == 0)
	{
		CString strText = m_datagrid.GetText();
		CString strTotal;
		char *stopString;
		char szTotal[15];
		long quantity;
		double price;

		// QUANTITY column is updated
		if (ColIndex == 4)
		{
		  quantity = strtol(strText, &stopString, 10);
		  m_datagrid.SetCol(0);
		  strText = m_datagrid.GetText();
		  price = strtod(strText, &stopString);
		  m_datagrid.SetCol(4);
		}
		else // PRICE column is updated
		{
		  price = strtod(strText, &stopString);
		  m_datagrid.SetCol(4);
		  strText = m_datagrid.GetText();
		  quantity = strtol(strText, &stopString, 10);
		  m_datagrid.SetCol(0);
		}

		sprintf(szTotal, "%f", quantity * price);
		strTotal = szTotal;
		m_datagrid.SetCol(5);
		m_datagrid.SetText((LPCTSTR)strTotal);
}
}
void COrderView::OnAfterUpdateDatagrid()
{
// Calculates the total amount for a purchase order
TotalOrder();
}
void COrderView::OnAfterDeleteDatagrid()
{
// Calculates the total amount for a purchase order
TotalOrder();
}
This lesson describes how to update the application to enable Nicole's employees to create a new purchase order for a customer. When you have completed this last customization, Nicole's employees can also commit or cancel the creation of a new purchase order.
This section consists of the following parts:
To see the set of completed files for Lesson 5, access:
ORACLE_HOME\APPWIZARD\VC++\TUTORIAL\ORDER5.
Many of Nicole's customers have similar names. To ensure that the each customer gets the correct merchandise, the Order application will have a dialog box with a list of customers. Nicole's employees can then pick the appropriate name from the list when they create a new purchase order.
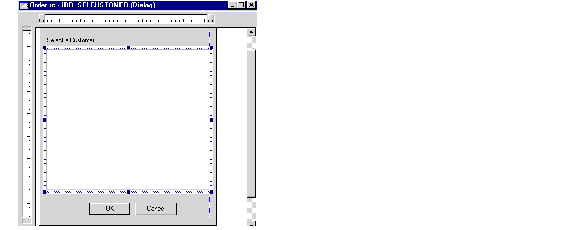
The customer list dialog box should look similar to the one shown below. The list box displays a list of customers from the CUSTOMER table.
| Object ID | Event | Event Handler Function |
|---|---|---|
|
CSelectCustomer |
WM_INITDIALOG |
OnInitDialog |
|
IDOK |
BN_CLICKED |
OnOK |
public:
long GetSelection();             // obtain the selected customer from the
                                      // customer list box.
int DoModal(ODatabase *db);  // involve the customer dialog box
long m_nSelection;              // nth location of the selected customers
                                     // in the customer list.
ODatabase * m_pDatabase;       // the database
BOOL CSelectCustomer::OnInitDialog()
{
...
CDialog::OnInitDialog();
ODynaset oCustList;
int index = 0;

oCustList.Open(*m_pDatabase, "SELECT CUSTOMER_ID, NAME FROM
DEMO.CUSTOMER");
while (!oCustList.IsEOF())
{
m_CustomerList.InsertString(index,
     (CString)oCustList.GetField(0) +
     " - " + oCustList.GetField(1));
m_CustomerList.SetItemData(index,
     (long)oCustList.GetField(0));
oCustList.MoveNext();
index++;
}
...
}
int CSelectCustomer::DoModal(ODatabase *db)
{
m_pDatabase = db;
return CDialog::DoModal();
}
long CSelectCustomer::GetSelection()
{
return(m_nSelection);
}
void CSelectCustomer::OnOK()
{
// TODO: Add extra validation here
int nItem = -1;
nItem = m_CustomerList.GetCurSel();
if (nItem >=0)
{
// location of selected customer in the customer list box
m_nSelection = m_CustomerList.GetItemData(nItem);
CDialog::OnOK();
}
else
AfxMessageBox(_T("Please select a customer.\n"),
    MB_OK, 0);
}
To enable Nicole's employees to easily add, commit, or cancel a new purchase order, create buttons in the IDD_ORDER_FORM dialog that enable them to perform these operations.
This header file defines the CSelectCustomer class that is used when getting customer information for a new purchase order.
These event handler functions are added to the COrderView class when the buttons specify the event handle.
When a new purchase order is created, a new record is inserted into the SALES_ORDER table and the ITEM table. Content in the master table controls and detail table control is also updated to reflect the new purchase order.
#include "SelectCustomer.h" // define CSelectCustomer class
                            // to get customer information for
                      // a new purchase order
...
void COrderView::OnNeworder()
{
CWnd *tempWindow;
char szCUSTOMER_ID[8];
OField oORDER_ID;
CSelectCustomer selectCustomer;
oresult dbresult;

if (selectCustomer.DoModal(&GetDocument()->m_database) ==
IDCANCEL)
return;
if (GetDocument()->m_database.GetSession().
BeginTransaction() == OSUCCESS &&
m_pDynasetMaster->AddNewRecord() == OSUCCESS)
{
     UpdateData(FALSE);
     tempWindow = GetDlgItem(IDC_Column1);
     itoa(selectCustomer.GetSelection(),
          szCUSTOMER_ID, 10);
     tempWindow->SetWindowText(szCUSTOMER_ID);
     if (m_pDynasetMaster->GetEditMode() ==
          ODYNASET_EDIT_NEWRECORD)
     {
                    ODynaset oSequenceDynaset;

                    dbresult = oSequenceDynaset.Open(
                         GetDocument()->m_database,
                         "SELECT MAX(ORDER_ID) + 1 FROM
                         DEMO.SALES_ORDER");
                    oORDER_ID = oSequenceDynaset.GetField(0);
                    dbresult = oSequenceDynaset.Close();
                    tempWindow = GetDlgItem(IDC_Column3);
                    tempWindow->SetWindowText
((CString)oORDER_ID);
}
dbresult = UpdateData();
if (m_pDynasetMaster->Update() == OFAILURE)
{
              ProcessOO4OError(m_pDynasetMaster);
              return;
}
m_pDynasetMaster->ResetToDefaultFilter();
m_pDynasetMaster->AddFilter("ORDER_ID = " +
(CString)oORDER_ID);
m_pDynasetMaster->RefreshQuery();
m_pDynasetCustomer->ResetToDefaultFilter();
m_pDynasetCustomer->AddFilter("CUSTOMER_ID = " +
(CString)m_pDynasetMaster->m_Column1);
m_pDynasetCustomer->RefreshQuery();
m_pDynasetDetail->ResetToDefaultFilter();
m_pDynasetDetail->AddFilter("ORDER_ID = " +
(CString)m_pDynasetMaster->m_Column3);
m_pDynasetDetail->RefreshQuery();
UpdateData(FALSE);
}
CButton *tempButton = (CButton *)GetDlgItem(IDC_NEWORDER);
tempButton->EnableWindow(FALSE);
tempButton = (CButton *)GetDlgItem(IDC_COMMITORDER);
tempButton->EnableWindow(TRUE);
tempButton = (CButton *)GetDlgItem(IDC_CANCELORDER);
tempButton->EnableWindow(TRUE);
}
When a new purchase order is created, users must be able to commit or cancel the change made to the purchase order system.
void COrderView::OnCommitorder()
{
// TODO: Add your control notification handler code here
CString strORDER_DATE;
CString strSHIP_DATE;
CWnd *tempWindow;

m_pDynasetMaster->StartEdit();
tempWindow = GetDlgItem(IDC_Column2);
tempWindow->GetWindowText(strORDER_DATE);
tempWindow = GetDlgItem(IDC_Column4);
tempWindow->GetWindowText(strSHIP_DATE);
m_pDynasetMaster->m_Column2.SetValue(LPCTSTR(strORDER_DATE));
m_pDynasetMaster->m_Column4.SetValue(LPCTSTR(strSHIP_DATE));
m_pDynasetMaster->Update();

OSession oSess = GetDocument()->m_database.GetSession();
if (oSess.Commit() == OFAILURE)
ProcessOO4OError(&oSess);
m_pDynasetMaster->ResetToDefaultFilter();
m_pDynasetMaster->RefreshQuery();
UpdateData(FALSE);
OnMoveFirst();
CButton *tempButton = (CButton *)GetDlgItem(IDC_NEWORDER);
tempButton->EnableWindow(TRUE);
tempButton = (CButton *)GetDlgItem(IDC_COMMITORDER);
tempButton->EnableWindow(FALSE);
tempButton = (CButton *)GetDlgItem(IDC_CANCELORDER);
tempButton->EnableWindow(FALSE);
}
When a new purchase order is created, users must be able to commit or cancel the change made to the purchase order system.
void COrderView::OnCancelorder()
{
// TODO: Add your control notification handler code here
GetDocument()->m_database.GetSession().Rollback();
m_pDynasetMaster->ResetToDefaultFilter();
m_pDynasetMaster->RefreshQuery();
UpdateData(FALSE);
OnMoveFirst();
CButton *tempButton = (CButton *)GetDlgItem(IDC_NEWORDER);
tempButton->EnableWindow(TRUE);
tempButton = (CButton *)GetDlgItem(IDC_COMMITORDER);
tempButton->EnableWindow(FALSE);
tempButton = (CButton *)GetDlgItem(IDC_CANCELORDER);
tempButton->EnableWindow(FALSE);
}
It should look similar to the following screen:

Your application is now complete.
|
|
 Copyright © 2000 Oracle Corporation. All Rights Reserved. |
|