Release 1 (9.0.1)
Part Number A90188-01
Home |
Book List |
Contents |
Index | Master Index | Feedback |
| Oracle9i Enterprise JavaBeans Developer's Guide and Reference Release 1 (9.0.1) Part Number A90188-01 |
|
![]()
![]()
This chapter describes the development and deployment of Enterprise JavaBeans in the Oracle9i server environment. Although it is not a complete tutorial on EJB and the EJB architecture, this chapter supplies you with enough information to start developing EJB applications.
This chapter covers the following topics:
An Enterprise JavaBean has two client interfaces: a remote interface and a home interface. The remote interface specifies the methods that the object's clients can invoke; the home interface defines how clients can create the object, which returns a reference to the object. The client uses both of these interfaces when invoking a method on a bean.
The events that occur when a client invokes a method within a bean are explained in the following diagram and steps:
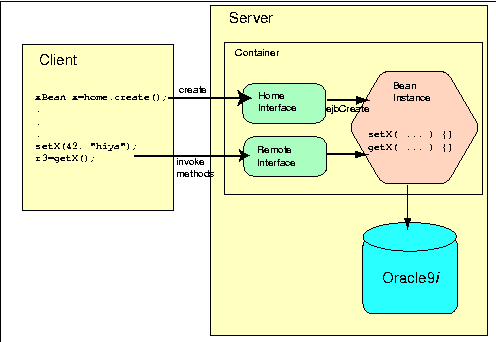
The numbers in the figure correspond to the following numbered steps:
During the JNDI lookup, the database creates a session for the server-side of the request.
create on home interface X.
The bean instance is created within the session that was established on the JNDI lookup.
The object reference of remote interface X is returned to client 1.
remove on remote interface X when it is done with the bean instance. This destroys the remote interface and the bean instance.
To create an EJB, you must perform the following steps:
javax.ejb.EJBObject.
javax.ejb.EJBHome. In addition, it defines the create method for your bean.
javax.ejb.SessionBean or javax.ejb.EntityBean interfaces. For the differences between these types of beans, see "Definition of an Entity Bean".
ejbCreate method with parameters matching those of the create method defined of the home interface.
| Requirement | Description |
|---|---|
|
RMI conformance |
Because the You can get the RMI specifications from the JavaSoft site, http://www.javasoft.com. |
|
Naming conventions |
The interface names, method names, and constants defined within these interfaces cannot start with an underbar (_) or contain a dollar sign ($). In addition, the application and bean names can include the slash sign (/). |
The remote interface of a bean provides an interface for the methods that the client will invoke. That is, the remote interface defines the methods that you implement for remote access.
javax.ejb.EJBObject interface, which has the following definition:
public interface javax.ejb.EJBObject extends java.rmi.Remote {

   public abstract EJBHome getEJBHome()

	throws java.rmi.RemoteException  // returns reference to home

		 // interface for this bean

   public abstract Handle getHandle()

	throws java.rmi.RemoteException // returns serializeable handle

   public abstract Object getPrimaryKey()

	throws java.rmi.RemoteException // returns key to an entity bean

   public abstract boolean isIdentical(EJBObject obj)

	throws java.rmi.RemoteException

   public abstract void remove()

	throws java.rmi.RemoteException, RemoveException //remove EJB object

}
You do not need to implement the methods in the EJBObject interface; these methods are implemented for you by the container.
| Function | Description |
|---|---|
| getEJBHome() |
Retrieves the object reference for the home interface |
| getHandle() |
A serializable Java representation of the EJB object reference can be obtained using the
You use the |
| getPrimaryKey() |
The |
| isIdentical() |
Tests that the object calling this method and the object in the argument are identical (as far as the container is concerned). This identifies that both objects are the same for all purposes. |
| remove() |
Deactivates the EJB bean. This, in turn, destroys the session bean instance (if stateful). |
The following code sample shows a remote interface called Employee, which declares the getEmployee method, which will be implemented in the bean.
package employee; import employee.EmpRecord; import javax.ejb.EJBObject; import java.rmi.RemoteException; public interfaceEmployeeextends EJBObject { public EmpRecordgetEmployee(int empNumber) throws java.sql.SQLException, EmpException, RemoteException; }
The home interface should define the appropriate create method for your bean. The home interface specifies one or more create methods. For each create method, a corresponding ejbCreate method must be defined in the bean implementation. All of the create methods return the bean type; all of the ejbCreate methods return void.
The client invokes the create method declared within the home interface. The container turns around and calls the ejbCreate method, with the appropriate parameter signature, within your bean implementation. The parameter arguments can be used to initialize the state of a new EJB object.
javax.ejb.EJBHome interface which has the following definition:
public interface javax.ejb.EJBHome extends java.rmi.Remote {
   public abstract EJBMetaData getEJBMetaData();
   public abstract void remove(Handle handle);
   public abstract void remove(Object primaryKey);
}
The methods in the EJBHome interface are implemented by the container. A client can remove an EJB object using the remove methods defined in either of its home or remote interfaces.
javax.ejb.EJBMetaData interface or remove the bean instance, given a handle.
create methods must throw the following exceptions:
javax.ejb.CreateException
java.rmi.RemoteException or javax.ejb.EJBException
The
Note:
deployejb tool publishes a reference to the home object in the database. See the Oracle9i Java Tools Reference for a full description of deployejb.
The following code sample shows a home interface called EmployeeHome. The create method contains no arguments.
package employee;

import javax.ejb.EJBObject;
import java.rmi.RemoteException;

public interface EmployeeHome extends EJBHome {
  public Employee create()
       throws CreateException, RemoteException;
}
Some methods in the Employee class can throw the EmpException exception. For an exception to be transported from the object to the client, you need to define a class for the exception.
The following code defines an exception class and is found in EmpException.java.
package employee;

public class EmpException extends RemoteException
{
  public EmpException(String msg)
  {
   super(msg);
  }
}
The bean contains the business logic for your bean. It implements the following methods:
The bean in the example application consists of one class, EmployeeBean, that retrieves an employee's information.
SessionBean or EntityBean interface.
ejbCreate methods that corresponds to the create methods declared in the home interface. The container invokes the ejbCreate method when the client invokes the corresponding create method.
Your bean implements the methods within either the SessionBean or EntityBean interface. This example implements the SessionBean interface. Basically, a session bean is used for process oriented beans--those beans that perform tasks to achieve an end. Entity beans are complex remote objects that are organized around persistent data. See "Definition of an Entity Bean" for more information on the differences between the two types of beans.
The session bean implements the javax.ejb.SessionBean interface, which has the following definition:
public interface javax.ejb.SessionBean extends javax.ejb.EnterpriseBean {
   public abstract void ejbActivate();
   public abstract void ejbPassivate();
   public abstract void ejbRemove();
   public abstract void setSessionContext(SessionContext ctx);
}
At a minimum, an EJB must implement the following methods, as specified in the javax.ejb.SessionBean interface:
This method is used by a session bean instance to retain a reference to its context. Session beans have session contexts that the container maintains and makes available to the beans. The bean may use the methods in the session context to make callback requests to the container.
The container invokes setSessionContext method, after it first instantiates the bean, to enable the bean to retrieve the session context. The container will never call this method from within a transaction context. If the bean does not save the session context at this point, the bean will never gain access to the session context.
When the container calls this method, it passes the reference of the SessionContext object to the bean. The bean can then store the reference for later use. The following example shows the bean saving the session context in the sessctx variable.
import javax.ejb.*; import oracle.oas.ejb.*; public class myBean implements SessionBean { SessionContext sessctx; void setSessionContext(SessionContext ctx) {sessctx= ctx; // session context is stored in // instance variable } // other methods in the bean }
The javax.ejb.SessionContext interface has the following definition:
public interface SessionContext extends javax.ejb.EJBContext {
    public abstract EJBObject getEJBObject();
}
And the javax.ejb.EJBContext interface has the following definition:
public interface EJBContext {
    public EJBHome         getEJBHome();
    public Properties      getEnvironment();
    public Principal       getCallerPrincipal();
    public boolean         isCallerInRole(String roleName);
    public UserTransaction getUserTransaction();
    public boolean         getRollbackOnly();
    public void            setRollbackOnly();
}
A bean needs the session context when it wants to perform the operations listed in Table 2-1.
The following code implements methods of a session bean called EmployeeBean. The SessionBean interface methods are implemented along with the public methods declared in the remote interface.
The JDBC code opens a default connection, which is the standard way that JDBC code that runs on the Oracle9i server opens a server-side connection. A JDBC prepared statement is used to prepare the query, which has a WHERE clause. Then the setInt method is used to associate the empNumber input parameter for the getEmployee method with the'?' placeholder in the prepared statement query. This is identical to the JDBC code that you would write in a client application.
package employeeServer; import java.sql.*; import java.rmi.RemoteException; import javax.ejb.*; public classEmployeeBeanimplementsSessionBean{ SessionContext ctx; //implement the bean method, getEmployee public EmpRecordgetEmployee(int empNumber) throws SQLException, RemoteException { //create a new employee record EmpRecord empRec = new EmpRecord(); //establish a connection to the database using JDBC Connection conn = new oracle.jdbc.driver.OracleDriver().defaultConnection(); //retrieve the employee's information from the database PreparedStatement ps = conn.prepareStatement("select ename, sal from emp where empno = ?"); ps.setInt(1, empNumber); ResultSet rset = ps.executeQuery(); if (!rset.next()) throw new RemoteException("no employee with ID " + empNumber); empRec.ename = rset.getString(1); empRec.sal = rset.getFloat(2); empRec.empno = empNumber; ps.close(); return empRec; } //implement the SessionBean methods: ejbCreate, ejbActivate, // ejbPassivate, ejbRemove and setSessionContext //implement ejbCreate, which is called by the container when //the Home create is invoked by the client. public voidejbCreate() throws CreateException, RemoteException { //you can do any initialization for the bean at this point. //this particular example does not require any initialization or //environment variable retrieval. } //ejbActivate and ejbPassivate are never called in this release. //Both methods should be declared, but be null methods. public voidejbActivate() { } public voidejbPassivate() { } //implement anything that needs to be done before the //bean is destroyed. this would include closing any open //resources. however, for this example, no open resources need //to be closed. thus, the method is empty. public voidejbRemove() { } //retreive the session context public voidsetSessionContext(SessionContext ctx) { this.ctx = ctx; } }
All EJB clients perform the following to instantiate a bean, invoke its methods, and destroy the bean:
create method on the home interface causes a new bean to be instantiated. This returns a bean reference to the bean's remote interface.
remove method to destroy the bean.
These steps are completely illustrated by example in Figure 2-1.
As a quick example, suppose that EmployeeHome is a reference that you have obtained to the home interface of a bean called Employee. The Employee home interface must have at least one create method that lets you instantiate the bean. You create a new instance of the bean on the remote server by coding:
Context ic = new InitialContext(env);

EmployeeHome home =
      (EmployeeHome) ic.lookup(serviceURL + objectName);  // lookup the bean
Employee testBean = home.create();   // create a bean instance
Then, you would invoke Employee methods using the usual syntax
testBean.getEmployee(empNumber);
When you use the getEJBHome method to retrieve the home interface given an object reference, you cannot cast the returned object to the home interface's type. Instead, the returned object is of type org.omg.CORBA.Object. Once received, the object is cast to the correct home interface type through the Helper.narrow method. The following shows the Hello example retrieve Hello's home interface using JNDI, creating the remote interface, and then later retrieving the home interface again using the getEJBHome interface. Notice that the HelloHomeHelper.narrow method is used to correctly typecast the home interface:
HelloHome hello_home = (HelloHome)ic.lookup (serviceURL + objectName);
Hello hello = hello_home.create ();
System.out.println (hello.helloWorld ());

org.omg.CORBA.Object newHome = (org.omg.CORBA.Object) hello.getEJBHome();
HelloHome newHello = HelloHomeHelper.narrow(newHome);
When you implement an EJB or write the client code that calls EJB methods, you have to be aware of the parameter-passing conventions used with EJBs.
A parameter that you pass to a bean method--or a return value from a bean method--can be any Java type that is serializable. Java primitive types, such as int, double, are serializable. Any non-remote object that implements the java.io.Serializable interface can be passed. A non-remote object passed as a parameter to a bean or returned from a bean is passed by value, not by reference. So, for example, if you call a bean method as follows:
public class theNumber {
  int x;
}
...
bean.method1(theNumber);
then method1() in the bean receives a copy of theNumber. If the bean changes the value of theNumber object on the server, this change is not reflected back to the client, because of pass-by-value semantics.
If the non-remote object is complex--such as a class containing several fields--only the non-static and non-transient fields are copied.
When passing a remote object as a parameter, the stub for the remote object is passed. A remote object passed as a parameter must extend remote interfaces.
The next section demonstrates parameter passing to a bean and remote objects as return values.
The EmployeeBean getEmployee method returns an EmpRecord object, so this object must be defined somewhere in the application. In this example, an EmpRecord class is included in the same package as the EJB interfaces.
The class is declared as public, and must implement the java.io.Serializable interface so that it can be passed back to the client by value, as a serialized remote object. The declaration is as follows:
package employee;

public class EmpRecord implements java.io.Serializable {
  public String ename;
  public int empno;
  public double sal;
}
This section shows the client code that you can use to send messages to the example bean described above, and get and print results from it. This client code demonstrates how a client:
The first step with any remote object implementation, whether it's pure RMI, or EJBs, or CORBA, is to find out how to locate a remote object. To get a remote object reference you must know:
With EJBs, the initial object name is the name of an EJB home interface, and you locate it using the Java Naming and Directory Interface (JNDI). The EJB specification requires that EJB implementations expose a JNDI interface as the means of locating a remote bean.
JNDI is an interface to a naming and directory service. For example, JNDI can serve as an interface to a file system that you can use to look up directories and the files they contain. Or, JNDI can be used as an interface to a naming or directory service, for example a directory protocol such as LDAP.
This section briefly describes JNDI. The EJB specification requires the use of JNDI for locating remote objects by name.
This section of the manual describes only those parts of JNDI that you need to know to write EJB applications for Oracle9i. To obtain the complete JNDI API (and SPI) specifications, see http://www.javasoft.com/products/jndi.
Sun Microsystems supplies JNDI in the javax.naming package, so you must import these classes in your client code:
import javax.naming.*;
For the Oracle9i EJB server, JNDI serves as an interface (SPI driver) to the OMG CosNaming service. But you do not have to know all about CosNaming, or even all about JNDI, to write and deploy EJBs for the Oracle9i server. To start, all you must know is how to use the JNDI methods used to access permanently-stored home interface objects and how to set up the environment for the JNDI Context object.
The remainder of this JNDI section describes the data structures and methods of the javax.naming package that you will need to access EJB objects.
You use JNDI to retrieve a Context object. The first Context object that you receive is bound to the root naming context of the Oracle9i publishing context. EJB home interfaces are published in the database, and are arranged in a manner similar to a file system hierarchy. See Oracle9i Java Tools Reference for more details about the publish tool.
You get the root naming context by creating a new JNDI InitialContext, as follows:
Context initialContext = new InitialContext(environment);
The environment parameter is a Java hashtable. Table 2-2 contains the six properties that you can set in the hashtable that are passed to the javax.naming.Context.
See Chapter 5, "JNDI Connections and Session IIOP Service", for more information about JNDI and connecting to an Oracle9i instance.
Once you have the initial references context, you can invoke its methods to get a reference to an EJB home interface. To do this, you must know the published full pathname of the object, the host system where the object is located, the IIOP port for the listener on that system, and the database system identifier (SID). When you obtain this information--for example, from the EJB deployer--construct a URL using the following syntax:
<service_name>://<hostname>:<iiop_listener_port>:<SID>/<published_obj_name>
For example, to get a reference to the home interface for a bean that has been published as /test/myEmployee, on the system whose TCP/IP hostname is myHost, the listener IIOP port is 2481, and the system identifier (SID) is ORCL, construct the URL as follows:
sess_iiop://myHost:2481:ORCL/test/myEmployee
The listener port for IIOP requests is configured in the listener.ora file. The default for Oracle9i is 2481. See the Oracle9i Net Services Administrator's Guide for more information about IIOP configuration information. See also Chapter 5, "JNDI Connections and Session IIOP Service" for more information about IIOP connections.
You get the home interface using the lookup method on the initial context, passing the URL as the parameter. For example, if the home interface's published name is /test/myEmployee, you would code:
...
String ejbURL = "sess_iiop://localhost:2481:ORCL/test/myEmployee";
Hashtable env = new Hashtable();
env.put(javax.naming.Context.URL_PKG_PREFIXES, "oracle.aurora.jndi");
// Tell sess_iiop who the user is
env.put(Context.SECURITY_PRINCIPAL, "SCOTT");
// Tell sess_iiop what the password is
env.put(Context.SECURITY_CREDENTIALS, "TIGER");
// Tell sess_iiop to use non-SSL login authentication
env.put(Context.SECURITY_AUTHENTICATION, ServiceCtx.NON_SSL_LOGIN);
// Lookup the URL
EmployeeHome home = null;
Context ic = new InitialContext(env);
home = (EmployeeHome) ic.lookup(ejbURL);
...
Once you have the home interface for the bean, you can invoke one of the bean's create methods to instantiate a bean. See Chapter 5, "JNDI Connections and Session IIOP Service" for information about granting execution rights. For example:
Employee testBean = home.create();
Then you can invoke the EJB's methods in the normal way:
int empNumber = 7499;
EmpRecord empRec = testBean.getEmployee(empNumber);
Here is the complete code for the client application:
import employee.Employee;
import employee.EmployeeHome;
import employee.EmpRecord;

import oracle.aurora.jndi.sess_iiop.ServiceCtx;

import javax.naming.Context;
import javax.naming.InitialContext;
import java.util.Hashtable;


public class Client {

  public static void main (String [] args) throws Exception {

    String serviceURL = "sess_iiop://localhost:2481:ORCL";
    String objectName = "/test/myEmployee";
    int empNumber = 7499;   // ALLEN
    Hashtable env = new Hashtable();

    env.put(Context.URL_PKG_PREFIXES, "oracle.aurora.jndi");
    env.put(Context.SECURITY_PRINCIPAL, "scott");
    env.put(Context.SECURITY_CREDENTIALS, "tiger");
    env.put(Context.SECURITY_AUTHENTICATION, ServiceCtx.NON_SSL_LOGIN);

    Context ic = new InitialContext(env);

    EmployeeHome home =
      (EmployeeHome) ic.lookup(serviceURL + objectName);  // lookup the bean
    Employee testBean = home.create();   // create a bean instance
    EmpRecord empRec =

              testBean.getEmployee(empNumber); // get the data and print it
    System.out.println("Employee name is " + empRec.ename);
    System.out.println("Employee sal is  " + empRec.sal);
  }
}
The EJB deployment process consists of the following steps:
deployejb tool, which:
The format used to package EJBs is defined by the EJB specification. This section describes the steps that the EJB developer and the EJB deployer take to compile, package, and deploy an EJB. Oracle9i supplies a deployment tool, deployejb, that automatically performs most of the steps necessary to deploy an EJB. The deployejb tool deploys only one bean at a time. This tool is described in Oracle9i Java Tools Reference.
To deploy an EJB, follow these four steps:
Use the standard client-side Java compiler to compile the bean source files. A bean typically consists of one or more Java source files and might have associated resource files.
Oracle9i supports the Sun Microsystems Java Developer's Kit compiler versions 1.1.6 or 1.2. Alternatively, you might be able to use another JCK-tested Java compiler to create EJBs to run in the Oracle9i server.
deployejb tool uses this JAR file as an input file.
deployejb tool (see Oracle9i Java Tools Reference for information on deployejb) to load and publish the bean.
With EJB 1.1, the deployment descriptor is now defined using XML. Sun Microsystems provides the DTD file, which describes the required entries for defining the bean and application. The deployment descriptor was designed to contain logical names--that is, names that do not necessarily match the true name of the object loaded in Oracle9i. These logical names are mapped to existing names through a companion deployment file--the Oracle deployment mapping file. The Oracle deployment mapping file maps the logical bean name to an existing JNDI name and map any container-managed entity bean fields to existing database columns.
Alternatively, if you use the actual JNDI and database column names within the XML deployment file, the Oracle deployment map file will be created for you automatically by deployejb.
|
Note:
Since this chapter discusses session beans, the only fields discussed here will pertain to session beans. For a full description of the XML elements, see either Appendix A, "XML Deployment Descriptors" or the "Deployment Descriptor" chapter within the EJB 1.1 specification, located on |
The following example shows the sections necessary for the Employee example. This example uses logical names within the XML deployment descriptor that map to JNDI names within the Oracle deployment map file.
<?xml version="1.0"?>
<!DOCTYPE ejb-jar PUBLIC "-//Sun Microsystems Inc.//DTD Enterprise JavaBeans 1.1
   //EN" "ejb-jar.dtd">
<ejb-jar>
   <enterprise-beans>
      <session>
         <description>Session Bean Employee Example</description>
         <ejb-name>Employee</ejb-name>
         <home>employee.EmployeeHome</home>
         <remote>employee.Employee</remote>
         <ejb-class>employee.EmployeeBean</ejb-class>
         <session-type>Stateful</session-type>
         <transaction-type>Container</transaction-type>
      </session>
   </enterprise-beans>
   <assembly-descriptor>
      <security-role>
         <description>Public</description>
         <role-name>PUBLIC</role-name>
      </security-role>
      <method-permission>
         <description>public methods</description>
         <role-name>PUBLIC</role-name>
         <method>
            <ejb-name>EmployeeBean</ejb-name>
            <method-name>*</method-name>
         </method>
      </method-permission>
      <container-transaction>
         <description>no description</description>
         <method>
            <ejb-name>EmployeeBean</ejb-name>
            <method-name>*</method-name>
         </method>
         <trans-attribute>Supports</trans-attribute>
      </container-transaction>
    </assembly-descriptor>
</ejb-jar>
The following sections describes each of the pieces of the XML deployment descriptor:
<?xml version="1.0"?>
<!DOCTYPE ejb-jar PUBLIC "-//Sun Microsystems Inc.//DTD Enterprise JavaBeans 1.1
//EN" "ejb-jar.dtd">
The first element to be declared is the <ejb-jar> element. Within this element, you define the following sections: the <enterprise-beans> section and the <assembly-descriptor> section. The <enterprise-beans> section defines the beans. The <assembly-descriptor> section defines the application's security and transaction attributes. In addition, you can also add the <ejb-client-jar> section to define the name of the output JAR file to be used on the client. If not specified, the client JAR file name is either specified in the deployejb command-line tool or defaults to <input_JARname>_generated.jar.
<ejb-jar>                            //Start of JAR file descriptor
 <enterprise-beans>                  //EJB Descriptor section
 ...                                 //Bean definition
 </enterprise-beans>
 <assembly-descriptor>               //Application Descriptor section
 ...                                 //Transaction and security definition
 </assembly-descriptor>
 <ejb-client-jar>	//Client JAR file name
 ...
 </ejb-client-jar>
</ejb-jar>
The beans are described within the <enterprise-beans> element. This element contains information such as the type of bean, the home interface name, the remote interface name, and the bean class name. The Employee example contains only a single session bean. If more than one bean was included, each bean would be defined within its own <session> or <entity> element within the <enterprise-beans> element. See "Specifying Multiple Beans in Deployment JAR File" for more information.
The following segment shows the following:
session> element.
Employee, defined within the <ejb-name> element.
employee package and are EmployeeHome, Employee, and EmployeeBean respectively.
   <enterprise-beans>
      <session>
         <description>Session Bean Employee Example</description>
         <ejb-name>Employee</ejb-name>
         <home>employee.EmployeeHome</home>
         <remote>employee.Employee</remote>
         <ejb-class>employee.EmployeeBean</ejb-class>
         <session-type>Stateful</session-type>
         <transaction-type>Container</transaction-type>
      </session>
   </enterprise-beans>
The <assembly-descriptor> element describes the security and transaction attributes for the application.
security-role> element. These roles are assigned to certain methods within the bean within the <method-permission> element. In this example, the Employee bean allows all methods to be accessed within PUBLIC.
container-transaction> element. In this example, all methods require the Supports transactional attribute.
   <assembly-descriptor>
      <security-role>
         <description>Public</description>
         <role-name>PUBLIC</role-name>
      </security-role>
      <method-permission>
         <description>public methods</description>
         <role-name>PUBLIC</role-name>
         <method>
            <ejb-name>EmployeeBean</ejb-name>
            <method-name>*</method-name>
         </method>
      </method-permission>
      <container-transaction>
         <description>no description</description>
         <method>
            <ejb-name>EmployeeBean</ejb-name>
            <method-name>*</method-name>
         </method>
         <trans-attribute>Supports</trans-attribute>
      </container-transaction>
    </assembly-descriptor>
If you had declared the true JNDI name within <ejb-name>, you do not have to create an Oracle deployment map file. This example used a logical name, Employee, within the XML deployment file. In this example, the JNDI name for Employee is /test/EmployeeBean.
In the Oracle deployment map file, you have the following structure:
<oracle-descriptor> element.
In this example, the logical name defined within <ejb-name>--Employee--is mapped to "/test/EmployeeBean" within the <jndi-name> element.
run-as> element defines the identity that the bean runs under within the <mode> element. The possible values can be the following:
security-role> element. See Appendix A, "XML Deployment Descriptors" for details.
method> element under the <run-as> element defines the methods that run under the <mode> identity.
In this example, only a single bean, EmployeeBean, is contained within the JAR file and all of its methods run as the client.
<?xml version="1.0"?> <!DOCTYPE oracle-descriptor PUBLIC "-//Oracle Corporation.//DTD Oracle 1.1//EN" "oracle-ejb-jar.dtd"> <oracle-ejb-jar> <oracle-descriptor> <mappings> <ejb-mapping><ejb-name>Employee</ejb-name><jndi-name>/test/EmployeeBean</jndi-name></ejb-mapping> </mappings> <run-as> <description>no description</description> <mode>CLIENT_IDENTITY</mode> <method> <ejb-name>EmployeeBean</ejb-name> <method-name>*</method-name> </method> </run-as> </oracle-descriptor> </oracle-ejb-jar>
Create a JAR file for the bean that contains the bean implementation, the home interface, and the remote interface. For the Employee example, the employee.jar file is created with its implementation, home, and remote interfaces.
Use the deployejb command-line tool to create the client-side JAR file for the client to use when accessing the bean.
 deployejb -user scott -password tiger -service sess_iiop://dbserver:2481:orcl \
  -descriptor employee.xml -oracledescriptor oracle_employee.xml \

  -temp /tmp/ejb -generated empClient.jar employee.jar
One of the tasks that the deployejb tool performs is to create a JAR file with the required stubs and skeletons, which is used by the client at execution time. Unless this JAR file name is specified either in the -generated option on the command line or in the <ejb-client-jar> element in the XML deployment descriptor, the default name for this JAR file is the name of the server JAR file appended with _generated.jar.
In this example, the client JAR file is named as empClient.jar by the -generated option. This JAR file must be included in the CLASSPATH for client execution.
A bean provider must make the bean's home interface available for JNDI lookup so that clients can find and activate the bean. However, when you create the JAR file with the deployejb command-line tool, this tool publishes the bean in the JNDI namespace under the <jndi-name> element name that you specify in the Oracle deployment mapping file.
Drop an EJB from the database by following these steps:
dropjava tool to delete the classes from the database. Provide the original bean JAR file that contains the class files for the bean.
See Oracle9i Java Tools Reference for documentation of the dropjava and session shell tools.
To run this example, execute the client class using the client-side JVM. For this example, you must set the CLASSPATH for the java command to include:
classes.zip)
vbjapp.jar and vbjorb.jar
mts.jar and aurora_client.jar
If you are using JDBC, include one of the following JAR files:
If you are using SSL, include one of the following JAR files:
javax-ssl-1_1.jar and jssl-1_1.jar for SSL 1.1 support
javax-ssl-1_2.jar and jssl-1_2.jar for SSL 1.2 support
You can locate these libraries in the lib and jlib directories under the Oracle home location in your installation.
The following invocation of the JDK java command runs this example.
% java -classpath .:$(ORACLE_HOME)/lib/aurora_client.jar			|

	:$(ORACLE_HOME/lib/mts.jar		|

	:$(ORACLE_HOME)/jdbc/lib/classes111.zip:		|

	$(ORACLE_HOME)/lib/vbjorb.jar:		|

	$(ORACLE_HOME)/lib/vbjapp.jar:$(JDK_HOME)/lib/classes.zip 		|

		Client 	|

		sess_iiop://localhost:2481:ORCL 	|

		/test/myEmployee 	|

		scott tiger
The EJB 1.1 specification contains the following programming restrictions, which you must follow when implementing the methods of an EJB class:
javax.Transaction.UserTransaction interface to demarcate transactions.
java.security.Identity. Any attempt to do so results in the java.security.SecurityException being thrown.
The 1.1 EJB specification states that "an EJB is not allowed to use read/write static fields. Using read-only static fields is allowed. Therefore, all static fields must be declared as final." This is not a restriction for Oracle9i.
Until Java IDEs and JVMs support remote debugging, you can adopt several techniques for debugging your CORBA client and server code.
DebugAgent object for debugging objects executing on a server. See "Using a Debug Agent for Debugging Server Applications" for more information.
Debug by placing both the client and server in a single address space in a single process. Use of an IDE for client or server debugging is optional, though highly desirable.
In the client, the output of System.out.println() goes to the screen. However, in the Oracle9i ORB, all messages are directed to the server trace files. The directory for trace files is a parameter specified in the database initialization file. Assuming a default install of the product into a directory symbolically named $ORACLE_HOME, the trace file appears, as follows:
${ORACLE_HOME}/admin/<SID>/bdump/ORCL_s000x_xxx.trc
where ORCL is the SID, and x_xxx represents a process ID number. Do not delete trace files after the Oracle instance has been started--if you do, no output will be written to a trace file. If you do delete trace files, stop and then restart the server.
For debugging only, set the MTS_SERVERS parameter in your INITSID.ORA file to MTS_SERVERS = 1, and set the MTS_MAX_SERVERS to 1. Having multiple MTS servers active means that a trace file is opened for each server process, and, thus, the messages get spread out over several trace files, as objects get activated in more than one session.
System.out. This example is available in the $ORACLE_HOME/javavm/demo/examples/corba/basic/printback directory.
The procedure for setting up your debugging environment is discussed fully in the Oracle9i Java Developer's Guide. However, it discusses starting the debug agent using a DBMS_JAVA procedures. Within a CORBA application, you can start, stop, and restart the debug agent using the oracle.aurora.debug.DebugAgent class methods. These methods perform exactly as their DBMS_JAVA counterparts perform.
public void start( java.lang.String host, int port, long timeout_seconds)

	throws DebugAgentError
public void stop() throws DebugAgentError
public void restart(long timeout) throws DebugAgentError
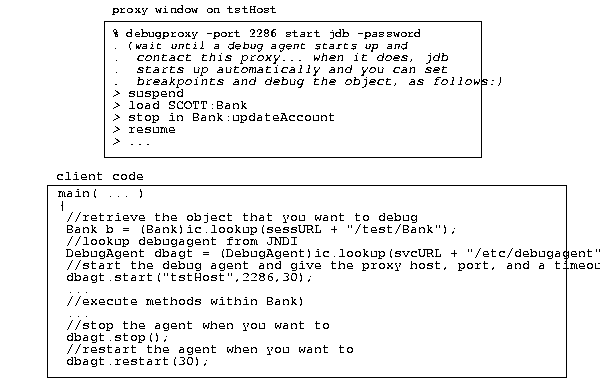
The following example shows how to debug an object that exists on the server. First, you need to start a debug proxy through the debugproxy command-line tool. This example informs the debugproxy to start up the jdb debugger when contacted by the debug agent.
Once you execute this command, start your client, which will lookup the intended object to be debugged, lookup the DebugAgent that is prepublished as "/etc/debugagent", and start up the DebugAgent.
Once the DebugAgent starts, the debugproxy starts up the jdb debugger and allows you to set your breakpoints. Since you have a specified amount of time before the DebugAgent times out, the first thing you should do is suspend all threads. Then, set all of your breakpoints before resuming. This suspends the timeout until you are ready to execute.
|
|
 Copyright © 1996-2001, Oracle Corporation. All Rights Reserved. |
|