Oracle9i Network, Directory, and Security Guide
Release 1 (9.0.1) for Windows

Part Number A90165-01
Go To Documentation Library
Home
Go To Product List
Book List
Go To Table Of Contents
Contents
Go To Index
Index

Master Index

Feedback

Go to previous page Go to next page

2
Administering External Users and Roles

This chapter describes the administration of external users and roles.

This chapter contains these topics:

How to Administer External Users and Roles

There are two methods for administering external users and roles:

Using Oracle Administration Assistant for Windows NT

Oracle Administration Assistant for Windows NT runs from the Microsoft Management Console and enables you to configure the following Oracle database users and roles to be authenticated by the Windows operating system:

Oracle Administration Assistant for Windows NT eliminates the need to manually:

This section describes how to perform the following tasks with Oracle Administration Assistant for Windows NT:

Adding a Computer and Saving Your Configuration

When you use Oracle Administration Assistant for Windows NT for the first time, it adds the local computer in the navigation tree. You can then add other computers.

To add a computer to the Microsoft Management Console tree:

  1. Choose Start > Programs > Oracle - HOME_NAME > Configuration and Migration Tools > Administration Assistant for Windows NT.

    The Microsoft Management Console starts.

  2. Double-click Oracle Managed Objects.

    The Computer icon appears.

  3. Right-click Computers.

  4. Choose New > Computer.

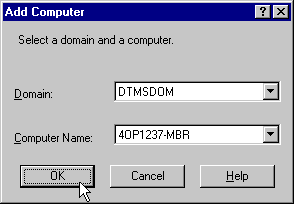
    The Add Computer dialog box appears.


    Text description of addcomp.gif follows.
    Text description of the illustration addcomp.gif
  5. Specify the domain and hostname of the computer on which your Oracle database is installed.

  6. Choose OK.

  7. Double-click Computers to display the computer you added.

  8. Double-click the computer you added. Several nodes for authenticating database administrators and operators appear:

    This Node...  Enables You To... 

    OS Database Administrators - Computer 

    Create an operating system-authenticated database administrator (with SYSDBA privileges) for all database instances on the computer. 

    OS Database Operators - Computer 

    Create an operating system-authenticated database operator (with SYSOPER privileges) for all database instances on the computer. 

  9. Save your configuration in a console file by choosing Save in the Console main menu.

    You can now authenticate database administrators and operators for all instances on the computer.

  10. See "Granting Administrator and Operator Privileges for All Databases on a Computer".

Granting Administrator and Operator Privileges for All Databases on a Computer

You can grant database administrator (SYSDBA) and database operator (SYSOPER) privileges to DBAs for all databases on a computer.

To grant privileges for all databases on a computer:

  1. Choose Start > Programs > Oracle - HOME_NAME > Configuration and Migration Tools > Administration Assistant for Windows NT.

    Oracle Administration Assistant for Windows NT starts.

  2. Make an appropriate selection:

    If You Want to Grant...  Then... 

    Database administrator (SYSDBA) privileges 

    1. Right-click OS Database Administrators - Computer.

    2. See section "Granting Administrator Privileges for All Databases on a Computer"


    Database operator (SYSOPER) privileges 

    1. Right-click OS Database Operators - Computer.

    2. See section "Granting Operator Privileges For All Databases on a Computer"


Granting Administrator Privileges for All Databases on a Computer

To grant administrator (SYSDBA) privileges for all databases on a computer:

  1. Choose Add/Remove.

    The OS Database Administrators - Computer for hostname dialog box appears:
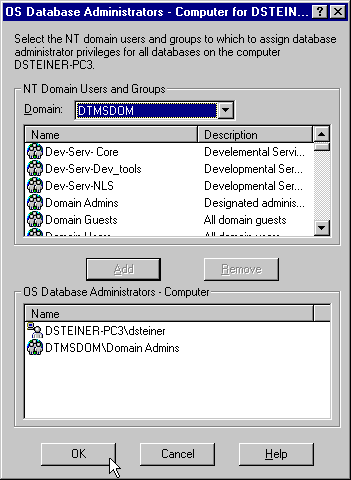

    Text description of ntdba.gif follows.
    Text description of the illustration ntdba.gif
  2. Select the domain of the user to which to grant SYSDBA privileges from the Domain drop-down list box.

  3. Select the user.

  4. Choose Add.

    The user now appears in the OS Database Administrators - Computer window.

  5. Choose OK.

Granting Operator Privileges For All Databases on a Computer

To grant operator (SYSOPER) privileges for all databases on a computer:

  1. Choose Add/Remove.

    The OS Database Operators - Computer for hostname dialog box appears:
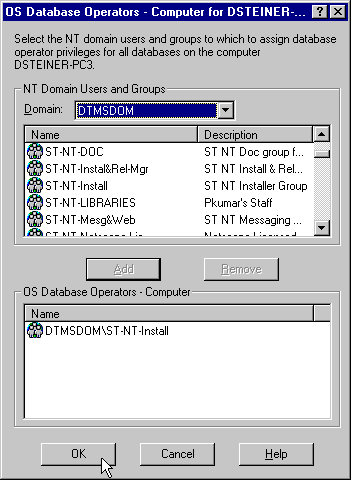

    Text description of osdboper.gif follows.
    Text description of the illustration osdboper.gif
  2. Select the domain of the user to which to grant SYSOPER privileges from the Domain drop-down list box.

  3. Select the user.

  4. Choose Add.

    The user now appears in the OS Database Operators - Computer window.

  5. Choose OK.

Connecting to a Database

Once you connect to a database, you can perform additional authentication tasks:

To connect to a database:

  1. Right-click the database instance to access (for example, ORCL) in the Microsoft Management Console scope pane:
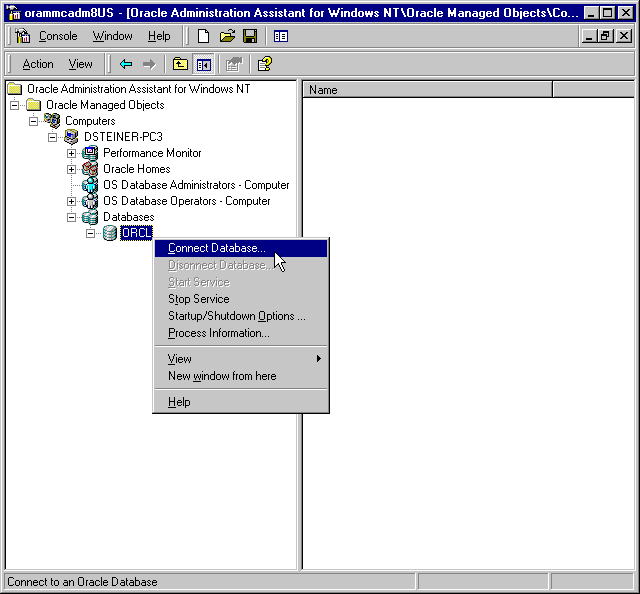

    Text description of cntdb.gif follows.
    Text description of the illustration cntdb.gif

    To enable Secure Sockets Layer (SSL) when connecting to an Oracle database, do not use the default user account in the Windows NT Services dialog box when starting the Oracle service and the listener service. Start these services in the same user account as the wallet created in Oracle Wallet Manager. If the Oracle service and the listener service are started in the default user accounts, SSL does not work and the listener does not start. Support for SSL is an Oracle Advanced Security feature. Oracle Wallet Manager is also an Oracle Advanced Security feature.

    See Also:

    Oracle Advanced Security Administrator's Guide for more information on SSL support 

  2. Choose Connect Database.

    If you connect to the Oracle database, the following Windows NT nodes appear beneath the instance. If these nodes do not appear, double-click the instance.

    This Node...  Enables You To...  For More Information... 

    External OS Users 

    Authenticate a Windows NT user to access the Oracle database as an external user without being prompted for a password. External users are typically regular database users (non-database administrators) to which you assign standard database roles (such as CONNECT and RESOURCE), but do not want to assign SYSDBA (database administrator) or SYSOPER (database operator) privileges.  

    See "Creating a Nonprivileged Database User (External User)" 

    Local Roles 

    Create a role and have it managed by the database. Once a local role is created, you can grant or revoke that role to a database user.  

    See "Creating a Local Database Role" 

    External OS Roles 

    Create an external role and have it managed by the Windows operating system. Once an external role is created, you can grant or revoke that role to a database user. 

    See "Creating an External Role" 

    OS Database Administrators 

    Authenticate a Windows NT user with SYSDBA privileges for a specific instance on a computer. 

    See "Granting Administrator and Operator Privileges for a Single Database" 

    OS Database Operators 

    Authenticate a Windows NT user with SYSOPER privileges for a specific instance on a computer. 

    See "Granting Administrator and Operator Privileges for a Single Database" 

Troubleshooting Connection Problems

When connecting to a local computer, Oracle Administration Assistant for Windows NT first tries to connect as a SYSDBA to the database using the Bequeath networking protocol. When connecting to a remote computer, Oracle Administration Assistant for Windows NT tries to connect using Windows native authentication as a SYSDBA to the database using the TCP/IP networking protocol (port 1521 or the deprecated 1526). If it is unsuccessful, the dialog boxes shown in Table 2-1 appear and prompt you to enter information to connect to the database:

Table 2-1 Resolving Database Connection Problems
This Dialog Box Appears...  Because... 

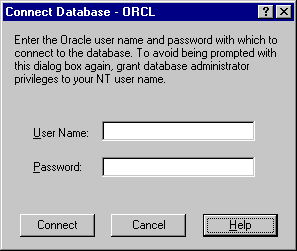
Text description of cntdb4.gif follows.
Text description of the illustration cntdb4.gif
 

The Windows NT domain user with which you are attempting to connect to the Oracle database is not recognized as an authenticated user with SYSDBA privileges.

Enter an Oracle username and password to access the database.

To avoid being prompted with this dialog box again, configure your domain user to be a database administrator authenticated by the Windows NT operating system.


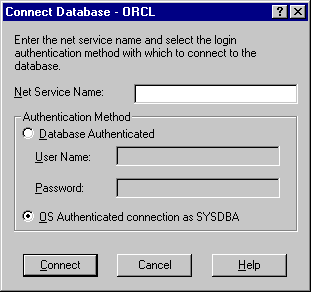
Text description of cntdb2.gif follows.
Text description of the illustration cntdb2.gif
 

You are not using the TCP/IP networking protocol to connect to a remote Oracle database or the Oracle database is not running. Using a protocol other than TCP/IP (Named Pipes for example) causes this dialog box to appear each time you attempt a remote connection.

If you do not want this dialog to appear each time change to the TCP/IP protocol and make sure the Oracle Net Services listener is for the database listening on the default port 1521 (or the deprecated default port 1526). Otherwise, this dialog appears every time. Ensure also that the Oracle database is started.

  1. Enter the net service name with which to connect to your Oracle database. You must enter a net service name regardless of the authentication method you select.

  2. If you want to access the database with an Oracle username and password, select the Database Authenticated option. This username and password must exist in the Oracle database and have the SYSDBA privilege.

  3. If you want to access the database with the Windows NT domain user with which you are currently logged in, select the OS Authenticated Connection as SYSDBA option. This domain user must already be recognized by Windows NT as an authenticated user with SYSDBA privileges. Otherwise, your logon fails.


Viewing Database Authentication Parameter Settings

To view database authentication parameter settings:

  1. Right-click the database.

  2. Choose Properties.

  3. The ORCL Properties dialog box appears displaying the following parameter values:

    Parameter  Description 

    OS_AUTHENT_PREFIX 

    OS_AUTHENT_PREFIX is an init.ora file parameter that authenticates external users attempting to connect to the Oracle database with the user's Windows NT username and password. The value of this parameter is attached to the beginning of every user's Windows username. By default, the parameter is set to none ("") during Oracle9i database creation. Create Oracle users in the database without the prefix OPS$, which was needed for Oracle7 and Oracle8 release 8.0.x.

    Therefore, a Windows domain username of frank is authenticated as username frank. You can set this parameter to an appropriate value. For example, if you set this parameter to xyz, the Windows NT domain user frank is authenticated as user xyzfrank

    OS_ROLES 

    OS_ROLES is an init.ora file parameter that, if set to true, enables the Windows NT operating system to manage the authorization of external roles for database users. By default, OS_ROLES is set to false. You must set OS_ROLES to true and restart your Oracle database before you can create external roles. If OS_ROLES is set to false, the Oracle database manages the granting and revoking of roles for database users. See section "Understanding the OS_ROLES Parameter" for more information. 

Understanding the OS_ROLES Parameter

OS_ROLES is a parameter in the init.ora file that, if set to true, enables the Windows NT operating system to manage the authorization of external roles for database users. You must set OS_ROLES to true and restart your Oracle database before you can create external roles.

If OS_ROLES is set to false, the Oracle database manages the granting and revoking of roles for database users.

If OS_ROLES is set to true and you assign an external role to an NT global group, it is granted only at the global group level, and not at the level of the individual user in this global group. This means that you cannot revoke or edit the external role assigned to an individual user in this global group through the Roles tab of the User Name Properties dialog box at a later time. Instead, you must use the Assign External OS Roles to an NT Global Group field in the dialog box to revoke the external role from this global group (and therefore all its individual users).

External roles assigned to an individual domain user or local roles (with OS_ROLES set to false) assigned to an individual domain user or NT global group are not affected by this issue, and can be edited or revoked.

If OS_ROLES is set to true, you cannot grant local roles in the database to any database user. You must grant the roles through Windows NT. See "Creating a Local Database Role" and "Creating an External Role" for more information.

Creating a Nonprivileged Database User (External User)

You can create a nonprivileged database user (external user).

To create a nonprivileged database user:
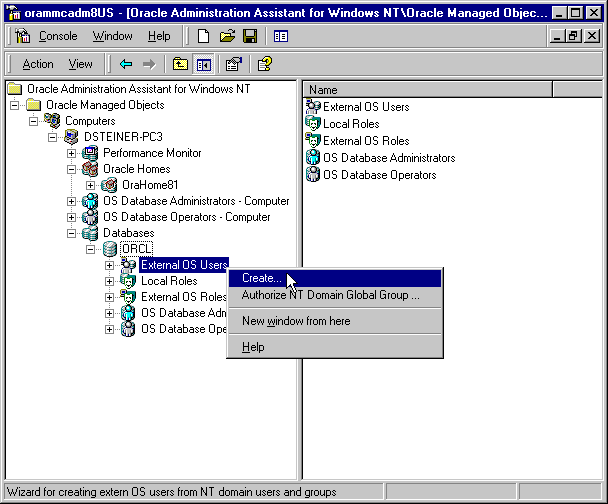
  1. Follow the steps in "Connecting to a Database" to connect to a database.

  2. Right-click External OS Users.

  3. Choose Create.


    Text description of mmc4.gif follows.
    Text description of the illustration mmc4.gif

    The Create External OS User Wizard starts:
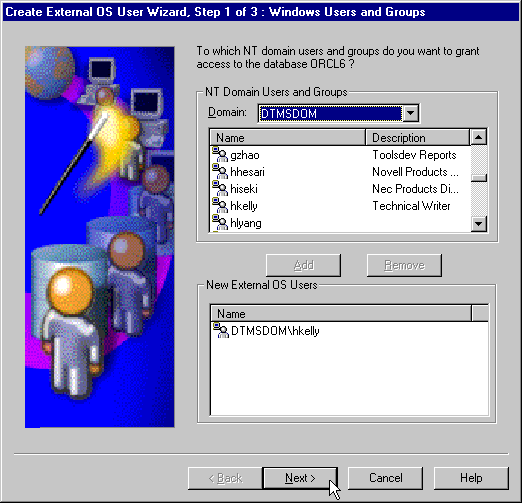

    Text description of mmc5.gif follows.
    Text description of the illustration mmc5.gif
  4. Select the domain in which your Windows NT domain users and global groups are located.

  5. Select the Windows NT domain users and global groups to which to grant access to the database.

  6. Choose Add.

    The user now appears in the New External OS Users window.


    Note:

    If you select an NT global group for authentication when using Oracle Administration Assistant for Windows NT, all users currently in the group are added to the Oracle database. If at a later time, you use a Windows NT tool to add or remove users in this Windows NT global group, these updates are not reflected in the Oracle database. The newly added or removed users must be explicitly added or removed in the Oracle database with Oracle Administration Assistant for Windows NT.  


  7. Choose Next.


    Text description of mmc6stp2.gif follows.
    Text description of the illustration mmc6stp2.gif

  8. Select a profile for the new external users. A profile is a named set of resource limits. If resource limits are enabled, Oracle limits database usage and instance resources to whatever is defined in the user's profile. You can assign a profile to each user, and a default profile to all users who do not have specific profiles.

  9. Double-click the tablespace to assign a tablespace quota in the Tablespace Quota window. This assigns profile and tablespace information to the users, and grants database roles.

  10. Choose Next.


    Text description of step3.gif follows.
    Text description of the illustration step3.gif

  11. Select the database roles to grant to the new external users.

  12. Choose the Grant button.

  13. Choose Finish.

  14. Right-click the external user for which you want to view information and select Properties.

    The assigned properties appear.

Creating a Local Database Role

You can create a local database role.

To create a local database role:

  1. Follow the steps in "Connecting to a Database" to connect to a database.

  2. Right-click Local Roles for the database for which you want to create a local role.

  3. Choose Create.

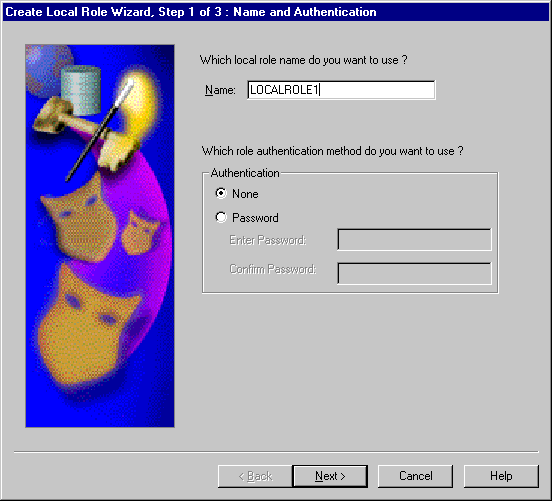
    The Create Local Role wizard appears:


    Text description of locrol1.gif follows.
    Text description of the illustration locrol1.gif
  4. Enter a local role name to use. A local role is a role that is managed by the Oracle database.

  5. Select None if you want a user to use this local role without being required to enter a password.

  6. Select Password if you want the use of this role to be protected by a password. These roles can only be used by supplying an associated password with the SET ROLE command. See Oracle9i Database Administrator's Guide for additional information.

  7. Enter the password to use with this role.

  8. Confirm the password by entering it a second time.

  9. Choose Next.


    Text description of locrol2.gif follows.
    Text description of the illustration locrol2.gif

  10. Select appropriate system privileges to assign to the local role.

  11. Choose Grant to grant the selected system privileges to the local role.

    The Granted System Privileges field displays the list of system privileges granted to the local role. To revoke a system privilege, make an appropriate selection, then choose Revoke.

  12. If you want to grant the Admin Option to this role, click the value in the Admin Option column to display a drop-down list box. This enables you to select Yes.

  13. Choose Next.

  14. Select appropriate roles to assign to the local role. Both local roles and external roles appear in this list.


    Text description of locrol3.gif follows.
    Text description of the illustration locrol3.gif

  15. Choose Grant to grant the selected roles to the role.

    The Granted Roles field displays the list of roles granted to the role. Both local roles and external roles can appear in this list. To revoke roles, make appropriate selections, then choose Revoke.

  16. Choose Finish.

Creating an External Role

You can create external roles.

To create an external role:

  1. Follow the steps in "Connecting to a Database" to connect to a database.

  2. Right-click External OS Roles for the database for which to create an external role.

  3. Choose Create.


    Note:

    This wizard is only available if you set the init.ora parameter OS_ROLES to true and restart the Oracle database.

    "Authentication: External" appears on this page to indicate that only external roles can be created.  


    Text description of exosrolw.gif follows.
    Text description of the illustration exosrolw.gif
  4. Enter an external role name to use. An external role is a role that is managed by the Windows operating system.

  5. Choose Next.


    Text description of exosrola.gif follows.
    Text description of the illustration exosrola.gif

  6. Select appropriate system privileges to assign to the external role.

  7. Choose Grant to grant the selected system privileges to the external role.

  8. The Granted System Privileges field displays the list of system privileges granted to the external role. To revoke a system privilege, make an appropriate selection, then choose Revoke.

  9. If you want to grant the Admin Option to this role, choose the value in the Admin Option column to display a drop-down list box. This enables you to select Yes.

  10. Choose Next.


    Text description of exosrolb.gif follows.
    Text description of the illustration exosrolb.gif

  11. Select appropriate roles to assign to the external role.

  12. Choose Grant to grant the selected roles to the external role. Both local roles and external roles appear in this list.

    The Granted Roles field displays the list of roles granted to the external role.

  13. Choose Finish.

Granting Administrator and Operator Privileges for a Single Database

You can grant database administrator (SYSDBA) and database operator (SYSOPER) privileges to database administrators for a single database on a computer.

To grant privileges for a single database:

  1. Follow the steps in "Connecting to a Database" to connect to a database.

  2. Right-click the database to access (for example, orcl) in the Microsoft Management Console scope pane.

  3. Choose Connect Database.

    Several icons, including OS Database Administrators and OS Database Operators, appear.

  4. Make an appropriate selection:

    If You Want to Grant...  Then... 

    Database administrator (SYSDBA) privileges 

    1. Right-click OS Database Administrators.

    2. Follow the steps 1-4 above.


    Database operator (SYSOPER) privileges 

    1. Right-click OS Database Operators.

    2. See section "Granting Operator Privileges for a Single Database"


Granting Administrator Privileges for a Single Database

To grant administrator (SYSDBA) privileges for a single database:

  1. Choose Add/Remove.

    The OS Database Administrators for instance dialog box (MARK in this example) appears:
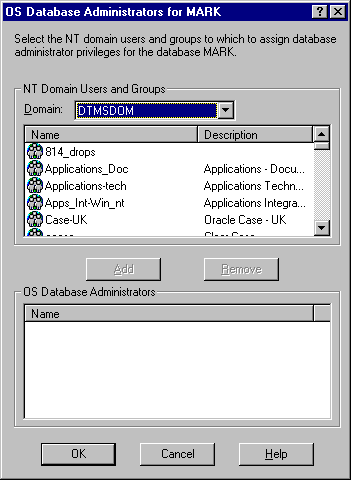

    Text description of ntdbasin.gif follows.
    Text description of the illustration ntdbasin.gif
  2. Select the domain of the user to which to grant SYSDBA privileges from the NT Domain Users and Groups drop-down list box.

  3. Select the user. The user now appears in the OS Database Administrators window.

  4. Choose OK.

Granting Operator Privileges for a Single Database

To grant operator (SYSOPER) privileges for a single database:

  1. Choose Add/Remove.

    The OS Database Operators for instance dialog box (mark in this example) appears:
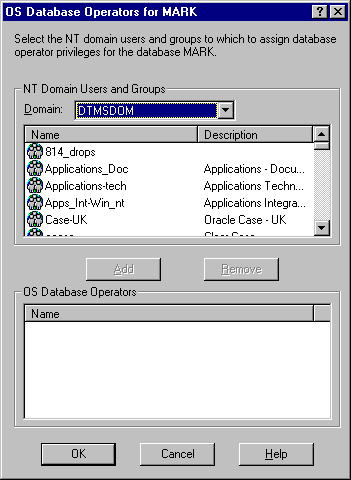

    Text description of ntopersi.gif follows.
    Text description of the illustration ntopersi.gif
  2. Select the domain of the user to which to grant SYSOPER privileges from the NT Domain Users and Groups drop-down list box.

  3. Select the user.

  4. Choose Add.

    The user now appears in the OS Database Operators window.

  5. Choose OK.

Manually Administering External Users and Roles

Manual configuration involves using Oracle command line tools, editing the registry, and creating local groups in Windows NT User Manager. This enables you to:

This section describes:

Creating a Nonprivileged Database User (External User)

This section describes how to authenticate nonprivileged database users (nondatabase administrators) using Windows NT so that a password is not required when accessing the database. See Table 2-2. When you use Windows NT to authenticate nonprivileged database users, your database relies solely on Windows NT to restrict access to database usernames. In the steps below, the following Windows NT usernames are authenticated:

Table 2-2 External User Database Access
Username  This User... 

Local user frank  

Logs into their local Windows NT client computer to access an Oracle9i database. The database can be on a different computer. To access other databases and resources on other computers, the local user must provide a username and password each time.  

Domain user frank on domain sales 

Logs into a domain (sales in the steps below) that includes many other Windows NT computers and resources, one of which contains an Oracle9i database. The domain user can access all the resources the domain provides with a single username and password. 

The local and domain username frank and the domain sales are used in the steps. Substitute the appropriate local and domain username and domain name for your environment.

Follow the subsequent steps to connect without a password as a nonprivileged database user:

Task 1: Perform Authentication Tasks on the Oracle9i Database Server

To perform authentication tasks on an Oracle9i database server:

  1. Add the OS_AUTHENT_PREFIX parameter to your init.ora file.

    The OS_AUTHENT_PREFIX value is prefixed to local or domain usernames attempting to connect to the server with the user's operating system name and password. The prefixed username is compared with the Oracle usernames in the database when a connection request is attempted. Using the OS_AUTHENT_PREFIX parameter with Windows native authentication methods is the recommended method for performing secure, trusted client connections to your server.

  2. Set OS_AUTHENT_PREFIX to an appropriate value. Values are case insensitive. For example:

    Set OS_AUTHENT_PREFIX to...  Result 

    xyz 

    xyz is prefixed to the beginning of the Windows NT username (for example, xyzfrank for local user frank or xyzsales\frank for domain user frank on domain sales).

    Note: xyz is only an example of an acceptable parameter value. Use a value appropriate to your environment. 

    "" 

    This is recommended, as it eliminates the need for any prefix to the Windows NT usernames (for example, frank for local user frank or sales\frank for domain user frank on domain sales).  

    Not included in init.ora file 

    The value defaults to OPS$ (for example, OPS$FRANK for local user frank or OPS$sales\frank for domain user frank on domain sales). 

    The parameter value xyz is used in the subsequent steps. Substitute xyz with the value you set for OS_AUTHENT_PREFIX.

  3. Use User Manager to create a Windows NT local or domain username for frank (if the appropriate name does not currently exist). See your Windows NT documentation or your network administrator if you do not know how to do this.

  4. Follow these substeps to create a new registry parameter only if you are not authenticating a domain name with a user (for example, just frank instead of frank on domain sales). Otherwise, go to step 5.

    1. Start the registry editor from the MS-DOS command prompt:

      C:\> regedt32
      
    2. Go to HKEY_LOCAL_MACHINE\SOFTWARE\ORACLE\HOMEID, where ID is the Oracle home directory you want to edit.

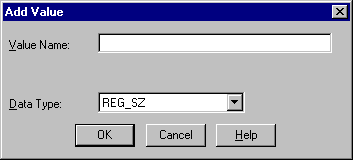
    3. Choose the Add Value option in the Edit menu.

      The Add Value dialog box appears:


      Text description of addval.gif follows.
      Text description of the illustration addval.gif
    4. Enter OSAUTH_PREFIX_DOMAIN in the Value Name field.

    5. Choose REG_EXPAND_SZ from the Data Type drop-down list box.

    6. Choose OK.

      The String Editor dialog box appears:


      Text description of addstr.gif follows.
      Text description of the illustration addstr.gif
    7. Enter true in the String field to enable authentication at the domain level.

      true enables the server to differentiate between multiple frank usernames, whether they are local user frank, domain user frank on sales, or domain user frank on another domain in your network. Entering false causes the domain to be ignored and local user frank to become the default value of the operating system user returned to the server.

    8. Choose OK.

      The Registry Editor adds the parameter.

    9. Choose Exit from the registry menu.

      The String Editor exits.

  5. Ensure that the SQLNET.AUTHENTICATION_SERVICES parameter in the sqlnet.ora file contains nts.

  6. Start SQL*Plus:

    C:\> SQLPLUS
    
  7. Connect to the database with the SYSTEM database administrator (DBA) name:

    SQL> CONNECT 
    Enter user-name: SYSTEM/password
    

    Unless you have changed it, the SYSTEM password is MANAGER by default.

  8. Create an operating system-authenticated user by entering the following:

    If Authenticating a...  Then Enter... 

    Local username 

    SQL> CREATE USER xyzfrank IDENTIFIED EXTERNALLY; 

    Domain username 

    SQL> CREATE USER "XYZSALES\FRANK" IDENTIFIED EXTERNALLY; 

    Where:  Is the... 

    xyz 

    Value set for the OS_AUTHENT_PREFIX initialization parameter. 

    frank 

    Windows NT local username. 

    SALES\FRANK 

    Domain name and Windows NT domain username. The double quotes are required and the entire syntax must be in uppercase. 

  9. Grant the Windows NT local user frank or domain user frank appropriate database roles:

    If Authenticating a...  Then Enter... 

    Local username 

    SQL> GRANT RESOURCE TO xyzfrank; 


    SQL> GRANT CONNECT TO xyzfrank; 

    Domain usernameFoot 1 

    SQL> GRANT RESOURCE TO "XYZSALES\FRANK"; 


    SQL> GRANT CONNECT TO "XYZSALES\FRANK"; 

    1 Enter the syntax for domain users in uppercase and with double quotes around the domain username.

  10. Connect to the database with the SYSDBA name:

    SQL> CONNECT / AS SYSDBA
    
  11. Shut down the database:

    SQL> SHUTDOWN
    
  12. Restart the database:

    SQL> STARTUP
    

    This causes the change to the OS_AUTHENT_PREFIX parameter value to take affect.

Task 2: Perform Authentication Tasks on the Client Computer

To perform authentication tasks on the client computer:

  1. Create Windows NT local or domain username frank with the same username and password that exist on the Windows NT server (if the appropriate name does not currently exist).

  2. Ensure that the SQLNET.AUTHENTICATION_SERVICES parameter in the sqlnet.ora file contains nts.

  3. Use Oracle Net Configuration Assistant to configure a network connection from your client computer to the Windows NT server on which your Oracle9i database is installed. See Oracle9i Net Services Administrator's Guide for instructions.

  4. Start SQL*Plus:

    C:\> SQLPLUS / NOLOG
    
  5. Connect to your Windows NT server:

    SQL> CONNECT /@connect_identifier
    

    where connect_identifier is the net service name for the Oracle9i database.

    The Oracle9i database searches the data dictionary for an automatic login username corresponding to the Windows NT local or domain username, verifies it, and enables connection as xyzfrank or xyzsales\frank.

  6. Verify that you have connected to the Oracle9i database as local or domain user frank by viewing the roles assigned in step 5 of "Task 2: Perform Authentication Tasks on the Client Computer".

    SQL> SELECT * FROM USER_ROLE_PRIVS;
    

    which outputs for local user frank:

    USERNAME                       GRANTED_ROLE                   ADM DEF OS_
    ------------------------------ ------------------------------ --- --- ---
    XYZFRANK                       CONNECT                        NO  YES NO 
    XYZFRANK                       RESOURCE                       NO  YES NO 
    2 rows selected.
    

    or, for domain user frank:

    USERNAME                       GRANTED_ROLE                   ADM DEF OS_
    ------------------------------ ------------------------------ --- --- ---
    XYZSALES\FRANK                 CONNECT                        NO  YES NO 
    XYZSALES\FRANK                 RESOURCE                       NO  YES NO 
    2 rows selected.
    

    As the Oracle9i username is the whole name xyzfrank or xyzsales\frank, all objects created by xyzfrank or xyzsales\frank (that is, tables, views, indexes, and so on) are prefixed by this name. For another user to reference the table shark owned by xyzfrank, for example, the user must enter:

    SQL> SELECT * FROM xyzfrank.shark 
    

    Note:

    Automatic authorization is supported for all Oracle Net protocols.  

Granting Administrator and Operator Privileges for Databases

This section describes how to enable Windows NT to grant the database administrator (SYSDBA) and database operator (SYSOPER) privileges to database administrators. This enables database administrators to issue the following commands from a client computer and connect to the Oracle9i database without entering a password:

To enable this feature, the Windows NT local or domain username of the client must belong to one of the following four Windows NT local groups on the server. See Table 2-3.

Table 2-3 Windows NT Local Groups

Local Group  This Local Group Includes All... 

ORA_OPER 

SYSOPER database privileges; applicable for all databases on a computer. 

ORA_DBA Foot 1 

SYSDBA database privileges; applicable for all databases on a computer. 

ORA_SID_DBA 

SYSDBA database privileges; applicable only for a single database on a computer (identified by the SID). 

ORA_SID_OPER 

SYSOPER database privileges; applicable only for a single database on a computer (identified by the SID). 

1 ORA_DBA is automatically created during installation. See section "Automatically Enabling Operating System Authentication During Installation" for information.

The SYSOPER and SYSDBA privileges are mapped to the following Windows NT local groups. See Table 2-4.

Table 2-4 SYSOPER and SYSDBA Privileges

This Privilege...  Maps to the Local Group... 

SYSOPER 

ORA_SID_OPER, ORA_OPER 

SYSDBA 

ORA_SID_DBA, ORA_DBA, ORA_SID_OPER, ORA_OPER 

Follow these steps to connect as SYSOPER or SYSDBA without a password:

Task 1: Perform Authentication Tasks on the Oracle9i Database Server

To perform authentication tasks on the Oracle9i database server:

  1. Open User Manager on the Windows NT server where your Oracle9i database is installed.

  2. Choose New Local Group from the User Menu.

    The New Local Group dialog box appears.

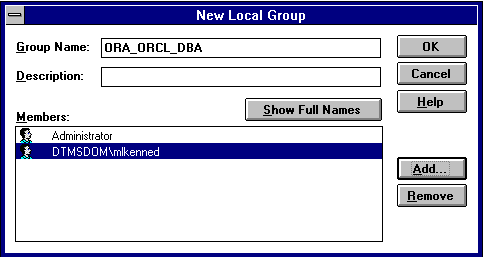
  3. Enter the appropriate Windows NT local group name in the Group Name field. For this example, the SID entered is ORCL.


    Text description of osauth1.gif follows.
    Text description of the illustration osauth1.gif

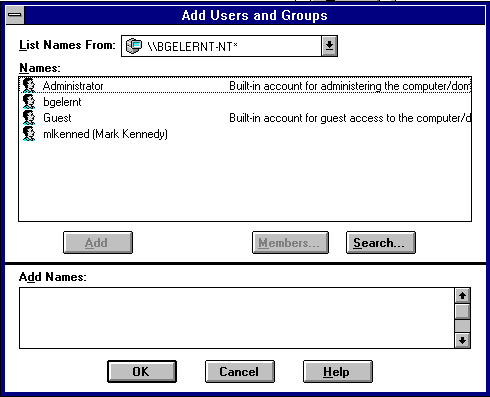
  4. Choose Add.

    The Add Users and Groups dialog box appears:

    Text description of osauth3.gif follows.
    Text description of the illustration osauth3.gif
  5. Select an appropriate Windows NT user from the Names field and choose Add.

  6. Choose OK.

    Your selection is added to the Members field of the New Local Group dialog box:

    Text description of osauth2.gif follows.
    Text description of the illustration osauth2.gif
  7. Choose OK.

  8. Exit User Manager.

  9. Ensure that the SQLNET.AUTHENTICATION_SERVICES parameter in the sqlnet.ora file contains nts.

  10. Start the registry edit from the command prompt: C:\>regedt32

  11. Go to HKEY_LOCAL_MACHINE\SOFTWARE\ORACLE\HOMEID.

  12. Set the parameter OSAUTH_PREFIX_DOMAIN to true where ID is the Oracle home that you want to edit.

Task 2: Perform Authentication Tasks on the Client Computer

To perform authentication tasks on the client computer:

  1. Create a Windows NT local or domain username with the same username and password that exist on the Windows NT server (if the appropriate username does not currently exist).

  2. Ensure that the SQLNET.AUTHENTICATION_SERVICES parameter in the sqlnet.ora file contains nts.

  3. Use Oracle Net Configuration Assistant to configure a network connection from your client computer to the Windows NT server on which your Oracle9i database is installed. See Oracle9i Net Services Administrator's Guide for instructions.

  4. Start SQL*Plus:

    C:\> sqlplus
    
  5. Connect to the Oracle9i database:

    SQL> SET INSTANCE net_service_name
    

    where net_service_name is the Oracle Net network service name for the Oracle9i database.

  6. Connect as SYSOPER or SYSDBA based on the local group you specified in step 3 of "Task 1: Perform Authentication Tasks on the Oracle9i Database Server":

    If The Local Group Is...  Then Enter... 

    ORA_DBA or ORA_SID_DBA 

    SQL> CONNECT / AS SYSOPER 


    or 


    SQL> CONNECT / AS SYSDBA 

    ORA_OPER or ORA_SID_OPER 

    SQL> CONNECT / AS SYSOPER 

    You are connected to the Windows NT server. If you connect with SYSDBA, you are given DBA privileges.

Creating an External Role

This section describes how to grant Oracle9i database roles to users directly through Windows NT (known as external roles). When you use Windows NT to authenticate users, Windows NT local groups can grant these users external roles. Through User Manager, you can create, grant, or revoke external roles to users.

All privileges for these roles are active when the user connects. When using external roles, all roles are granted and managed through the operating system. You cannot use both external roles and Oracle roles at the same time. For example see Table 2-5:

Table 2-5 External Roles and Oracle Roles
If You...  Then... 
  1. Enable external roles.


  1. Log onto a Windows NT domain with your domain username; for example, sales\frank, where sales is the domain name and frank is the domain username.

 
  1. Connect to the Oracle9i database as Oracle database user scott.


You only receive the roles granted to sales\frank, and not the roles granted to scott

Follow the subsequent tasks to grant external roles with Windows NT:

Task 1: Perform Authentication Tasks on the Oracle9i Database Server

To perform authentication tasks on the Oracle9i database server:

  1. Add the OS_ROLES initialization parameter to the init.ora file.

  2. Set OS_ROLES to true.

    The default setting for this parameter is false.

  3. Ensure that the SQLNET.AUTHENTICATION_SERVICES parameter in the sqlnet.ora file contains nts.

  4. Start SQL*Plus:

    C:\> SQLPLUS / NOLOG
    
  5. Connect to your Windows NT server:

    SQL> CONNECT / AS SYSDBA
    
  6. Create a new database role:

    SQL> CREATE ROLE DBSALES3 IDENTIFIED EXTERNALLY;
    

    where DBSALES3 is the name of the role for these steps. Substitute a role name appropriate to your database environment.

  7. Grant Oracle roles to DBSALES3 that are appropriate to your database environment:

    SQL> GRANT DBA TO DBSALES3 WITH ADMIN OPTION;
    SQL> GRANT RESOURCE TO DBSALES3 WITH ADMIN OPTION;
    SQL> GRANT CONNECT TO DBSALES3 WITH ADMIN OPTION;
    
  8. Connect to the database with the SYSDBA name:

    SQL> CONNECT / AS SYSDBA
    
  9. Shut down the database:

    SQL> SHUTDOWN
    
  10. Restart the database:

    SQL> STARTUP
    
  11. Open the Windows NT User Manager.

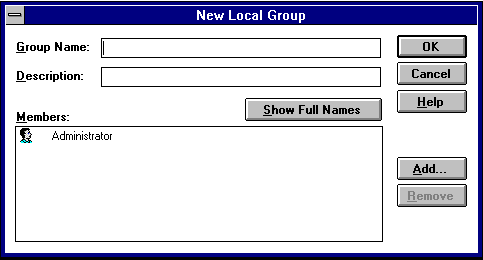
  12. Choose New Local Group from the User menu.

    The New Local Group dialog box appears:

    Text description of osauth4.gif follows.
    Text description of the illustration osauth4.gif
  13. Enter the Windows NT local group name corresponding to the database role in the Group Name field with the following syntax:

    ORA_sid_rolename [_D] [_A] 
    

    where:

    sid

    Indicates the database instance.

    rolename

    Identifies the database role granted to users of a database session.

    D

    Optional character indicating that this database role is to be the default role of the database user. If specified, this character must be preceded by an underscore.

    A

    Optional character indicating that this database role includes the ADMIN OPTION. This enables the user to grant the role to other roles only. If specified, this character must be preceded by an underscore.

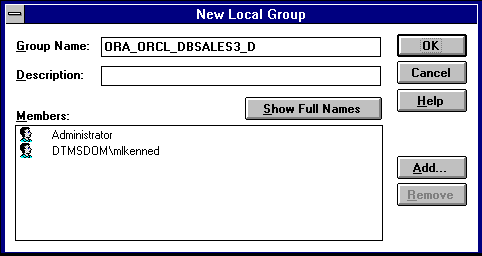
    For this example, ORA_orcl_dbsales3_D is entered.

  14. Choose Add.

    The Add Users and Groups dialog box appears:


    Text description of osauth3.gif follows.
    Text description of the illustration osauth3.gif
  15. Select the appropriate Windows NT local or domain username and choose Add.

  16. Choose OK.

    Your selection is added to the Members field of the New Local Group dialog box:

    Text description of osauth5.gif follows.
    Text description of the illustration osauth5.gif

    You can convert additional database roles to several possible Windows NT groups, as shown in the following table. Then, users connecting to the ORCL instance in this example and authenticated by Windows NT as members of these Windows NT local groups have the privileges associated with dbsales3 and dbsales4 by default (because of the _D option). DBSALES1 and dbsales2 are available for use by the user if they first connect as members of dbsales3 or dbsales4 and use the SET ROLE command. If a user tries to connect with dbsales1 or dbsales2 without first connecting with a default role, they are unable to connect. Additionally, users can grant dbsales2 and dbsales4 to other roles.

    Database Roles  Windows NT Groups 

    dbsales1 

    ORA_ORCL_dbsales1 

    dbsales2 

    ORA_ORCL_dbsales2_a 

    dbsales3 

    ORA_ORCL_dbsales3_d 

    dbsales4 

    ORA_ORCL_dbsales4_da 


    Note:

    When the Oracle9i database converts the group name to a role name, it changes the name to uppercase. 


  17. Choose OK.

  18. Exit User Manager.

Task 2: Perform Authentication Tasks on the Client Computer

To perform authentication tasks on the client computer:

  1. Create a Windows NT local or domain username with the same username and password that exist on the Windows NT server (if the appropriate username does not currently exist).

  2. Ensure that the SQLNET.AUTHENTICATION_SERVICES parameter in the sqlnet.ora file contains nts.

  3. Use Oracle Net Configuration Assistant to configure a network connection from your client computer to your Oracle9i database. See Oracle9i Net Services Administrator's Guide for instructions.

  4. Start SQL*Plus:

    C:\> SQLPLUS / NOLOG
    
  5. Connect to the correct instance:

    SQL> SET INSTANCE connect_identifier
    

    where connect_identifier is the net service name for the Oracle9i database that you created in Step 3.

  6. Connect to the Oracle9i database:

    SQL> CONNECT scott/tiger AS SYSDBA
    

    You are connected to the Windows NT server over net service with the Oracle username scott/tiger. The roles applied to the Oracle username scott consist of all roles defined for the Windows NT username that were mapped to the database roles above (in this case, ORA_DBSALES3_D). All roles available under an authenticated connection are determined by the Windows NT username and the Oracle-specific Windows NT local groups to which the user belongs (for example, ORA_SID_DBSALES1 or ORA_SID_DBSALES4_DA).

    Note:

    OSDBA and OSOPER are the generic names for the two special operating system groups that control database administrator logins when using operating system authentication. On Windows NT, OSDBA and OSOPER are mapped to local groups in User Manager. The Windows NT-specific names for OSDBA and OSOPER are described in "Granting Administrator and Operator Privileges for Databases". See Oracle9i Database Administrator's Guide for more information on OSDBA and OSOPER. 


Go to previous page Go to next page
Oracle
Copyright © 1996-2001, Oracle Corporation.

All Rights Reserved.
Go To Documentation Library
Home
Go To Product List
Book List
Go To Table Of Contents
Contents
Go To Index
Index

Master Index

Feedback