5
Disaster Recovery
This chapter provides information on how to recover from different types of system disasters on your LSM Server computer. It stresses the importance of preparing for a disaster. If you back up your Oracle data regularly and implement the planning procedures outlined in this chapter, you will be well prepared to recover from a disaster.
This chapter contains these topics:
Types of Disaster
For the purpose of this guide, a disaster is any situation in which the day-to-day access to data (for example, working files, software programs, or system files) is disrupted. A disaster can also damage network components such as data, devices, hardware, media, and software.
A disaster can be the result of any one or a combination of the following:
- Computer viruses that can destroy data
- Hardware and software failures
- Infrastructure interruptions, inconsistencies, or loss of services such as communication or network connections
The degree of loss during a disaster can range from one or more files lost when a disk crashes to an entire computer system. The degree of severity of the disaster determines the procedures you might need to perform to recover data on your computer.
In your disaster recovery plan, you should consider how to recover from the following types of disasters on your LSM Server:
- Figure 5-1 illustrates how the operating system and LSM software can be damaged or destroyed. In this example, the LSM Server computer has several physical disks. A power outage has corrupted the file system on Disk 0, and the operating system and LSM software residing on Disk 0 has been lost. To recover from the disaster, you need to replace the disk, reinstall the operating system and LSM software, and use LSM to recover the lost server configuration and any data that was lost when the file system was corrupted.
Figure 5-1 Damaged Disk Containing Operating System and LSM Software
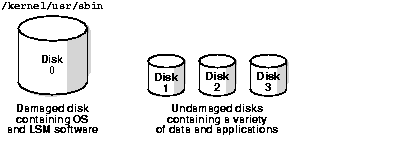
Text description of the illustration legad006.gif
Note:
In a situation where the primary disk containing both the operating system and the LSM binaries has been destroyed, you must always reinstall the operating system, reinstall LSM, and then use LSM to recover the remainder of your data. You cannot recover data backed up by LSM without reinstalling the operating system and LSM software first.
|
- Figure 5-2 shows how the directory containing the LSM online indexes and resource configuration files can be damaged or destroyed. In this example, a disaster has corrupted the disk on the LSM Server computer that contains the LSM indexes and configuration files. To recover from a disaster of this type, you need to recover the contents of the bootstrap save set.
Figure 5-2 Damaged Disk Containing LSM Indexes
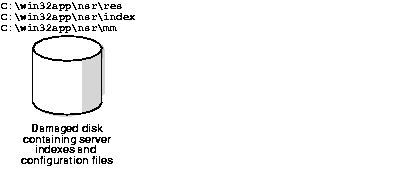
Text description of the illustration legad007.gif
- Figure 5-3 illustrates how Oracle data can be damaged or destroyed. In this example, an LSM Server computer has two disks. The second disk containing the Oracle data has been destroyed by a severe disk problem. However, the disk containing the operating system and LSM software is still operational. To recover from this situation, you can use the Oracle backup/restore utility, RMAN.
Figure 5-3 Damaged Disk Containing Oracle Data
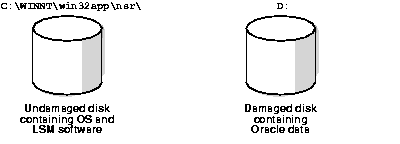
Text description of the illustration legad008.gif
- In the example in Figure 5-4, the LSM Server computer is destroyed. To recover from this disaster, you need to recover all the data to a new system by the same name.
Figure 5-4 Destroyed LSM Server
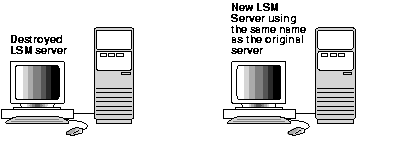
Text description of the illustration legad009.gif
Disaster Preparation
It is important to develop a plan for recovering from different types of disasters on the LSM Server computer. You need to back up important data on the LSM Server computer on a regular basis. You also need to develop and test a plan for recovering your data should you experience a severe disk problem or loss of data. The more time and effort you invest in developing and testing your backup strategy and disaster recovery plan, the better prepared you will be in the event of a disaster.
Note:
Be sure to back up the Oracle data on the LSM Server computer regularly using LSM. Also, be sure to back up the other data on the LSM Server computer regularly using a suitable backup method.
|
The section "LSM Server Bootstrap Backups" describes how the LSM Server is preconfigured to perform an automatic daily bootstrap backup. The bootstrap is a special backup save set that includes the LSM Server index, media index, and resource database. You can also perform a manual bootstrap backup by using the procedure in "Manual Bootstrap Backup" .
The bootstrap information printed at the end of every bootstrap backup is essential for recovering LSM Server indexes and resource configuration files. As explained in "Maintaining Bootstrap Information" , you should keep the bootstrap printout in a safe place, ready for use during a disaster recovery.
If you do not keep the bootstrap printout, you will need to determine the save set ID of the most recent bootstrap. For more information on determining the bootstrap save set ID and using the bootstrap information, see "How to Recover an LSM Server".
To prepare for disaster recovery, it is important to provide suitable access to the key information about the LSM Server computer. You should maintain this key information in an onsite location that is the least resistant to disaster. The information should be easily accessible by those assigned to perform disaster recovery. You should also enact strict guidelines regarding the access, maintenance, and usage of this key information.
Gathering the Key Information
You should maintain accurate records for each hardware, software, network, device, and media component related to the LSM Server computer.
Computer Hardware Information
The following information regarding computer hardware must be maintained and kept up-to-date:
- File system configuration
- Fully qualified Domain Names, IP addresses, and hostnames
- For Domain Name Service (DNS) clients, maintain the DNS host's internet address and its hostname
- Hard drive configuration information
- Media device names
- Hardware vendor contact information and contract number
- Configuration information for each piece of hardware, both active and inactive
Computer Software Information
The following information regarding computer software must be maintained and kept up-to-date:
- Copies of the original operating system and software media and patches, including the original LSM software media (and where they are located)
- Software enabler and authorization codes
- Software vendor contact information and contract number
- The operating system version and patches installed
- Operating system configuration information
- Emergency media that can be used to restore the computer in the event of a disaster
- LSM Server bootstrap information
- Kernel configuration and location information
- Device drivers
Disaster Recovery
This section describes how to perform a disaster recovery on an LSM Server computer running Windows. The information provided is designed to give you general principles on how to recover critical data and to help you understand the disaster recovery procedures. Refer to the following list of disaster recovery scenarios to determine which set of instructions apply to your situation.
Note:
To recover data other than Oracle data on the LSM Server computer, use the recovery method that corresponds to the method used to back up that data. Note that you can use LSM to restore only Oracle data that was backed up by LSM.
|
Table 5-1 Sections Containing Disaster Recovery Information
How to Replace a Hard Drive
To replace a hard drive:
- Obtain the hard drive information.
- Replace the hard drive.
Obtaining the Hard Drive Information
On Windows 2000, go to Start>Programs>Administrative Tools>Computer Management>Storage>Disk Management. On Windows NT, use the Windows NT Disk Administrator. Obtain the following information about each drive:
- Size of the drive
- Size, file system type, and volume label assigned to each disk partition
Note: Though it will not affect LSM operation, you may also want to note any use of mirroring, RAID/striping, compression, and volume sets.
After you obtain the hard drive information, you can replace the hard drive.
Replacing a Hard Drive
To replace a hard drive, follow these steps:
- Install a new drive that is the same size or larger. This will ensure that you can recover all of the drive's data.
- Use the BIOS Setup program to:
- Configure the drive.
- Set the start sequence.
Refer to the vendor documentation for instructions on how to use the BIOS Setup program.
If you have a SCSI, RAID, or other controller type, refer to the corresponding documentation to complete the configuration of the drive.
- If the operating system was on the failed drive that you are replacing, install the operating system on the new drive. For example, on Windows NT, load the Windows NT system disk into drive A and restart the computer.
If the operating system is still intact, restart the computer and open Disk Administrator.
- Depending on whether the operating system is functional, use SETUP or Disk Administrator to partition the drive.
Partition the new drive exactly like the old drive, using the same:
- Volume name(s).
- Partition size(s) or larger.
- File system type for each partition, for example NTFS, FAT.
- Format the drive.
- If the original drive was compressed, compress the new hard drive or ensure that the new partition is large enough to store uncompressed data.
- Verify the drive partition information.
- Verify the integrity of the hard drive, using the
chkdsk command on Windows 2000 or the scandisk command on Windows NT.
The drive should now be ready for recovery.
To begin the recovery process, recover:
How to Recover the Operating System
To recover the operating system:
- Meet the operating system recovery requirements.
- Recover the operating system.
Operating System Recovery Requirements
To recover the operating system, you need the following information:
- Version, service pack, and patch level of the operating system
- Location of the operating system
- TCP/IP properties:
- Adapter type
- IP address
- Default gateway
- Subnet mask
- DNS server
- Windows server/workstation properties:
- Computer name
- Fully qualified domain name (also called the hostname)
- Administrator name and password
- Date/time properties
- Virtual memory settings
- Protocols installed
- See "DHCP and WINS Databases" for more information about requirements on Windows NT.
Once you have met these requirements, you can recover the operating system.
Recovering the Windows Operating System
This section describes how to recover the Windows 2000 or Windows NT operating system. You can use this process to recover the Windows operating system back to the original computer or to a different computer.
You can recover the operating system by performing either:
- A complete installation. In this case, you perform a complete installation and configuration of the operating system.
-- or --
- A partial installation. In this case, you install and configure only those files that enable the computer to communicate over the network. Then, you recover the remaining operating system and configuration files using a suitable recovery method.
To recover the operating system, follow these steps:
- Install the operating system.
- Test the operating system and configure the devices.
Step 1: Install the Operating System
To install the operating system:
- Install the same version, service pack, and patch level of the Windows operating system into its original location. Refer to the documentation accompanying the operating system for details.
If you want to upgrade the operating system, first recover the operating system as it was previous to the disaster, and then perform the upgrade.
- For Windows NT, install the computer as a workstation or server, not as a BDC (Backup Domain Controller) or PDC (Primary Domain Controller).
- Install the computer into a workgroup, not into a domain.
- Configure the TCP/IP properties as they were configured before, with the same hostname (domain name), IP address, default gateway, subnet mask, and DNS server. For example, in the hosts file on Windows 2000 (%SystemRoot%system32\drivers\etc\hosts), the computer name should appear directly after the fully qualified domain name, on the same line, as in the following example:
123.56.890.474 kingdome.seattle.washington.com kingdome
Note:
If you are recovering the operating system to a different computer, you must:
-- Use the same hostname for the new computer. If you do not use the same hostname, you will not be able to recover the LSM indexes associated with the original computer.
-- Assign the same TCP/IP address for the new computer; otherwise, the computer will be assigned a new host ID by LSM. If this computer does not have the same TCP/IP address as the original computer, you must reinstall and configure the LSM software on it. For details, see "How to Recover an LSM Server".
|
- Configure the Windows server/workstation properties as they were configured before the disaster. Be sure to use the same computer name, fully qualified domain name, administrator name, and password. (The fully qualified domain name for a computer named kingdome, for example, might be kingdome.seattle.washington.com.)
For example, on Windows 2000, perform the following steps:
- On the Desktop, right-click My Computer and select Properties on the context menu. The System Properties dialog box appears. (Another way to reach the System Properties dialog box is to select Start>Settings>Control Panel and click the System icon.)
- In the System Properties dialog box, select the Network Identification tab.
- In the Network Identification dialog box, click the Properties button.
- In the Identification Changes dialog box, click the More button.
- In the DNS Suffix and NetBIOS Computer Name dialog box, ensure that the field labeled "Primary DNS suffix of this computer" contains your domain name. If not, enter your domain name in this field.
- Configure the Localization Properties or Date/Time Properties as they were configured before the disaster.
- Restart the computer after installing the Windows operating system.
- Reset the Virtual Memory Settings as they were configured before, by selecting the appropriate options in the Control Panel:
- If you had any additional Windows components installed previously, install them before recovering the computer data.
- Restart the computer after the Service Pack is installed, to apply the new settings.
Step 2: Test the Operating System and Configure the Devices
To test the operating system and configure the devices:
- Configure any devices required by LSM.
Note:
On Windows 2000, you must disable RSM for each standalone storage device to be used by LSM.
|
- On Windows 2000, select Storage>Removable Storage>Physical Locations from the Computer Management console, then repeat the following steps for each device connected to your system to which LSM will have access:
- Under Physical Locations, right-click the device for which you want to disable RSM. Select Properties.
- In the General tab of the Properties dialog box, ensure that the Enable Library check box is not checked.
- Verify that the:
- Operating system is functioning properly.
- Network protocols are functioning properly. Test by running
ping.
- "Name to Address" resolution is correct. Test by running
nslookup using the fully qualified domain name of the LSM Server.
- Required devices are recognized by the operating system. If the devices are not recognized by the operating system, you might need to:
- Load the SCSI driver.
- Install the device driver software.
To complete the recovery process, recover:
After you have recovered the computer's data and rebooted the computer:
- If you want to use Active Desktop, install it.
- On Windows NT, if the computer is a Backup Domain Controller, synchronize it with the Primary Domain Controller.
- On Windows NT, if the computer is a Primary Domain Controller, synchronize it with the domain.
How to Recover an LSM Server
To recover an LSM server:
- Meet the LSM server requirements.
- Recover the LSM server.
LSM Server Requirements
To recover the LSM server, you need the following:
- Version and patch level of LSM
- Location of LSM
- LSM Server for Windows installation media
- Backup volumes containing the server bootstrap, which includes the following three items:
Once you have met these requirements, you can recover the LSM Server.
Recovering an LSM Server
This section describes how to recover an LSM Server. You can use the following process to recover the LSM Server back to the original computer or to a different computer.
To recover an LSM server, follow these steps:
- Install LSM.
- Configure LSM.
- Locate the LSM Server bootstrap save set ID.
- Recover the LSM Server bootstrap.
- Rename the LSM Server configuration files.
- Verify the LSM Server recovery.
Step 1: Install LSM
To install LSM:
- Install the same release of LSM into its original location. Refer to the Oracle Installation Guide for LSM installation instructions.
If you want to upgrade the LSM Server, first recover the server to its original state, and then perform the upgrade.
Note: By default, the configuration files are located in the directory C:\\nsr\res. You should only attempt to reuse these LSM configuration files if the LSM Server's hard drive had not crashed and you are upgrading or reinstalling LSM.
- Install any LSM patches that were installed prior to the disaster.
Step 2: Configure LSM
To configure the LSM Server:
- From the LSM Administrator GUI, check the settings in the Preferences tab of the LSM client resource. Verify that the computer's aliases are entered correctly. The settings might look something like the following:
aliases:kingdome
      kingdome.seattle.washington.com
- Configure the LSM device resource for each device to be used in the following section, "Step 3: Locate the Server's Bootstrap Save Set ID". For details on the device configuration, see "Configuring Storage Devices".
- The server's current file index path must be the same as when the disaster occurred. If you have relocated the server's file index path to a new location, reset it to the original path using the following procedure:
- Edit the Index Path attribute in the server's associated Client resource to the original path.
- Restart the LSM services. This will enable LSM to recognize that the index path has changed. For information on how to restart the LSM services, refer to "Step 5: Rename the LSM Server Configuration Files".
- Run
nsrck -c server-name from the directory containing the LSM binaries to create an empty file index into which the records can be recovered. By default, the LSM binaries are located in the directory C:\\nsr\bin.
Step 3: Locate the Server's Bootstrap Save Set ID
This section describes how to locate the save set ID for the LSM Server's latest bootstrap. The bootstrap contains the server's online file index, media index, and resource configuration files.
Use the following steps to locate the save set ID of the most recent bootstrap if you do not have this information:
- Insert the most recent backup tape used for the automatic daily bootstrap backups or for manual bootstrap backups into the appropriate device.
- At the command prompt, switch to the directory where the LSM binaries and executables are located. By default, these files are located in the directory C:\nsr\bin.
- Use the
scanner -B command to determine the save set ID of the most recent bootstrap on the tape. For example:
scanner -B \\.\Tape0
The scanner -B command displays the latest bootstrap save set information found on the backup volume, as in the following example:
scanner: scanning 8mm tape mars.006 on \\.\Tape0
scanner: Bootstrap 1148869870 12/11/99 6:29:58 mars.006, file 88
Step 4: Recover the LSM Server Bootstrap
This section describes how to recover the LSM bootstrap. By default, these files reside in the C:\\nsr and C:\\nsr\res directories, and can be recovered using the mmrecov command.
To recover the LSM bootstrap:
- Use the
mmrecov command to recover the LSM Server's bootstrap (online file index, media index, and configuration files).
The following information appears:
mmrecov: Using madrid.spain.com as server
Note:
The mmrecov command will overwrite the LSM Server's existing online file and media indexes.
|
- When the following message appears, enter the name of the device you are using for the recovery (this message only appears if the server has multiple devices configured and enabled):
What is the name of the device you plan on using [\\.\Tape]? \\.\Tape0
- When the following message appears, enter the save set ID for the latest bootstrap.
Enter the latest bootstrap save set ID: 20076
- When the following message appears, enter the file number to begin the recovery. If unknown, enter zero.
Enter starting file number (if known) [0]: 130
- When the following message appears, enter the first record number to begin the recovery. If unknown, enter zero.
Enter starting record number (if known) [0]: 0
- When the following message appears, insert the volume containing the associated save set ID into the backup device, for example:
Please insert the volume on which save set ID 20076 started into \\.\Tape0.
When you have done this, press <RETURN>:
- Once you have loaded the appropriate volume, the following message appears:
Scanning for save set 20076; this may take a while...
LSM then scans the volume for the appropriate save set. Once the save set has been located, LSM recovers it.
- Use the
nwadmin program to monitor the recovery of the server indexes and configuration files.
Note:
The server index might not be on the same volume as the media database and resource configuration files. If this is the case, LSM will prompt you if additional media is required.
|
Once the media database and resource configuration files have been recovered, mmrecov recovers the LSM Server index.
If you routinely move your LSM backup media to an offsite location for safekeeping and a subsequent file recover operation generates a mount request, the recover will wait until an operator satisfies the mount request. To avoid delays when recovering files, use the mminfo -mv command to list the media that is associated with the file you want to recover and retrieve the media from the offsite storage before starting the recover.
The LSM Server index is recovered when the following message appears:
The bootstrap entry in the online index for server_name has been
recovered.
Step 5: Rename the LSM Server Configuration Files
Because the configuration files cannot be reliably overwritten while LSM is running, mmrecov recovered the C:\nsr\res directory as C:\\nsr\res.R by default. In addition, mmrecov may have recovered another server's configuration file in this directory, so stopping and restarting the Legato services is recommended.
To rename the configuration files:
- In the Windows Control Panel, select the Services window. For each Legato service listed in the window, select and shut down the service, in the following order:
- NetWorker Power Monitor (on Windows 2000 only)
- NetWorker Backup and Recover Server
- NetWorker Remote Exec
- Rename the existing C:\\nsr\res directory to C:\\nsr\res.orig.
- Rename the recovered C:\\nsr\res.R directory to C:\\nsr\res.
- In the Windows Control Panel, select the Services window. For each Legato service listed in the window, select and start the service, in the following order:
- NetWorker Remote Exec
- NetWorker Backup and Recover Server
- NetWorker Power Monitor (on Windows 2000 only)
- After you verify that the LSM configurations are correct in the LSM Administrator GUI, remove the res.orig directory.
Step 6: Verify the LSM Server Recovery
To verify the LSM Server recovery:
- Perform a test Oracle backup or restore to make sure the LSM Server is fully recovered.
- Perform a test LSM Server bootstrap backup manually using the instructions in "Manual Bootstrap Backup".
DHCP and WINS Databases
If you are using Dynamic Host Configuration Protocol (DHCP) or Windows Internet Naming Service (WINS), it is recommended that you regularly dump these databases and back up the dumps using a suitable backup method.
Windows NT does not provide a programming interface for backup and restore of the DHCP database or the WINS database, but you can configure DHCP and WINS database dumps using DHCP Manager and WINS Manager. You can back up these database dumps as part of your routine file system backup operations and then restore the dumps if it ever becomes necessary. After restoring the dumps you can import them, again using DHCP Manager or WINS Manager.
To dump, back up, restore, and import the WINS and DHCP databases:
- To open the DHCP administrative interface, go to Start>Programs>Administrative Tools>DHCP Manager.
- To run DHCP dumps as necessary, configure the dumps from DHCP Manager. A default dump location is provided, but you can specify a different location. Make a note of the database dump location you choose.
- To open the WINS administrative interface, go to Start>Programs>Administrative Tools>WINS Manager.
- To run WINS dumps as necessary, configure the dumps from WINS Manager. A default dump location is provided, but you can specify a different location. Make a note of the database dump location you choose.
- As part of your routine file system backups, specify the backup set(s) including the file system locations you specified for the DHCP and WINS databases dumps. You can then restore a dump whenever it becomes necessary.
- To recover a DHCP or WINS database, open DHCP Manager or WINS manager and import the database that was backed up and restored.
How to Restore Oracle Data
This section describes how to recover from a severe disk problem in which one or more files of an Oracle database were damaged on your LSM Server computer.
The first sign of a disk severe disk problem will usually be an I/O error. Oracle will usually document the I/O error in the trace file and in the alert log.
If only one database file is affected, your database may have encountered a bad spot on the disk. This can be circumvented by reformatting the disk to make a new list of bad blocks. However, this can be time-consuming, so it is prudent to have a spare disk available to swap in while you reformat.
If several database files are affected, all on the same disk, you could have a disk controller problem or a disk head problem. A bad controller can be replaced, and data on the disk will often be in perfect shape. But after a head crash, you will need to use that spare disk as a replacement.
Keep an extra disk on hand as a "hot spare," in case a disk failure occurs. Format it and verify that it works. If a disk failure does occur, it is much faster to swap in a spare disk than it is to rename database files and update the control file accordingly.
After you have determined the Oracle data that must be recovered, you must first restore the relevant files.
You can restore and recover the Oracle database files by using one of these programs:
- RMAN command-line interface
- OEM Backup Management Tools
For complete details on how to restore Oracle database files using LSM, see Chapter 4, "Backup and Restore Operations".
To recover an Oracle9i database using Recovery Manager, please see Oracle9i Recovery Manager User's Guide.
