3
Building a Paper Report with Ref Cursors
Reports Builder enables you to easily manage your queries by use of ref cursors. By using a ref cursor, which is a PL/SQL cursor datatype, you can reference a cursor from within a PL/SQL query. For example, if you already have numerous queries built and you want to reuse those queries in your reports, you can simply use a ref cursor in your report data model to access those queries.
In this chapter, you will learn how to use Reports Builder's features for using ref cursors. To build this paper report, you will use the Data Model view to create a multi-query data model, and then use the Report Wizard to create the report layout. You will make fairly extensive manual refinements in the Data Model view.
About ref cursor queries
A ref cursor is a PL/SQL datatype that you can use in a query to fetch data. Each ref cursor query is associated with a PL/SQL function that returns a strongly typed ref cursor. The PL/SQL function must ensure that the ref cursor is opened and associated with a SELECT statement that has a SELECT list that matches the ref cursor type. You base a query on a ref cursor when you want to:
- more easily administer SQL
- avoid the use of lexical parameters in your reports
- share data sources with other applications
- increase control and security
- encapsulate logic within a subprogram
Furthermore, if you use a stored program unit to implement ref cursors, you receive the added benefits that go along with storing program units in the Oracle database.
The following figure shows that you create a report with the SELECT statement in the ref cursor query of the report. It also shows that you can store the SELECT statement in a package in the database. Then, from the report, you can call the package from the database allowing you to reuse the package in many reports.
Figure 3-1 Overview of the Ref Cursor Example
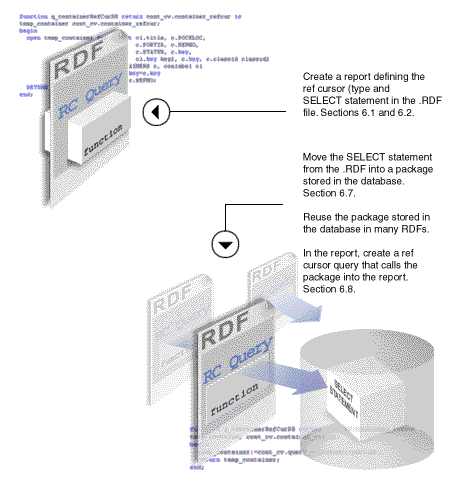
Text description of the illustration refcurs.gif
Example Scenario
In this example, you will create a detailed report showing information about employees and the job position they hold in each department.
Table 3-1 Features demonstrated in this Ref Cursor Example
3.1 Prerequisites for this example
To build the examples in this manual, you must have the example files we've provided. If you haven't already done so, you can download the files you'll need to complete this example from the Oracle Technology network and install them on your machine.
To download and install the example files:
- Go to the Oracle Technology Network Web site (http://otn.oracle.com/product/reports/).
- Click Getting Started with Oracle9i Reports.
- Click Index, then find the "Building a Paper Report with Ref Cursors" example.
- Download the file refcursor.zip into a temporary directory on your machine (e.g., "d:\temp").
- Unzip the contents of the file, maintaining the directory structure, into an examples directory on your machine (e.g.,
d:\orawin90\examples).
This zip file contains the following files:
Table 3-2 Files necessary for building this sample report using ref cursors
3.1.1 Access to the sample Human Resources schema
If you don't know if you have access to the sample Human Resources schema provided with the Oracle9i database, contact your database administrator.
3.2 Defining a ref cursor type
To create a ref cursor query, you first create a package spec that defines the ref cursor. Then you create a query that uses the ref cursor. The steps in this section will help you create package specs that define ref cursors.
To define a ref cursor type:
- Open Reports Builder. If the Welcome dialog box appears, click Build a new report manually and click OK. If not, choose File > New > Report. Click Build a new report manually, and click OK.
- In the Object Navigator, click the Program Units node under your UNTITLED report node.
- Click the Create icon in the Object Navigator toolbar to add a program unit.
- In the New Program Unit dialog box, type
concl_cv as the name of the program unit.
- Click Package Spec, then click OK.
- Type the following package spec definition in the editor (existing text is in bold):
PACKAGE concl_cv IS
    type conclass_rec is RECORD
       (EMPLOYEE_ID NUMBER(6),
     FIRST_NAME VARCHAR2(20),
     LAST_NAME VARCHAR2(25),
     EMAIL VARCHAR2(25),
     PHONE_NUMBER (VARCHAR2(20),
     HIRE_DATE DATE,
     JOB_ID VARCHAR2(10),
     SALARY NUMBER(8,2)
     DEPARTMENT_ID NUMBER(4);
    type conclass_refcur is REF CURSOR return conclass_rec;
END;
This package spec does two things:
- Click Compile.
- If any compilation errors occur, check the code for syntax errors and recompile as needed.
- Click Close.
- Repeat steps 2 through 8 to create two more package specs with the following characteristics (existing text is in bold):
- Package Spec Name: cont_cv
PACKAGE cont_cv IS
    type container_rec is RECORD
       (EMPLOYEE_ID NUMBER(6),
        START_DATE DATE,
        END_DATE DATE,
        JOB_ID VARCHAR2(10),
        DEPARTMENT_ID NUMBER(4));
    type container_refcur is REF CURSOR return container_rec;
END;
3.3 Creating a ref cursor query
After creating package specs that define the ref cursors, you are ready to define the queries, as described in this section.
To create a ref cursor query:
- In the Object Navigator, double-click the Data Model node to go to the Data Model view.
- Click the PL/SQL icon.
- Click in the main area (canvas region) of the Data Model view.
- Drag your mouse in the canvas region to display the Program Unit Editor.
- In the Program Unit Editor, type in the bold code that follows to define the function. New code is displayed in bold:
function
q_portdescRefCurDS return port_cv.portdesc_refcur istemp_portdesc port_cv.portdesc_refcur;begin open temp_portdesc for select department_id, department_name from departments; return temp_portdesc;end;
Note:
You can open the file Examples/RefCursor/scripts/refcursor_code.txt to copy and paste the code into Reports Builder.
|
Click Compile.
If any compilation errors occur, check the code for syntax errors and recompile as needed.
Click Close. The data objects display in the Data Model view.
In the Data Model view, click the ref cursor query object (QR_1), then choose Tools > Property Inspector.
Under the General Information node, change the Name property to q_portdesc.
|
Tip:
It is usually a good idea to give objects meaningful names, particularly when building a report with many objects. Later when building the layout, it is helpful to have queries and groups with meaningful names.
|
Press ENTER or RETURN, or click any other field in the Property Inspector to accept the change.
Close the Property Inspector.
Repeat steps 2 through 11 to create two more queries with the following characteristics. Be sure to rename the queries using the Property Inspector after creating them. New code is displayed in bold:
- Query name: q_container
function q_containerRefCurDS return cont_cv.container_refcur is
temp_container cont_cv.container_refcur;
begin
    open temp_container for
     select employee_id,
         start_date
         end_date,
         job_id,
         department_id
      from job_history;
    return temp_container
		end;
The Data Model should look similar to the following figure:
Figure 3-2 Data Model with Three Queries
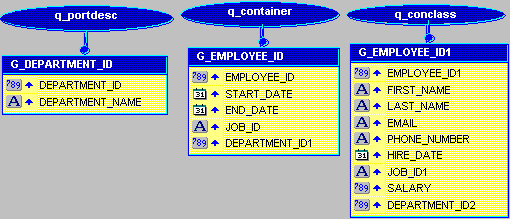
Text description of the illustration orbrref_62.gif
Save the report as ref_62_<your initials>.rdf.
Note:
You can open the file Examples/RefCursor/result/ref_emp62.rdf and display the Data Model to compare your results.
|
3.4 Refining the data model
In this section, you will rename some of the objects in the data model so that they have more meaningful names. You will also create a break group.
To refine the data model:
- In the Data Model view, drag the title bar of the group G_EMPLOYEE_ID down a few inches to move the entire group.
- Click and drag the column named JOB_ID out of and above G_EMPLOYEE_ID to create a new break group, as shown in the following figure:
Figure 3-3 Query with Group
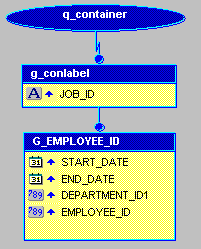
Text description of the illustration orbrref_gp.gif
Click the title bar of the new group that contains JOB_ID, and choose Tools > Property Inspector.
Under the General Information node, change the Name property to G_conlabel.
Press ENTER or RETURN, or click any other field in the Property Inspector to accept the change.
Close the Property Inspector.
In the Data Model view, your data model should look similar to the following figure:
Figure 3-4 Data Model with Group

Text description of the illustration orbrref_63.gif
Note:
You can open the file Examples/RefCursor/result/ref_emp63.rdf and display the Data Model to compare your results.
|
Save the report as ref_63_<yourinitials>.rdf.
3.5 Creating links between ref cursor queries
Currently, the queries that you have created are unrelated. To create relationships between them, you need to create group-to-group data links. The steps in this section will help you create the links.
To create links between ref cursor queries:
- In the Data Model view, click the Data Link icon.
- Click the title bar of G_DEPARTMENT_ID, and drag to the title bar of G_EMPLOYEE_ID.
- Double-click q_container. The Program Unit Editor displays.
- Now, you will append code to the WHERE clause of the SELECT statement to specify which columns are being used as primary and foreign keys.
After from job_history, add the following code:
where :department_id = department_id;
Be sure that the semicolon (;) now follows the WHERE clause.
Note that ::department_id is a bind variable referring to the DEPARTMENT_ID in G_DEPARTMENT_ID.
- Click Compile.
- If any compilation errors occur, check the code for syntax errors and recompile as needed.
- Click Close.
- Click the Data Link icon.
- Click the title bar of G_EMPLOYEE_ID and drag to the title bar of G_EMPLOYEE_ID1.
- Double-click q_conclass.
- Now you will add a WHERE clause to the SELECT statement. Insert your cursor between
FROM EMPLOYEES and the semicolon (;), and press ENTER or RETURN to create a new line.
- Add the following code:
where :employee_id = employee_id;
Be sure that the semicolon (;) now follows the WHERE clause.
Note that :employee_id is a bind variable referring to the EMPLOYEE_ID column in G_employee_id.
- Click Compile.
- If any compilation errors occur, check the code for syntax errors and recompile as needed.
- Click Close.
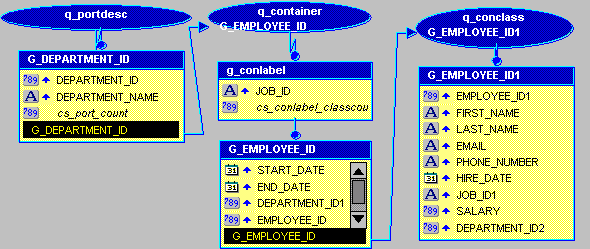
- Your data model should look similar to the following figure
Figure 3-5 Data Model with Links
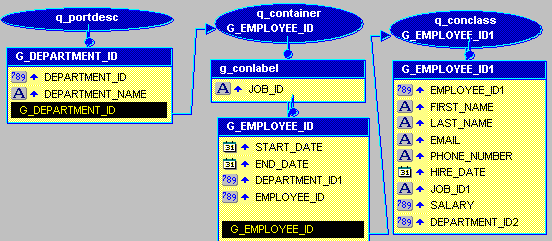
Text description of the illustration orbrref_64.gif
Note:
You can the file Examples/RefCursor/result/ref_emp64.rdf and display the Data Model to compare your results.
|
Save the report as ref_64_<your initials>.rdf.
3.6 Adding summary columns
Now that your queries are complete and linked, the steps in this section will help you to create columns to summarize the data.
To add summary columns:
- In the Data Model view, click the Summary Column icon.
- Click inside the G_EMPLOYEE_ID group. This creates a new column, CS_1.
- Double-click the newly created column to open the Property Inspector.
- Under the General Information node, change the Name property to
CS_classcount.
- Under the Summary node, change the following settings:
Table 3-3 Summary Column Settings
- Click any other field in the Property Inspector to accept the changes.
- Close the Property Inspector.
You have now created a summary that counts up the number of employees. You will not use the summary in this report's layout, but you will use it as the source for other, more interesting summaries later.
- Repeat steps 1 through 5 to create summaries with the following characteristics:
|
G_conlabel |
CS_conlabel_classcount |
Sum |
CS_classcount |
G_conlabel |
|
G_department |
CS_port_count |
Sum |
CS_conlabel_classcount |
G_DEPARTMENT_ID |
You may not understand these summaries now. Their purpose will become clearer when you create the report layout and preview the live data.
Your data model should look similar to the following figure:
Figure 3-6 Data model with Summary Columns
Text description of the illustration orbrref_65.gif
Note:
You can also compare your results to the file we've provided, called ref_emp65.rdf.
|
Save the report as ref_65_<your initials>.rdf.
3.7 Creating a layout
Now that you have a working data model, the steps in this section will help you to create a layout.
To create a paper layout:
- In the Object Navigator, right-click the report name and choose Report Wizard.
- On the Report Type page, select the Create Paper Layout Only radio button, then click Next.
- On the Style page, type
My Employees as the Title.
- Click Group Above as the report style.
- Click Next.
- On the Groups page, click G_conlabel and click Down.
- Repeat step 5 for:
- G_DEPARTMENT_ID
- G_EMPLOYEE_ID
- Click Next.
- On the Fields page, click DEPARTMENT_NAME, and click the right arrow.
- Repeat step 8 for:
- DEPARTMENT_NAME
- EMPLOYEE_ID
- START_DATE
- END_DATE
- JOB_ID
- CS_port_count
- Click Next.
- On the Labels page, type in the labels and widths as shown in the following table:
|
DEPARTMENT_NAME |
Department |
10 |
|
EMPLOYEE_ID |
Employee ID |
8 |
|
START_DATE |
Start Date |
9 |
|
END_DATE |
End Date |
9 |
|
JOB_ID |
Job ID |
10 |
|
CS_port_count |
Total: |
12 |
- Click Next.
- On the Template page, click Predefined template, and choose Cyan Grid Landscape.
- Click Finish. The report automatically displays in the Paper Design view.
Figure 3-7 Paper Design View of the Ref Cursor Report
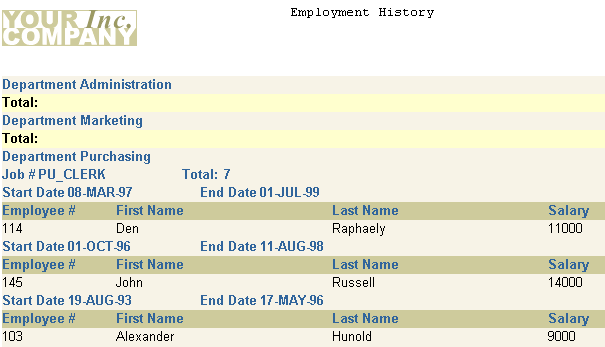
Text description of the illustration orbrref_66.gif
Note:
You can open the file Examples/RefCursor/result/ref_emp66.rdf and display the Paper Design view to compare your results.
|
Save the report as ref_66_<your initials>.rdf.
3.8 Moving the SELECT statement into a package
In your current report configuration, the SELECT statements used by the ref cursor queries reside within the report itself. In many cases, it is advantageous to have SELECT statements reside in the packages that define the ref cursor types. Then, you can simply reference the packages, rather than typing the same SELECT statement directly into every report that uses it. If you need to change the SELECT statement (for example, to modify or add clauses), you simply update it once in the package, rather than in every report that uses it.
The steps in this section will help you to move the SELECT statements to the packages that define the ref cursor types.
To move the SELECT statement into a package:
- In the Object Navigator, click the Program Units node for your report.
- Click the Create icon to add a program unit.
- In the New Program Unit dialog box, type cont_cv as the name of the program unit.
- Click Package Body, and click OK.
- Type the following code in the editor.
PACKAGE BODY cont_cv IS function query_container (p_department_id number) return container_ refcur is tempcv_container cont_cv.container_refcur; begin
open tempcv_container for
select employee_id,
start_date,
end_date,
ob_id,
department_id
from   job_history
where  :department_id=department_id;
return tempcv_container;
end; END;
Note:
You can open the file Examples/RefCursor/scripts/refcursor_code.txt to copy and paste the code into Reports Builder.
|
Click Compile.
If any compilation errors occur, check the code for syntax errors and recompile as needed.
Click Close.
Now that the function is defined, you must add it to the package spec so that it can be referenced. Other program units will know about the function in the package body only if it is described in the package spec.
In the Object Navigator, double-click the CONT_CV(Package Spec) object.
In the Program Unit editor, type the following line above the END; statement:
function query_container (p_department_id number) return container_refcur;
Click Close.
Choose Program > Compile > All.
Click OK when done.
In the Object Navigator, double-click the Q_CONTAINERREFCURDS object under the Program Units object.
Edit the code to look as follows:
function Q_containerRefCurDS return cont_cv.container_refcur is
    temp_container cont_cv.container_refcur;
begin
     temp_container:=cont_cv.query_container (:department_id);
       return temp_container;
end;
Click Compile.
If any compilation errors occur, check the code for syntax errors and recompile as needed.
Click Close.
Click the Paper Design icon to view the report in the Paper Design view.
Save the report as ref_67_<your initials>.rdf.
Optional Exercise:
Repeat steps 1 through 19 for the other two queries in the report.
3.9 Moving the packages into a library
If you have many reports that use these same ref cursor types and SELECT statements, you can move the program units that you created into a PL/SQL library stored in a file or the database, so that other reports can easily share the code. The steps in this section will help you to move the program units to a PL/SQL library.
To move the packages into a library:
- In the Object Navigator, click the PL/SQL Libraries object.
- Click the Create icon to add a new library.
- Choose File > Save As.
- Type DEPT_CONTAINER as the Library.
- Click File System.
- Click OK.
- Drag and drop the following program units from your report to the Program Units node under the newly created DEPT_CONTAINER library:
- CONCL_CV(Package Spec)
- CONT_CV(Package Spec)
- CONT_CV(Package Body)
- PORT_CV(Package Spec)
- Save DEPT_CONTAINER.
- If the Paper Design view is open, close it.
- In the Object Navigator, under the Program Units node of your report, delete CONCL_CV(Package Spec), CONT_CV(Package Spec), CONT_CV(Package Body), and PORT_CV(Package Spec).
Note:
If the Paper Design view is open when you delete the packages from the report, you may get some errors.
|
- Click the Attached Libraries node for your report.
- Click the Create icon to add a new attached library.
- In the Attach Library dialog box, click File System.
- Click Browse to find the DEPT_CONTAINER library. It will have a
.PLL file extension. After you have found and selected DEPT_CONTAINER, click Open.
- Click Attach.
- Choose Program > Compile > All.
- Click OK to close the Compile window.
- In the toolbar, click the Paper Design icon to view the report.
Note:
If you get an error when you attempt to view the report, repeat steps 16 through 18.
|
- Save the report as ref_68_<your initials>.rdf.
Optional Exercise:
Store the PL/SQL library in the database rather than in a file. Note that you will need "create" privileges on the database to complete this optional exercise.
3.10 Summary
Congratulations! You have finished the Ref Cursor Query sample report. You now know how to:
- Create package specs that define ref cursors.
- Create ref cursor queries.
- Create data links between ref cursor queries.
- Create summaries to describe data.
- Create a report layout.
- Move SELECT statements into packages.
- Move packages into a PL/SQL library.
For more information about using ref cursors, see the Reports Builder online help.
