Skip Headers

Oracle9i Reports Building Reports
Release 9.0

Part Number A92101-01
Go To Documentation Library
Home
Go To Product List
Solution Area
Go To Table Of Contents
Contents
Go To Index
Index

Go to previous page Go to next page

5
Building a Report with a Text Pluggable Data Source

Reports Builder enables you to use any data source you wish. In this chapter, you will learn how to use character-delimited text as a data source.

About Pluggable Data Sources

The information you must publish is often derived from data in various corporate data sources. These data sources may be SQL-based (relational databases) or non-SQL-based, such as XML, OLAP, and the like. Often, you must combine data from one or more of these data sources to publish meaningful information. For example, you may need to combine data that exists in a relational database with data from a multi-dimensional database to compare trends and performance.

Oracle9i Reports enables you to leverage capabilities, such as aggregation, summarization, formatting, and scheduling, on data from any data source. You can leverage the PDS (pluggable data source) architecture to connect to your own data source, as well as to the data sources available with Oracle9i Reports (XML, JDBC, text, and Express).

For more information on pluggable data sources, refer to the Reports Builder online help and the Javadoc documentation for the PDS APIs.

Example Scenario

Suppose you downloaded the US Census Bureau data in CSV (comma-separated values) format and want to generate a report. In this example, you will create a paper report that queries this data.

Table 5-1 Features demonstrated in this Text PDS example
Feature Location

Configure Reports Builder to recognize your text file as a pluggable data source.

Section 5.2, "Set up the textpds.conf file"

Use the Report Wizard to create an paper report based on the text data source.

Section 5.3, "Use the Report Wizard to create a report"

5.1 Prerequisites for this example

To build the examples in this manual, you must have the example files we've provided. If you haven't already done so, you can download the files you'll need to complete this example from the Oracle Technology network (http://otn.oracle.com/products/reports/) and install them on your machine.

To download and install the example files:

  1. Go to the Oracle Technology Network Web site (http://otn.oracle.com/product/reports/).

  2. Click Getting Started with Oracle9i Reports.

  3. Click Index, then find the "Building a Report Using a Text Pluggable Data Source" example.

  4. Download the file textpds.zip into a temporary directory on your machine (e.g., "d:\temp").

  5. Unzip the contents of the file, maintaining the directory structure, into an examples directory on your machine (e.g., d:\orawin90\examples).

    This zip file contains the following files:

    Table 5-2 Files necessary for building this Text PDS example
    File Description

    Examples\TextPDS\result\censusreport.rdf

    The finished RDF for your report.

    Examples\TextPDS\result\censusreport.pdf

    A PDF version of your finished report.

    Examples\TextPDS\scripts\census_csv.txt.

    The character-delimited data downloaded from the US Census Bureau Web site.

    Examples\TextPDS\scripts\config.txt

    Code for the TextPDS.conf file.

5.2 Set up the textpds.conf file

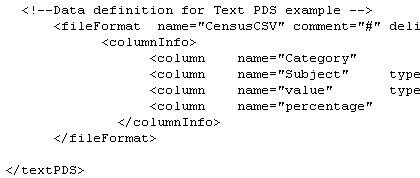
Before you can use a text file as your pluggable data source, you must set up the text PDS configuration file (textpds.conf) with the definition of the values in the text file. When you add this format information to the configuration file, Reports Builder can then recognize your entries as a valid format.


Note:

You must edit your configuration file before you launch Reports Builder in order for the changes to take effect.


To set up your textpds.conf:

  1. In a text editor, such as UltraEdit, open the file textpds.conf, located in the Reports_Home/reports/conf directory.


    Note:

    Reports_Home is where Reports Builder is installed on your computer.


  2. In another text editor window, open the config.txt file we've provided in the Examples/TextPDS/Scripts directory.

  3. Cut the text we've provided in config.txt and paste it into textpds.conf before the </textPDS> entry, so that the resulting textpds.conf file contains an entry like this:

Figure 5-1 Snapshot of the textpds.conf Entry

Text description of orbrtext_conf.gif follows.

Text description of the illustration orbrtext_conf.gif


Note:

This entry enables Reports Builder to recognize a text file as a PDS. When you choose your PDS in the Report Wizard, the text file displays as an option. Here, you also define the properties of each column in the file


  • Save the textpds.conf file.

    You have set up your textpds.conf file for the character-delimited text data source.

    5.3 Use the Report Wizard to create a report

    When you create a report, you can either use the Report Wizard to assist you or create the report yourself. To build the simple report in this example, you can use the Report Wizard.

    Before you use a text pluggable data source, you might want to examine the text file first to see what it looks like. You can open the census_csv.conf file in a text editor, like UltraEdit or WordPad, to see the data we'll be using in this example.

    To create a simple report:

    1. Now that you've updated the textpds.conf file, launch Reports Builder.

      Tip:

      If Reports Builder was already open when you modified the textpds.conf file, you should shut down Reports Builder and relaunch it.

    2. In the New Report dialog box, select the Use the Report Wizard radio button, then click OK.

    3. If the Welcome page displays, click Next.

    4. On the Report Type page, select the Create Paper Layout Only radio button, then click Next.

    5. On the Title page, type a title for your report, then select the Group Above radio button.

    6. Click Next.

    7. On the Data Source page, click Text Query, then click Next.

    8. On the Data Source Definition page, click Query Definition.

      If you get an error message and cannot display the Query Definition dialog box, check your configuration file (textpds.conf) to confirm the code you added.

    9. Under Data Definition, choose the CensusCSV format from the drop-down list.


      Note:

      The CensusCSV format displays in this list because you added it to the textpds.conf file.


    10. Under Data Source, click Browse to find the census_csv.txt file we provided in the Examples/TextPDS/Scripts directory.

      If you do not see the file listed in your directory, make sure you've selected TXT from the drop-down list.

    11. Select the file, then click Open.

    12. When the census_csv.txt file displays in the Location field, click OK.

      The data source definition displays in the text box.

    13. Click Next.

    14. On the Groups page, in the left-hand list, click CATEGORY, then click the right arrow to move the group to the Group Fields list.

    15. Click Next.

    16. On the Fields page, click the double right arrows to display all available fields.

    17. Click Next in the Report Wizard until you see the Templates page.

    18. On the Templates page, choose Beige, then click Finish.

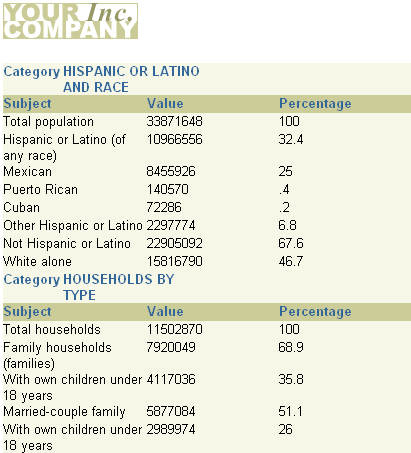
    The report displays in the Paper Design view, and should look something like this:

    Figure 5-2 Paper Design View of the Final Text PDS Example Report

    Text description of orbrtext_fin.gif follows.

    Text description of the illustration orbrtext_fin.gif

  • Save the report as censusreport_<your initials>.rdf.

    5.4 Summary

    Congratulations! You have successfully used a text pluggable data source for a paper report. You now know how to:

    For more information on using text as a data source, refer to Getting Started with Oracle9i Reports on the Oracle Technology Network (http://otn.oracle.com/products/reports/), or the Reports Builder online help, which you can access by choosing Help > Help Contents in Reports Builder.


  • Go to previous page Go to next page
    Oracle
    Copyright © 2002 Oracle Corporation.

    All Rights Reserved.
    Go To Documentation Library
    Home
    Go To Product List
    Solution Area
    Go To Table Of Contents
    Contents
    Go To Index
    Index