2
Configuring Oracle9i Warehouse Builder
After you install the products included on the CD for Oracle9i Developer Suite, you can access the following Warehouse Builder components from your Windows program group for Warehouse Builder:
- Oracle9i Warehouse Builder Client: Provides the graphical interface used to define the data warehouse.
- Oracle9i Warehouse Builder Repository Assistant: Enables you to create a Warehouse Builder repository in your database to store the definitions that describe your data warehouse.
- Oracle9i Warehouse Builder Runtime Assistant: Enables you to create the runtime objects in your database to store audit and error information captured when you run jobs to load and refresh the data warehouse.
- Oracle9i Warehouse Builder Runtime Audit Viewer: Enables you to view the the audit and error information captured when you load and refresh your data warehouse.
- Oracle9i Warehouse Builder Browser Assistant: Enables you to configure the Warehouse Builder Browser to view your metadata, run web reports, and perform lineage and impact analysis on your metadata.
- Oracle9i Warehouse Builder MDL File Upgrade Utility: Enables you to upgrade your metadata from a previous version of Warehouse Builder to Oracle9i Warehouse Builder.
This chapter provides instructions for configuring the Warehouse Builder repository, the Warehouse Builder runtime objects, and the Warehouse Builder Browser.
You must configure the Warehouse Builder repository before you can log into the Warehouse Builder client. You can configure the other components at any time.
Install the Warehouse Builder Repository
To log in to your Warehouse Builder client, you need to create a new Warehouse Builder repository within a schema in your database. The Warehouse Builder repository stores metadata definitions for all the objects created to populate your data warehouse. You use the Warehouse Builder Repository Assistant to create a new repository. To start the Warehouse Builder Repository Assistant, select Start, and then select Warehouse Builder Repository Assistant from the Warehouse Builder program group.
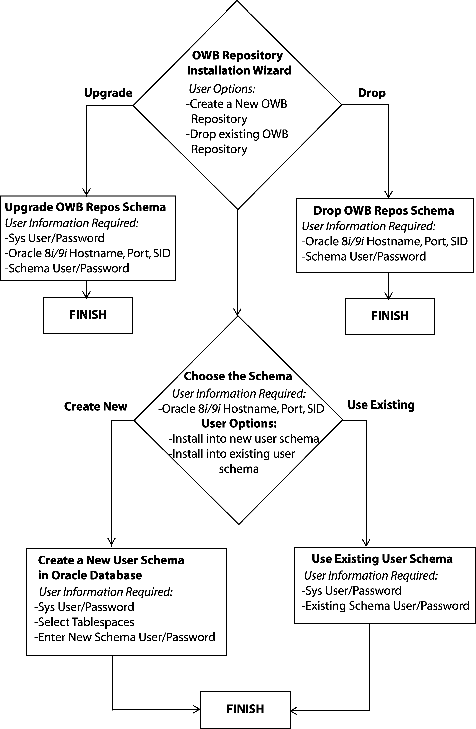
You can create the new repository in a new or existing schema. You can also use the assistant to drop an existing Warehouse Builder repository. The following chart provides an overview of the Warehouse Builder repository installation. Use this chart to gather all the information you require before installing the repository.
Warehouse Builder Repository Installation Wizard
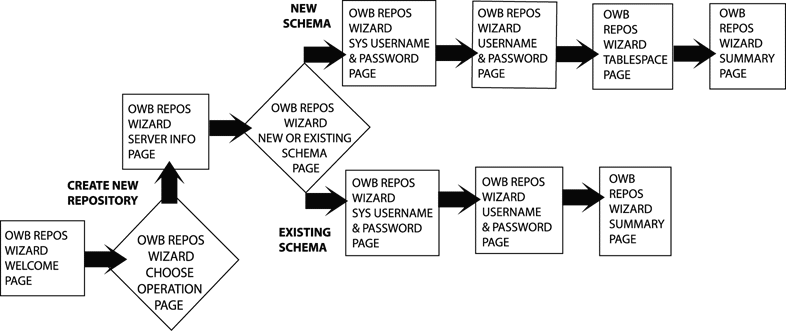
The following chart outlines the steps for a new Warehouse Builder repository installation.
If you want to drop an existing Warehouse Builder Repository from your system, refer to Chapter 5, "Deinstalling Warehouse Builder Components".
To install the Warehouse Builder Repository:
- Select Oracle9i Warehouse Builder Repository Assistant from the Warehouse Builder program group.
The Warehouse Builder Repository Assistant Welcome page displays.
- Review the installation steps and click Next.
The Choose Operation page displays.
- Choose Create a new Warehouse Builder Repository for a new installation.
- Click Next.
The Server Information page displays.
- Provide the connection information for the Warehouse Builder Repository.
- Host Name: Name of the machine where you want to install the Warehouse Builder Repository.
- Port Number: The TNS port number on your host machine (default: 1521).
- Oracle SID: Oracle database SID.
- Click Next.
The New or Existing Schema page displays.
- Choose whether you want to create a new schema or install the repository into an existing user schema. If you are creating a new schema, choose Create and Install into a new user schema. If you are installing into an existing schema, choose Install into existing user schema.
Note:
If the existing schema already contains Warehouse Builder repository objects, the installation will fail. You must first drop the existing objects, and then proceed with the installation.
|
If you already have repository objects from Warehouse Builder 3i, you must choose Upgrade Repository objects from the Choose Operation page to upgrade your repository objects to Oracle9i Warehouse Builder. This option is only valid if you are upgrading from Warehouse Builder 3i to Oracle9i Warehouse Builder. It is not valid for upgrading Warehouse Builder versions 2.x.
Click Next.
The System User Name and Password page displays.
Provide the password for the sys user.
Note:
You must use the sys account with SYSDBA privileges in order to access or create the Warehouse Builder Repository schema. The Warehouse Builder Repository user requires access to certain v_$ tables and these grants are made by the SYSDBA account when you create the repository.
|
To ensure that the SYSDBA privilege is granted to SYS, you must set your database parameter remote_login_parameterfile=EXCLUSIVE.
Click Next.
The User Name and Password page displays.
Specify the user name and password for the new schema. You use this information to login to your Warehouse Builder Repository.
If you are creating the Warehouse Builder Repository within an existing schema, provide the user name and password for that schema.
Note:
You can install new repository objects within an existing schema only if the schema contains no previous repository objects.
|
Click Next.
The Tablespace page displays.
Select the following tablespaces from the ones available in your repository database:
- Default tablespace for Repository data: Stores objects (such as tables) created by a user.
- Default tablespace for indexes: Stores the indexes for the repository.
- Temporary tablespace: Stores temporary segments required to perform large sorts.
Click Next.
The Summary page lists the new Warehouse Builder Repository setup information.
Review and click Finish to create the new Warehouse Builder Repository.
Install Warehouse Builder Runtime Objects
After you define your warehouse using Warehouse Builder, you need to create runtime objects for each schema in the physical instance where you want to deploy your data warehouse. The Warehouse Builder Runtime Assistant creates a new schema, or uses an existing one, within the target instance and initializes it with the Warehouse Builder runtime objects. Warehouse Builder runtime components use these objects to log audit and error information captured when you run jobs to load and refresh the target instance. The audit and error information can be viewed using the Warehouse Builder Runtime Audit Viewer or the Discoverer Runtime workbooks. For details, see the Oracle9i Warehouse Builder User's Guide.
Overview
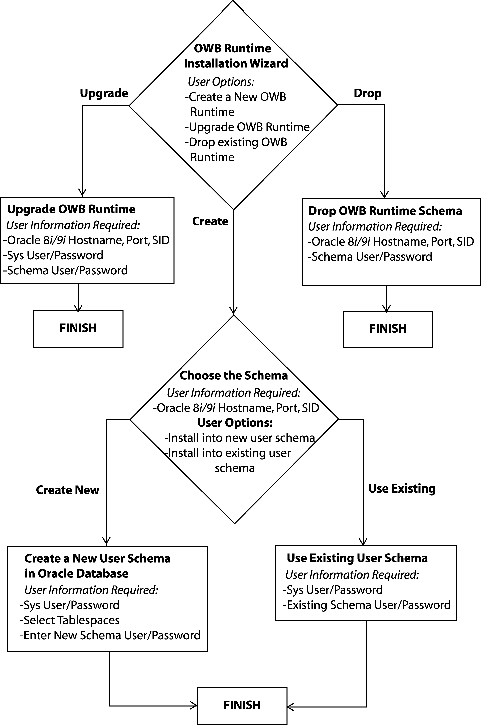
Use the Warehouse Builder Runtime Assistant to create new runtime objects or to drop existing ones. The following chart provides an overview of the installation. Use it to gather all the information you require before the installing the runtime objects.
Warehouse Builder Runtime Installation Wizard
You must run the Warehouse Builder Runtime Assistant to create runtime objects for each of your target warehouse schemas.
Note:
When you install Warehouse Builder Runtime, you must have a working Oracle 8.1.7 or 9i installation with Jserver installed and the java_pool_size parameter (in the init.ora file) set to at least 20MB.
|
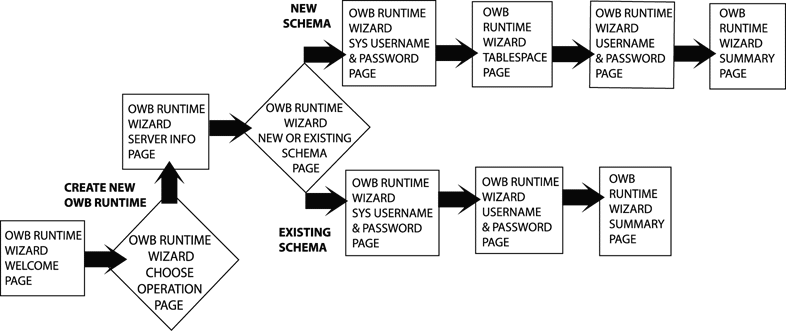
The following chart provides the steps for a new Warehouse Builder Runtime schema installation.
To install Warehouse Builder runtime objects:
- Select the Oracle9i Warehouse Builder Runtime Assistant from the Warehouse Builder program group.
The Warehouse Builder Runtime Assistant welcome page displays.
- Review the installation steps and click Next.
The Choose Operation page displays.
- Choose Install a new Warehouse Builder Runtime to create Warehouse Builder runtime objects within the target warehouse database.
If you already have runtime objects from a previous version of Warehouse Builder, you can either upgrade your Warehouse Builder runtime objects to the current version of Warehouse Builder or drop existing Warehouse Builder runtime objects.
- Click Next.
The Server Information page displays.
- Provide the connection information for the database where you are installing the Warehouse Builder runtime objects.
- Host Name: Name of the machine where you are installing the Warehouse Builder runtime objects.
- Port Number: The TNS port number on your host machine. Default: 1521.
- Oracle SID: Oracle database SID.
- Click Next.
The New or Existing Schema page displays.
- Specify whether you want to create and install the Warehouse Builder runtime objects into a new schema or an existing one.
- If you are creating a new schema, choose Create and Install into new user Schema.
- If you are installing into an existing schema, choose Install into existing user schema.
- Click Next.
The System User Name and Password page displays.
- Provide the password for the sys user.
Note:
You must use the sys account that has SYSDBA privileges in order to access or create the Warehouse Builder Runtime schema.
|
To ensure that the SYSDBA privilege is granted to SYS, you must set your database parameter remote_login_parameterfile=EXCLUSIVE.
- Click Next.
The User Name and Password page displays.
- Specify a user name and password for the new schema.
If you are installing runtime objects into an existing schema, provide the user name and password for that schema.
Note:
You can install new runtime objects within an existing schema only if the schema contains no existing Runtime objects.
|
- Click Next.
The Tablespace page displays.
- Select the following from the tablespaces available in your database:
- Default tablespace for Runtime data: Default tablespace that stores your runtime data.
- Default tablespace for indexes: Stores the indexes for the Warehouse Builder runtime data.
- Temporary tablespace: Stores temporary segments required to perform large sorts on runtime data.
- Click Next.
The Summary page lists the new Warehouse Builder runtime schema setup information.
- Click Finish to create the Warehouse Builder runtime objects.
Install the Warehouse Builder Browser
The Warehouse Builder Browser Assistant guides you through the installation of the Warehouse Builder Browser. You can use the Warehouse Builder Browser to view your metadata, run web reports, and perform lineage and impact analysis on your metadata. For more information on using the Warehouse Builder Browser, refer to the Oracle9i Warehouse Builder User's Guide.
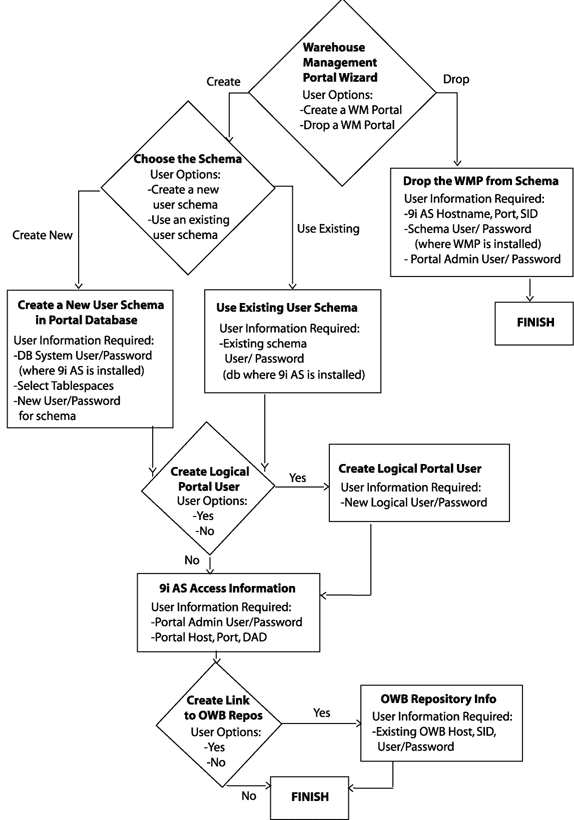
The following chart provides an overview of the Warehouse Builder Browser installation process. Use this diagram to gather all the information you require before performing the installation.
Warehouse Builder Browser Assistant
When you install Warehouse Builder Browser, make sure you have a working Oracle Portal installation.
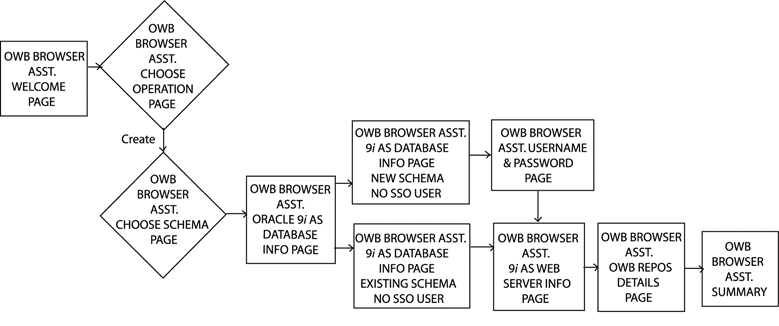
The following chart provides the steps for a new Warehouse Builder Browser Installation.
If you want to drop existing Warehouse Builder Browser objects from your schema, refer to Chapter 5, "Deinstalling Warehouse Builder Components" in this guide.
To install the Warehouse Builder Browser:
- Select Oracle9i Warehouse Builder Browser Assistant from the Warehouse Builder program group.
The Warehouse Builder Browser Assistant Welcome page displays.
- Review the installation steps and click Next.
The Choose Operation page displays.
From the Choose Operation page, you can choose to install the Warehouse Builder Browser or drop existing Warehouse Builder Browser objects (if you have previously performed the Warehouse Builder Browser installation).
- Choose Install the Warehouse Builder Browser and click Next.
The Choose Schema page displays.
If you are dropping existing Warehouse Builder Browser objects, select the Uninstall the Warehouse Builder Browser and skip to Chapter 5, "Deinstalling Warehouse Builder Components" to follow the instructions.
- Choose to create and install the Warehouse Builder Browser into a new schema or into an existing one.
- Click Next.
The Oracle9iAS Database Information page displays.
- Provide the following Oracle9iAS database connection information:
- Host Name: Name of the host machine where the Oracle9iAS database is installed. (For example, server8)
- Port Number: TNS port number of the machine where the Oracle9iAS database is installed. (For example, 1521)
- Oracle SID: The unique database identifier of the machine where the Oracle9iAS database is installed. (For example, dev817)
- Click Next.
Depending on your set of choices in Step 3, the installer displays different pages for this step.
- If you choose to install into a new user schema but not to create an SSO user, refer to Step 8a.
- If you choose to install into an existing schema and not to create an SSO user, refer to Step 8b.
- Depending on your set of choices in Step 4, the installer displays different pages for this step. Based upon your choice, refer to the correct instructions.
- If you chose to install Warehouse Builder Browser into a new user schema, provide the following Oracle9iAS database information:
- User Name: Admin user name of the system where the Oracle9iAS database is installed.
- Password: Admin password of the system where the Oracle9iAS database is installed.
- Oracle Portal Schema Name: Oracle Portal user name set during the Oracle9iAS install. This is the schema where you installed Oracle Portal. (Default: portal)
- Oracle Portal Schema Password: Oracle Portal password set during the Oracle9iAS installation. This is the schema where you installed Oracle Portal. (Default: portal)
Click Next to display the Enter Username and Password page (step 9).
- If you choose to install into an existing schema and not to create an SSO user at this time, provide the following Oracle9iAS database information:
- Oracle Portal Schema Name: Oracle Portal user name set during the Oracle9iAS installation. This is the schema where you installed Oracle Portal. (Default: portal)
- Oracle Portal Schema Password: Oracle Portal password set during the Oracle9iAS installation. This is the schema where you installed Oracle Portal. (Default: portal)
- OWB Browser Name: User name of the existing schema in the Oracle9iAS database where you want to install Warehouse Builder Browser.
- Password: Password of the existing schema in the Oracle9iAS database where you want to install Warehouse Builder Browser.
Click Next to display the Oracle9iAS Web Server Information page (step 11).
- If you are installing Warehouse Builder Browser in a new schema (Step 3), then in the Enter Username and Password page, choose the default tablespace and temporary tablespace for Warehouse Builder Browser objects.
Also enter the OWB Browser schema name and password to log into the new schema you are creating in the Oracle9iAS database. You are installing the Warehouse Builder Browser objects in this schema.
- Click Next.
The Oracle9iAS Web Server Information page displays.
- Provide the following information:
- Oracle Portal Host Name: Host name of the machine where Oracle Portal is installed.
- Web Server Listener Port: HTTP listener port number of the machine where the web server is installed.
- Oracle Portal DAD: Portal Database Access Descriptor set during Oracle Portal installation.
- Click Next.
The Warehouse Builder Repository Details page displays.
The Warehouse Builder Details page is an optional step that enables you to register your Warehouse Builder Repository with Warehouse Builder Browser. If you choose to do this later, select No to display the Summary page.
- If you choose to register a Warehouse Builder Repository, select Yes and provide the following information:
- OWB Repository User: User name to log in to your Warehouse Builder Repository.
- OWB Repository Password: Password to login to your Warehouse Builder Repository.
- Host Name: Name of the computer where your Warehouse Builder Repository is located.
- Port Number: Number of the TNS listener port of the database in which the Warehouse Builder Repository is located.
- Oracle SID: Unique database identifier of the computer where the Warehouse Builder Repository is located.
- Click Next.
The Summary page displays.
- Review the information and click Back if you want to revise any information.
- Click Finish to complete the Warehouse Builder Browser installation.
For information on configuring Warehouse Builder Browser, see "Configure Warehouse Builder Browser".
Configure Warehouse Builder Browser
To use the Warehouse Builder Browser, follow these configuration steps.
Log into Oracle Portal as the Portal Administrator
- Open your Web Browser.
- Access Oracle Portal.
For example, in Windows NT, type: http://server:80/pls/portal
Where server is the Web server host name, 80 is the Web server port number for Windows NT, and portal is the DAD name.
The Welcome to Oracle Portal page displays.
- Click Login (in the upper right corner).
- In the Single Sign-On page, enter the portal administrator user name and password (For example, portal).
Refresh the Portlet Repository
- From the Oracle Portal Home Page, click the Administer tab.
- Scroll down to locate the Portlet named Portlet Repository.
- Click Refresh Portlet Repository.
- Click Refresh.
The Warehouse Builder Browser portlet displays in the show portlet mode. You can now view the Warehouse Builder Repository and assign roles to your SSO users.
 Steps for Warehouse Builder Repository Installation