Version 9.0.2
Part Number A90880-01
Home | Solution Area | Contents |
Index |
| Oracle9iAS Discoverer Plus Tutorial Version 9.0.2 Part Number A90880-01 |
|
It will probably take you about 30 minutes to complete this lesson.
In this lesson you learn how to start Discoverer and open the tutorial workbook.
This lesson consists of the following exercises:
To begin this tutorial, you need one of the following:
Note: For more information about how to create a private Discoverer connection for accessing the tutorial database, see "How do I create a Discoverer connection for accessing the tutorial database?".
In this exercise, you will learn how to start Discoverer Plus.
To start Discoverer Plus:
Note: The Discoverer web site address might be:
Note: The first time you run Discoverer, if you do not have the required plug-ins, Discoverer installs the required plug-ins for you.
The Connect to Oracle9iAS Discoverer Plus page is displayed (see figure below).
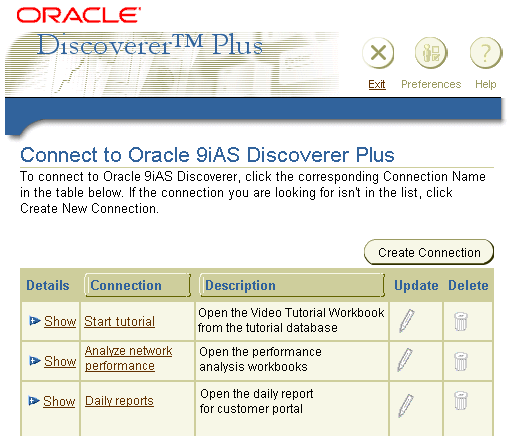
Discoverer displays a list of the existing Discoverer connections in the Connection column.
For example, to start Discoverer using a connection called 'Start tutorial', click 'Start tutorial' in the Connection column.
Note: The Discoverer manager will tell you which connection to use.
After a few moments, Discoverer displays the Workbook Wizard, which means that you are connected to the tutorial database and you are ready to continue with the tutorial.
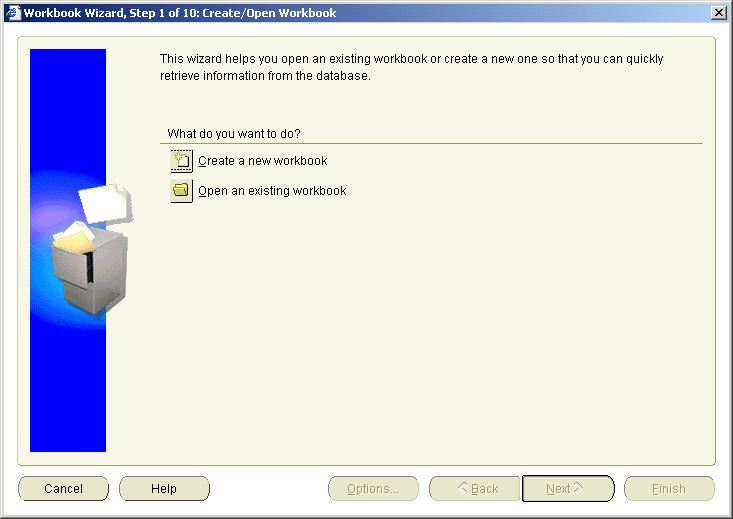
The Workbook Wizard guides you through the necessary steps for getting the data you want from the database.
You are now connected to the database and can begin using Discoverer's powerful business analysis tools.
Having learned how to start Discoverer, you are now ready to learn how to open a workbook from the database.
In this exercise you will open the tutorial workbook from the database.
Discoverer stores workbooks in the database. The Discoverer manager will tell you the name of the tutorial workbook that you need to open. In this tutorial, the workbook is called Video Tutorial Workbook.
Note: Before you can open a workbook, you must start Discoverer (for more information, see "Exercise 1: Starting Discoverer Plus").
To open the tutorial workbook:
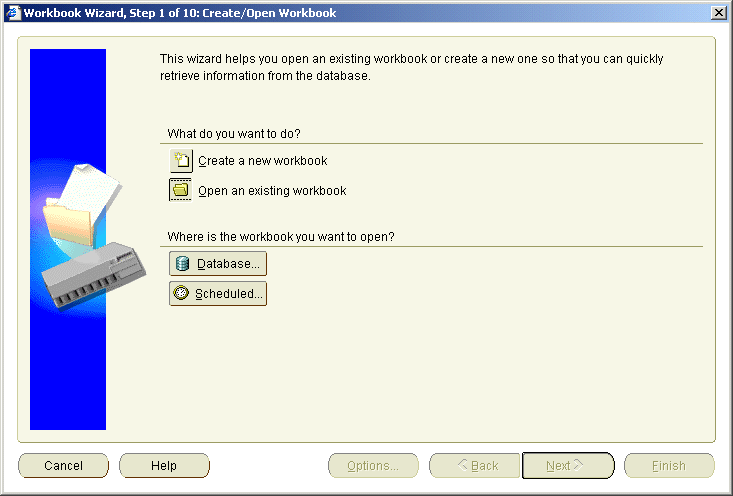
Note: If the Workbook Wizard: Create/Open Workbook dialog is not displayed, choose File | Open to first display this dialog, then begin step 1.
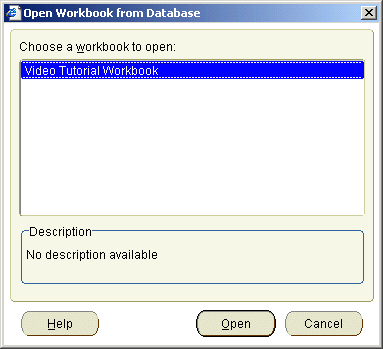
Note: If you saved a copy of the Video Tutorial Workbook earlier, open the copy of the Video Tutorial Workbook that you made. The copy should be called Video Tutorial Workbook followed by your initials.
Discoverer displays the tutorial workbook.
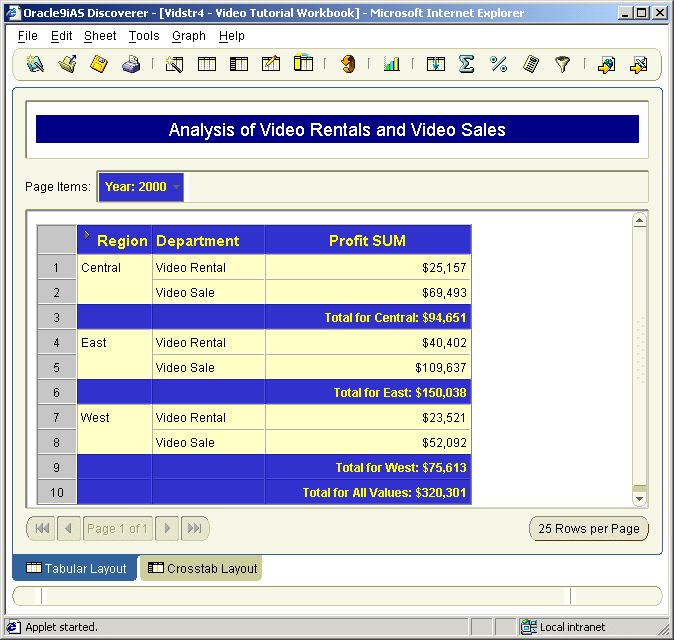
Before continuing, you need to save a copy of the Video Tutorial Workbook to work on.
Video Tutorial Workbook followed by your initials in the New name field.
For example, if your initials are A.B, type Video Tutorial Workbook AB in the New name field.
Now that you have saved a copy of the Video Tutorial Workbook to work on, you are ready to look in more detail at the Discoverer workarea.
Discoverer Plus enables you to analyze data stored in workbooks. Workbooks are Discoverer files containing worksheets that display data retrieved from the database.
Hint: If you are familiar with spreadsheet applications (e.g. Microsoft Excel), think of a workbook as a spreadsheet file, and worksheets as different sheets in that spreadsheet file.
Worksheets contain the data that you want to analyze, together with a number of Discoverer components to help you analyze the data. For example, a worksheet can contain parameters, totals, percentages, exceptions, and calculations (for more information, see figure below).
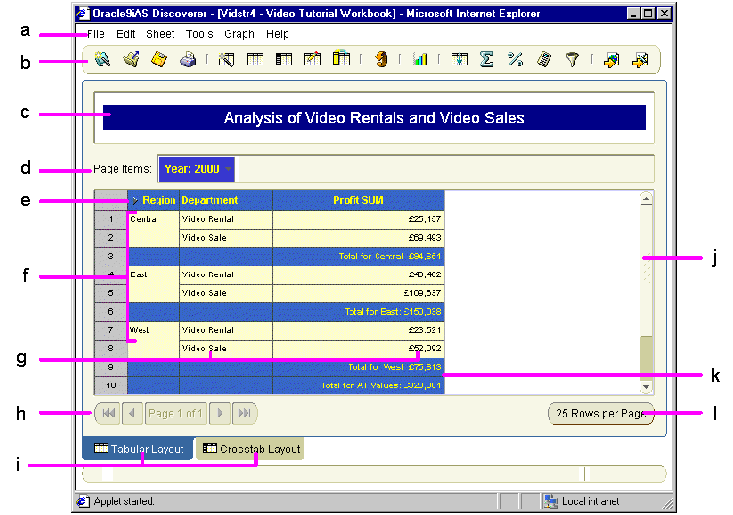
Key to figure:
Congratulations on finishing Lesson 1. In this lesson you have:
Now you are ready to find out how easy it is to create your own workbooks in Discoverer, described in "Lesson 2: Getting the data you want".
Workbooks are Discoverer files that contain worksheets displaying related data retrieved from the database. If you are familiar with spreadsheet applications (e.g. Microsoft Excel), think of a workbook as a spreadsheet file.
For example, you might choose to have a workbook with separate worksheets for Sales by Region, Sales by Department, and Sales by Product; each worksheet contains sales information grouped by region, department, and product.
Worksheets contain the data that you want to analyze, together with a number of Discoverer components to help you analyze the data. If you are familiar with spreadsheet applications (e.g. Microsoft Excel), think of worksheets as different sheets in a spreadsheet file.
If a worksheet contains more rows that can fit on one screen page, you can navigate through pages using the navigation tool bar beneath the worksheet. For example, click the right-arrow to display the next set of rows in the worksheet.
Note: Pages relating to rows on a screen page should not be confused with page items displayed in the Page Items area, which relate to different areas of data.
If there is more than one worksheet in a workbook, click a tab located at the bottom of the workbook to switch to another worksheet. The first time you click a tab, Discoverer might ask you if you want to run the query for that worksheet, (depending on how Discoverer is configured in the Tools | Options | General tab). If you choose Yes, or if Discoverer is configured to automatically run the query, Discoverer retrieves the most current information for that worksheet from the database.
To create a new Discoverer connection, do the following:
Note: The Discoverer web site address might be:
Discoverer displays the Connect to Oracle9iAS Discoverer Plus page (see figure below).

Discoverer displays a list of the existing connections in the Connection column.
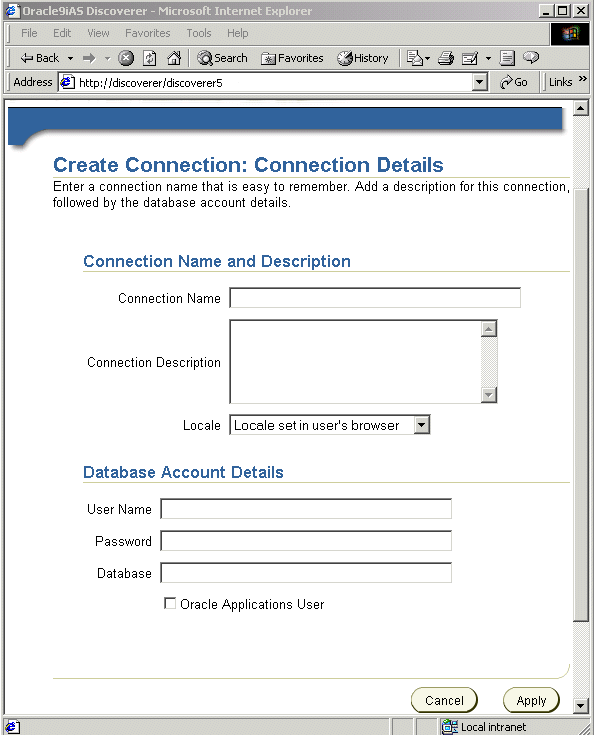
The Create Connection: Connection Details page is a web form for entering login details that you want to save in a connection.
Start tutorial in the Connection Name field.
The connection name that you enter is displayed in the Connections column on the Connect to Oracle9iAS Discoverer Plus page.
Open the Video Tutorial Workbook from the tutorial database in the Connection Description field.
VIDEO5 in the User Name field.
VIDEO5 in the Password field.
Discoverer displays the Connect to Oracle9iAS Discoverer Plus page. The new connection that you have created is included in the Connections list. Click Start tutorial to start Discoverer and connect to the tutorial database.
|
|
 Copyright © 2002 Oracle Corporation. All Rights Reserved. |
|