Release 2 (9.0.2)
Part Number A95438-01
Home |
Contents |
Index |
| Oracle9iAS InterConnect Adapter for SAP R/3 Installation and User's Guide Release 2 (9.0.2) Part Number A95438-01 |
|
Application Link Enabling (ALE) handles the exchange of messages across independent R/3 systems or between external systems and R/3. Application Link Enabling uses intermediate documents (IDOC) as a universal container for the information. Intermediate documents are used to upload to, or download data from, other systems.
This chapter discusses the following topics:
Table 4-1 displays a list of frequently used Application Link Enabling transactions.
Table 4-1 Frequently Used Application Link Enabling Transactions
The following terms are described:
A logical system is your R/3 representation. This is your R/3 address where you can distribute data to and from an R/3 system. Logical systems start with a base logical system.
The base contains your main address. From the base logical system, an SAP administrator creates partner logical systems.
A base system uses the case sensitive Remote Function Call (RFC). To browse the Remote Function Call destinations from the SAP interface:
Make sure the Remote Function Call points to the correct computer using the System Information > Target System. You can also verify your connection using Test Connection.
Ask the administrator of the logical system which RFC Destination to use.
An intermediate document type represents the structure of the data associated with a message type. An intermediate document is a component with the data of a particular message type in it. Intermediate documents are data containers with intelligence built in. Each intermediate document contains only one business type.
Before a the development machine can send or receive intermediate documents of a certain type, it needs to know the intermediate document structure. An intermediate document consists of the following types:
Intermediate documents are identified by a unique intermediate document number (IDOCNUM) assigned by SAP. However, it is possible to manually assign a number range of intermediate documents.
The message type represents the data exchanged between R/3 and an external system. A message type characterizes the data being sent across systems and relates to the structure of the data: an intermediate document type. For example, MATMAS is a message type for Material Master, and IVOIC is a message type for an Invoice. There are over 200 message types supported by Application Link Enabling in an R/3 system.
Access logical message types using the /nwedi transaction or by completing the following steps:
Using Environment > Message types retrieves a list of available message types.
To access an assignment of logical message types to intermediate document types, complete the following steps:
The main transaction in the R/3 system for intermediate documents handling is /nwedi. SAP documentation is available for intermediate document types and intermediate document segment types. The IDOC>IDOC lists menu accesses the list of intermediate documents created and received in an R/3 system.
If you want to make your Oracle9iAS InterConnect application acts as a client sending intermediate documents, create a subscribed event or an implemented procedure. It is preferable to create a subscribed event because intermediate documents are more similar to events than request/reply pairs. When this event/procedure is triggered, an intermediate document is sent to the SAP system.
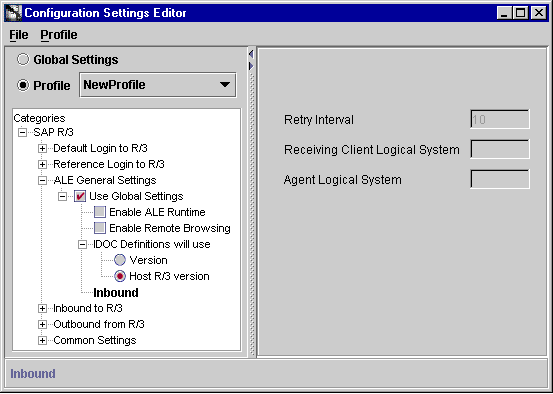
You must set up the Application Link Enabling general settings using the R/3 configuration editor to send an intermediate document to R/3.
If you browse the SAP system in iStudio, a pair of methods associated with each intermediate document displays. These methods are called Send and AdvancedSend. Events/procedures can be built around either of these. If you call the Send method it populates the control record of the intermediate document from the parameters set in the R/3 configuration editor. AdvancedSend allows more flexibility; if you use this method you must pass the control data to the method.
You can have your Oracle9iAS InterConnect application act as a server receiving R/3 intermediate documents. R/3 sends an intermediate document to the development machine's Program ID. In order to receive an Application Link Enabling intermediate document, you must first register the RFC program ID. This is done by setting the RFC program ID in the R/3 configuration editor.
You can create a published event or an invoked procedure (events are preferred) to be triggered when an intermediate document is sent to your Oracle9iAS InterConnect application. You must use the AdvancedSend method associated with that Application Link Enabling intermediate document to define your event/procedure. When an intermediate document is sent to your application, an appropriate Oracle9iAS InterConnect message will be constructed and sent to the Oracle9iAS InterConnect hub.
The Application Link Enabling Cache and Queue directories, located under <install_path>\...\config\ALE\<profileName>, are created after Application Link Enabling parameters are set in the Configuration Editor. The Cache and Queue directories are required when manually downloading intermediate document structures (the .mtd file) from the SAP system to the local machine.
The Queue directory contains the queue of requests that were not sent. The requests are re-sent every [RetryInterval] minutes.
The Cache directory contains local descriptions of Application Link Enabling messages.
.mtd, for example, <IDOCName>_<SAPVersionNumber>.mtd, are created when downloaded using RSEIDOC3, with only the Display structure and Display segment fields set and one intermediate document type generated. Files of this name are automatically converted to .ido files by the SAP adapter. However, .mtd files do not convert to .ido files if an .ido file with the same name exists.
.ido are binary files containing the local representation of intermediate document messages. These are either downloaded from the R/3 system or they are built from .mtd files as needed.
Intermediate documents can be accessed at runtime by setting the Application Link Enabling Enable Remote Browsing parameter in the development machine's Configuration Editor only if the Enhanced Browsing Function Modules have been uploaded.
This parameter is used mostly for casual browsing as the .ido files are not saved locally and it can be slow. The preferred method is to use the SAP Parser method and download the .mtd files locally to generate the .ido file.
If, at runtime, an intermediate document definition is needed but no .ido file exists, then the development machine downloads the .ido file from an available R/3 system. However, if the R/3 system is down, nothing will work. In this case, for reliability, pre-download the intermediate document definitions to an .mtd file.
The.mtd files create the .ido files. The .ido files are compiled versions of the .mtd file. Delete the .mtd file after creating the .ido file. Calling the intermediate document, either by viewing them in the development machine's Browser or being called by the development machine, creates the .ido file from the .mtd only on the initial call.
If an .ido file exists in your CACHE directory for a specific intermediate document, the development machine uses the existing .ido file. If the .mtd file is then updated, the .ido file does not automatically update. To manually update the .ido file, delete the old .ido file. Calling the intermediate document causes the updated .mtd file to generate a new .ido file. If you customize an intermediate document definition locally, do not forget to update the intermediate document definition in R/3 and inform users of this change in the definition structure. Otherwise, the next time an intermediate document is sent, it uses the old definitions and conversion errors will occur. Users of the intermediate document definition must delete the .mtd and the .ido files for that intermediate document and download the IDOC.mtd to compile a new .ido file.
If R/3 is down, the development machine cannot send inbound intermediate documents. It saves the intermediate documents for later transmission.
If you have not downloaded an .ido definition into an .mtd file, the development machine cannot transmit or queue your intermediate document.
When sending Application Link Enabling intermediate documents to R/3, the runtime code retrieves, and uses, a connection from its connection pool. If R/3 cannot be contacted, for example, no connection is available, the intermediate document is queued to re-send later. If a copy of the development machine is running with the same profile used by the sending client, the agent scans the Queue directory. The SAP Agent sends the queued intermediate documents according to the user-specified retry interval.
The General Settings panel of the Configuration Editor defines the general Application Link Enabling settings. It is available from either the Global Settings or a user-defined profile. Table 4-2 provides a description of the fields in the Configuration Editor.
| Field | Description |
|---|---|
|
Enable ALE Runtime |
Activates the Application Link Enabling connections. Enables or disables the ability of the SAP adapter to be sent intermediate documents via the Remote Function Call destination defined by the Host. |
|
Enable Remote Browsing |
When unchecked, the Application Link Enabling adapter will not go to the R/3 system to retrieve the definition of Application Link Enabling messages. The SAP adapter only browses intermediate document definitions that were manually downloaded from the R/3 system. For more information, refer to the Manually Downloading an IDOC. Pre-Requisite: Upload the intermediate document browsing function modules provided into the SAP system. Application Link Enabling checks a setting before attempting to retrieve an intermediate document definition from R/3. |
|
DOC Definitions will use Host R/3 version |
A three letter, uppercase string used to specify that the intermediate document definitions should be those of the specified release of R/3. If the setting is blank (internally) this indicates that the latest R/3 version must use. |
|
IDOC Definitions will use Version |
A three letter, uppercase string used to specify that the intermediate document definitions should be those of the specified release of R/3. The first time the R/3 system version is required at runtime, the R/3 system is queried and the result is stored back into this key. The setting changes from Use Latest Available to the R/3 version. |
|
Inbound - Retry Interval |
This is a 32-bit integer with valid values ranging from 1 to 2*24*60 to two days. It represents the number of minutes between retry attempts when re-sending a message to R/3. |
|
Receiving Client Logical System ID |
A 10-character string representing the SAP System Base logical system ID for the recipient of your intermediate document (created in the SAP System by a System Administrator). You are sending an intermediate document. This is the logical system ID associated with the SAP client to whom you are sending the intermediate document.
If you use |
|
Agent Logical System ID |
A 10-character string representing the development machine. This identification is created in the SAP System for the development machines by the System Administrator. You are sending an intermediate document. This is the logical system ID associated with the intermediate document source (the development machine) in R/3.
If you use |
If sending an inbound intermediate document from an Oracle9iAS InterConnect application to R/3, set the following using the Configuration Editor:
If sending an outbound intermediate document from R/3 to Oracle9iAS InterConnect application, set the following using the Configuration Editor:
Complete the following steps to configure the R/3 system to use Application Link Enabling functionality.
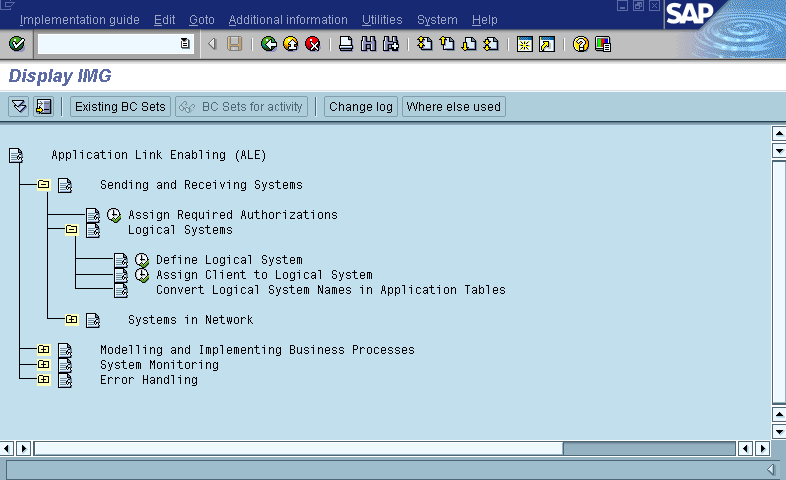
To use Application Link Enabling functionality you must configure both SAP and the development machine. The first step is to identify a base logical system in your R/3 system. Using the SAPGUI ALE customizing menu, set up your client's base logical system.
To access the ALE customizing menu, either use the /nSALE transaction or the Implementation Guide for R/3 Customizing (IMG) > Cross-Applications Components > Distribution (ALE) menu selection and expand Basic Configuration. The logical system you create is the sender in outbound interfaces and the receiver in inbound interfaces. An SAP system administrator creates the base logical system as follows:
For example, SAP recommends the naming standard for the base logical system as XXXCLNTyyy.
where:
After setting your base logical system, assign the logical system to the client of the base logical system, thus creating partner logical systems. Access the panel using the /nSCC4 transaction.
To assign the logical system to the client of the base logical system:
yyy.
xxxCLNTyyy in the field for logical system and save your entry.
You can use either the /nSALE transaction or the menu:
To use an existing logical system, you can access the current logical system list using the following:
To send a material master intermediate document, use the /nBD10 transaction or select from the menu:
To communicate outside of the R/3 system, you need a transactional Remote Function Call port and a communication level through a Remote Function Call destination. A port is an SAP logical representation of a communication channel for intermediate documents. There are four types of ports that Application Link Enabling can use to distribute intermediate documents:
To create a transactional port:
The List of Port dialog displays.
You are linking this port to a logical Remote Function Call destination to invoke certain processing on a server. Use the /nsm59 transaction to create a Remote Function Call destination of type TCP/IP connection.
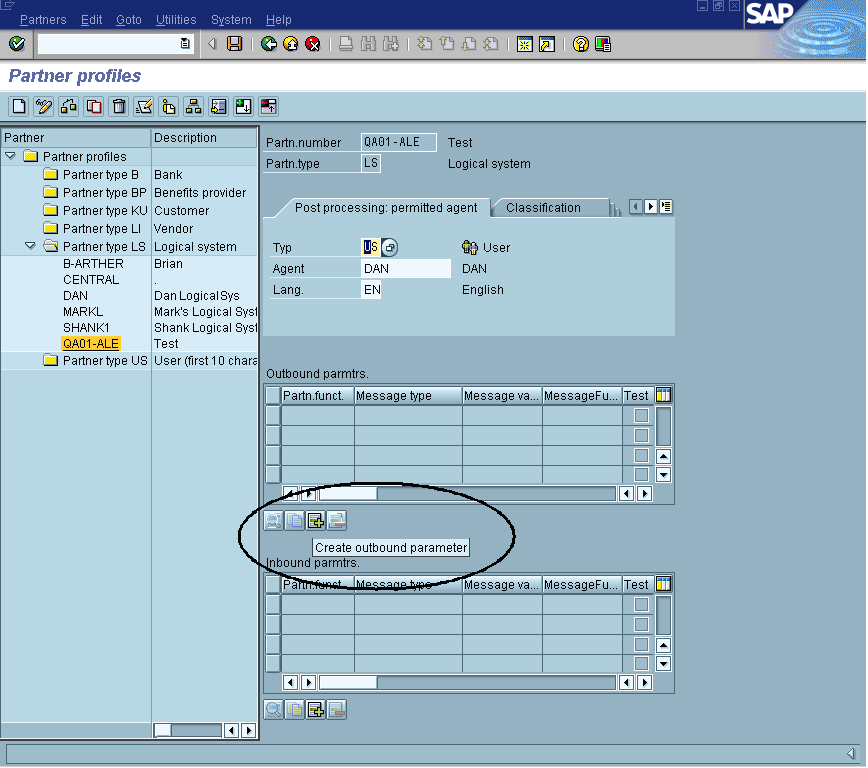
Based on an existing logical system, a partner profile is an identifier for a system used for communicating messages. There are four types of partner profiles of which LS (logical system) is used for Application Link Enabling communications.
A partner profile defines parameters of communication between two or more systems. Other than general information, you must maintain inbound parameters and message control. The main parameters are:
There are parameters that also determine the mode of processing and error handling.
Partner profiles are the gateway for Application Link Enabling communications. They route specified messages through defined intermediate document types to a given port. This is after invoking the appropriate function modules for outbound processing. During this time, it receives intermediate documents of a specific type and identifies modules to post data to the application databases for inbound messages.
To maintain partner profiles use the following transactions:
To define a partner logical system:
/sale transaction.
All Application Link Enabling partner profiles use LS as the partner type. LS is used for Application Link Enabling communications.
LS for Partner Type in the Partner Type and Number fields.
Each client has its own base that represents it to the outside world. To send Application Link Enabling messages you need to start with a base.
Complete the following steps to create a partner profile:
/nsale transaction.
This is either the base logical system you created, or an existing logical system. Every partner profile used for Application Link Enabling must be based on an existing logical system.
XXXCLNTyyy.
where:
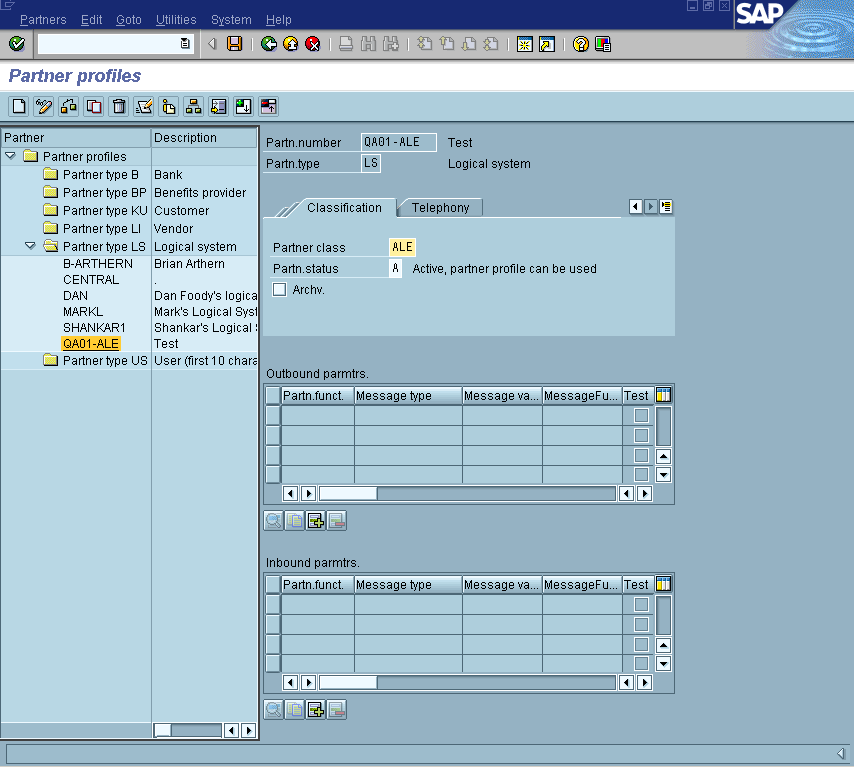
LS in the Partn. type field.
All Application Link Enabling partner profiles use LS as the partner type. LS is used for Application Link Enabling communications.
ALE in the Partner class field.
A in the Partn. status field.
To maintain the outbound parameters:
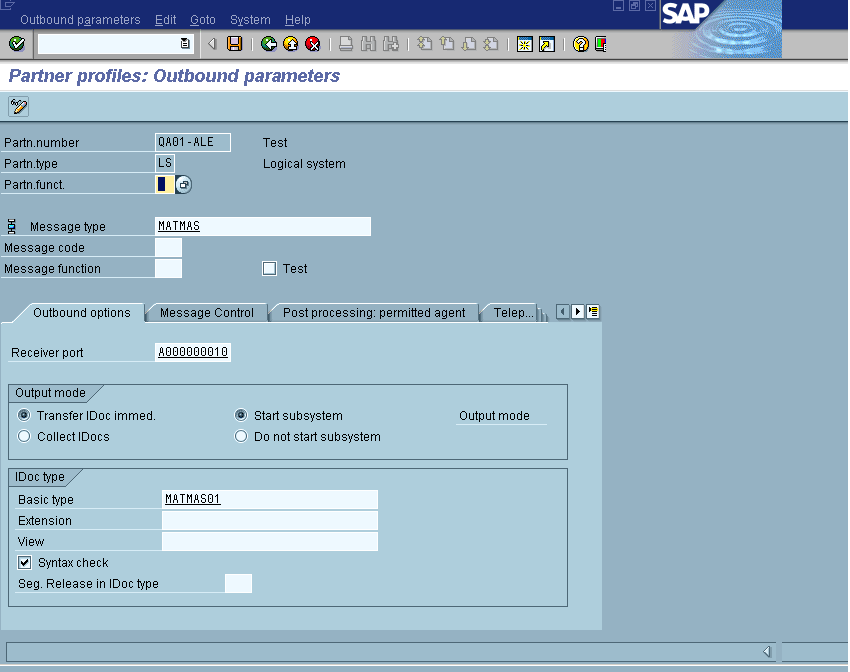
The pack size is the number of intermediate documents sent in a single dispatch.
You can also select Collect IDocs or Do not start subsystem. The first parameter instructs Application Link Enabling communication layer to collect all intermediate documents until further processing is requested. The second parameter is used to invoke third-party translation software.
Intermediate Document Basic type browsing displays available intermediate documents for that message type. Enter a basic type, for example, MATMAS02.
Using this dialog, you can specify multiple message types.
The Customer Distribution Model stores information about the flow of messages across various systems. It stores data that dictates which messages (messages types) flow to which logical system. Many messages can flow to one logical system, and one message can flow to several systems.
To create a Customer Distribution Model in the R/3 system with the client's base logical system as the sender logical system, either use the /nBD64 transaction or complete the following to use the menu:
There are two ways to use the development machine and R/3 to explore intermediate documents. You can manually download the intermediate documents to your local machine, or you can use the development machine's Enhance Browsing steps.
If you only work with a few intermediate documents, it is recommended that you manually download the intermediate documents.
If you use multiple intermediate document structures, you can enhance Application Link Enabling browsing by adding a few items provided with the development machine in your SAP system. By uploading the development machine source code into your SAP system, you can download all of the intermediate document definitions from your SAP system to your local machine for automatic browsing.
Uploading the development machine source code into the function modules may have been done. Perform a simple check by completing the following:
function-pool zmas. MESSAGE-ID ..include ledidtyp.
|
See Also:
"How to Install the Remote Browsing Function Modules" if |
The development machine includes the text files for Z_RPY_IDOCTYPE_LIST (idoclist.asc) and Z_RPY_IDOCTYPE_READ_DEFN3 (idocread.asc) in the install_directory\SAP\ALE_Files directory. Use these files to upload the source code into the function modules.
To download intermediate documents, you must have the Cache and Queue directories under \install_directory\config\ALE\profileName.
If you do not have these directories, use the Configuration Editor-> R/3-> ALE-> General Settings menu and check Enable ALE Runtime. Re-starting the Oracle9iAS InterConnect application creates the Cache and Queue directories.
To manually download intermediate document definitions from an R/3 system to your the development machine server, complete the following steps:
The SAPGUI Easy Access dialog displays.
The Process technology tree displays.
matmas02_31H.mtd:
install_path\config\ALE\profileName\Cache\IDOCName_SAPVers.mtd
In the iStudio browser, when you browse Application Link Enabling intermediate documents, the downloaded information, retrieved from your machine, displays without logging into an R/3 session.
To enhance your Application Link Enabling remote browsing, the development machine includes the text files for Z_RPY_IDOCTYPE_LIST (idoclist.asc) and Z_RPY_IDOCTYPE_READ_DEFN3 (idocread.asc) in the install_directory\SAP\ALE_Files directory.
This procedure is optional. If you only work with a few intermediate documents, it is recommended that you manually download the definitions (.mtd files) for use with the development machine.
If you use multiple intermediate document structures, you can use the following to enhance Application Link Enabling remote browsing. IDOCName_SAPVersionNumber.ido files download automatically at runtime if you have selected Enable Remote Browsing and you are using the development machine's enhanced browsing function modules. Downloading IDOCName_SAPVersionNumber.ido files at runtime is time-consuming. For example, running the Application Link Enabling sample generates the matmas_31H.ido automatically (unless it was already manually downloaded because .ido files are over-written and the original file remains). Also, if you send or receive intermediate documents and the R/3 system goes down, you do not receive an error message; the message is queued and the message is sent the next time the system is functional.
The following steps create:
Z_RPY_IDOCTYPE_LIST and Z_RPY_IDOCTYPE_READ_DEFN3
The function modules must be in the same function group (usually custom built) and the global data (shared by the entire function group) must contain the include ledidtype statement.
To begin, create the following four Data dictionary structures:
ZRPYIDCTXT--IDOC Text Description
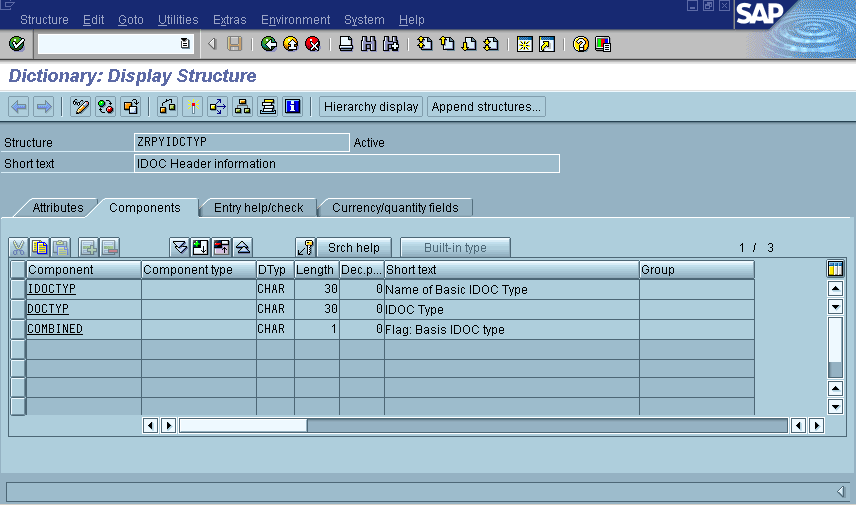
ZRPYIDCTYP--IDOC Header information
ZRPYIDCSG3--IDOC Segment header
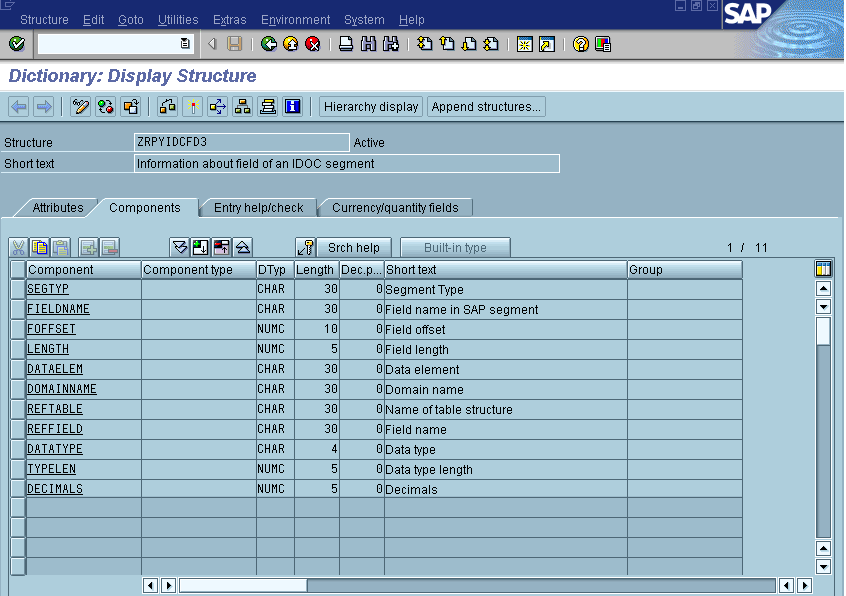
ZRPYIDCFD3--Information about field of an intermediate document segment
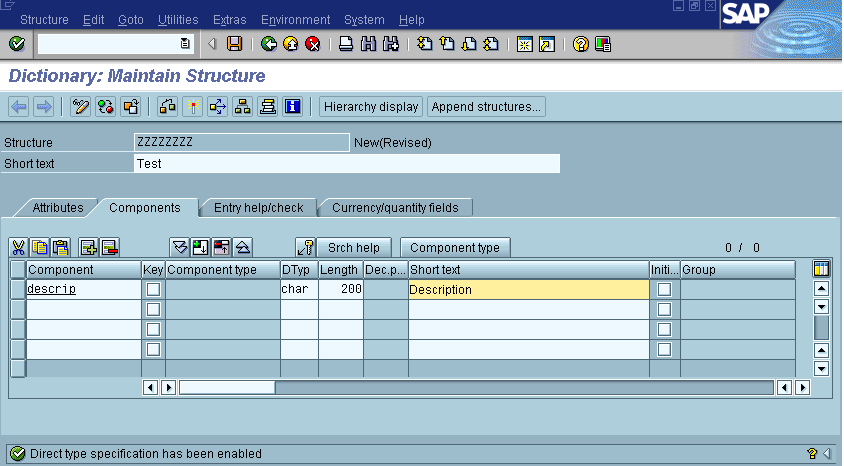
To create a structure, use the following pattern for each structure, for example using ZRPYIDCTXT in the SAPGUI, execute the /nse11 transaction, or complete the following steps:
ZRPYIDCTXT.
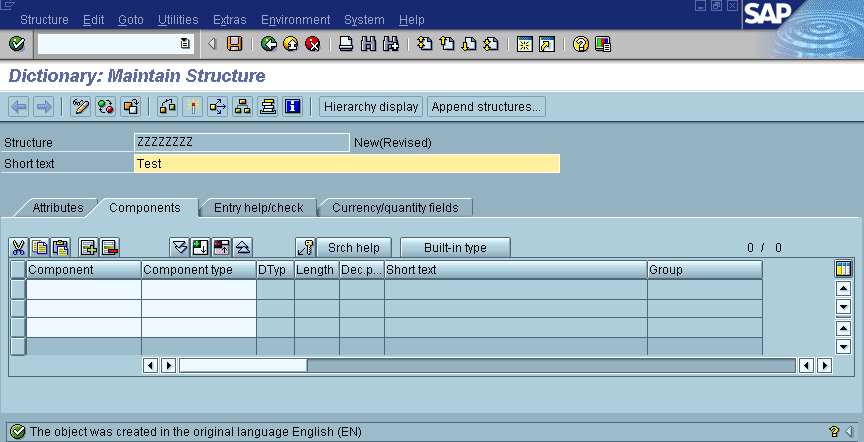
Text description of the illustration structurechangefields.gif
DESCRIP.
The Create object catalog entry dialog displays.
Repeat these steps for the other three structures, ZRPYIDCTYP, ZRPYIDCSG3, and ZRPYIDCFD3. Use the following information for all Field name and Data elem fields. Table 4-3 lists the table structure and display fields.
| Name | Short text |
|---|---|
|
|
Intermediate Document Header information |
| Field name | Type | Length | Short Text |
|---|---|---|---|
|
|
|
30 |
Name of Basic intermediate document type |
|
|
|
30 |
Intermediate Document Type |
|
|
|
1 |
Flag: Basis intermediate document type |
| Name | Short text |
|---|---|
|
Intermediate Document Segment header |
Figure 4-10 describes creating the ZRPYIDCTYP structure.
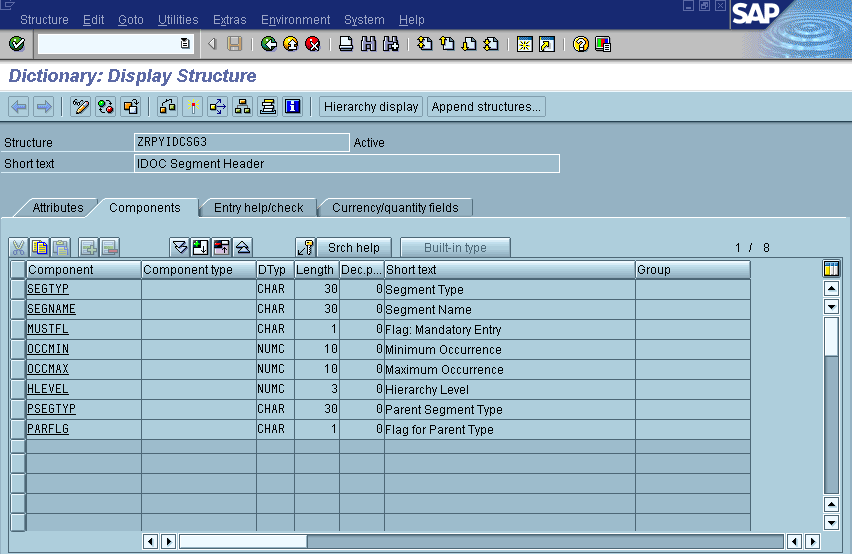
Figure 4-11 describes creating the ZRPYIDCFD3 structure.
To create a function group using the SAPGUI:
/nse37 transaction.
The Create object catalog entry dialog displays.
To create the Z_RPY_IDOCTYPE_LIST and Z_RPY_IDOCTYPE_READ_DEFN3 function modules in the SAPGUI:
/nse37 transaction.
The Function Library: Initial Screen dialog displays.
Z_RPY_IDOCTYPE_LIST.

Text description of the illustration r3createobjectcomponents.gif
The following section describes creating the Z_RPY_IDOCTYPE_LIST function module.
Table 4-5 lists object components.
| Classification | Function Group: | ZMAS |
|---|---|---|
|
NA |
Application: |
Z |
|
NA |
ShortText: |
Retrieve details about all released intermediate documents. |
|
Processing type |
Remote Function Call supported |
|
|
NA |
Immediate Start |
|
Figure 4-13 displays the function module display for the Z_RPY_IDOCTYPE_LIST.
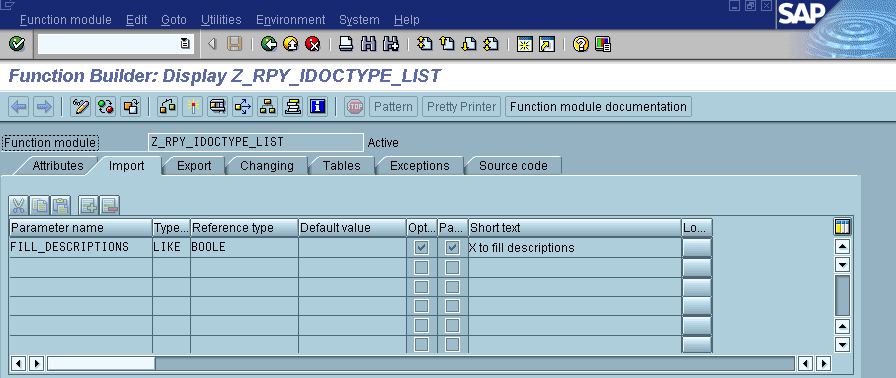
Text description of the illustration aleidoctypelistfill.gif
| Import parameter | Reference field | Proposal | Short Text |
|---|---|---|---|
|
|
BOOLE |
x to fill descriptions |
Figure 4-14 displays the function module display for the Z_TPY_IDOCTYPE_LIST.
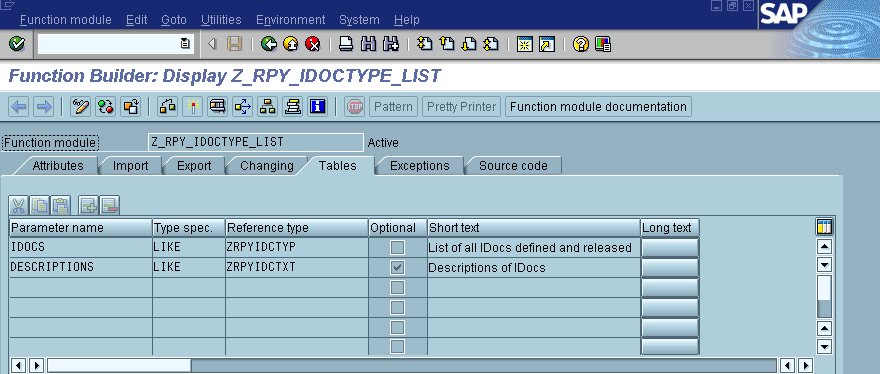
Text description of the illustration aleidoctypelisttable.gif
| Table Parameters | Ref. Structure | Optional | Short Text |
|---|---|---|---|
|
|
|
|
List of intermediate document's defined and released. |
|
|
|
X |
Description of intermediate documents. |
To access documentation:
Upload the Source Code provided with the development machine using SAP's command, Utilities > More Utilities > UpLoad/DownLoad > UpLoad.
R/3 Version 3.x--Enter the path and file name, install_directory\SAPALE_Files\idoclist.asc.
R/3 Version 4.x--Enter the path and file name, install_directory\SAP\ALE_Files\idoclist40.asc.
This section describes creating a Z_RPY_IDOCTYPE_READ_DEFN3 function module.
Table 4-8 lists the classification, function group, and ZMAS for the Z_RPY_IDOCTYPE_READ_DEFN3 function module.
| Classification | Function Group: | ZMAS |
|---|---|---|
|
NA |
Application: |
Z |
|
NA |
ShortText: |
Retrieve details about one intermediate document type. |
|
Processing type |
Remote Function Call supported |
|
|
NA |
Immediate Start |
|
Figure 4-15 displays the function module display for the Z_RPY_IDOCTYPE_READ_DEFN3 function module.
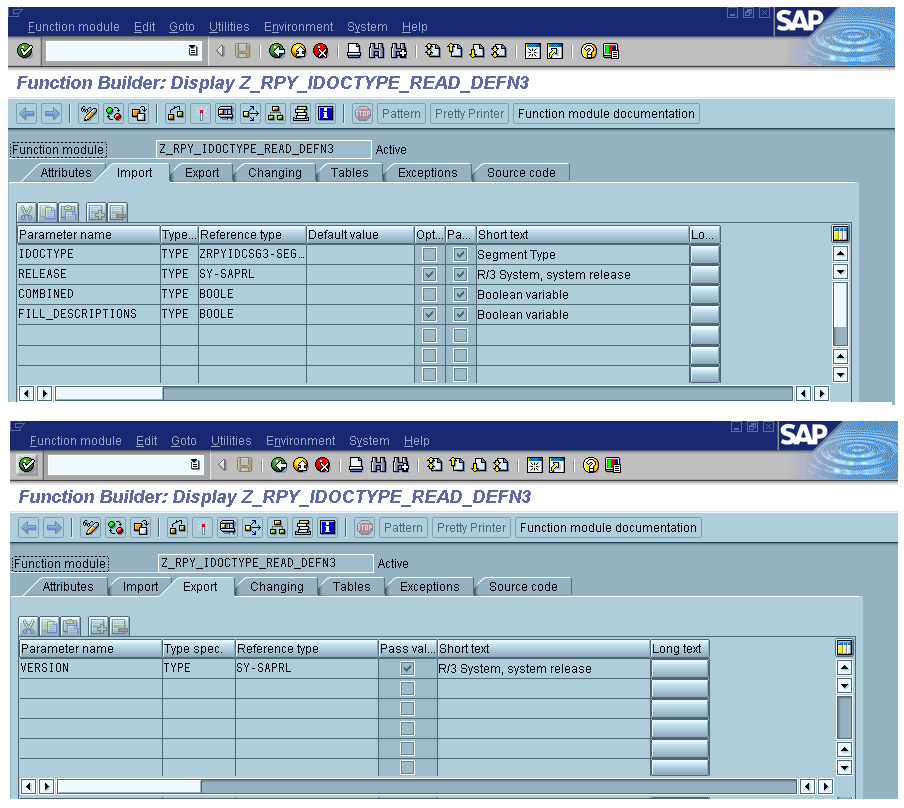
Text description of the illustration alestruct2-upgrade1.gif
Table 4-9 Function Module Display: Import/Export Parameters Z_RPY_IDOCTYPE_READ_DEFN2If you get an error and cannot continue, ensure all reference fields have been activated.
Figure 4-16 displays the table parameters and exceptions for the Z_RPY_IDOCTYPE_READ_DEFN3 function module.
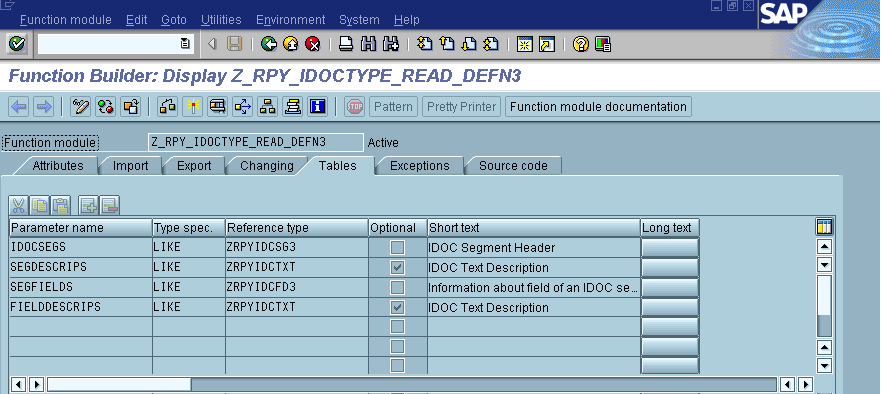
Text description of the illustration alestruct2-upgrade2.gif
Table 4-10 Function Module Display: Import/Export Parameters Z_RPY_IDOCTYPE_READ_DEFN3To upload the source code:
install_directory\SAP\ALE_Files\idocread.asc.
function-pool zmas.MESSAGE-ID ..,
include ledidtyp.
To verify you have access to this global data, perform a simple check:
|
|
 Copyright © 2002 Oracle Corporation. All Rights Reserved. |
|