Release 2 (9.0.2) for Sun SPARC Solaris
Part Number A90324-01
Home |
Contents |
Index |
| Oracle9i Application Server Installation Guide Release 2 (9.0.2) for Sun SPARC Solaris Part Number A90324-01 |
|
This chapter guides you through the steps for the Oracle9iAS Infrastructure installation. The topics include:
The following instructions guide you through the Oracle9iAS Infrastructure installation of Oracle9i Application Server (Oracle9iAS).
Table 4-1 lists required information for Oracle9iAS Infrastructure installation. Enter your values for the listed installation information in the Your Information column before beginning.
| Information | Example Values | Your Information |
|---|---|---|
|
Oracle base directoryFoot 1 (Section 2.5.3.1, "ORACLE_HOME") |
|
|
|
Oracle home location (Section 2.5.3.1, "ORACLE_HOME") |
|
|
|
|
|
|
|
|
|
|
|
Instance Name (Section 2.5.3.1, "ORACLE_HOME") |
|
|
|
ias_admin Password (Section 2.5.3.1, "ORACLE_HOME") |
|
|
|
Oracle9iAS Single Sign-On Server Host NameFoot 2 (Section 1.3, "Oracle9iAS Infrastructure Installation") |
|
|
|
Oracle9iAS Single Sign-On Port NumberFootref 2 (Appendix F, "Default Port Numbers and Port Ranges") |
|
|
|
Oracle Internet Directory Host Name (Section 1.3, "Oracle9iAS Infrastructure Installation") |
|
|
|
Oracle Internet Directory Port Number (Appendix F, "Default Port Numbers and Port Ranges") |
|
|
|
Database Character Set (Step 9 ) |
|
|
The Welcome screen provides information about the Oracle Universal Installer. The following function buttons appear on the installation screens:
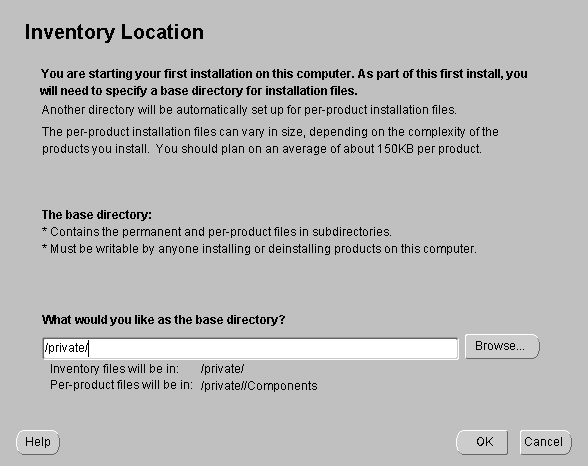
The Inventory Location screen appears during the first installation on a host to set a location for installation files. Product components use a different directory. The installation files can vary in size depending on the complexity of the product. For file storage considerations, assume a file size of 150 KB per product.
The base directory has the following attributes:
Input where you would like the base directory to be stored. For example:
/private
The storage location for product component files is the Components directory. For example:
/private/oraInventory/Components
/var/opt/oracle/oraInst.loc file, which provides a pointer to the oraInventory directory.
After you execute the shell script, continue with the installation process.
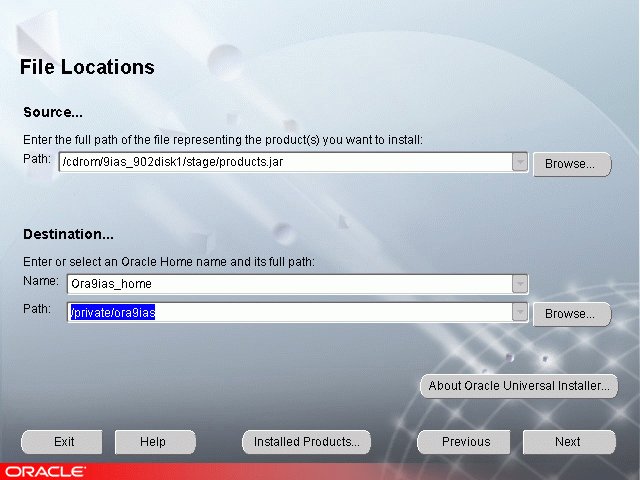
The File Locations screen allows you to enter the full path for the source and destination locations for your installation.
products.jar file from which the product will be installed. The installer detects and uses the default values of the products.jar file of the installation program. Do not change the path.
Oracle homes are identified by name. The Oracle home name identifies the program group associated with a specific Oracle home and the installed Oracle services associated with the home.
The Oracle home name must consist of 1 to 16 characters long and can only include alphanumeric characters and underscores; spaces are not allowed.
The Oracle home path must be an absolute path. It cannot contain environment variables or spaces.
Note:
Oracle9iAS Infrastructure needs to be installed in a separate Oracle home, preferably on a separate host from any Oracle9iAS installations. Do not install Oracle9iAS Infrastructure into an existing:
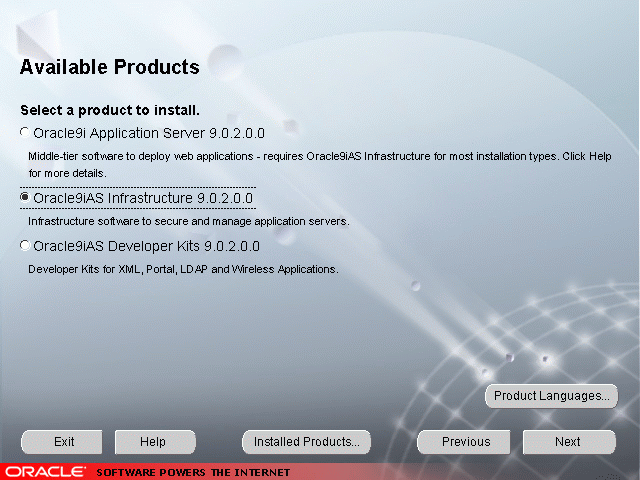
Oracle9iAS Infrastructure installs Oracle9iAS Metadata Repository, Oracle Internet Directory, Oracle9iAS Single Sign-On, and Oracle Management Server. Oracle9iAS Infrastructure is required for all of the Oracle9iAS middle-tier applications except when installing the J2EE and Web Cache install type without single sign-on or clustering. Prior to installing an instance of either Portal and Wireless, Business Intelligence and Forms, or Unified Messaging, you must install and configure the Oracle9iAS Infrastructure somewhere in your network.
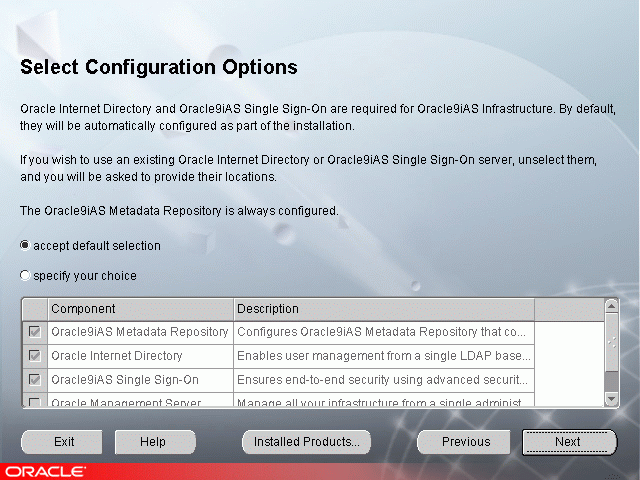
The Select Configuration Options screen offers two configuration options
If you de-select a component here, the installer installs it, but does not configure or start it. After installation, the installer starts the selected Oracle9iAS component. If you decide to use that component at a later time, then launch the Oracle Enterprise Manager Home Page to configure that component.
If you would like to configure Oracle Internet Directory and Oracle9iAS Single Sign-On on separate hosts:
If you plan to install copies of Oracle Internet Directory on different hosts to form a directory replication network, configure Oracle9iAS Single Sign-On with only one of the Oracle Internet Directory copies. The remaining copies of Oracle Internet Directory must not associate with any Oracle9iAS Single Sign-On configuration. Refer to the Oracle Internet Directory Administrator's Guide for more information.
Oracle9iAS Metadata Repository is always configured and started during Oracle9iAS Infrastructure installation.
Enter the host name and port number for the existing instance of Oracle9iAS Single Sign-On that you wish to use with this installation of Oracle9iAS Infrastructure and click Next.
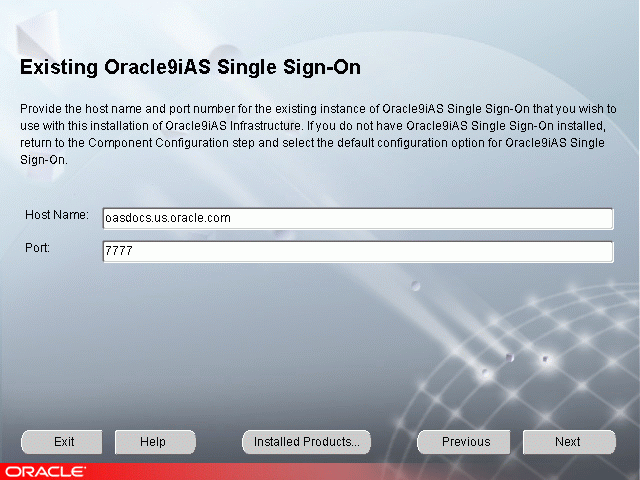
If you do not have Oracle9iAS Single Sign-On installed, return to the Component Configuration and Startup screen and select the default configuration option for Oracle9iAS Single Sign-On.
Enter the host name and port number for the existing instance of Oracle Internet Directory that you wish to use with this installation of Oracle9iAS Infrastructure and click Next.
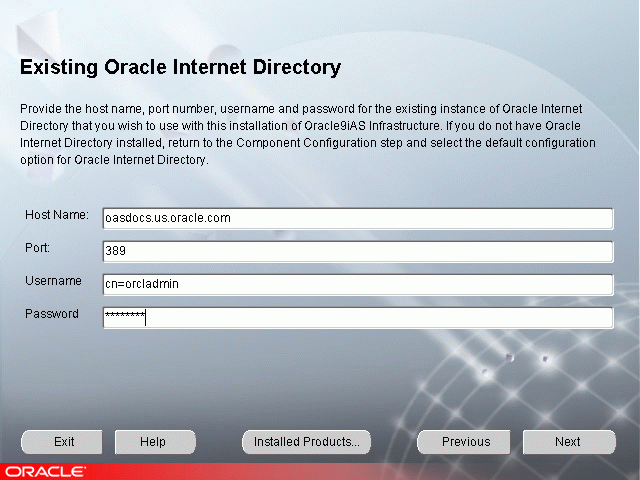
This screen appears if you have unchecked the configuration of Oracle Internet Directory on the Component Configuration and Startup screen.
If you do not have Oracle Internet Directory installed, you must install it through the Oracle9iAS Infrastructure installation before proceeding with this installation.
Oracle Internet Directory and Oracle9iAS Single Sign-On are required components for using Infrastructure.
You will need the following to add information about the Oracle9iAS instance into Oracle Internet Directory:
The username and password are defined in Oracle Internet Directory as either the:
The username creates a user entity in Oracle Internet Directory. The user must be a member of the IASAdmins group. By default, orcladmin (the Oracle Internet Directory administrator) is also a member of the IASAdmins group. If the Oracle Internet Directory administrator does not wish to give out the orcladmin password, the administrator creates a username and password for a member of the IASAdmins group. Refer to the Oracle Internet Directory Administrator's Guide for more information.
The following terms may be used on the following three screens:
Instance Name: Identifies the installation instance of Oracle9iAS Infrastructure on this host.
ias_admin password: The ias_admin users password used to administer any Oracle9iAS on this host. This password is required for installing additional Oracle9iAS instances. If you are configuring Oracle Internet Directory, the default administrative user, "orcladmin", will be assigned the same password as the ias_admin user by default. The orcladmin user is a superuser for Oracle Internet Directory.
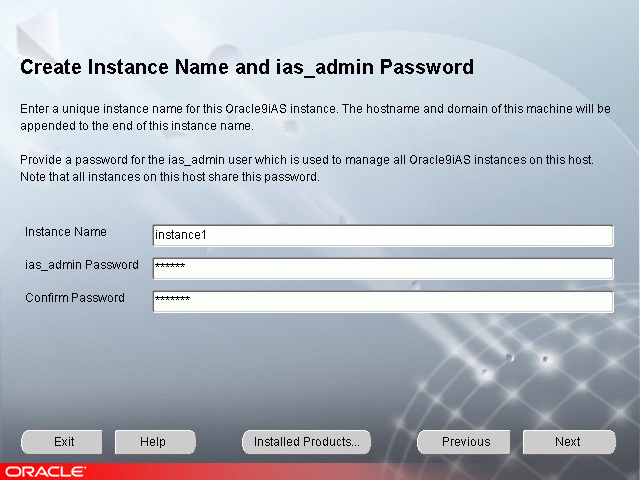
Enter a unique instance name and ias_admin users password for this installation of Oracle9iAS Infrastructure and click Next.
This screen appears if this is a first time installation of Oracle9iAS on this host.
Enter a unique name in the instance name field for this installation of Oracle9iAS Infrastructure. The instance name must contain alphanumeric and underscore characters only.
Select an ias_admin password for this instance of Oracle9iAS Infrastructure and then re-enter the password for confirmation. The ias_admin password must consist of at least five alphanumeric characters. Additionally, at least one of the characters must be a number.
The unique instance name will be used to identify this installation of Oracle9iAS Infrastructure on the install host.
The ias_admin password allows you to:
|
Note: If you are configuring Oracle Internet Directory as part of this installation, the default administrative user, "orcladmin", will be assigned the same password as the ias_admin user by default. |
Enter a unique instance name and the ias_admin password for this installation of Oracle9iAS Infrastructure and click Next.
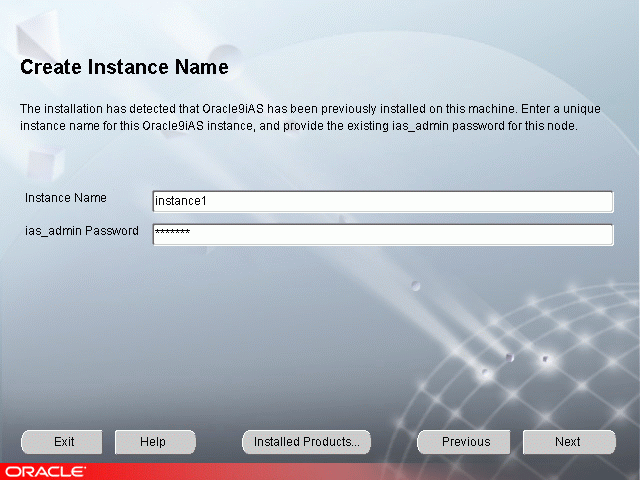
If the Oracle Universal Installer has detected a previous Oracle9iAS installation on this host but in a different Oracle home this screen appears. Enter a unique instance name and the existing ias_admin password for this host to continue with the installation. The instance name must contain alphanumeric and underscore characters only.
If you forget your ias_admin users password following installation, refer to the Oracle9i Application Server Administrator's Guide for the steps you can follow to reset the password.
oracle account is not a member of the dba group. Enter the database administrator and operator group name and click Next.
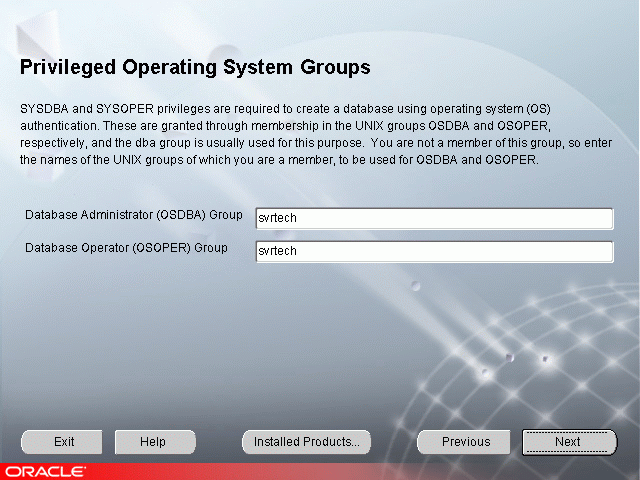
The Privileged Operating System Groups screen allows you to enter the database administrator and operator group name for installation of the Oracle9iAS Metadata Repository. For more information regarding privileged group names, refer to Section 2.5.5.3, "UNIX Group Names for Privileged Groups". The installer detects and defaults to the your OS group.
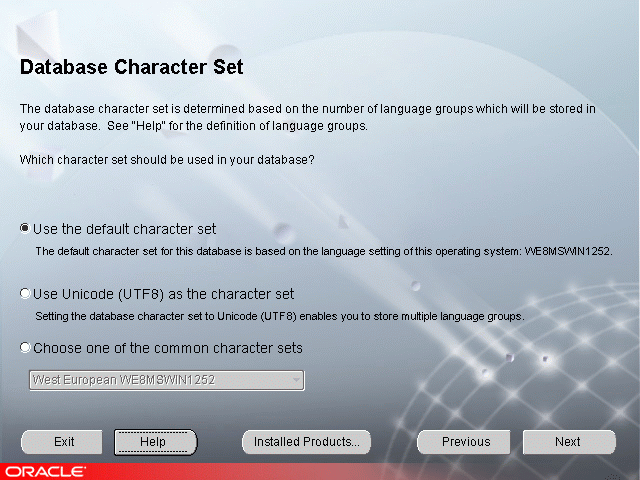
Choose from one of the three following character sets for your database:
The Summary screen allows you to review all the settings before the installation begins. These settings include source, destination, installation type, product language, install file sizes, and a list of Oracle9iAS components.
When you click Install, the installation process begins.
The Install screen appears while the product is installing. The Install screen shows installation operations, including executing actions such as file copy and linking, and executing decision points and calculations. It displays the full path of the installation log.
Running root.sh
During installation of Oracle9iAS, the installer prompts you to run the root.sh script.
Use the following steps to run the root.sh script.
root.sh script in the Oracle home directory.
prompt> ORACLE_HOME/root.sh
Once you see "Finished running generic part of the root.sh script" and "Now product-specific root actions will be performed," exit root user and return to the Install screen.
The root.sh script detects:
The Components Configuration and Startup screen appears for Oracle9iAS components to configure and start. The screen lists the configuration tools for all installed components.
Depending on the configurations selected you will see some component configuration screens, but no input is required.
Monitor the progress of each configuration tool by scrolling down the tools list to review the configuration status of each tool. The status changes as each component is configured.
The installer performs the following functions in this screen:
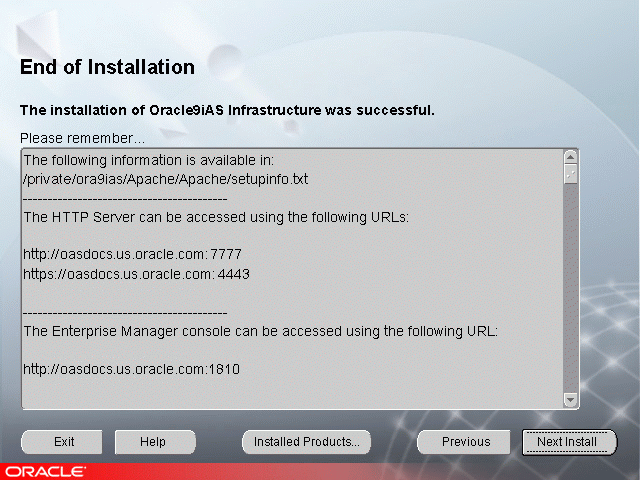
The End of Installation screen appears at the end of the installation process. It notifies you whether the installation was successful or unsuccessful and provides information about accessing the Oracle9iAS instance.
The End of Installation screen displays the URL and port number for accessing the Oracle HTTP Server page and the Oracle Enterprise Manager Web Site. The default Oracle HTTP Server page is the Oracle9iAS Welcome page. The Oracle9iAS Welcome page provides links to demonstrations and information about new features.
|
See Also:
|
You can view the Install Log for the completed installation at:
/your_base_directory/oraInventory/logs/installActiontodays_date_time.log
in which your_base_directory is the location for your installation files and todays_date_time is the date and time of installation.
A complete listing of log files is included in the Oracle9i Application Server Administrator's Guide.
You have successfully installed the Oracle9iAS Infrastructure installation of Oracle9iAS.
Proceed to Section 4.2, "Oracle9iAS Infrastructure Postinstallation" to complete the installation process.
The following instructions guide you through the basic postinstallation tasks for Oracle9iAS Infrastructure.
The postinstallation contains the following sections:
The Oracle Enterprise Manager Web Site is available after Oracle9iAS Infrastructure installation and component configuration. The Oracle Enterprise Manager Web Site is comprised of Oracle Enterprise Manager Home Pages. Each Oracle Enterprise Manager Home Page is used to manage an installed Oracle9iAS component or instance.
Oracle strongly recommends that you use the Secure Socket Layer (SSL) protocol and HTTPS for all connections to the Oracle Enterprise Manager Web Site. Refer to the Oracle9i Application Server Administrator's Guide for setup information.
Following successful installation and configuration of Oracle9iAS Infrastructure you must download and install the Oracle9iAS Infrastructure patches. You can download the patches from:
http://metalink.oracle.com
Select the Patches link. On the patch download form, select Oracle9i Application Server in the Product Family field and then submit the form.
Oracle9iAS components can be started and stopped using the Oracle Enterprise Manager Home Page. For information on manual starting and stopping of Oracle9iAS components refer to the component specific documentation.
Following installation, the Oracle Universal Installer creates a file showing the port assignments during installation of Oracle9iAS components. The installation process automatically detects any port conflicts and chooses an alternate port in the range allocated for that component. Appendix F, "Default Port Numbers and Port Ranges" lists the default port ranges. The file portlist.ini is located at:
OracleHome/install/portlist.ini
This file lists component entries as "port name = port value". For example:
Oracle HTTP Server port = 7777Oracle HTTP Server SSL port = 4443Oracle HTTP Server listen port = 7778Oracle HTTP Server SSL listen port = 4444Oracle HTTP Server Jserv port = 8007Enterprise Manager Servlet port = 1810
You can also view the port numbers by pointing your browser to the Oracle9iAS Welcome page and selecting the Ports tab
.
|
See Also:
|
For information regarding installation of additional Oracle9iAS installations, refer to Section 2.8, "Additional Oracle9iAS Product Installations", and Chapter 7, "Coexistence".
For further information on postinstallation and configuration tasks, refer to the Oracle9i Application Server Administrator's Guide and component-specific documentation. For information on viewing and installing the documentation, refer to Appendix G, "Installing the Documentation Library".
|
|
 Copyright © 2002 Oracle Corporation. All Rights Reserved. |
|