![]()
This guide provides general details for developing and deploying
Java applications in Oracle9iAS Containers for J2EE (OC4J). OC4J
is a J2EE container that accepts HTTP and RMI connections. These connections
access servlets, JSP Pages, and EJBs.
|
Note: For more details on OC4J, see on-line materials (and the latest version of this document) located on /docs/tech/java/oc4j. |
OC4J subjects are discussed as follows:
Oracle9iAS provides a complete Java2 Enterprise Edition
(J2EE) container written entirely in Java that executes on the standard
Java Development Kit (JDK) Virtual Machine (JVM). OC4J can be run on the
standard JDK that exists on your operating system and does not require
the Oracle9i JVM. OC4J contains its own Web server, which we recommend
that you configure for handling J2EE applications behind Apache.
The Oracle9iAS new J2EE container, OC4J, is based on some technology licensed from Ironflare Corporation, which develops the OrionServer--one of the market's leading J2EE containers. While Oracle has integrated--and continues to integrate OC4J with the Oracle9iAS infrastructure--the product and some of the documentation contains some reference to the origin of this product.
The primary features of OC4J are the following:
The J2EE container is implemented completely in Java and has the following capabilities:
OC4J is a complete J2EE 1.2 container that includes a JSP
Translator, a Java servlet engine, and an Enterprise JavaBeans (EJB) container.
It also supports the Java Messaging Service (JMS), and several other Java
specifications as shown below in Figure
1-1.
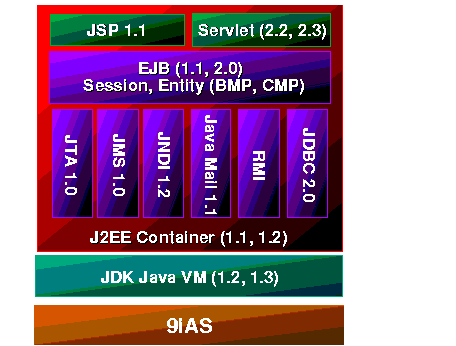
OC4J supports the standard J2EE APIs, listed below in Table
1-1.
The standard APIs and OC4J support for these APIs are discussed in the following sections:
The OC4J servlet engine provides the following:
The OC4J servlet engine provides complete support for the
Servlet 2.2 and also supports the Servlet 2.3 specification. The Servlet
2.3 specification is part of the upcoming J2EE 1.3 Specification.
The OC4J servlet engine is 100% compatible with the Tomcat
Servlet Engine delivered by the Apache consortium. Developers, who have
used Apache and Tomcat to develop their applications, can easily deploy
them to the OC4J servlet engine.
OC4J supports simple and complex filters which are part of
the servlet 2.3 specification. Specifically, a filter is a component that
is invoked when a client requests a resource that the Filter is mapped
to such as a URL pattern or a servlet name. Normally, a filter is wrapped
and manipulates a request, response, or header values before or after the
execution of the original request target. It does not return any response
to the client.
Filters can be the following:
The OC4J servlet engine provides the following features:
Servlets are packaged and deployed to J2EE containers using a standard format called a Web Application Archive (WAR) file. OC4J provides:
OC4J provides automatic compilation of servlets and automatic
deployment where the server receives a .WAR archive. OC4J automatically
decompresses the .WAR archive and installs the application. This
shortens the develop, compile, deploy cycle of building J2EE applications.
A cluster is a group of OC4J servers that coordinate their
actions in order to provide scalable, highly-available services in a transparent
manner. Servlets make use of the HTTP session object to save their state
between method requests, such as the contents of a Web shopping cart or
travel itinerary. OC4J supports an IP-multicast based clustering mechanism
that allows servlets to transparently--that is, without any programmatic
API changes--replicate servlet session state specifically HTTP session
objects to other OC4J instances.
OC4J provides a JSP 1.1 Compliant Translator and Runtime Engine. Users can also use the Oracle JSP Translator (OJSP) against OC4J. It has several important features:
OC4J provides a JDK-based EJB container that provides the following:
OC4J includes an O-R mapping system that allows complex object models to be mapped to database tables with ease. It allows practical object models to use CMP. Specifically, it allows the following types of fields to be mapped within entity beans: simple objects and primitives (such as INT or CHAR), objects (compound objects), serializable objects (compound objects that can be serialized and stored in BLOBs and CLOBs), entity reference (a reference to another entity bean), and collections. Further, it provides an isolation layer that captures the SQL that is automatically code generated allowing the CMP facilities to target Oracle and non-Oracle databases.
With Oracle9iAS, Oracle provides connectivity to both
Oracle and non-Oracle databases. Specifically, it provides enhanced JDBC
drivers to access Oracle8.0, Oracle8i, and Oracle9i databases.
Oracle has certified, but does not ship, Merant's JDBC drivers to access
non-Oracle databases--specifically DB/2 UDB, Microsoft SQL Server, Informix,
and Sybase databases.
The primary features of JDBC support within OC4J are as follows:
Oracle's JDBC Drivers are fully JDBC 2.0 compliant providing:
To access non-Oracle databases from the Oracle J2EE Container,
Oracle certifies Type 4 JDBC Drivers from Merant, which is an Oracle Partner.
Merant provides JDBC Drivers to access Informix, Sybase, Microsoft SQL-Server,
and IBM DB/2 Databases from Oracle9iAS v 1.0.2.2.
OC4J provides a complete JNDI 1.2 implementation. Servlets
and Enterprise JavaBeans in OC4J access names using the standard JNDI programming
interfaces. The JNDI service provider in OC4J is implemented in an XML-based
file system.
OC4J provides a complete implementation of the JTA 1.0.1 specification that consists of two parts:
With J2EE, developers do not need to be concerned about programming
explicit transactions with JTA, since that work is done through the JDBC
and EJB APIs handled by the container and configured by the application
deployment descriptor. Application developers can focus on the design of
the transaction rather than its implementation.
JMS is the J2EE mechanism to support the exchange of messages between Java programs. This is how Java supports asynchronous communication--where the sender and receiver do not need to be aware of each other. Thus, each can operate independently. JMS supports two messaging models:
OC4J provides a complete implementation of the JMS 1.0 specification.
The current release of OC4J is more stable when used with
JDK version 1.2.2_07, or 1.3.xxx. We recommend that you use the JDK that
comes with Oracle9i Application Server 1.0.2.2, which is JDK version
1.2.2_07.
You do not need to add anything to your CLASSPATH
to run OC4J, because it loads the Java JAR and class files directly from
the installation directory, from the lib/ subdirectory, and from
the deployed applications EAR, WAR, or ejb-jar files.
OC4J is distributed within a ZIP file named oc4j.zip
on the Oracle9iAS Containers for J2EE CD. After unzipping this file,
follow instructions listed in the README.TXT. Install this ZIP file in
the $ORACLE_HOME directory where you installed the Oracle9i
Application Server.
You must have a Java2 version Java executable in your $PATH, preferably version 1.2.2_07. To install OC4J, execute the following:
% cd $ORACLE_HOME
% unzip oc4j.zip
% cd $ORACLE_HOME/j2ee/home
% java -jar orion.jar -install
After the install is complete, the $ORACLE_HOME/j2ee/home
directory contains all the files necessary for running OC4J with a default
configuration. The installation prompts you for an administration username
and password, which is used for the administration console command-line
tool.
OC4J is installed with a default configuration that includes
a default Web site and a default application. These are provided so you
can start and test OC4J immediately.
Start OC4J by executing the following:
This starts OC4J using the default configuration files, which are located in j2ee/home/config.
This starts OC4J using the server.xml file located in /mypath.
The server should output "Oracle9iAS (1.0.2.2) Container for J2EE initialized".
For example, test the Web server by connecting a Web browser
to http://localhost:8888/servlet/HelloWorldServlet, which should
return a "Hello World" page.
For more information on starting and stopping OC4J, see "Starting
and Stopping OC4J". For more information on configuration, see "Configuring
OC4J and J2EE Applications".
To deploy Web applications on OC4J, you can either place
your servlet classes and JSP Pages in the j2ee/home/default-web-app
directory or you can deploy full-fledged J2EE applications in the WAR,
EJB-JAR, or EAR formats. Dropping servlets and JSP Pages is the easiest
way to migrate applications from previous versions of Oracle9iAS.
|
Note: Using J2EE standard applications is required if you use EJBs, and recommended for all new developments. |
If you already have servlets and JSP Pages, you can drop them below the j2ee/home/default-web-app directory of your OC4J installation.
If, as recommended, you have configured Apache to proxy requests to OC4J (see "Setting Up OC4J For Access Behind Apache"), you must add ProxyPass commands in the Apache http.conf file for the URLs giving access to JSPs. For example, to access the Hello.jsp page through Apache you can add the following lines to the Apache httpd.conf. file:
ProxyPass         /examples/ http://<oc4j-host>:8888/examples/
ProxyPassReverse  /examples/ http://<oc4j-host>:8888/examples/
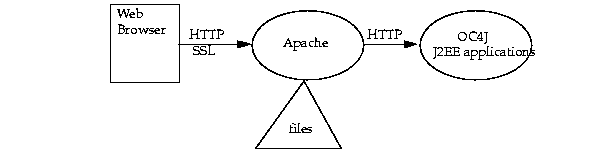
OC4J and Apache can both be used as Web Servers. Apache has more features, such as SSL.
We recommend that you tunnel requests to the J2EE Container from Apache using mod_proxy. Although this is not necessary, it ensures that all pages that are served by the Oracle9i Application Server can benefit from other Oracle9i Application Server services--such as SSL and WebCache. This avoids wasting Java resources for serving static pages.
<IfModule mod_proxy.c>
  ProxyRequests On
  ProxyPass         /servlet/ http://<oc4j-host>:8888/servlet/
  ProxyPassReverse  /servlet/ http://<oc4j-host>:8888/servlet/
<IfModule>
You can add these lines to one of the following configuration files:
"include oc4j.conf"
This keeps your OC4J configuration separate from all other
configuration details in httpd.conf. There is less chance of introducing
an error in the larger httpd.conf.
To change the OC4J default Web site port number, edit the <web-site> element as follows:
where <port> is the port number you want for the default Web site.
When started, OC4J executes on a single standard JDK. To start OC4J, change to the container's installation directory ($ORACLE_HOME/j2ee/home) and issue the following command:
% java -jar orion.jar <options>
Table 1-2 lists the options:
After starting the OC4J server, you can administer the server from a command-line client admin console, admin.jar. The syntax is as follows:
java -jar admin.jar ormi://<host>:<port> <admin_id> <admin_password> <options>
If this host executes the statement, use localhost.
The default port number for ORMI is 23791. You defined the administration
username and password at installation time. These are contained within
the principals.xml file.
Table 1-3 lists the -restart
and -shutdown options for admin.jar. A complete description
of all options for admin.jar is contained in Table
1-5.
| Option | Description |
|---|---|
|
-shutdown |
Shuts down the OC4J server. |
|
-restart |
Restarts the OC4J server. The container must have been started with orion.jar. |
OC4J detects automatically most of the changes made to deployed
applications. When detected, OC4J reloads the applications automatically.
Thus, you do not need to restart the server when redeploying an application.
However, you may have to restart OC4J if you change some of the container-level
configuration files, such as: data-sources.xml, rmi.xml, principals.xml.
The recommended method to restart or shut down OC4J is through the use of the client admin console, which is contained in admin.jar. To restart OC4J using the default parameters, change to the installation root directory and issue the following command:
java -jar admin.jar ormi://localhost/ <admin> <admin_password> -restart
This command connects to the OC4J RMI listener port and requests
it to restart. Sometimes this command does not work, because the JVM itself
may be in a broken state that does not accept RMI messages. In this case,
stop the JVM with normal operating system commands, such as kill
or killall.
To shut down OC4J, from the container installation directory, issue the following command from the client console:
% java -jar admin.jar ormi://localhost/ <admin> <admin-password> -shutdown
This command provides a graceful shut down of the container. If it does not shut down the container, force a rapid shut down by passing the force argument, as follows:
% java -jar admin.jar ormi://localhost/ <admin> <admin-password> -shutdown force
For the cases where this does not work, kill OC4J processes
with your operating system commands.
Each OC4J server instance can contain multiple Web sites
and multiple J2EE applications. Each Web site is an HTTP listener that
provides access to Web applications for HTTP clients. Each application
is a standard J2EE application defined in an EAR file. An application can
have both Web application components (servlets and JSP Pages) and EJB applications.
J2EE Applications with a Web application are made accessible to Web clients
through binding them to a URL served by one of the Web sites. Applications
that contain only EJBs are not bound to a URL in a Web site, but are accessible
in the server through RMI. The relationship of each of these components
is described within the OC4J XML configuration files.
Figure 1-2 illustrates that OC4J server configuration consists of basic OC4J server configuration files, all Web site configuration files, and the load balancer configuration. The J2EE application configuration consists of XML files for J2EE application deployment and client configuration.
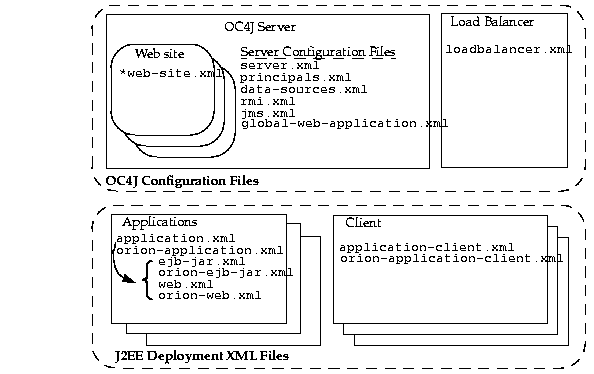
Table 1-4 describes each
component and feature contained within OC4J and how each configuration
file maps to these components and features:
| Features/Components | XML Configuration Files |
|---|---|
|
OC4J overall server configuration |
server.xml |
|
OC4J security |
principals.xml |
|
Performance for OC4J servers |
loadbalancer.xml--every load balancer exists outside of the OC4J server. See "Increasing Performance With Load Balancing and Clustering" for more information. |
|
OC4J JDBC support |
data-sources.xml |
|
RMI support within OC4J |
rmi.xml |
|
JMS support within OC4J |
jms.xml |
|
Web sites defined within OC4J |
Each Web site is defined within its own *web-site.xml file. Note that each *web-site.xml can be named individually, as long as it is suffixed with web-site.xml. Replace the asterix (*) with your desired name. For example, Web site XML files can be named my-web-site.xml. |
|
J2EE applications |
application.xml and orion-application.xml The *application.xml files are used to define the J2EE EAR file, which contains the location of the EJB JAR file and Web application WAR file. It also defines the location of the security XML definition file - principals.xml. Note that an application.xml exists within the config/ directory. This is the global application definition file. |
|
J2EE Web applications |
|
|
J2EE EJB applications |
ejb-jar.xml and orion-ejb-jar.xml The *ejb-jar.xml files are used to define the EJB deployment descriptors and is included in the EJB JAR file. |
|
J2EE client applications |
application-client.xml and orion-application-client.xml |
Some of these XML files are inter-related. That is, some of these XML files reference other XML files--both OC4J configuration and J2EE application. These files are as follows:
As mentioned previously, the server.xml file is
the primary configuration file for the OC4J server. It references other
configuration files, which pertain to this instance of OC4J. The server.xml
file references the XML configuration files shown in Figure
1-3:
server.xml
|------>rmi.xml
|------>application.xml---->principals.xml
|------>global-web-application.xml
`------>default-web-site.xml
        |------>default-web-app
        `------>web-app
A description of each of these XML files is contained in
"XML
File Reference". An example of how these files may be configured is
shown in "J2EE Application XML Configuration
Example".
Each installation of OC4J can contain several logical Web servers, each with its own listener port, and one logical EJB container with its RMI listener port.
|
Note: Do not confuse the RMI default port number (23791) with the HTTP default port number (8888). |
The J2EE application deployment information is contained
within XML configuration files. Each application type has its own configuration
files, as follows:
These XML files are discussed more in "XML
File Reference".
Each of the OC4J server configuration files belong in the
config/
directory as shown in Figure 1-4:
config
|-------database-schemas
|       |-------ms-access.xml
|       |-------ms-sql.xml
|       |-------oracle.xml

|       `-------sybase.xml
|-------application.xml (the global application.xml file)
|-------data-sources.xml
|-------default-web-site.xml
|-------global-web-application.xml
|-------jms.xml
|-------principals.xml
|-------rmi.xml
`-------server.xml
When you create an EAR file for your J2EE application, the
J2EE specification directs you to place your classes and XML configuration
files in specific directories. Normally, each EAR file is created from
the following directory structure contents:
`-------META-INF
|       |-------application.xml
|       `-------orion-application.xml
|-------ejb.JAR
`-------web.WAR
Each WAR file was created with the Web application and its
XML files structured as follows:
|-------WEB-INF
|       |-------web.xml
|       |-------orion-web.xml
|       `-------classes
|               `-------Servlet classes
|-------index.html
`-------JSP pages
Each EJB file was created with the EJB application classes
and its XML files structured as follows:
|-------META-INF
|       |-------ejb-jar.xml
|       `-------orion-ejb-jar.xml
|
`-------EJB classes
You can provide all application XML files in either of the following:
Notice that each J2EE-specific file can be supplemented with
an OC4J-specific file. For example, the ejb-jar.xml file is defined
by Sun Microsystems. The OC4J-specific orion-ejb-jar.xml file
may optionally be necessary for implementation-specific information.
OC4J supports all types of J2EE applications: Web Applications
(WAR files) that contain servlets and JSP Pages, EJB Applications (EJB-JAR
files) that contain enterprise Java beans, and Enterprise Applications
(EAR files) that group together Web and EJB applications. The J2EE specifications
define the layout for EAR files, which is discussed in the previous section.
There are 2 ways to deploy J2EE applications:
This section discusses the following in more depth:
When developing, you want to quickly modify, compile, and
execute your classes. OC4J automatically deploys Web applications that
are placed in the j2ee/home/default-web-app directory, as described
in "Quick Start for JSPs and Servlets",
and EJB applications that are placed in the j2ee/home/applications
directory.
For deploying EJB or complex J2EE applications, you can place
the files in its own directory under the applications/ directory.
The directory structure is similar as designated for an EAR file. Replace
a directory name where the EJB JAR file or Web application WAR file would
exist. Deposit the classes where they belong in a directory structure that
maps to their package structure. This structure is displayed in Figure
1-8.
applications
`------<appname>
       |-------META-INF
       |       `-------application.xml
       |
       |-------ejb
       |       |-------EJB classes (my.ejb.class maps to /my/ejb/class)
       |       `-------META-INF
       |               `-------ejb-jar.xml
       |-------web
       |        |-------index.html
       |        |-------JSP pages
       |        `-------WEB-INF
       |                |----web.xml
       |                `----classes
       |                     `-------Servlet classes (my.servlet to /my/servlet)
        `-------client
                |-------Client classes
                `-------META-INF
                        |-------application-client.xml
                        `-------orion-application-client.xml
Modify the server.xml, applications.xml, and *web-site.xml files as stated below:
<application_name="myapp" path="/technology/private/j2ee/home/applications/myapp"

        auto-start="true" />
<module>
  <web>
    <web-uri>myapp/web</web-uri>
</web>
</module>
For Web application binding for the myapp Web application, add the following:
<web-app application="myapp" name="myapp/web" root="/technology/myapp" />
If you decide to deploy a packaged J2EE application, you must first assemble the application and then deploy using the admin.jar command.
You must assemble your application into an EAR file. The
EAR file contains either one or both EJB JAR or Web WAR files. OC4J provides
assembly tools, but you can also assemble these files manually.
For manual assembly, create the necessary directories, edit
the descriptors, and place the files under the expected directory--as described
in the J2EE specification. Finally, execute the appropriate Java tools
to package the application into the EAR file.
Alternatively, OC4J offers a set of GUI assembly tools to package J2EE modules and applications. OC4J offers the following J2EE assembly tools:
You can start each tool individually by executing "java
-jar xxx.jar".
OC4J contains a command-line deployment tool for deploying
J2EE applications--the admin.jar command. The options for this
command are listed in Table 1-5.
To deploy a J2EE application using an EAR file, execute admin.jar, as follows:
java -jar admin.jar ormi://<host><:port>

        <username> <password> -deploy -file <filename>

        -deploymentName <deploymentName> -targetpath <target_path>
This deployment step creates a new entry in server.xml for the application, as follows:
<application name=<app_name> path=<path_EARfile> auto-start="true" />
where
To make your J2EE application accessible from the OC4J Web server, you must explicitly bind the Web application. The following command binds the application to the OC4J Web server:
java -jar admin.jar ormi://<host><:port> <username> <password>

                -bindWebApp <app_deploy_name> <web_app_name>

        <web_site_name> <context_root>
This creates an entry in the OC4J *web-site.xml
configuration file that was denoted in the <web_site_name>
variable.
You can have your applications automatically deployed when OC4J starts. For server start up deployment, you modify the server.xml and web-site.xml files with your application information. Modify these files similarly to what is done for you by the admin console with the -deploy and -bindWebApp options. These options place the correct information into server.xml and the *web-site.xml files. Once these configurations are in these XML configuration files, the application is deployed automatically when you start OC4J by executing orion.jar.
For Web application binding using a WAR file, add the following:
<web-app application="myapp" name="/technology/private/myapp-web" root="/technology/myapp" />
OC4J hot deploys your applications if the timestamp on some
of the XML files change. Restarting OC4J to redeploy is a common problem.
Instead, OC4J notices when some of the XML files change and redeploys appropriately.
Hot deployment is enabled for some cases, but not all of them. These cases
are listed as follows:
Cases when hot deployment occurs:
Cases when hot deployment does not occur:
If you change the appropriate XML file, the server automatically
detects the change. The next time a client accesses the application, OC4J
redeploys the application. For the case where OC4J does not check for updates,
you redeploy either by using the admin.jar console or restart
the OC4J server manually for these to be redeployed.
J2EE applications retrieve connections to the database through java.sql.DataSource objects. Data source objects are used for connecting to a database. You can set up each data source to contain connection information to the database. In addition, you can create special types of data source objects to provide the following functionality:
Specify the data source in data-sources.xml. Part
of the specification includes JNDI names to locate them at runtime. The
XML definition for each data source includes a JDBC connection string,
and, optionally, a database account. Once deployed, the application accesses
the data sources at runtime through a JNDI lookup.
|
Note: You must restart OC4J after you modify the data-sources.xml file. |
Alternatively, you can use the client admin console to install the data source as follows:
% java -jar admin.jar ormi://localhost admin welcome

        -installDataSource -jar $ORACLE_HOME/jdbc/classes12.jar

        -url jdbc:oracle:thin:@localhost:5521:jismain

        -connectionDriver oracle.jdbc.driver.OracleDriver

        -location jdbc/DefaultOracleDS -username scott -password tiger
See Table 1-5 for a full
description of the required parameters for this option.
If you want to use the JDBC Thin driver, provide the host, port, and SID of the database in the database URL in the data-sources.xml file. Declare the data source as follows, replacing <host>, <port>, and <sid> with the correct values:
<data-source
 class="com.evermind.sql.DriverManagerDataSource"
 connection-driver="oracle.jdbc.driver.OracleDriver"
 ejb-location="jdbc/myPooledDataSource"
 location="jdbc/myDataSource"
 url="jdbc:oracle:thin:@<host>:<port>:<sid>"
 username="scott"
 password="tiger"
 />
You can retrieve connections from your application code, as follows.
InitialContext ic = new InitialContext();
DataSource ds = (DataSource)ic.lookup("jdbc/myPooledDataSource");
Connection conn = ds.getConnection();
...do some work...
conn.close();
In this example, we retrieved the connection from the JNDI
name associated with the ejb-location entry. Thus, the connections
come from a pool, and the conn.close() statement returns the connection
to the pool.
In general, the JDBC OCI driver is faster than the JDBC Thin driver. However, it requires an Oracle Client installation. To use JDBC OCI, replace the url entry with a JDBC OCI entry. Provide the tnsname of your database or an Oracle Net Services name-value list.
<data-source

 class="com.evermind.sql.DriverManagerDataSource"
 connection-driver="oracle.jdbc.driver.OracleDriver"
 ejb-location="jdbc/myPooledDataSource"
 location="jdbc/myDataSource"
 url="jdbc:oracle:oci:@tnsname"
 username="scott"
 password="tiger"
 />
The JDBC OCI driver can be used the leverage the database
cache. To do this, set the OCI_CACHE environment variable to one
before starting OC4J.
Merant JDBC drivers are shipped with Oracle9iAS to
connect to heterogeneous databases. Merant JDBC drivers do not connect
to Oracle databases, but instead are used to connect with non-Oracle databases,
such as Microsoft SQLServer, Sybase and DB2. If you want to use Merant
drivers with OC4J, add corresponding entries for Merant in the data-sources.xml
file.
|
Note: See the Merant documentation for installing Merant JDBC drivers. |
The following displays an example of a DataSource entry for SQLServer. For detailed information, see the Merant DataDirect Connect JDBC" User's guide and reference.
<data-source
  class="com.evermind.sql.DriverManagerDataSource"
  name="MerantDS"
  location="jdbc/MerantCoreSSDS"
  xa-location="jdbc/xa/MerantSSXADS"
  ejb-location="jdbc/MerantSSDS"
  connection-driver="com.merant.datadirect.jdbc.sqlserver.SQLServerDriver"
  username="test"
  password="secret"
  url="jdbc:sqlserver//hostname:port;User=test;Password=secret"
  inactivity-timeout="30"
 />
For a DB2 database, refer to the following sample:
<data-source
  class="com.evermind.sql.DriverManagerDataSource"
  name="MerantDS"
  location="jdbc/MerantCoreDB2DS"
  xa-location="jdbc/xa/MerantDB2XADS"
  ejb-location="jdbc/MerantDB2DS"
  connection-driver="com.merant.datadirect.jdbc.db2.DB2Driver"
  username="test"
  password="secret"


url="jdbc:sqlserver//hostname:port;LocationName=jdbc;CollectionId=default;Packag
eName=pkg1;User=test;Password=secret"
  inactivity-timeout="30"
 />
For a Sybase database, refer to the following sample:
<data-source
  class="com.evermind.sql.DriverManagerDataSource"
  name="MerantDS"
  location="jdbc/MerantCoreSybaseDS"
  xa-location="jdbc/xa/MerantSybaseXADS"
  ejb-location="jdbc/MerantSybaseDS"
  connection-driver="com.merant.datadirect.jdbc.sybase.SybaseDriver"
  username="test"
  password="secret"
  url="jdbc:sqlserver//hostname:port;User=test;Password=secret"
  inactivity-timeout="30"
 />
You can supply the username and password in the data-sources.xml file or provide them at runtime from your application code, as follows:
InitialContext ic = new InitialContext();
DataSource ds = (DataSource)ic.lookup("jdbc/myPooledDataSource");
Connection conn = ds.getConnection("scott", "tiger");
...do some work...
conn.close();
Most of the time, use the JNDI name associated with the ejb-location entry, because it provides connection pooling. However, there are cases where you may want to open and close connections yourself, such as when you need one connection per client. To achieve this, use the JNDI name associated with the location entry, as is shown below:
InitialContext ic = new InitialContext();
// Use the name from the location entry
DataSource ds = (DataSource)ic.lookup("jdbc/myDataSource");
Connection conn = ds.getConnection("scott", "tiger");
...do some work...
conn.close(); // The connection is really closed
OC4J contains the following security features:
Providing authorization information in the two deployment descriptors (generic and container-specific) that are embedded in your EAR, WAR, or EJB JAR files.
You define users and groups in the principals.xml file. Also, you can provide your own Java class to fetch user and group information from a different store.
We strongly recommend that you set up OC4J to be accessed
behind Apache. Thus, Apache takes care of confidentiality. For example,
Apache can be configured to use SSL. See the Apache manual for how to set
up Apache in SSL mode.
We do not recommend that you set up OC4J to use SSL. The additional SSL handshake between Apache and OC4J significantly degrades performance.
Users and groups are identities known by the container. Roles
are the logical identities each application uses to indicate access rights
to its different objects. The username/passwords can be digital certificates
and, in the case of SSL, private key pairs. The deployment descriptors
indicate what roles are needed to access the different parts of the application.
The descriptors also provide a mapping between the logical roles and the
users/groups known by the container.
Defining users, groups, and roles are discussed in the following sections:
OC4J supports the definition of users and groups--either shared by all deployed applications or specific to given applications.
The following excerpt from the principals.xml file shows how to define a group named allusers and a user named guest with password, welcome. The guest user is made a member of the allusers group.
<principals>
 <groups>
  <group name="allusers">
   <description>Group for all normal users</description>
   <permission name="rmi:login" />
   <permission name="com.evermind.server.rmi.RMIPermission" />
  </group>
....other groups...
 </groups>
 <users>
  <user username="guest" password="welcome">
   <description>Guest user</description>
   <group-membership group="allusers" />
  </user>
 </users>
</principals>
Specify the logical roles that your application uses in the XML deployment descriptors. Depending on the type of the application, update one of the following with the logical roles:
In each of these deployment descriptors, the roles are defined
by an XML element named <security-role>.
This example creates a logical role named VISITOR in the ejb-jar.xml deployment descriptor.
<security-role>
 <description>A role for every user</description>
 <role-name>VISITOR</role-name>
</security-role>
<method-permission>
 <description>VISITOR role needed for CustomerBean methods</description>
 <role-name>VISITOR</role-name>

 <method>
  <ejb-name>customerbean</ejb-name>
  <method-name>*</method-name>
 </method>
</method-permission>
You map logical roles defined in the application deployment
descriptors to actual users and groups defined in the principals.xml
file. The mapping is specified in the container-specific deployment descriptor
with a <security-role-mapping> element.
This example maps the logical role VISITOR to the allusers group in the orion-ejb-jar.xml file. Any user that can log in as part of this group is considered to have the VISITOR role; thus, it can execute the methods of customerbean.
<security-role-mapping name="VISITOR">
 <group name="allusers" />
</security-role-mapping>
|
Note: You can map a logical role to a single group or to several groups. |
The default behavior of the container is to read the user
names, groups, and passwords from the principals.xml file. This
is not always secure. Alternatively, you can specify that the container
use a user repository that manipulates the usernames, passwords, and groups.
You can specify your own user repository or use the sample implementation
of a custom user manager provided with OC4J.
A sample implementation of the com.evermind.security.UserManager interface is provided in com.evermind.sql.DataSourceUserManager. In order for OC4J to use any user manager, specify the name of the user manager class in one of the following XML files:
The UserManager manages users, groups, and passwords with interfaces such as createUser(), getUser(), getGroup(), and so on. The OC4J-provided DataSourceUserManager class manages the users in a database specified by DataSource. You must define the table name and columns where the data is stored in the XML configuration file. The XML requires that these are set within the properties shown below in the example. A typical registration of the user manager for an application can be specified in orion-application.xml, as follows.
                        <user-manager class="com.evermind.sql.DataSourceUserManager">
            <property name="table" value="j2ee_users" />
            <property name="usernameField" value="username" />
            <property name="passwordField" value="password" />
            <property name="dataSource" value="jdbc/OracleCoreDS" />
            <property name="groupMembershipTableName" value="second_table" />
            <property name="groupMembershipGroupFieldName" value="group" />
            <property name="groupMembershipUserNameFieldName" value="userId" />
        </user-manager>
You must set these properties for the user manager to work properly. This DataSourceUserManager assumes that two tables exist in the database:
Notice that no table exists for the list of groups that are
available. Instead, the list of groups is specified in principals.xml.
The mappings from groups to roles is also specified in the OC4J-specific
application.xml.
The UserManager is a hierarchical implementation
with a parent-child relation ships. The parent for the DataSourceUserManager
is always the default file-based (principals.xml) UserManager.
However, you can change the parent with the setParent() method.
The sample DataSourceUserManager invokes parent.getGroups()
to retrieve all the available groups.
Most clients to your application are Web browsers, which
access the container through Apache mod_proxy. OC4J requests the
client to authenticate itself when accessing protected URLs.
When you access EJBs in a remote container, you must pass valid credentials to this container.
Indicate the username (principal) and password (credentials)
to use when looking up remote EJBs in the jndi.properties file.
For example, if you want to access remote EJBs as guest/welcome, define the following properties. The factory.initial property indicates that you will use the Oracle JNDI implementation:
java.naming.security.principal=guest
java.naming.security.credentials=welcome
java.naming.factory.initial=

        com.evermind.server.ApplicationClientInitialContextFactory
java.naming.provider.url=ormi://localhost/ejbsamples
In your application program, authenticate and access the remote EJBs, as shown below:
InitialContext ic = new InitialContext();
CustomerHome = (CustomerHome)ic.lookup("java:comp/env/customerbean");
To access remote EJBs from a servlet or JavaBean, pass the credentials in the InitialContext object, as follows:
Hashtable env = new Hashtable();
env.put("java.naming.provider.url", "ormi://localhost/ejbsamples");
env.put("java.naming.factory.initial",
        "com.evermind.server.ApplicationClientInitialContextFactory");
env.put(Context.SECURITY_PRINCIPAL, "guest");
env.put(Context.SECURITY_CREDENTIALS, "welcome");
Context ic = new InitialContext (env);
CustomerHome = (CustomerHome)ic.lookup("java:comp/env/customerbean")
OC4J supports the standard servlet 2.2/2.3 Web application deployment directory structure. Users can make Java classes available to a Web application by doing the following:
After the Java classes are available to a user's Web application,
the user can access them. For example, a user can access a JavaBean in
a JSP page through the <jsp:useBean> tag.
Customizing tags in the OC4J server requires the following procedures:
<%@ taglib prefix="mytagprefix" uri="http://www.foo.com/footaglib/" >
The URI in this directive can point to one of the following:
Once all these steps are completed, you can use the tag library under the specified prefix. For example, to use a tag, footag, that was defined in the URI under the mytagprefix, specify the following:
<mytagprefix:footag attr1="value1" />
ORMI is the custom wire protocol for RMI that OC4J uses.
Specify the factory, security, and location settings in JNDI properties for application clients to use EJBs. In a Web application, you can use InitialContext to retrieve the properties, because they are internal to OC4J. For external applications, however, you need the following settings:
java.naming.factory.initial=


        com.evermind.server.ApplicationClientInitialContextFactory
java.naming.provider.url=ormi://<hostname>/<application-name>
java.naming.security.principal=<username>
java.naming.security.credentials=<password>
To enable HTTP tunneling, do the following:
<servlet>
 <servlet-name>rmi</servlet-name>
 <servlet-class>com.evermind.server.rmi.RMIHttpTunnelServlet</servlet-class>
</servlet>
For instance, ormi://localhost/theapp becomes http:ormi://localhost/theapp.
The ORMI default port number is 23791. Thus, set the URL in the jndi.properties, as follows:
java.naming.provider.url=ormi://<hostname>/<app-name>
or
java.naming.provider.url=ormi://<hostname>:23791/<application-name>
You can provide load balancing and fault tolerance for your
OC4J servers.
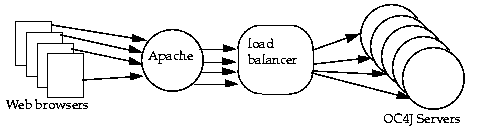
Load balancing, as depicted in Figure
1-9, receives all of the client requests and redirects these requests
to an OC4J server that it knows about. The load balancer treats the OC4J
servers as a pool that can service incoming calls. The load balancer also
maintains session context, so that when a client reconnects, its request
is sent to the OC4J server that previously was servicing that client.
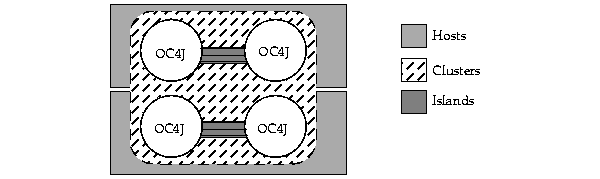
Fault tolerance is provided by setting up your OC4J servers to exist within clusters and islands.
Figure 1-10 graphically
displays a single cluster of two islands across two hosts.
If you want to load balance HTTP requests across multiple
OC4J instances, you must configure and start the OC4J load balancer in
back of the Apache server, but in front of your server farms, as shown
in Figure 1-9.
For high scalability, you can replicate multiple OC4J instances
on multiple JVMs on a single host or across multiple hosts. You must use
your own mechanisms to replicate the installations; but once your farm
is set up, the container's deployment tools enable you to deploy and update
applications on all the machines in the farm at the same time. Each system
in the farm runs one Oracle9i Application Server and several JVMs
for the J2EE container. In the current release, you must start--by hand--each
separate OC4J and JDK JVM on each server.
When configuring a server farm, use a hardware-based load
balancer in front of the farm, such as Cisco LoadDirector or BigIP. The
hardware load balancer distributes HTTP requests to different Apache servers
in the farm. The container load balancer, sitting in between Apache and
the OC4J instances, distributes the requests to the different OC4J instances.
Because the session routing information is kept in the container
load balancers, you do not get farm-wide session tracking by default. If
you are using the HTTPSession object for an application deployed
in the farm, you must configure your hardware load balancer to ensure "stickiness."
This ensures that connections from the same client are routed to the same
server in the farm. You can set a stickiness time-out to the same value
as the HTTPSession time-out.
OC4J supports clusters of islands for fault tolerance. You
can customize clustering to the specific needs of your users. Clustering
requires a load balancer, because the load balancer replicates each individual
node state to the cluster. In the case of failover, the state information
is preserved. The state information is not saved to any persistent store--instead,
it is stored in-memory.
OC4J supports HTTP tunneling of RMI requests/responses without
clustering. Clustering for pure EJB clients is not supported. However,
one can receive failover for pure RMI/EJB clients by specifying a comma-separated
list of multiple sites in the java.provider.url JNDI environment
property. When there is a failure connecting to one server, the client
container switches over to the next server in line.
|
Note: The LoadBalancer provides load balancing for the Web component, not for EJBs. |
Fault tolerance in OC4J works for both stateful and stateless requests.
To enable clustering in OC4J, perform the following:
Make sure that the nodes you are using in your cluster have the same Web application installed. If you do not want this in two places, you can place the Web application on a shared drive that both servers can access. Start all your nodes, and check that the Web application is working correctly on all nodes in the cluster.
Add the following:
<orion-web-app>
  ...
  <cluster-config/>
  ...
</orion-web-app>
Repeat this step for all the OC4J servers in your cluster. This step ensures that the following is replicated:
When using multiple islands, you may want to use different
multicast IP addresses to enable "smart" routing of multicast packets in
your network. Smart routing ensures that you do not send unnecessary packets
to uninterested parties (machines).
For example, if we want two hosts in one island and three hosts in another island, you should configure different multicast addresses so that each does not receive unnecessary messages.
Cluster islands are connected to a certain site, rather than to a Web application. To configure a cluster island, edit the *web-site.xml file where your Web application is deployed. Modify the <web-site> element and add a numerical identifier for the cluster island. For example, in the default-web-site.xml, the cluster island is identified as "1", as follows:
<web-site ... cluster-island="1" >
If your cluster has more than one island, specify different numerical values for the servers that belong to different islands. Remember that state is shared only within an island.
In the main body of the <web-site> element for each *web-site.xml, add the following:
<web-site ... >
  ...
  <frontend host="balancer-host" port="balancer-port" />
  ...
</web-site>
Replace the following:
This host and port make up the public host name for the site. We recommend port 80 for the port number.
To test the clustering, start up the load balancer by executing
"java -jar loadbalancer.jar". Then, access the load balancer host and port
with your Web browser. If you request the same page multiple times from
different clients, the load is balanced across servers. If you request
it multiple times from the same client, it is served by the first server
accessed. If you want to see what the load balancer is doing, start the
OC4J instance with the following debug options set to true: -Dhttp.cluster.debug
and -Dcluster.debug.
To test the state replication, access /servlet/SessionServlet.
After the first request, check to see which server becomes the primary
server for this session. Shut the primary server down, and try the request
again. You should receive the same session as before on a different node.
In addition, the counter should update correctly.
By default, the behavior of the load balancer is as follows:
If more than one island in the cluster is capable of serving the same site, an island is picked at random. Thereafter, a random node is picked within the selected island, and all state sharing is within the island of this selected node.
By default, load balancing is client-based and not request-based. Statistically, load balancing is expected to forward an equal number of clients to each of the nodes in the island.
When using multiple islands, use different multicast IP addresses to enable "smart" routing of multicast packets in your network.
Every IP multicast group has a group address. IP multicast
provides only open groups. That is, it is not necessary to be a member
of a group to send datagrams to the group.
Multicast address are similar to IP addresses used for single
hosts and are written in the same way: A.B.C.D. Multicast addresses never
clash with host addresses, because a portion of the IP address space is
reserved for multicast. This reserved range consists of addresses from
224.0.0.0 to 239.255.255.255. However, the multicast addresses from 224.0.0.0
to
224.0.0.255 are reserved for multicast routing information. Application
programs should use multicast addresses outside this range.
If any router between the individual systems running OC4J
instances and the system running the LoadBalancer is not IP multicast-enabled,
then the LoadBalancer does not discover the instance. Note that many ISP
routers are not multicast-enabled.
The following examples show how to configure and deploy a J2EE application within OC4J. Directions for modifying the XML configuration files for the Petstore demo are available on the /docs/tech/java/oc4j site.
In this example, the myapp application contains
a Java client, an EJB assembled into a JAR file, servlets and JSPs assembled
into a WAR file, and an EAR file that contains both the EJB JAR file and
the Web application WAR file. The tree structure showing the location of
all the XML configuration files, the Java class files, and JSP files is
shown in Figure 1-11. Notice that you
can separate all the configuration files into logical directories within
the application directory.
myapp.EAR
|-------META-INF

|       `-------application.xml
|
|-------client.JAR
|       |-------META-INF
|       |       |-------application-client.xml
|       |       `-------orion-application-client.xml
|       `-------TemplateClient.class
|-------ejb,JAR
|       |-------META-INF
|       |       `-------ejb-jar.xml
|       |-------Template.class
|       |-------TemplateBean.class
|       `-------TemplateHome.class
`-------web.JAR
        |-------WEB-INF
        |       |-------web.xml
        |       `-------classes
        |               `-------TemplateServlet.class
        |-------add.jsp
        |-------delete.jsp
        |-------edit.jsp
        |-------index.html
        |-------list.jsp
        `-------serv.jsp
The myapp/META-INF/application.xml file lists the EJB JAR and Web application WAR file that is contained in the EAR file within <module> elements.
<?xml version="1.0"?>
<!DOCTYPE application PUBLIC "-//Sun Microsystems, Inc.//DTD J2EE Application
1.2//EN" "http://java.sun.com/j2ee/dtds/application_1_2.dtd">
<application>
  <display-name>myapp j2ee application</display-name>
  <description>
     A sample J2EE application that uses a Container Managed
     Entity Bean and JSPs for a client.
  </description>
  <module>
    <ejb>myapp-ejb.jar</ejb>
  </module>
  <module>
    <web>
      <web-uri>myapp-web.war</web-uri>
      <context-root>/myapp</context-root>
    </web>
  </module>
</application>
The file myapp/web/WEB-INF/web.xml contains the class definitions for EJBs, servlets, and JSPs that are executed within the Web site. These can be similar to the following:
<?xml version="1.0"?>
<!DOCTYPE web-app PUBLIC "-//Sun Microsystems, Inc.//DTD Web Application
2.2//EN" "http://java.sun.com/j2ee/dtds/web-app_2_2.dtd">

<web-app>
   <display-name>myapp web application</display-name>
   <description>
      Web module that contains an HTML welcome page, and 4 JSP's.
   </description>
   <welcome-file-list>
      <welcome-file>index.html</welcome-file>
   </welcome-file-list>
   <ejb-ref>
      <ejb-ref-name>myapp/ejb/TemplateBean</ejb-ref-name>
      <ejb-ref-type>Entity</ejb-ref-type>
      <home>myapp.ejb.TemplateHome</home>
      <remote>myapp.ejb.Template</remote>
   </ejb-ref>
   <servlet>
      <servlet-name>template</servlet-name>
      <servlet-class>myapp.web.TemplateServlet</servlet-class>
      <init-param>
         <param-name>param1</param-name>
         <param-value>1</param-value>
      </init-param>

   </servlet>
</web-app>
The file myapp/ejb/META-INF/ejb-jar.xml contains the definitions for a container-managed persistent EJB, which should contain something similar to the following:
<?xml version="1.0"?>
<!DOCTYPE ejb-jar PUBLIC "-//Sun Microsystems, Inc.//DTD Enterprise JavaBeans
1.1//EN" "http://java.sun.com/j2ee/dtds/ejb-jar_1_1.dtd">
<ejb-jar>
   <display-name>myapp</display-name>
   <description>
      An EJB app containing only one Container Managed Persistence Entity Bean
   </description>
   <enterprise-beans>
      <entity>
         <description>
            template bean populates a generic template table.
         </description>
         <display-name>TemplateBean</display-name>
         <ejb-name>TemplateBean</ejb-name>
         <home>myapp.ejb.TemplateHome</home>
         <remote>myapp.ejb.Template</remote>
         <ejb-class>myapp.ejb.TemplateBean</ejb-class>
         <persistence-type>Container</persistence-type>
         <prim-key-class>java.lang.Integer</prim-key-class>
         <reentrant>False</reentrant>
         <cmp-field><field-name>col_1</field-name></cmp-field>
         <cmp-field><field-name>col_2</field-name></cmp-field>
         <cmp-field><field-name>col_3</field-name></cmp-field>
         <primkey-field>col_1</primkey-field>
      </entity>
   </enterprise-beans>
   <assembly-descriptor>
      <container-transaction>
         <method>
            <ejb-name>TemplateBean</ejb-name>
            <method-name>*</method-name>
         </method>
         <trans-attribute>NotSupported</trans-attribute>
      </container-transaction>
      <security-role>
         <description>Users</description>
         <role-name>users</role-name>
      </security-role>
   </assembly-descriptor>
</ejb-jar>
When you deploy the application using the admin console,
the console adds the location of the application EAR file to the server.xml
file. This causes the application to be restarted every time that OC4J
is restarted. If you do not want the application to be restarted with OC4J,
change the auto-start variable to FALSE.
|
Note: If you set auto-start to FALSE, you can manually start the application through the admin console or it is automatically started when a Web browser requests the application. |
<application name="myapp" path="../myapp/lib/myapp.ear" auto-start="true" ">
where
You must designate the WAR file name and define the root context for the Web application, which was deployed in the WAR file. Edit default-web-site.xml and add the following:
<web-app application="myapp" name="myapp-web" root="/technology/myapp" />
The client XML configuration is contained in two files: application-client.xml
and orion-application-client.xml.
The application-client.xml file contains a reference for an EJB, as follows:
<?xml version="1.0"?>
<!DOCTYPE application-client PUBLIC "-//Sun Microsystems, Inc.//DTD J2EE
Application Client 1.2//EN" "http://java.sun.com/j2ee/dtds/application-client_1_
2.dtd">

<application-client>
        <display-name>TemplateBean</display-name>
        <ejb-ref>
                <ejb-ref-name>TemplateBean</ejb-ref-name>
                <ejb-ref-type>Entity</ejb-ref-type>
                <home>myapp.ejb.TemplateHome</home>
                <remote>myapp.ejb.Template</remote>
        </ejb-ref>
</application-client>
The orion-application-client.xml file maps the EJB reference logical name to the JNDI name for the EJB. For example, this file maps the <ejb-ref-name> element, "TemplateBean," defined in the application-client.xml to the JNDI name, "myapp/ejb/TemplateBean", as follows:
<?xml version="1.0"?>
<!DOCTYPE orion-application-client PUBLIC "-//Evermind//DTD J2EE
Application-client runtime 1.2//EN"
"http://xmlns.oracle.com/ias/dtds/orion-application-client.dtd">

<orion-application-client>
        <ejb-ref-mapping name="TemplateBean" location="myapp/ejb/TemplateBean" />
</orion-application-client>
After developing your J2EE application, assemble the different
modules of your J2EE application (EJB, Web, and client) into an EAR file.
This section shows and example of a J2EE application with a EJB, Web, and
client sections.
The following descriptor--META-INF/application.xml--shows how a J2EE application includes the WAR, EJB JAR, and client JAR files:
<?xml version="1.0"?>
<!DOCTYPE application PUBLIC "-//Sun Microsystems, Inc.//DTD J2EE Application
1.2//EN" "http://java.sun.com/j2ee/dtds/application_1_2.dtd">
<application>
  <display-name>myapp j2ee application</display-name>
  <description>
     A sample J2EE application that uses a Container Managed
     Entity Bean and JSP's for a client.
  </description>
  <module>
    <ejb>myapp-ejb.jar</ejb>
  </module>
  <module>
    <web>
      <web-uri>myapp-web.war</web-uri>
      <context-root>/myapp</context-root>
    </web>
  </module>
  <module>
    <java>myapp-client.jar</java>
  </module>
</application>
To deploy this application from the client using the admin console "admin.jar", perform the following from the myapp directory. Notice that it defines the EAR file in the -file option and the target path for copying the EAR file into in the -targetPath option. Since the path where the EAR resides and the target path is the same, no copying occurs.
% java -jar $J2EE_HOME/admin.jar ormi://localhost admin welcome

        -deploy -file ./lib/myapp.ear -deploymentName myapp -targetPath ./lib
Auto-deploying myapp (New server version detected)...
Auto-deploying myapp-ejb.jar (ejb-jar.xml had been touched since the previous
deployment)... done.
Auto-deploying myapp web application (New server version detected)...
|
Note: The EJB JAR file is immediately unpacked; the WAR file is unpacked when you navigate to /myapp on the Web server. |
This adds the following to server.xml:
<application name="myapp"

        path="/technology/private/myapp/lib/myapp.ear" auto-start="true" />
where
These additions allow the application to automatically start--by default--with the OC4J container and enable subsequent hot deployments every time a component in myapp.ear is touched. However, if auto-start was set to FALSE, the application starts when it is used or manually started. The following command demonstrates a manual start of the myapp application.
% java -jar admin.jar ormi://localhost admin welcome -application myapp -restart
Package the CMP-EJB module with home interface, remote interface,
bean class, and XML descriptor--META-INF/ejb-jar.xml--in an EJB
JAR file. The XML descriptor must conform to the DTD standard at http://java.sun.com/j2ee/dtds/ejb-jar_1_1.dtd.
The myapp EJB deployment descriptor contains the following specifics:
For example, the ejb-jar.xml for the myapp application is as follows:
<?xml version="1.0"?>
<!DOCTYPE ejb-jar PUBLIC "-//Sun Microsystems, Inc.//DTD Enterprise JavaBeans 1.
1//EN" "http://java.sun.com/j2ee/dtds/ejb-jar_1_1.dtd">
<ejb-jar>
   <display-name>myapp</display-name>
   <description>
      An EJB app containing only one Container Managed Persistence Entity Bean
   </description>
   <enterprise-beans>
      <entity>
         <description>
            template bean populates a generic template table.
         </description>
         <display-name>TemplateBean</display-name>
         <ejb-name>TemplateBean</ejb-name>
         <home>myapp.ejb.TemplateHome</home>
         <remote>myapp.ejb.Template</remote>
         <ejb-class>myapp.ejb.TemplateBean</ejb-class>
         <persistence-type>Container</persistence-type>
         <prim-key-class>java.lang.Integer</prim-key-class>
         <reentrant>False</reentrant>
         <cmp-field><field-name>col_1</field-name></cmp-field>
         <cmp-field><field-name>col_2</field-name></cmp-field>
         <cmp-field><field-name>col_3</field-name></cmp-field>
         <primkey-field>col_1</primkey-field>
      </entity>
   </enterprise-beans>
   <assembly-descriptor>
      <container-transaction>
         <method>
            <ejb-name>TemplateBean</ejb-name>
            <method-name>*</method-name>
         </method>
         <trans-attribute>NotSupported</trans-attribute>
      </container-transaction>

      <security-role>
         <description>Users</description>
         <role-name>users</role-name>
      </security-role>
   </assembly-descriptor>
</ejb-jar>
The EJB module is deployed as part of a J2EE application EAR file.
% java -jar admin.jar ormi://localhost admin welcome -deploy

        -file ./lib/myapp.ear -deploymentName myapp

        -targetPath ./lib
Auto-deploying myapp (New server version detected)...
Auto-creating table: create table TemplateBean (col_1 NUMBER not null primary
key, col_2 VARCHAR2(255) null, col_3 FLOAT null)
Auto-deploying myapp-ejb.jar (Class 'myapp.ejb.Template' had been updated)...
done.
To install a data source, copy the JDBC JAR that has the data source connection drivers (DriverManagerDataSource, DriverManagerConnectionPoolDataSource and DriverManagerXADataSource) to $J2EE_HOME/lib. Modify data-source.xml as follows:
<?xml version="1.0"?>
<!DOCTYPE data-sources PUBLIC "data source configuration"
"http://xmlns.oracle.com/ias/dtds/data-sources.dtd">
<data-sources>
        <data-source
                name="Oracle"
                class="com.evermind.sql.DriverManagerDataSource"
                location="oracle/jdbc/default/MySidDS"
                pooled-location="oracle/jdbc/pool/MySidDS"
                ejb-location="oracle/jdbc/container/MySidDS"
                xa-location="oracle/jdbc/xa/MySidXADS"
                connection-driver="oracle.jdbc.driver.OracleDriver"
                url="jdbc:oracle:thin:@localhost:<port>:<mysid>"
                username="scott"
                password="tiger"
                max-connections="300"
                min-connections="5"
                max-connect-attempts="10"
                connection-retry-interval="1"
                inactivity-timeout="30"
                wait-timeout="30"
        />
</data-sources>
Alternatively, you can use the client admin console to install the data source as follows:
% java -jar admin.jar ormi://localhost admin welcome

        -installDataSource -jar $ORACLE_HOME/jdbc/classes12.jar

        -url jdbc:oracle:thin:@localhost:5521:jismain

        -connectionDriver oracle.jdbc.driver.OracleDriver

        -location jdbc/DefaultOracleDS -username scott -password tiger
Package the Web module, which includes HTML pages, JSPs,
and servlets, in a WAR file with the descriptor--WEB-INF/web.xml.
This file must conform to the standard DTD at http://java.sun.com/j2ee/dtds/web-app_2_2.dtd.
The myapp Web module specifies the following in its descriptor:
The Web server looks for the following:
To bind the Web component (WAR file) of a J2EE application ( EAR file) on a Web site, do the following:
% java -jar admin.jar ormi://localhost admin welcome

        -bindWebApp myapp myapp-web default-web-site /myapp
This adds the following to default-web-site.xml:
<web-app application="myapp" name="myapp-web" root="/technology/myapp" />
The myapp web.xml descriptor is as follows:
<?xml version="1.0"?>
<!DOCTYPE web-app PUBLIC "-//Sun Microsystems, Inc.//DTD Web Application
2.2//EN" "http://java.sun.com/j2ee/dtds/web-app_2_2.dtd">
<web-app>
   <display-name>myapp web application</display-name>
   <description>
      Web module that contains an HTML welcome page, Servlet and JSP's.
   </description>
   <welcome-file-list>
      <welcome-file>index.html</welcome-file>
   </welcome-file-list>
   <ejb-ref>
      <ejb-ref-name>myapp/ejb/TemplateBean</ejb-ref-name>
      <ejb-ref-type>Entity</ejb-ref-type>
      <home>myapp.ejb.TemplateHome</home>
      <remote>myapp.ejb.Template</remote>
   </ejb-ref>
   <servlet>
      <servlet-name>template</servlet-name>
      <servlet-class>myapp.web.TemplateServlet</servlet-class>
      <init-param>
         <param-name>param1</param-name>
         <param-value>1</param-value>
      </init-param>
   </servlet>
   <servlet-mapping>
      <servlet-name>template</servlet-name>
      <url-pattern>/template</url-pattern>
   </servlet-mapping>
</web-app>
Package your client module in a JAR with the descriptor META-INF/application-client.xml
that conforms to standard DTD at http://java.sun.com/j2ee/dtds/application-client_1_2.dtd.
The application client that accesses the myapp application has a descriptor, which describes where to find the EJB stubs (home and remote interface) and its JNDI name.
<?xml version="1.0"?>
<!DOCTYPE application-client PUBLIC "-//Sun Microsystems, Inc.//DTD J2EE
Application Client 1.2//EN" "http://java.sun.com/j2ee/dtds/application-client_1_
2.dtd">
<application-client>
        <display-name>TemplateClient</display-name>
        <ejb-ref>
                <ejb-ref-name>myapp/ejb/TemplateBean</ejb-ref-name>
                <ejb-ref-type>Entity</ejb-ref-type>
                <home>myapp.ejb.TemplateHome</home>
                <remote>myapp.ejb.Template</remote>
        </ejb-ref>

</application-client>
Set the JNDI properties for a regular client, so it finds the initial JNDI context factory.
jndi.properties:
---------------
java.naming.factory.initial=com.evermind.server.ApplicationClientInitialCont
extFactory
java.naming.provider.url=ormi://localhost:8888/myapp
java.naming.security.principal=admin
java.naming.security.credentials=welcome
Package the client in an runnable JAR with a manifest that has the main class to run and required CLASSPATH, as shown below. Be careful to check the relative paths in this file.
manifest.mf
-----------
Manifest-Version: 1.0
Main-Class: myapp.client.TemplateClient
Name: "TemplateClient"
Created-By: 1.2 (Sun Microsystems Inc.)
Implementation-Vendor: "Oracle"
Class-Path: ../../../j2ee/home/orion.jar ../../../j2ee/home/jndi.jar
../../../j2ee/home/ejb.jar ../lib/myapp-ejb.jar
To execute the client, perform the following:
% java -jar lib/myapp-client.jar
TemplateClient.main(): start
Enter integer value for col_1: 1
Enter string value for col_2: BuyME
Enter float value for col_3: 99.9
Record added through bean
The following sections briefly describe each XML file and its contents:
The server.xml file contains the configuration for the application server. Among other things, this is where you specify the following:
The server.xml file also contains references to
the other configuration files.
Specifically, in the server.xml you specify the following:
<web-site path="./default-web-site.xml" />
<web-site path="./another-web-site.xml" />
|
Note: The path designated is relative to the config/ directory. |
Finally, the server.xml file is where you can add
your own applications. You can have as many application directories as
you want, which do not have to be located under the container installation
directory.
The DTD is located at the following site:
http://xmlns.oracle.com/ias/dtds/server.dtd
The web-site.xml file contains the configuration for a Web site. Specifically you specify:
The DTD is located at the following site:
http://xmlns.oracle.com/ias/dtds/web-site.dtd
The principals.xml file contains security information for the OC4J server. It defines user and group configuration for using the default XMLUserManager.
The DTD is located at the following site:
http://xmlns.oracle.com/ias/dtds/principals.dtd
The data-sources.xml file contains configuration for the data sources used. In addition, it contains information on how to retrieve JDBC connections. A data source has the following settings:
The DTD is located at the following site:
http://xmlns.oracle.com/ias/dtds/data-sources.dtd
The jms.xml file contains configuration for the in-memory Java Messaging Service implementation. It contains the following:
The DTD is located at the following site:
http://xmlns.oracle.com/ias/dtds/jms.dtd
The rmi.xml file contains configuration for the Remote Method Invocation system. It contains the setting for the RMI listener, which provides remote access for EJBs. In this file you specify the following:
The DTD is located at the following site:
http://xmlns.oracle.com/ias/dtds/rmi.dtd
The load balancer routes requests across OC4J instances,
which are registered as belonging to a cluster. You can use the loadbalancer.xml
file to configure the load balancer without using the command-like options
described in the clustering document. See "Increasing
Performance With Load Balancing and Clustering" for more information.
The DTD is located at the following site:
http://xmlns.oracle.com/ias/dtds/loadbalancer.dtd
All J2EE applications use both J2EE-specific and product-specific
XML files. These are described below.
The J2EE configuration files are standardized configuration files used across all J2EE servers. See the J2EE specifications for information on how to configure the following XML files:
The DTD is located at the following site:
http://xmlns.oracle.com/ias/dtds/application.dtd
The DTD is located at the following site:
http://xmlns.oracle.com/ias/dtds/ejb-jar.dtd
The DTD is located at the following site:
http://xmlns.oracle.com/ias/dtds/web.dtd
The DTD is located at the following site:
http://xmlns.oracle.com/ias/dtds/application-client.dtd
The OC4J-specific deployment XML files contain deployment information for different components. If you do not create the OC4J-specific files, they are are automatically generated when using auto-deployment. You can edit them manually. OC4J-specific deployment files are used by the deployer to map environment entries, resources references, and security-roles to actual deployment-specific values.
This is the configuration for the global application. It contains settings as listed below:
The DTD is located at the following site:
http://xmlns.oracle.com/ias/dtds/orion-application.dtd
This is the OC4J-specific deployment descriptor for EJBs. It contains the following settings:
The DTD is located at the following site:
http://xmlns.oracle.com/ias/dtds/orion-ejb-jar.dtd
This is the OC4J-specific deployment descriptor for mapping Web settings. This XMl file contains the following:
The DTD is located at the following site:
http://xmlns.oracle.com/ias/dtds/orion-web.dtd
This OC4J-specific deployement file is for the client application. It contains JNDI mappings and entries for the client. The DTD is located at the following site:
http://xmlns.oracle.com/ias/dtds/orion-application-client.dtd
The javax.servlet.jsp.* package distributed by OC4J
is not the Javasoft standard package. If you substitute and use the standard
Javasoft packages, these packages make the OC4J JSP behave incorrectly
for the tag ext area.
OC4J contains features to enable developing servlets and
JSPs. For example, if you set "development=true" in the global-web-application.xml
file, OC4J compiles the servlet class for you automatically as soon as
the the servlet source (the .java file) is changed. The servlet
is compiled and executed when accessed through a Web browser. This is known
as running in "development mode". Turn off this flag when you finish your
development cycle.
In orion-application.xml, a <namespace-access>
element defines the different aspects of the JNDI namespace. However, if
you define an orion-application.xml with your application, and
deploy it using admin.jar, this element is not initialized. Instead,
the default value for <namespace-access> is used.
The work-around is not clean. In order for your <namespace-access> definitions to be initialized properly, do the following:
You only have to do this the first time with the application.
From this time on, the <namespace-access> element is read correctly.
OC4J JTA does not provide two-phase commit. In addition,
OC4J does not currently support Oracle AQ.
If you include a jndi.properties file for the application,
it is used only for Java classes, not for the Web application. For the
Web application, you can set your properties within a hashtable and pass
it to javax.naming.InitialContext. You must define your properties
with one of these two methods if your client accesses OC4J JNDI from outside
the container.
See /docs/tech/java/oc4j for
FAQ updates.
|
|

Copyright © 2001 Oracle Corporation. All Rights Reserved. |