5
Managing Users and Groups
This document describes how you can create and modify Oracle9i Application Server Wireless Edition users and user groups. Each section of this document presents a different topic. These sections include:
5.1 Overview
The Wireless Edition provides administrative user and group management and configuration functions in both the Service Designer and the Personalization Portal.
5.2 Managing Groups Using the Service Designer
This section describes how you can create, modify, or delete user groups using the Wireless Edition Service Designer:
5.2.1 Creating User Groups Using the Service Designer
The Wireless Edition users can be organized into groups. Each Wireless Edition user can belong to several groups. Services can also be assigned to these user groups and can be made available to all users in that group. To create a group:
- Right-click Groups in the Wireless Edition repository tree view.
- Click Create New Group to display the Create New Group form.
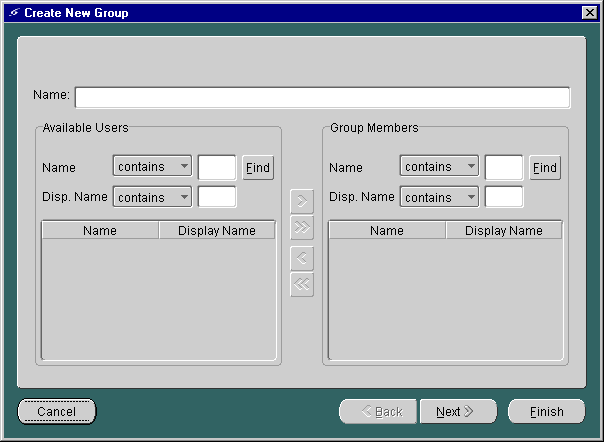
Figure 5-1 Create New Group Form
Text description of the illustration usr_cngf.gif
The Create New Group form includes the following parameters:
Table 5-1 Parameters of the Create New Group Form
- Enter the name of the new user group in the Name field at the top of the screen.
- In the Available Users section of the Create New Group form, enter the name of the user you wish to add in the Name field or enter the user's display name.
- Click Find. To display all available users, leave the Name and Disp. Name fields blank and click Find. Results of the search criteria are displayed by user name and display name in the Available Users section.
Note:
Searching the Name and Disp. Name fields in the Available Users section returns only users who are not assigned to any group.
|
- Select the user you want to add to the group. You can select multiple users by holding the CONTROL key.
- Click the right arrow (>) to move users from the Available Users section to the Group Members section. Clicking the double right arrows (>>) adds all available users to the new group.
- Click Next.
After creating the group, you can make services available to the group members by assigning service folders to the group. To assign a service to a group:
- If not already selected, select the group from the Wireless Edition tree view.
- Click the Service Folders tab.
- Expand, if necessary, the root service folders shown to display the folder you want to make available to the group.
- Select the folder you want to assign to the group. Holding the CONTROL key enables you to select multiple folders.
- Click the right arrow (>) to move folders to the Selected Service Folders field. Clicking the double right arrows (>>) moves all folders to the Selected Services Folder field.
- Click Finish.
5.2.2 Deleting Groups Using the Service Designer
To delete a group:
- Expand the Groups folder in the Wireless Edition repository tree view.
- Select the group you want to delete by clicking the right mouse button.
- Click Delete.
- Click Yes in the Confirm Delete dialog.
5.2.3 Adding Users to a Group Using the Service Designer
To add a user to a group:
- Expand the Groups folder in the Wireless Edition repository tree view.
- Select the group to which you want to add users. The Group Properties form appears in the right frame. Select the General tab, if it does not already appear.
- In the Available Users section, enter the name of the user you wish to add in the Name field or enter the user's display name.
- Click Find. To display all available users, leave the Name and Disp. Name fields blank and click Find. Results of the search criteria are displayed by user name and display name in the Available Users section.
- Select the user you want to add to the group. You can select multiple users by holding the CONTROL key.
- Click the right arrow (>) to move users from the Available Users section to the Group Members section. Clicking the double right arrows (>>) adds all available users to the group.
- Click Apply.
5.2.4 Adding Services to a Group Using the Service Designer
To make services available to a group:
- Expand the Groups folder in the Wireless Edition repository tree view.
- Select the group name to which you want to add services.
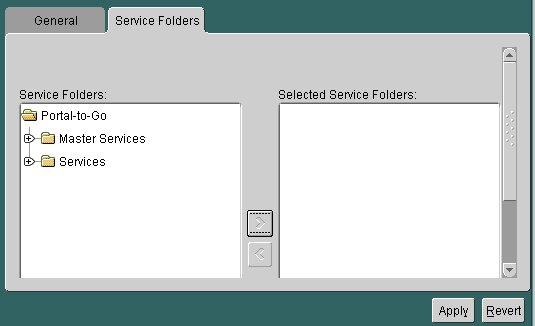
- Click the Service Folders tab to display the Service Folders panel.
Figure 5-2 The Service Folders Tab
Text description of the illustration usr_srft.gif
- Under Service Folders, expand the folders, if necessary, to display the folder that you want to assign to the group. Select the folder. You can select multiple folders by holding the CONTROL key.
- Click the right arrow (>) button to move the folder to the Selected Service Folders field.
- Click Apply.
5.2.5 Removing Users from a Group Using the Service Designer
To remove users from a group:
- Expand the Groups folder in the Wireless Edition repository tree view to display the available groups.
- Select the group from which you want to remove users. The group properties form appears in the right frame. Select the General tab, if it does not already appear.
- In the Available Users section, enter the name of the user you wish to remove from the group in the Name field or enter the user's display name.
- Click Find. To display all available users, leave the Name and Disp. Name fields blank and click Find. Results of the search criteria are displayed by user name and display name in the Available Users section.
- Select the user you want to remove from the group. Hold the CONTROL key to select multiple users for removal.
- Click the left arrow (<) to move users from the Group Members section to the Available Users section. Clicking the double left arrows (<<) removes all users from the group.
- Click Apply.
5.2.6 Removing Services from a Group Using the Service Designer
To remove services from a group:
- Expand the Groups folder in the Wireless Edition repository tree view to display the available groups.
- Select the group from which you want to remove services. The group properties form appears in the right frame.
- Click the Folders tab.
- Under Selected Service Folders, select the folder you want to remove. You can select multiple folders by holding the CONTROL key.
- Click the left arrow (<) to remove the folder from the Selected Service Folders field. Clicking the double left arrows (<<) removes all folders from the group.
- Click Apply.
5.3 Managing Groups and Users Using the Personalization Portal
The Personalization Portal provides a browser interface that administrators use to both configure and create users.
The Personalization Portal organizes groups, users, and services as a hierarchy of folders. For example:
- A group is a folder containing users.
- A user is a folder containing sub-folders and services.
- A service is an alias for a master service created using Service Designer.
In addition to managing users and groups, administrators can use the Personalization Portal to create such objects as alerts and location marks. Administrators can also use the Personalization Portal to perform service assignment, subfolder creation, URL bookmark association, and manipulation of other Wireless Edition repository objects. For more information on these uses of the Personalization Portal, see Chapter 6, "Personalization from Desktops".
Administrators can also update repository objects by adding pages to them or creating customized pages for them. The Personalization Portal framework and interface are designed to be customizable. For more information on customizing these pages, see the Oracle9i Application Server Wireless Edition Developers Guide.
5.3.1 Accessing the Personalization Portal
Before using the Personalization Portal, you must first use your browser to access the portal. From a Web browser, enter the following URL:
After you enter the URL, the Service screen of the Personalization tab appears.
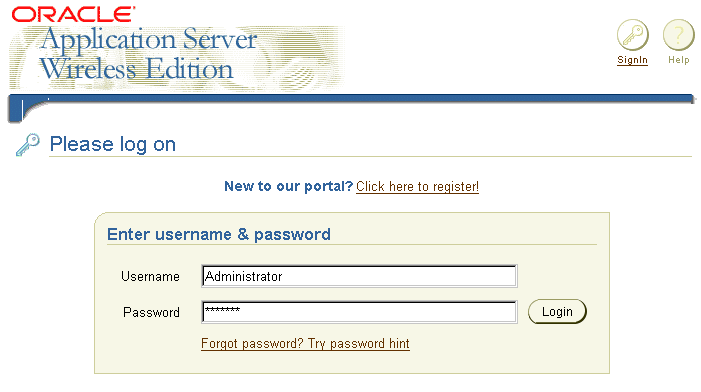
Figure 5-3 The Services screen of the Personalization Tab
Text description of the illustration usr_log1.gif
The Service tab presents the following login information for the Personalization Portal:
Table 5-2 Login Elements of the Service Tab of the Personalization Portal
5.3.2 Logging in as an Administrator
To log into the Personalization Portal as an Administrator:
- Enter Administrator as the user name.
- Enter manager as the password.
Note:
Both the user name and password are case-sensitive.
|
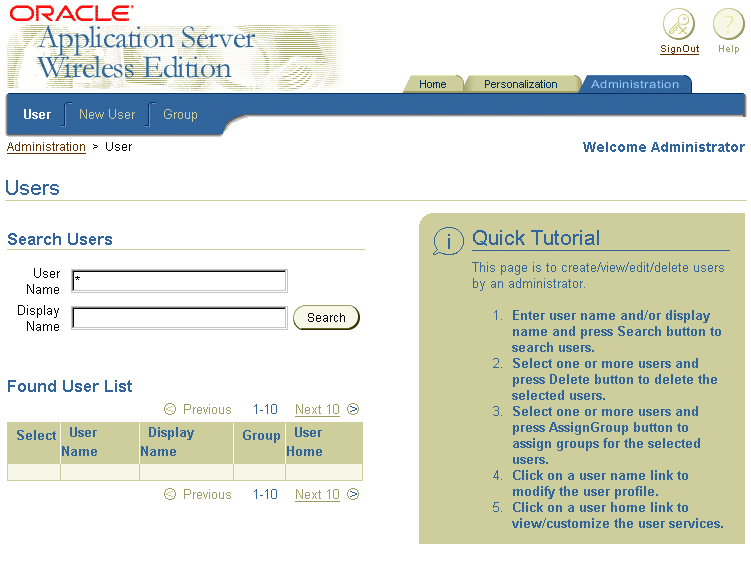
The Administration tab of the Personalization Portal appears with the User page selected.
Figure 5-4 The User Page of the Personalization Portal
Text description of the illustration usr_log2.gif
5.3.3 Using the Administration Tab
The Administration tab enables the creation and management of user accounts, including group membership, user profile, and the services associated with that user. The Administration tab contains the following screens:
The User Page
The User page enables administrators to search for users using both user name and the display name of a user.
Note:
No users are listed in the User screen when it first displays. Use the Find User feature to display a list of users.
|
The search results display in the Found User List. The Found User List enables administrators to delete a user, edit the profile of a user, or assign the user to groups.
Note:
The Found User List displays up to ten users at a time.
|
The New User Page
The New User page enables administrators to create a new user account and assign passwords, privileges, and services. For more information on finding users, see Section 5.3.3.2.
The Group Page
The Group page enables the creation and management of groups including user membership, service association, and editing group properties.
5.3.3.1 Finding Users
The User page contains the Users screen. The Users screen contains User Name, Display Name fields that Administrators use to find current Wireless Edition users. To find users, administrators enter the user's name in the User Name field and click the Search button. The list of users corresponding to the search criteria appear in the Found User List.
Administrators can narrow their searches using the User Name field by adding the display name of the user in the Display Name field and then clicking the Search button. Conversely, administrators can display all current users in the Found User List by first entering a wildcard (* or %) in the User Name field and then clicking the Search button. In addition, wildcards (*or %) can be inserted in place of characters, or can replace all characters from the current position to the end of the string. The question mark (?) can be used to replace a single character.
The Found Users List is comprised of the following:
Table 5-3 Elements of the Found User List
5.3.3.2 Creating Users
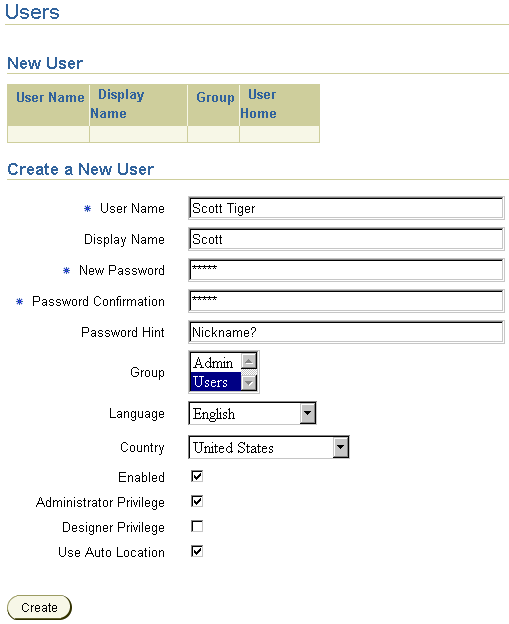
The New User page contains a set of parameters that administrators set to create and configure new users.
Figure 5-5 The New User Page
Text description of the illustration usr_crad.gif
The New User page contains the following parameters.
Table 5-4 Parameters for the New User Page
To create a new user:
- Select the New User page.
- Complete the parameters as follows:
- Enter the user name in the User Name field.
- Enter the display name for the user in the Display Name field.
- Enter a password for the user in the Password field.
- Enter the password again in the Confirm Password field.
- Enter a password hint that is meaningful to the user in the Password Hint field.
- From the Group list box, select a group (or groups) for the user.
- Select a language from the Language list box.
- Select a country from the Country list box.
- Select the Enabled check box to allow the end user to log into the Personalization Portal and the phone portal.
- Select from among the Administrator Privilege or Designer Privilege check boxes to assign a role to the user. This is an optional step.
Note:
Leaving the Administrator Privilege and Designer Privilege check boxes empty (the default setting) limits the user's access to that of an end user. Users with the end user role have access only to the objects they own.
|
- Select the Auto Location check box to get personalized results from location-based services. This is an optional step.
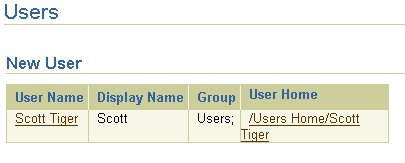
- Click create to complete the creation of the user. The new user appears at the top of the screen, confirming the creation of the new user.
Figure 5-6 New User Confirmation
Text description of the illustration usr_crae.gif
Clicking the links under the User Name invokes the Profile page of the Personalization tab, where administrators can edit user properties. Clicking the links under User Home invokes the Service page of the Personalization tab, where administrators can personalize the new user's services, run the services and create alerts for the new user. For more information on editing user properties, see Section 5.3.3.3.
5.3.3.3 Editing User Properties
The Found Users List enables administrators to edit user profiles and edit services available to a user. In addition, the Found Users List enables administrators to delete users from the Wireless Edition repository or assign users to groups.
Figure 5-7 The Found User List

Text description of the illustration usr_ful1.gif
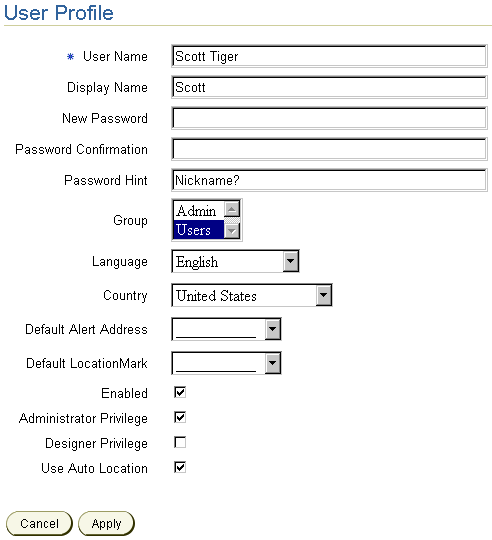
To edit a user's profile, click the desired link under the User Name label. The Profile screen of the Personalization tab appears. The parameters of the Profile screen are populated by the values entered in the New User page.
Figure 5-8 The User Profile Page
Text description of the illustration usr_crup.gif
The Profile page has the following parameters.
Table 5-5 Parameters for the User Profile Page
To edit a user profile:
- Click the desired link under the Names label of the Found Users List. The Profile page appears.
- Change the following parameters as needed:
- Enter a new user name in the User Name field.
- Enter a new display name for the user in the Display Name field.
- Enter a new password for the user in the Password field.
- Enter the new password again in the Confirm Password field.
- Enter a password hint that is meaningful to the user in the Password Hint field.
- From the Group list box, select a new group for the user.
- Select a language from the Language list box.
- Select a country from the Country list box.
- Select a default alert address from the Default Alert Address list box.
- Select a default locationmark address from the Default LocationMark list box.
- Select the Enabled check box to allow the end user to see the available services.
- Select from among the Administrator Privilege or Designer Privilege check boxes to assign a role to the user. This is an optional step.
Note:
Leaving the Administrator Privilege and Designer Privilege check boxes empty (the default setting) limits the user's access to that of an end user. Users with the end-user role have access only to the objects they own.
|
- Select the Auto Location check box to report the user's location to the server for personalized content from a location-dependent service. This is an optional step.
- Click Apply. The Users page appears, with any changes pertinent to the labels in the Found Users List (for example, the user name) visible.
5.3.3.4 Assigning a User to a Group
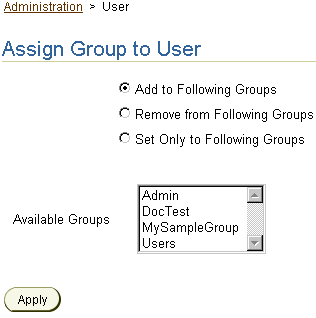
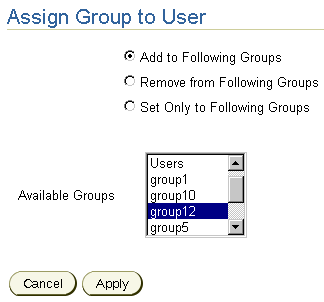
The Found User List also enables administrators to assign users to groups by giving them access to the Assign Group to User page
Figure 5-9 The Assign Group to User page
Text description of the illustration usr_flug.gif
The Assign Group to User screen contains the following elements:
Table 5-6 Elements of the Assign Group to User Screen
To assign a user to a group:
- Select the check box next to the desired user.
- Click the AssignGroup button. The Assign Group to User screen page.
- Select the appropriate group assignment option radio box.
- Select a group or groups from the Available Groups list box.
- Click Apply. The Users screen reappears, with the new group membership visible.
Note:
Users retain their member to groups to which they already belong. For example, if a user belongs to Group 1 and is assigned to Group 2, that user will retain membership to Group 1. However, if an administrator uses the Set Only to Following Groups function to assign this Group 1 user to Group 2, the user is no longer a member of Group 1 and now belongs exclusively to Group 2.
|
5.3.4 Managing Groups Using the Personalization Portal
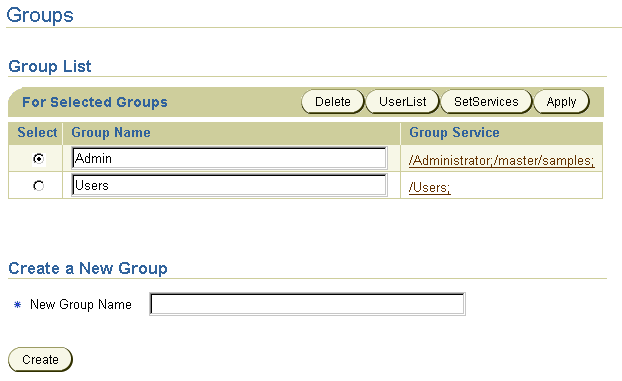
Administrators use the Group page to create and manage Wireless Edition groups The Groups page is divided into two sections: the Groups List section and the Create a New Group section. The Groups List section enables administrators to manage groups by enabling such functions services and user assignment while the Create a New Group section enables administrators to create new groups in the Wireless Edition repository.
5.3.4.1 Creating a Group Using the Personalization Portal
To create a group using the Personalization Portal:
- In the Create a Group portion of the Groups page, enter the name of the group you want to create in the New Group Name field.
- Click Create. The new group appears in the Group Name section.
5.3.4.2 Managing Groups
The Groups List section of the Groups page enables administrators to delete groups, assign users to groups, and to assign services to groups.
Figure 5-10 The Groups Page
Text description of the illustration usr_mngg.gif
The section contains the following elements.
Table 5-7 Elements in the Group List Section of the Groups Page
Administrators use the Delete, Userlist, SetServices, and Apply buttons with the Select radio box to manage a group's users and service subscriptions.
5.3.4.3 Deleting a Group
To delete a group:
- Select the radio box next to the group that you want to remove from the Wireless Edition repository.
- Click the Delete button.
5.3.4.4 Adding Users to a Group
To add users to a group:
- Select the radio box next to the group to which you want to add users.
- Click UserList. The Found User List appears.
- Enter the name of the user you want to add, or enter * or % to return a list of all users. The User page from the Administration tab appears.
Figure 5-11 The Found User List

Text description of the illustration usr_aug1.gif
- Click AssignGroup. The Assign Group to User page appears.
Figure 5-12 The Assign Group to User Page
Text description of the illustration usr_aug2.gif
- Select the Add to Following Groups radio box.
- Select the group from the list box.
- Click Apply.
5.3.4.5 Assigning Services to a Group
To assign services to a group:
- Select the radio box next to the group to which you want to add services (For example, Group 12).
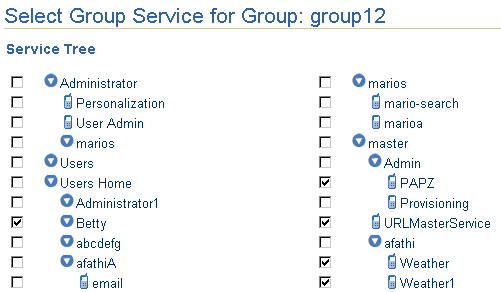
- Click SetServices. The Select Group Service for Group page appears. For this example, the Select Group Service for Group screen displays the services available to Group 12.
Figure 5-13 The Select Service for Group Page
Text description of the illustration usr_asg1.gif
- Select the check box (or check boxes) adjacent to the desired service.
Note:
The services are displayed as branches off of the three main entries, Administrator, Users Home, and Master. Selecting a higher-level branch selects everything below it. Typically, end- users have only access to Users Home.
|
- Click the Apply button. The Group List page reappears with the services assigned to the group visible as a hyperlink. Clicking this hyperlink displays the service tree that belongs to the group, enabling administrators to personalize the group's services.
5.4 Integrating Users with Existing Provisioning Systems
You can integrate your repository with an existing provisioning system using one of the following:
- You can manage users with the Wireless Edition provisioning adapter. The provisioning adapter supports the Wireless Edition services that create, update, and delete users at runtime.
- Use the
LoadXml utility to import users from a flat XML file that conforms to the Repository DTD. This utility enables you to create and update user information. For more information on the LoadXML utility, see Chapter 2.
- You can look up users at runtime by using the
UserAuthenticationHook and the ProvisioningHook interfaces. This is similar to using the LoadXML utility, but with the hook interfaces you can import users one-by-one. The LoadXML utility operates on the entire repository. The following sections describe these interfaces.
5.4.1 ProvisioningHook Interface
You use the ProvisioningHook interface to integrate an external provisioning system with the Wireless Edition. The Wireless Edition locates the provisioning class to use in the System.properties file as the value of the locator.provisioning.class parameter. The implementing class must be implemented as a singleton class. This interface has the following methods:
getRootFolder(): Creates a root folder for a user.
getUsersRootFolder(): Gets the common root folder for all users.
5.4.2 UserAuthenticationHook Interface
The Wireless Edition calls the user authentication class when it cannot locate a user. The class must be implemented as a singleton class. This interface has the following methods:
authenticate(): Authenticates a Wireless Edition user.
checkUser(): Checks if the user exists, and if it does, sets appropriate attributes.


