Oracle Portal Configuration Guide
Release 3.0.8

Part Number A87566-01

Library

Service

Contents

Index

Go to previous page Go to next page

7
Setting Up the Search Feature in Oracle Portal Content Areas

This chapter provides information on setting up the built-in interMedia Text search capabilities in Oracle Portal content areas.

This chapter contains the following sections:


See also:

  • For interMedia Text documentation, see your Oracle8i database documentation library.

  • For interMedia Text technical papers, training materials, code samples, and so on, visit:

http://technet.oracle.com/products/intermedia 


7.1 Prerequisites

You must be logged on as an Oracle Portal administrator to configure interMedia Text, and create, alter, update, and drop interMedia Text indexes.

Before using interMedia Text into Oracle Portal, perform the following tasks:

Install and configure the Oracle8i database with the interMedia Text option by running the Oracle Universal Installer (OUI) and the Database Configuration Assistant. See the Oracle8i installation documentation for more information about installing and configuring an Oracle8i database to use interMedia Text.


Important:

If you are planning to enable interMedia Text in Oracle Portal on Windows NT/2000, the following requirements apply:


Install Oracle Portal 3.0 according to the instructions provided in the "Oracle9i Application Server Installation Guide" for your particular operating system.

Create an Oracle Portal content area using the Content Area Creation Manager. See the "Creating a content area" topic in the Oracle Portal Online Help content area.

If this database was an existing ConText site, make sure to remove text_enable from the init.ora file. It is no longer used in Oracle8i, and actually prevents Oracle8i from operating properly. The error, "cannot find package DR_REWRITE" may appear.


See also:

For a complete list of system requirements, see Chapter 1, "Verifying Requirements", Section 1.1, "System Requirements"


7.1.1 interMedia Text On UNIX

For the interMedia Text feature to work, set the following UNIX environment variables before starting the Oracle8i database and Net8 Listener.

Korn Shell (ksh)

LD_LIBRARY_PATH=$LD_LIBRARY_PATH:$ORACLE_HOME/ctx/lib
export LD_LIBRARY_PATH
C-Shell (csh)

setenv LD_LIBRARY_PATH ${LD_LIBRARY_PATH}:${ORACLE_HOME}/ctx/lib

7.2 Searching in Oracle Portal

The main points when searching in Oracle Portal content areas include:

Table 7-1 interMedia Text search types
  Basic Search  Advanced Search 

Availability 

From Search field on Navigation Bar as shown

From Advanced Search screen as shown

interMedia Text is disabled  

  • Searches on the item attributes such as display name, description, and keywords of items.

  • Automatically uses wildcards.

Example: If you search on "sing,", the results of the search include: sing, single, tossing. 

interMedia Text is enabled 

  • Searches on the item attributes such as display name, description, and keywords of items.

  • Searches in the content of documents and URLs.

  • Uses STEM searching.

Examples:

  • If you search on "distinguish," the results of the search include: distinguish, distinguished, distinguishes.

  • If you search on "sing," the results of the search include: sing, sang, sung.


7.2.1 Basic Search

This type of search looks for the specified words in the item attributes such as the display name, description, and keywords of items, as well as the display name and description of folders, categories, and perspectives are searched. If interMedia Text is enabled, basic search also looks in the content of documents and URLs. A search results page displays all items with this criteria.

Typically, a Search field appears on the Navigation bar enabling end uses to perform a basic search as shown below:
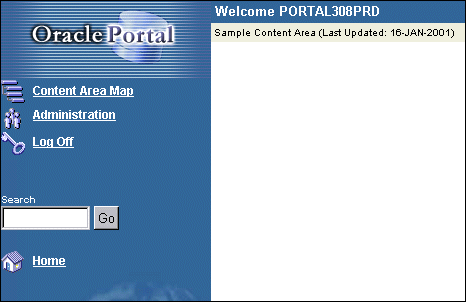
Figure 7-1 Basic search screen in Oracle Portal


Text description of basicsea.gif follows.
Text description of the illustration basicsea.gif


See also:

The following topics in the Oracle Portal Online Help content area which is installed with the Oracle Portal:

  • "Performing a basic search"

  • "Setting up the search feature"

  • "Editing navigation bars"


7.2.2 Advanced Search

With advanced search (which is always enabled), you can:
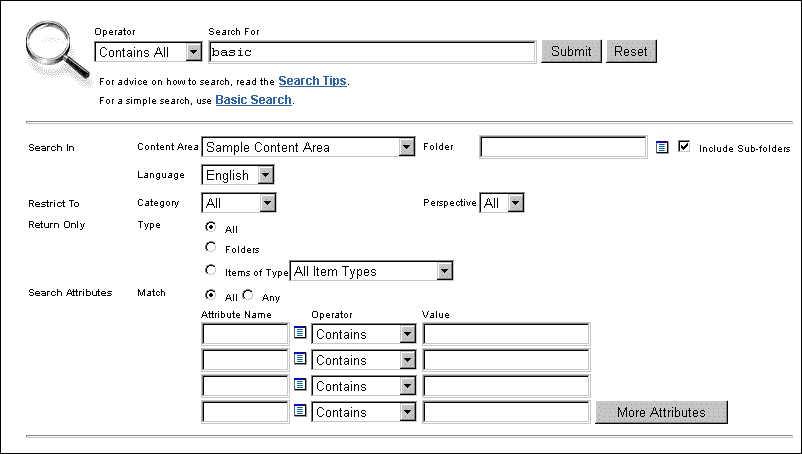
Figure 7-2 Advanced search screen in Oracle Portal

Text description of advsear.gif follows.
Text description of the illustration advsear.gif


See also:

"Performing an Advanced Search" topic in the Oracle Portal Online Help content area which is installed with the product. 


7.2.3 interMedia Text Search

As discussed earlier, Oracle Portal has built-in support for interMedia Text indexing. It is worth repeating that when search is enabled in Oracle Portal, search is enabled for all content areas created in your Oracle Portal installation. It cannot be enabled on one content area and disabled on another content area. Search results, however, are restricted to the content area on which the search is performed. The search is performed on the actual content in documents such as PDF, PowerPoint, and Word as well as the contents on URL pages, text, and HTML.

If interMedia Text is not enabled, end users can always perform a basic or advanced search in the content area.

7.2.4 Viewing interMedia Text Search Results

If themes and gists are enabled from the Search Settings page (see figure), then you can access the themes and gists for documents returned by a search from the search results. You can:


See also:

"Step 2: Enable interMedia Text Searching" 


7.3 Setting Up interMedia Text Searching

There are four main steps for setting up interMedia Text in Oracle Portal:


Note:

To obtain additional information for any Oracle Portal configuration page, click the small Help icon Text description of helps.gif follows.
Text description of the illustration helps.gif
displayed on the page.  


7.3.1 Step 1: Set Up the Global Page Settings

The first step requires you to configure the global page settings in the following way:
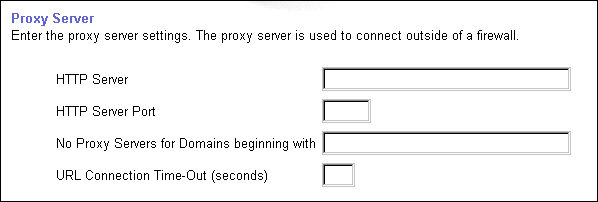
  1. In the Services portlet, click Global Settings. By default, the Services portlet is located on the Oracle Portal home page's Administer tab.

Figure 7-3 Global page settings - Proxy Server


Text description of interm1.gif follows.
Text description of the illustration interm1.gif
  • In the Proxy Server section:

    1. Enter the host name of your proxy server for the HTTP Server.

      Note: Do not prefix http:// to the proxy server name.

    2. Enter the domains that you do not want redirected to the proxy server.

    3. Enter the maximum amount of time (in seconds) that a connection should be attempted before timing out.

  • Click OK.

    7.3.2 Step 2: Enable interMedia Text Searching

    Before creating the interMedia Text indexes, configure the interMedia Text settings in Oracle Portal in the following way:
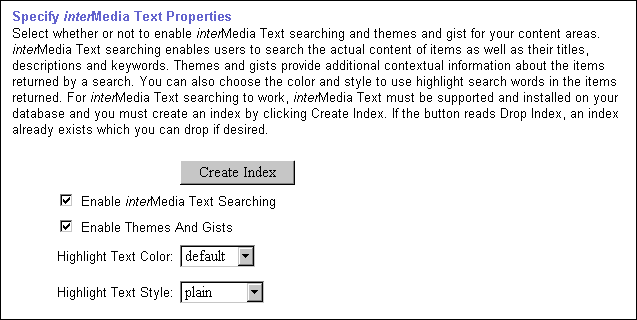
    1. In the Services portlet, click Search Settings. By default, the Services portlet is located on the Oracle Portal home page's Administer tab.

    Figure 7-4 Services portlet - interMedia Text properties


    Text description of interm2.gif follows.
    Text description of the illustration interm2.gif


    Note:

    If you see the message, "interMedia Text is not installed", interMedia Text was not installed with the database and is not available for your content areas. Arrange with your database administrator to have interMedia Text installed. 


    1. Select Enable interMedia Text Searching to make interMedia Text searching available in your content areas.

    2. Select Enable Themes And Gists to create a theme and gist for each item returned by the search.

      • A theme shows the nouns and verbs that occur most frequently within the item.

      • A gist displays a brief summary of the item, derived from how frequently those nouns and verbs appear.


        Note:

        Themes and gists are not available for all languages. 


    3. In the Highlight Text Color list, choose the color to highlight the search words in the HTML renditions of the items returned by the search.

    4. In the Highlight Text Style list, choose the style to apply to the search words in the HTML renditions of the items returned by the search.

    5. Click OK.

    Now that you've enabled interMedia Text, you'll need to create a new interMedia Text index.

    7.3.3 Step 3: Create an interMedia Text Index

    To create an interMedia Text index:

    1. Make sure that you have configured the interMedia Text settings in Oracle Portal as discussed in the previous section, Section 7.3.2, "Step 2: Enable interMedia Text Searching".

    2. In the Specify interMedia Text Search Properties section, as shown on the previous page, click Create Index.

      • If properly run, the message "Index created" appears and the interMedia Text index is created on the server.

      • If you fail to create the index, check that your system has met all the requirements in Section 7.1, "Prerequisites".


    Notes:

    • The time required for creating indexes varies depending on the number of items you have in your content area.

    • You can also run the following command in SQL*Plus:

           ctxcrind.sql

    This file is located in the <ORACLE_HOME>/portal30/src/wws directory.

    Log on using the user name and password for the schema that owns the Oracle Portal content area. For example, if the schema is named "SCOTT", log on with user name and password, "SCOTT". 


    The following interMedia Text indexes are created:

    Table 7-2 interMedia Text indexes created


    See also:

    If you encounter problems creating an interMedia Text index, see "Problem: Unable to create interMedia Text indexes."


    7.3.4 Step 4: Maintain interMedia Text Index

    interMedia Text lets you create a text index (an inverted index) on documents stored in the database. Updating an inverted index requires heavy processing, so changes to a text column are queued and processed in batch. The process of updating the inverted index based on the queue is referred to as "synchronizing" the index.

    The second aspect of maintaining your interMedia Text index is optimizing. As your index is synchronized, it grows in such a way as to consume more disk space than necessary and reduces the efficiency of queries.

    Optimizing your index works differently depending on the mode you select. Optimizing in FAST MODE works on the entire index and compacts fragmented rows, but does not remove old data. FULL MODE permits optimization of the whole index or a portion of the index and both compacts fragmented rows and removes old data. For more information, see the "Oracle8i interMedia Text Reference" for the ALTER INDEX command.

    interMedia Text gives you full control over how often each text index is synchronized. You can choose to synchronize every five seconds, for example, if it is important for your application to reflect text changes quickly in the index. Or, choose to synchronize once a day, for more efficient use of computing resources and a more optimal index.

    After creating your interMedia Text index, you'll need to consider a strategy for maintaining the index. For example, if you have many inserts, updates, or deletes (DML) throughout the day, consider synchronizing the interMedia Text index on a daily basis.

    7.3.4.1 Synchronize the interMedia Text Index

    The following example assumes that you've installed ctx_schedule.

    1. Log on to SQL*Plus with the appropriate username and password.

    2. Enter the following commands:

      exec ctx_schedule.startup ( 'ex1_index', 'SYNC', 1 ) ; 
      exec ctx_schedule.startup ( 'ex1_index', 'OPTIMIZE FAST', 120 ) ; 


    In this example, the index ex1_index is synchronized every minute, and optimized every two (2) hours. This is true even if the database is shutdown and restarted.

    7.3.4.2 Stop Index Maintenance

    1. Log on to SQL*Plus with the appropriate username and password:

    2. Enter the following commands:

      exec ctx_schedule.stop ( 'ex1_index' ) ; 
      exec ctx_schedule.stop ( 'ex1_index', 'OPTIMIZE FAST' ) ; 


      ctx_schedule.stop assumes that the operation to be stopped is 'SYNC', unless you specify otherwise.


    Notes:

    • If you want new text to be searched immediately (every five seconds), consider using the drbgdml.sql script located in:

       <ORACLE_HOME>/ctx/sample/script/drbgdml.sql

    • To obtain the ctx_schedule script, visit Oracle Support Services at:

       http://support.oracle.com/home.html

    • The Context Server (ctxsrv) has been deprecated and should no longer be used. Use drbgdml.sql instead.


    7.4 Dropping an interMedia Text Index

    Dropping an index is a very time-consuming and resource-intensive operation so plan this task during non-business hours.

    You would drop an interMedia Text index in the following situations:

    You can drop interMedia Text indexes in the following ways:

    1. In the Services portlet, click Search Settings. By default, the Services portlet is located on the Oracle Portal home page's Administer tab.

    2. In the interMedia Text Properties section, click Drop Index.

      The interMedia Text index is dropped from the server.


    Note:

    • You can also drop an interMedia Text Index, by running the following script in Oracle SQL*Plus and logging in as the Oracle Portal schema owner:

    ctxdrind.sql 


    7.5 Setting Up Your Environment for interMedia Text

    For Oracle8i Release 8.1.6.2 on UNIX, configure the listener.ora and tnsnames.ora files in your Oracle8i Home directory to support these external procedures. On Windows NT/2000, you require an Oracle 8.1.7 database if you want to use interMedia Text with Oracle Portal.


    Note:

    If you are running Oracle8i Release 8.1.7, ignore this section as the database does not use external procedures to perform document filtering.  


    The listener.ora and tnsnames.ora files on your computer should look similar to the following examples:

    7.5.1 listener.ora

    The following lines define a complete listener definition in your listener.ora file.

    LISTENER =
       (DESCRIPTION_LIST =
       (DESCRIPTION =
       (ADDRESS_LIST =
       (ADDRESS = (PROTOCOL = IPC) (KEY = EXTPROC0))
                        )
       (ADDRESS_LIST =
       (ADDRESS = (PROTOCOL = TCP) (HOST = oracle) (PORT=1521))
    

    7.5.1.1 System ID

    If you want to add a system identifier (SID) name of PLSExtProc and a program name of EXTPROC in the server's listener.ora file, insert the following in the SID_LIST_LISTENER definition:

    SID_LIST_LISTENER =
      (SID_LIST =
      (SID_DESC = ...
    
      (SID_DESC =
      (SID_NAME=PLSExtProc)(ORACLE_HOME=/oracle/db/dev118)
      (PROGRAM=extproc)


    Notes:

    • EXTPROCO and PRESENTATION=RO ends with the letter "o" not the number zero.

    • SID=PLSExtProc is non-negotiable.


    7.5.2 tnsnames.ora

    Add the following lines to the end of your tnsnames.ora file, to add a net service name description entry for EXTPROC0 in the server's tnsnames.ora file, using SID rather than SERVICE_NAME in the CONNECT_DATA section. For example:

              extproc_connection_data =
                 (DESCRIPTION=
                    (ADDRESS_LIST =
                       (ADDRESS=(PROTOCOL=IPC)(KEY=EXTPROC0))
                    )
                    (CONNECT_DATA=
                       (SID=PLSExtProc)
                       (PRESENTATION = RO)
                    )
                 )


    Notes:

    • Do not substitute your SID anywhere.

    • Do not change the case of any text.

    • EXTPROCO ends with the letter "o" not the number zero.

    • Start the Net8 Assistant to help you configure the tnsnames.ora.

    • See also "Net8 Administrator's Guide" for more information about creating these configuration files.


    7.6 Multilingual Functionality (Multilexer)


    Note:

    You may need to increase your tablespace to at least 20 MB to support multilexer. 


    Oracle8i (8.1.6 and above) provides multilexer which allows you to use language-specific features on documents of different languages stored in the same table. Multilexer is a feature of the index and is configured during index creation. Multilexer requires an extra column in your table, which identifies the language of each document.

    At query time, the multilexer chooses a language-specific lexer to lex the query tokens. This is based on the NLS_LANG setting for the query session. Thus, a query session in the FRENCH language uses the lexer for FRENCH.

    During installation of Oracle Portal, the sbrimtlx.sql script creates the language-specific lexer preferences and gathers them under a single multilexer preference.

    7.7 interMedia Text-related Procedures Created in Oracle Portal

    The Oracle Portal installation creates the following procedures in the ctxsys schema. These procedures are created to support the user datastores that are used in Oracle Portal content areas for interMedia Text indexing.

    where <n> is the user_id of the Oracle Portal schema which may be different for each database. This value is the user_id column value from all_users.


  • Go to previous page Go to next page
    Oracle
    Copyright © 2001 Oracle Corporation.

    All Rights Reserved.

    Library

    Service

    Contents

    Index