6
Managing Users and Groups
This document describes how you can create and modify Portal-to-Go users and user groups. Topics include:
User Roles
Portal-to-Go users can be granted the following roles:
- Administrator
- Designer
- Anonymous
Users assigned to the Administrator role can change the Portal-to-Go configuration and can start and stop any component, even the entire server. In addition, users with the Administrator role can update privileges on any part of the Portal-to-Go repository and can install and remove any service.
Users assigned the Designer role can create and modify any service or adapter.
Users having the Anonymous role are Portal-to-Go end users who have access only to the objects they own.
Portal-to-Go Users
This section describes how you use the Portal-to-Go Service Designer to accomplish the following user-related tasks:
Creating Users
You use the Create New User form to create users in the Portal-to-Go repository. To invoke the form:
- Click Users in the Portal-to-Go repository tree view. The Query Users form displays in the right panel.
- Click Add to display the Create New User form.
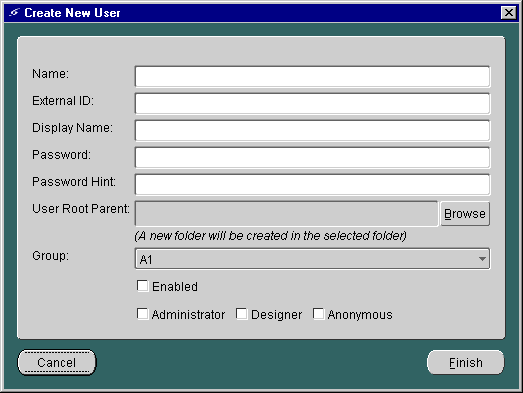
The form includes the following parameters:
Adding Agent Information to a User
Once Portal-to-Go administrators create new users, they can add agents to user properties. Agents associate a user with a channel for delivering asynchronous requests. For example, when a user schedules an asynchronous request, its result can be sent to either an SMS-enabled phone or to an email inbox. Each agent uses a logical device definition to transform the result of the user request for output to the appropriate channel. An agent has an address, which is a protocol-specific parameter required to deliver the result to a channel of the user's choice, such as an email address. Adding agent information to a user's properties enables a user to receive notifications.
To add agent information for a user:
- Select Users in the Portal-to-Go repository tree. The Query Users form appears.
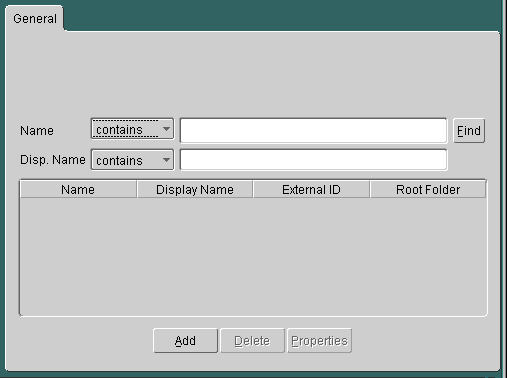
The form includes the following fields:
- Enter values in the Name or Disp. Name field and click Find. The query form returns a list of users that match your search criteria.
- Select the user to which you want to add agent information.
- Click Properties to display the Properties form for that user.
- In the Properties form, click the Agents tab to display the Agents panel. The panel is blank if you have just created a new user.
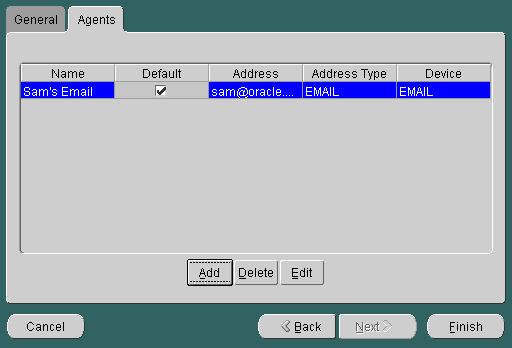
The Agents tab includes the following attributes:
- Click Add to display the Create New Agents form.
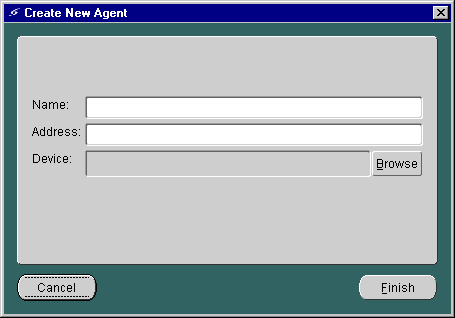
The Create New Agents form includes the following parameters:
- Provide values for the new agent parameters and click Finish to complete the user agent configuration.
Deleting Users
Follow these steps to delete a user:
- Select Users in the Portal-to-Go repository tree view to display the Users form.
- Enter the name of the user you wish to delete in the Name field or enter the user's identifier in the External ID field.
- Click Find to display users that match your search criteria. To display all users, leave the Name and External ID fields blank and then click Find.
- Select the user you want to delete.
- Click Delete.
- Confirm the action by clicking the Yes button in the Confirm Delete dialog.
Modifying Users
Follow these steps to modify a user's information:
- Select Users in the Portal-to-Go repository tree view to display the Users form.
- Enter the name of the user you wish to delete in the Name field or enter the user's identifier in the External ID field.
- Click Find to display users that match your search criteria. To display all users, leave the Name and External ID fields blank and then click Find.
- Select the user whose information you want to modify.
- Click Properties to display the Properties form for this user.
- Modify the desired parameters on the General and Agents tabs as described in "Adding Agent Information to a User", and click the Apply button to save your changes.
User Groups
This section describes how you can create, modify, or delete user groups using the Portal-to-Go Service Designer:
Creating User Groups
Portal-to-Go users can be organized into groups, with each Portal-to-Go user belonging to a single group. Services can also be assigned to these user groups and can be made available to all users in that group. To create a group:
- Right-click Groups in the Portal-to-Go repository tree view.
- Click Create New Group to display the Create New Group form.
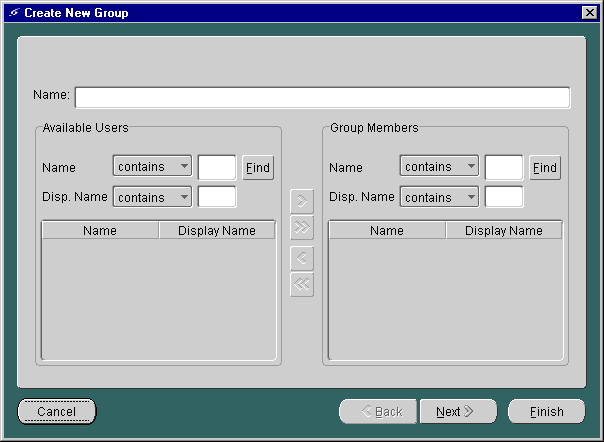
The Create New Group form includes the following parameters:
- Enter the name of the new user group in the Name field at the top of the screen.
- In the Available Users section of the Create New Group form, enter the name of the user you wish to add in the Name field or enter the user's display name.
- Click Find. To display all available users, leave the Name and Disp. Name fields blank and click Find. Results of the search criteria are displayed by user name and display name in the Available Users section.
Note:
Searching the Name and Disp. Name fields in the Available Users section returns only users who are not assigned to any group.
|
- Select the user you want to add to the group. You can select multiple users by holding the CONTROL key.
- Click the right arrow (>) to move users from the Available Users section to the Group Members section. Clicking the double right arrows (>>) adds all available users to the new group.
- Click Next.
After creating the group, you can make services available to the group members by assigning service folders to the group. You can only assign services by folder; you cannot assign individual services to a group. To assign services to a group:
- If not already selected, select the group from the Portal-to-Go tree view.
- Click the Service Folders tab.
- Expand, if necessary, the root service folders shown to display the folder you want to make available to the group.
- Select the folder you want to assign to the group. Holding the CONTROL key enables you to select multiple folders.
- Click the right arrow (>) to move folders to the Selected Service Folders field. Clicking the double right arrows (>>) moves all folders to the Selected Services Folder field.
- Click Finish.
Deleting Groups
To delete a group:
- Expand the Groups folder in the Portal-to-Go repository tree view.
- Select the group you want to delete by clicking the right mouse button.
- Click Delete.
- Click Yes in the Confirm Delete dialog.
Adding Users to a Group
To add a user to a group:
- Expand the Groups folder in the Portal-to-Go repository tree view.
- Select the group to which you want to add users. The Group Properties form appears in the right frame. Select the General tab, if it does not already appear.
- In the Available Users section, enter the name of the user you wish to add in the Name field or enter the user's display name.
- Click Find. To display all available users, leave the Name and Disp. Name fields blank and click Find. Results of the search criteria are displayed by user name and display name in the Available Users section.
- Select the user you want to add to the group. You can select multiple users by holding the CONTROL key.
- Click the right arrow (>) to move users from the Available Users section to the Group Members section. Clicking the double right arrows (>>) adds all available users to the group.
- Click Apply.
Adding Services to a Group
To make services available to a group:
- Expand the Groups folder in the Portal-to-Go repository tree view.
- Select the group name to which you want to add services.
- Click the Service Folders tab to display the Service Folders panel.
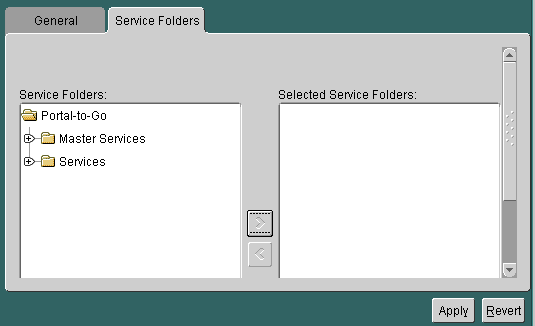
- Under Service Folders, expand the folders, if necessary, to display the folder that you want to assign to the group. Select the folder. You can select multiple folders by holding the CONTROL key.
- Click the right arrow (>) button to move the folder to the Selected Service Folders field.
- Click Apply.
Removing Users from a Group
To remove users from a group:
- Expand the Groups folder in the Portal-to-Go repository tree view to display the available groups.
- Select the group from which you want to remove users. The group properties form appears in the right frame. Select the General tab, if it does not already appear.
- In the Available Users section, enter the name of the user you wish to remove from the group in the Name field or enter the user's display name.
- Click Find. To display all available users, leave the Name and Disp. Name fields blank and click Find. Results of the search criteria are displayed by user name and display name in the Available Users section.
- Select the user you want to remove from the group. Hold the CONTROL key to select multiple users for removal.
- Click the left arrow (<) to move users from the Group Members section to the Available Users section. Clicking the double left arrows (<<) removes all users from the group.
- Click Apply.
Removing Services from a Group
To remove services from a group:
- Expand the Groups folder in the Portal-to-Go repository tree view to display the available groups.
- Select the group from which you want to remove services. The group properties form appears in the right frame.
- Click the Folders tab.
- Under Selected Service Folders, select the folder you want to remove. You can select multiple folders by holding the CONTROL key.
- Click the left arrow (<) to remove the folder from the Selected Service Folders field. Clicking the double left arrows (<<) removes all folders from the group.
- Click Apply.
Changing a User's Group
A Portal-to-Go user can only belong to one group at a time. If you wish to change a user's group, you must first remove the user from one group before adding the user to another group. See "Removing Users from a Group" and "Adding Users to a Group" for more information.
Integrating Users with Existing Provisioning Systems
You can integrate your repository with an existing provisioning system using one of the following:
- You can manage users with the Portal-to-Go provisioning adapter. The provisioning adapter supports Portal-to-Go services that create, update, and delete users at runtime.
- Use the
LoadXml utility to import users from a flat XML file that conforms to the Repository DTD. This utility enables you to create and update user information. For more information on the LoadXML utility, see Chapter 3, "Portal-to-Go Tools".
- You can look up users at runtime by using the
UserAuthenticationHook and the ProvisioningHook interfaces. This is similar to using the LoadXML utility, but with the hook interfaces you can import users one-by-one. The LoadXML utility operates on the entire repository. The following sections describe these interfaces.
ProvisioningHook Interface
You use the ProvisioningHook interface to integrate an external provisioning system with Portal-to-Go. Portal-to-Go locates the provisioning class to use in the System.properties file as the value of the locator.provisioning.class parameter. The implementing class must be implemented as a singleton class. This interface has the following methods:
getRootFolder(): Creates a root folder for a user.
getUsersRootFolder(): Gets the common root folder for all users.
UserAuthenticationHook Interface
Portal-to-Go calls the user authentication class when it cannot locate a user. The class must be implemented as a singleton class. This interface has the following methods:
authenticate(): Authenticates a Portal-to-Go user.
checkUser(): Checks if the user exists, and if it does, sets appropriate attributes.


